

Operating Instructions
Page 3
...Photo search/Photo scan 82 Playing back a tape with manual adjustment 36 Resetting the date and time 128 Focusing manually 45 "Memory Stick" Operations Adjusting ... this manual 4 Checking supplied accessories 6 Searching for picture quality - Table of DVCAM and Using the fader function 67 DV formats 156 Using special effects - Basics ...Labeling a cassette 116 Erasing the cassette memory data 118 Customizing Your Camcorder Advanced Recording Operations Changing the menu settings 120 Shooting with digital effects ......... 84 Step 1 Installing the microphone 7 Step 2 ...
...Photo search/Photo scan 82 Playing back a tape with manual adjustment 36 Resetting the date and time 128 Focusing manually 45 "Memory Stick" Operations Adjusting ... this manual 4 Checking supplied accessories 6 Searching for picture quality - Table of DVCAM and Using the fader function 67 DV formats 156 Using special effects - Basics ...Labeling a cassette 116 Erasing the cassette memory data 118 Customizing Your Camcorder Advanced Recording Operations Changing the menu settings 120 Shooting with digital effects ......... 84 Step 1 Installing the microphone 7 Step 2 ...
Operating Instructions
Page 26
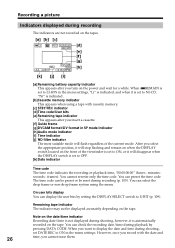
... : seconds : frames). You can be preset or be displayed accurately depending on the tapes. [a] [b] [c] Li REC 00:00:00:01 [d] 45min [e] [f] [g] DVCAM ND1 32K JUL 4 2001 12:05:56PM [h] [k] [j] [i] [a] Remaining battery capacity indicator This appears after you cannot erase them. On user bits display You can check..., set DATE REC to ON in the menu settings. After you turn on the tape. Remaining tape indicator The indicator may not be reset during recording (p. 105). When uREMAIN is set to LI-ION in the menu settings, "Li" is indicated, and when it is set...
... : seconds : frames). You can be preset or be displayed accurately depending on the tapes. [a] [b] [c] Li REC 00:00:00:01 [d] 45min [e] [f] [g] DVCAM ND1 32K JUL 4 2001 12:05:56PM [h] [k] [j] [i] [a] Remaining battery capacity indicator This appears after you cannot erase them. On user bits display You can check..., set DATE REC to ON in the menu settings. After you turn on the tape. Remaining tape indicator The indicator may not be reset during recording (p. 105). When uREMAIN is set to LI-ION in the menu settings, "Li" is indicated, and when it is set...

Operating Instructions
Page 50
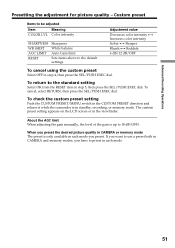
When you preset, we recommend that you check the picture quality by displaying the picture onto the monitor screen, which is connected to the camcorder. (1) Turn the CUSTOM PRESET/MENU switch in the CUSTOM PRESET direction and release it . CUSTOM PRESET MENU CUSTOM PRESET MENU 1 7 ...CUSTOM PRESET SET OFF COLOR LVL SHARPNESS WB SH I FT AGC LIMIT OFF RESET STBY [CP] : END 2-4 CUSTOM PRESET SET OFF COLOR LVL SHARPNESS WB SH I FT AGC LIMIT RESET RETURN STBY CUSTOM PRESET SET OFF [CP] : ENCSDHOALORPRNELVSLS ON WB SH I FT AGC LIMIT...
When you preset, we recommend that you check the picture quality by displaying the picture onto the monitor screen, which is connected to the camcorder. (1) Turn the CUSTOM PRESET/MENU switch in the CUSTOM PRESET direction and release it . CUSTOM PRESET MENU CUSTOM PRESET MENU 1 7 ...CUSTOM PRESET SET OFF COLOR LVL SHARPNESS WB SH I FT AGC LIMIT OFF RESET STBY [CP] : END 2-4 CUSTOM PRESET SET OFF COLOR LVL SHARPNESS WB SH I FT AGC LIMIT RESET RETURN STBY CUSTOM PRESET SET OFF [CP] : ENCSDHOALORPRNELVSLS ON WB SH I FT AGC LIMIT...
Operating Instructions
Page 51
..., or memory mode. To check the custom preset setting Push the CUSTOM PRESET/MENU switch in the CUSTOM PRESET direction and release it while the camcorder is in step 4, then press the SEL/PUSH EXEC dial. About the AGC limit When adjusting the gain manually, the level of the gain is... (OFF). When you preset the desired picture quality in CAMERA or memory mode The preset is up to the standard setting Select OK from the RESET item in the viewfinder. To cancel, select RETURN, then press the SEL/PUSH EXEC dial. The custom preset setting appears on the LCD screen or...
..., or memory mode. To check the custom preset setting Push the CUSTOM PRESET/MENU switch in the CUSTOM PRESET direction and release it while the camcorder is in step 4, then press the SEL/PUSH EXEC dial. About the AGC limit When adjusting the gain manually, the level of the gain is... (OFF). When you preset the desired picture quality in CAMERA or memory mode The preset is up to the standard setting Select OK from the RESET item in the viewfinder. To cancel, select RETURN, then press the SEL/PUSH EXEC dial. The custom preset setting appears on the LCD screen or...

Operating Instructions
Page 105
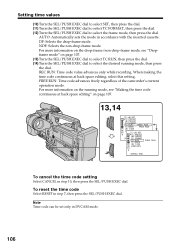
... UB T I ME RETURN TC / UB SET TC PRESET 00:00:00:00 UB PRESET [MENU]T:CENFDORMAT RESET TC RUN PRESET TC MAKE RETURN UB T I ME RETURN TC / UB SET TC PRESET UB PRESET 01...:00:00:00" in non-drop-frame mode. (9) Repeat step 8 to set up the first two digits. Setting the time code value This section describes the steps for setting time code recording methods for particular shooting...Push the CUSTOM PRESET/MENU switch in the viewfinder, or on the display window. Setting time values The camcorder uses two types of time values: time code values and user bits. When you record the picture, ...
... UB T I ME RETURN TC / UB SET TC PRESET 00:00:00:00 UB PRESET [MENU]T:CENFDORMAT RESET TC RUN PRESET TC MAKE RETURN UB T I ME RETURN TC / UB SET TC PRESET UB PRESET 01...:00:00:00" in non-drop-frame mode. (9) Repeat step 8 to set up the first two digits. Setting the time code value This section describes the steps for setting time code recording methods for particular shooting...Push the CUSTOM PRESET/MENU switch in the viewfinder, or on the display window. Setting time values The camcorder uses two types of time values: time code values and user bits. When you record the picture, ...
Operating Instructions
Page 106
... "Making the time code continuous at back space editing, select this setting. To reset the time code Select RESET in DVCAM mode. 106 NDF: Selects the non-drop-frame mode. FREE RUN: Time code advances freely regardless of the camcorder's current operation mode. For more information on the running mode, then press the dial...
... "Making the time code continuous at back space editing, select this setting. To reset the time code Select RESET in DVCAM mode. 106 NDF: Selects the non-drop-frame mode. FREE RUN: Time code advances freely regardless of the camcorder's current operation mode. For more information on the running mode, then press the dial...
Operating Instructions
Page 108
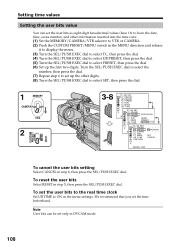
...PUSH EXEC dial to select PRESET, then press the dial. (6) Set up the first two digits. CUSTOM PRESET MENU 1 MEMORY CAMERA VTR 2 3-8 TC / UB SET TC PRESET UB...UB SET TC PRESET UB PRESET 00 00 00 00 [MENU]T:CENFDORMAT TC RUN RESET TC MAKE PRESET UB T I ME RETURN RETURN TC / UB SET TC...set the user bits as eight-digit hexadecimal values (base 16) to have the date, time, scene number, and other digits. (8) Turn the SEL/PUSH ...EXEC dial to ON in the menu settings. To set the time beforehand. To reset the user bits Select RESET in step...
...PUSH EXEC dial to select PRESET, then press the dial. (6) Set up the first two digits. CUSTOM PRESET MENU 1 MEMORY CAMERA VTR 2 3-8 TC / UB SET TC PRESET UB...UB SET TC PRESET UB PRESET 00 00 00 00 [MENU]T:CENFDORMAT TC RUN RESET TC MAKE PRESET UB T I ME RETURN RETURN TC / UB SET TC...set the user bits as eight-digit hexadecimal values (base 16) to have the date, time, scene number, and other digits. (8) Turn the SEL/PUSH ...EXEC dial to ON in the menu settings. To set the time beforehand. To reset the user bits Select RESET in step...
Operating Instructions
Page 121
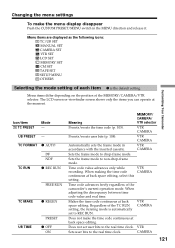
...REC RUN FREE RUN TC MAKE z REGEN UB TIME PRESET z OFF ON Meaning MEMORY/ CAMERA/ VTR selector Presets/resets the time code (p. 105). When adjusting the discrepancy between time code value and real time. Does not set ...the time code CAMERA continuous at back space editing. Menu items differ depending on the position of the camcorder's current operation mode. The LCD screen or viewfinder screen shows only the items you can operate at ... the time code continuous at the moment. Customizing Your Camcorder Icon/item TC PRESET Mode - VTR CAMERA Presets/resets user bits (p. 108).
...REC RUN FREE RUN TC MAKE z REGEN UB TIME PRESET z OFF ON Meaning MEMORY/ CAMERA/ VTR selector Presets/resets the time code (p. 105). When adjusting the discrepancy between time code value and real time. Does not set ...the time code CAMERA continuous at back space editing. Menu items differ depending on the position of the camcorder's current operation mode. The LCD screen or viewfinder screen shows only the items you can operate at ... the time code continuous at the moment. Customizing Your Camcorder Icon/item TC PRESET Mode - VTR CAMERA Presets/resets user bits (p. 108).
Operating Instructions
Page 126
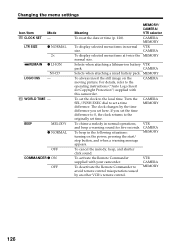
If you set a time difference. To activate the Remote Commander supplied with this camcorder. To deactivate the Remote Commander to the local time. LTR SIZE z NORMAL 2× uREMAIN z LI-ION LOGO INS NI-CD - CAMERA To display selected menu ... normal VTR size. Changing the menu settings Icon/item Mode CLOCK SET - BEEP MELODY z NORMAL OFF COMMANDER z ON OFF Meaning MEMORY/ CAMERA/ VTR selector To reset the date or time (p. 128). Selects when attaching a lithium-ion battery VTR pack. MEMORY To always insert the still image on the power, pressing the...
If you set a time difference. To activate the Remote Commander supplied with this camcorder. To deactivate the Remote Commander to the local time. LTR SIZE z NORMAL 2× uREMAIN z LI-ION LOGO INS NI-CD - CAMERA To display selected menu ... normal VTR size. Changing the menu settings Icon/item Mode CLOCK SET - BEEP MELODY z NORMAL OFF COMMANDER z ON OFF Meaning MEMORY/ CAMERA/ VTR selector To reset the date or time (p. 128). Selects when attaching a lithium-ion battery VTR pack. MEMORY To always insert the still image on the power, pressing the...
Operating Instructions
Page 128
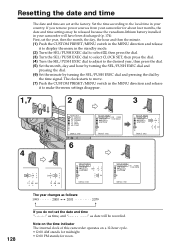
... EXEC dial and pressing the dial by the time signal. First, set at the factory. Note on the time indicator The internal clock of this camcorder operates on a 12-hour cycle. •12:00 AM stands for midnight. •12:00 PM stands for about four months, the date and time... S I ZE 5:30:00PM REMA I N RETURN [MENU] : END The year changes as follows: 1995 2000 2001 2079 128 If you remove power sources from your camcorder for noon. Resetting the date and time The date and time are set the year, then the month, the day, the hour and then the minute. (1) Push...
... EXEC dial and pressing the dial by the time signal. First, set at the factory. Note on the time indicator The internal clock of this camcorder operates on a 12-hour cycle. •12:00 AM stands for midnight. •12:00 PM stands for about four months, the date and time... S I ZE 5:30:00PM REMA I N RETURN [MENU] : END The year changes as follows: 1995 2000 2001 2079 128 If you remove power sources from your camcorder for noon. Resetting the date and time The date and time are set the year, then the month, the day, the hour and then the minute. (1) Push...

Operating Instructions
Page 167
... The batteries are inserted in the viewfinder when your camcorder. c Set it to the default.) (p. 11, 180) Additional Information 167 c Remove the cassette and insert it again, then operate your camcorder does not work , press the RESET button located below the DISPLAY SELECT switch using a ...sharp-pointed object. (If you press the RESET button, all the settings including the date and time return to ON. (p....
... The batteries are inserted in the viewfinder when your camcorder. c Set it to the default.) (p. 11, 180) Additional Information 167 c Remove the cassette and insert it again, then operate your camcorder does not work , press the RESET button located below the DISPLAY SELECT switch using a ...sharp-pointed object. (If you press the RESET button, all the settings including the date and time return to ON. (p....

Operating Instructions
Page 170
... the logo insert system is not inserted that has the logo data. Consult your Sony dealer or local authorized Sony service facility. * You hear the melody or beep sound. **x and the message appear alternately. Warning messages •CLOCK SET Reset the date and time (p. 128). •MEMORY FULL The "Memory Stick" is full...
... the logo insert system is not inserted that has the logo data. Consult your Sony dealer or local authorized Sony service facility. * You hear the melody or beep sound. **x and the message appear alternately. Warning messages •CLOCK SET Reset the date and time (p. 128). •MEMORY FULL The "Memory Stick" is full...

Operating Instructions
Page 180
... 142) ra DATA CODE button (p. 31) rs TITLE button (p. 110) rd END SEARCH button (p. 29) rf DIGITAL EFFECT button (p. 69) rg AUDIO MONITOR selector (p. 31) rh DISPLAY SELECT switch (p. 109) rj RESET button (p. 167) 180 Identifying the parts and controls eh ej ek el r; MEMORY +/- ra rs rd rf MEMORY... PLAY INDEX DELETE MEMORY MIX AUDIO MONITOR CH-1 MIX CH-2 DATA CODE TITLE END SEARCH DIGITAL EFFECT DISPLAY SELECT TC U-BIT RESET AUDIO INPUT AUDIO SELECT FRONT REAR AUTO MANUAL CH-1 FRONT REAR AUTO MANUAL CH-2 rg rh rj eh MEMORY DELETE button (p. ...
... 142) ra DATA CODE button (p. 31) rs TITLE button (p. 110) rd END SEARCH button (p. 29) rf DIGITAL EFFECT button (p. 69) rg AUDIO MONITOR selector (p. 31) rh DISPLAY SELECT switch (p. 109) rj RESET button (p. 167) 180 Identifying the parts and controls eh ej ek el r; MEMORY +/- ra rs rd rf MEMORY... PLAY INDEX DELETE MEMORY MIX AUDIO MONITOR CH-1 MIX CH-2 DATA CODE TITLE END SEARCH DIGITAL EFFECT DISPLAY SELECT TC U-BIT RESET AUDIO INPUT AUDIO SELECT FRONT REAR AUTO MANUAL CH-1 FRONT REAR AUTO MANUAL CH-2 rg rh rj eh MEMORY DELETE button (p. ...

Operating Instructions
Page 181
AUDIO SELECT (CH-1) switch (p. 7) ta AUDIO INPUT (CH-1) switch (p. 7) ts AUDIO INPUT (CH-2) switch (p. 7) td AUDIO SELECT (CH-2) switch (p. 7) tf PHONES jack tg AUDIO LEVEL (CH-2) knob (p. 54) Quick Reference 181 ta MEMORY PLAY INDEX DELETE MEMORY MIX AUDIO MONITOR CH-1 MIX CH-2 DATA CODE TITLE END SEARCH DIGITAL EFFECT DISPLAY SELECT TC U-BIT RESET AUDIO INPUT AUDIO SELECT FRONT REAR AUTO MANUAL CH-1 FRONT REAR AUTO MANUAL CH-2 ts td tf tg rk Speaker rl AUDIO LEVEL (CH-1) knob (p. 54) t; Identifying the parts and controls rk rl t;
AUDIO SELECT (CH-1) switch (p. 7) ta AUDIO INPUT (CH-1) switch (p. 7) ts AUDIO INPUT (CH-2) switch (p. 7) td AUDIO SELECT (CH-2) switch (p. 7) tf PHONES jack tg AUDIO LEVEL (CH-2) knob (p. 54) Quick Reference 181 ta MEMORY PLAY INDEX DELETE MEMORY MIX AUDIO MONITOR CH-1 MIX CH-2 DATA CODE TITLE END SEARCH DIGITAL EFFECT DISPLAY SELECT TC U-BIT RESET AUDIO INPUT AUDIO SELECT FRONT REAR AUTO MANUAL CH-1 FRONT REAR AUTO MANUAL CH-2 ts td tf tg rk Speaker rl AUDIO LEVEL (CH-1) knob (p. 54) t; Identifying the parts and controls rk rl t;

Operating Instructions
Page 182
... yd BREAKER button yf AUDIO IN CH1 connector (p. 58, 102) yg AUDIO IN CH2 connector (p. 58, 102) yh "Memory Stick" slot (p. 131) On BREAKER (breaker reset) button If an excessive current flows in the internal circuits, the internal circuit breaker shuts off the power supply. Push this button after eliminating the...
... yd BREAKER button yf AUDIO IN CH1 connector (p. 58, 102) yg AUDIO IN CH2 connector (p. 58, 102) yh "Memory Stick" slot (p. 131) On BREAKER (breaker reset) button If an excessive current flows in the internal circuits, the internal circuit breaker shuts off the power supply. Push this button after eliminating the...
Operating Instructions
Page 192
... monitor) 35 Continuous 135 Custom preset 50 Cut recording 76 Data code 32 Date search 80 Date/time indicator 32 DIGITAL EFFECT 69 Digital program editing ....... 88 Digital zoom 25 DISPLAY 31 DOT 67 Dubbing a tape 85 DV connecting cable 86 FRAME REC 76 GAIN 38 Grip strap...Recording level 54 Remaining battery capacity indicator 26 Remaining tape indicator .... 26 Remote Commander .......... 188 Remote control jack (LANC) 183 Remote sensor 179 RESET 167 S S VIDEO jack 35, 85, 96 SEL/PUSH EXEC dial ....... 120 Self-diagnosis display ........ 168 Skip scan 33 Slide show ...
... monitor) 35 Continuous 135 Custom preset 50 Cut recording 76 Data code 32 Date search 80 Date/time indicator 32 DIGITAL EFFECT 69 Digital program editing ....... 88 Digital zoom 25 DISPLAY 31 DOT 67 Dubbing a tape 85 DV connecting cable 86 FRAME REC 76 GAIN 38 Grip strap...Recording level 54 Remaining battery capacity indicator 26 Remaining tape indicator .... 26 Remote Commander .......... 188 Remote control jack (LANC) 183 Remote sensor 179 RESET 167 S S VIDEO jack 35, 85, 96 SEL/PUSH EXEC dial ....... 120 Self-diagnosis display ........ 168 Skip scan 33 Slide show ...


