
Operating Instructions
Page 2
... enclosure that may cause harmful interference to persons. For customers in the U.S.A. Congratulations on your Digital camcorder, you can return your nearest Sony Service Center or Factory Service Center. CAUTION You are designed to provide reasonable protection against harmful interference...to the following two conditions: (1) This device may not cause harmful interference, and (2) this Sony Digital camcorder. Operation is intended to alert the user to Part 15 of important operating and maintenance (servicing) instructions in a commercial environment. NOTE This equipment ...
... enclosure that may cause harmful interference to persons. For customers in the U.S.A. Congratulations on your Digital camcorder, you can return your nearest Sony Service Center or Factory Service Center. CAUTION You are designed to provide reasonable protection against harmful interference...to the following two conditions: (1) This device may not cause harmful interference, and (2) this Sony Digital camcorder. Operation is intended to alert the user to Part 15 of important operating and maintenance (servicing) instructions in a commercial environment. NOTE This equipment ...

Operating Instructions
Page 3
... own titles 114 Labeling a cassette 116 Erasing the cassette memory data 118 Customizing Your Camcorder Advanced Recording Operations Changing the menu settings 120 Shooting with an analog video unit and ... Identifying the parts and controls 177 title - Index search 77 Maintenance information and precautions ... 172 Specifications 176 Quick Reference Searching the boundaries of DVCAM and Using... - Photo search/Photo scan 82 Playing back a tape with all the pixels - Digital program editing 88 Using with manual adjustment 36 Resetting the date and time 128 Focusing ...
... own titles 114 Labeling a cassette 116 Erasing the cassette memory data 118 Customizing Your Camcorder Advanced Recording Operations Changing the menu settings 120 Shooting with an analog video unit and ... Identifying the parts and controls 177 title - Index search 77 Maintenance information and precautions ... 172 Specifications 176 Quick Reference Searching the boundaries of DVCAM and Using... - Photo search/Photo scan 82 Playing back a tape with all the pixels - Digital program editing 88 Using with manual adjustment 36 Resetting the date and time 128 Focusing ...
Operating Instructions
Page 13
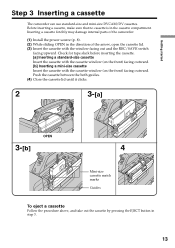
... the cassette with the cassette window (on the front) facing outward. Getting started Step 3 Inserting a cassette The camcorder can use standard-size and mini-size DVCAM/DV cassettes. Inserting a cassette forcibly may damage internal parts of the camcorder. (1) Install the power source (p. 8). (2) While sliding OPEN in the direction of the arrow, open the cassette...
... the cassette with the cassette window (on the front) facing outward. Getting started Step 3 Inserting a cassette The camcorder can use standard-size and mini-size DVCAM/DV cassettes. Inserting a cassette forcibly may damage internal parts of the camcorder. (1) Install the power source (p. 8). (2) While sliding OPEN in the direction of the arrow, open the cassette...
Operating Instructions
Page 14
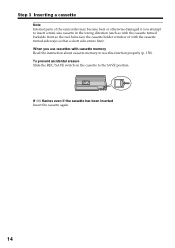
... face the cassette holder window or with cassette memory Read the instruction about cassette memory to the SAVE position. Step 3 Inserting a cassette Note Internal parts of the camcorder may become bent or otherwise damaged if you use this function properly (p. 158). If Q flashes even if the cassette has been inserted Insert the...
... face the cassette holder window or with cassette memory Read the instruction about cassette memory to the SAVE position. Step 3 Inserting a cassette Note Internal parts of the camcorder may become bent or otherwise damaged if you use this function properly (p. 158). If Q flashes even if the cassette has been inserted Insert the...

Operating Instructions
Page 20
Adjust the eyepiece focus to get the clearest viewfinder image for your Sony dealer. 20 Eyepiece focusing knob To modify the adjustment range Using an optional part allows you to modify the adjustment range to -2 to +1 diopters or -0.5 to indicate the degree of convergence or divergence of a bundle of rays. For details, ...
Adjust the eyepiece focus to get the clearest viewfinder image for your Sony dealer. 20 Eyepiece focusing knob To modify the adjustment range Using an optional part allows you to modify the adjustment range to -2 to +1 diopters or -0.5 to indicate the degree of convergence or divergence of a bundle of rays. For details, ...
Operating Instructions
Page 72
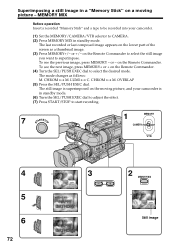
on the lower part of the screen as follows: M. The mode changes as a thumbnail image. (3) Press MEMORY+/- LUMI 3 100-0019 M. Superimposing a still image in a "Memory Stick" on a moving picture, and your camcorder. (1) Set the MEMORY/CAMERA/VTR selector to CAMERA. (2) Press MEMORY MIX in standby mode. ... see the next image, press MEMORY+ or + on the Remote Commander. (4) Turn the SEL/PUSH EXEC dial to be recorded into your camcorder is superimposed on the Remote Commander. CHROM 100-0019 Still image MEMORY MIX Before operation Insert a recorded "Memory Stick" and a tape to ...
on the lower part of the screen as follows: M. The mode changes as a thumbnail image. (3) Press MEMORY+/- LUMI 3 100-0019 M. Superimposing a still image in a "Memory Stick" on a moving picture, and your camcorder. (1) Set the MEMORY/CAMERA/VTR selector to CAMERA. (2) Press MEMORY MIX in standby mode. ... see the next image, press MEMORY+ or + on the Remote Commander. (4) Turn the SEL/PUSH EXEC dial to be recorded into your camcorder is superimposed on the Remote Commander. CHROM 100-0019 Still image MEMORY MIX Before operation Insert a recorded "Memory Stick" and a tape to ...
Operating Instructions
Page 92
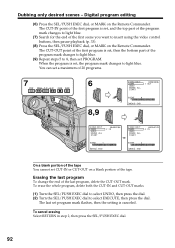
... Select RETURN in step 2, then press the SEL/PUSH EXEC dial. 92 The CUT-OUT point of the first program is set, and the top part of the program mark changes to light blue. (7) Search for the end of the first scene you want to 8, then set CUT-IN or CUT... the SEL/PUSH EXEC dial to select UNDO, then press the dial. (2) Turn the SEL/PUSH EXEC dial to light blue. Dubbing only desired scenes - Digital program editing (6) Press the SEL/PUSH EXEC dial, or MARK on a blank portion of the last program, delete the CUT-OUT mark. The last set...
... Select RETURN in step 2, then press the SEL/PUSH EXEC dial. 92 The CUT-OUT point of the first program is set, and the top part of the program mark changes to light blue. (7) Search for the end of the first scene you want to 8, then set CUT-IN or CUT... the SEL/PUSH EXEC dial to select UNDO, then press the dial. (2) Turn the SEL/PUSH EXEC dial to light blue. Dubbing only desired scenes - Digital program editing (6) Press the SEL/PUSH EXEC dial, or MARK on a blank portion of the last program, delete the CUT-OUT mark. The last set...

Operating Instructions
Page 111
... : END TITLE SCENE5 [EXEC] : SAVE [T I TLE] : END TITLE SCENE5 [EXEC] : SAVE [T I TLE] : END If you set the REC/SAVE switch of the recorded parts The title may be displayed correctly. If the tape has a blank portion You cannot superimpose a title on that portion. If the tape has a blank portion... superimposed the title may not be detected as an index signal when searching a recording with other video equipment. The titles superimposed with your camcorder The point you want to SAVE You cannot superimpose or erase the title. To use the custom title, select in the menu settings (p....
... : END TITLE SCENE5 [EXEC] : SAVE [T I TLE] : END TITLE SCENE5 [EXEC] : SAVE [T I TLE] : END If you set the REC/SAVE switch of the recorded parts The title may be displayed correctly. If the tape has a blank portion You cannot superimpose a title on that portion. If the tape has a blank portion... superimposed the title may not be detected as an index signal when searching a recording with other video equipment. The titles superimposed with your camcorder The point you want to SAVE You cannot superimpose or erase the title. To use the custom title, select in the menu settings (p....

Operating Instructions
Page 115
To erase a character Turn the SEL/PUSH EXEC dial to change, then press the SEL/PUSH EXEC dial. To enter a space Select [ ], then select the blank part. The last character is erased. Editing 115 Making your own titles To change a title you have stored In step 3, select CUSTOM1 SET or CUSTOM2 SET, depending on which title you want to select [C], then press the dial. Enter a new title as desired. Turn the SEL/PUSH EXEC dial to select [C], then press the dial to delete the title. The last character is erased.
To erase a character Turn the SEL/PUSH EXEC dial to change, then press the SEL/PUSH EXEC dial. To enter a space Select [ ], then select the blank part. The last character is erased. Editing 115 Making your own titles To change a title you have stored In step 3, select CUSTOM1 SET or CUSTOM2 SET, depending on which title you want to select [C], then press the dial. Enter a new title as desired. Turn the SEL/PUSH EXEC dial to select [C], then press the dial to delete the title. The last character is erased.

Operating Instructions
Page 117
... erase a character Turn the SEL/PUSH EXEC dial to REC. If you can select for the label. To enter a space Select [ ], then select the blank part. Labeling a cassette To change the label, and operate in the cassette When the label is full.
... erase a character Turn the SEL/PUSH EXEC dial to REC. If you can select for the label. To enter a space Select [ ], then select the blank part. Labeling a cassette To change the label, and operate in the cassette When the label is full.
Operating Instructions
Page 129
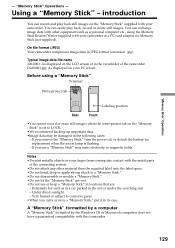
... Front •You cannot record or erase still images when the write-protect tab on the "Memory Stick" supplied with the metal parts of the camcorder. You can easily play back still images on the "Memory Stick" is flashing. - Before using the Memory Stick Reader/Writer supplied... with your finger from coming into contact with your PC screen. Using a "Memory Stick" - Notes •Prevent metallic objects or your camcorder or a PC card adaptor for replacement when the access lamp is set to a "Memory Stick." •Do not disassemble or modify a "Memory ...
... Front •You cannot record or erase still images when the write-protect tab on the "Memory Stick" supplied with the metal parts of the camcorder. You can easily play back still images on the "Memory Stick" is flashing. - Before using the Memory Stick Reader/Writer supplied... with your finger from coming into contact with your PC screen. Using a "Memory Stick" - Notes •Prevent metallic objects or your camcorder or a PC card adaptor for replacement when the access lamp is set to a "Memory Stick." •Do not disassemble or modify a "Memory ...
Operating Instructions
Page 157
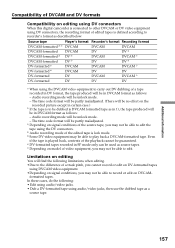
... to recorder's format as described below. formatted tapes. Compatibility of DVCAM and DV formats Compatibility on editing using DV connectors When this digital camcorder is connected to other DVCAM or DV video equipment using DV connectors, the recording format of...DVCAM DV DVCAM DV DVCAM DV DVCAM DV DVCAM DV 4) DVCAM 7) DV 4) DVCAM 1) DV DVCAM 1) DV 1) When using DVCAM video equipment. •Depending on signal conditions, you may not be able to record or edit on DV-formatted tapes using the DVCAM video equipment to be dubbed is lock mode. 5) Some DV video equipment may not be partly...
... to recorder's format as described below. formatted tapes. Compatibility of DVCAM and DV formats Compatibility on editing using DV connectors When this digital camcorder is connected to other DVCAM or DV video equipment using DV connectors, the recording format of...DVCAM DV DVCAM DV DVCAM DV DVCAM DV DVCAM DV 4) DVCAM 7) DV 4) DVCAM 1) DV DVCAM 1) DV 1) When using DVCAM video equipment. •Depending on signal conditions, you may not be able to record or edit on DV-formatted tapes using the DVCAM video equipment to be dubbed is lock mode. 5) Some DV video equipment may not be partly...

Operating Instructions
Page 177
Identifying the parts and controls Camcorder 7 1 2 3 4 5 6 START/STOP SHUTTER OFF ON WHT BAL INDEX MARK AUDIO LEVEL 12 8 9 q; Quick Reference 177 - When purchasing Sony video products, Sony recommends that this "GENUINE VIDEO ACCESSORIES" mark. These are trademarks. qa qs 1 VF connector (p. 187) 2 MIC IN +48V connector (p. 7) 3 Zoom ring (p. 25) 4 Focus ring (p. 45) 5 ... (p. 53) qa WHT BAL switch (p. 47) qs AUDIO LEVEL knob (p. 54) This mark indicates that you purchase accessories with this product is a genuine accessory for Sony video products. Quick Reference -
Identifying the parts and controls Camcorder 7 1 2 3 4 5 6 START/STOP SHUTTER OFF ON WHT BAL INDEX MARK AUDIO LEVEL 12 8 9 q; Quick Reference 177 - When purchasing Sony video products, Sony recommends that this "GENUINE VIDEO ACCESSORIES" mark. These are trademarks. qa qs 1 VF connector (p. 187) 2 MIC IN +48V connector (p. 7) 3 Zoom ring (p. 25) 4 Focus ring (p. 45) 5 ... (p. 53) qa WHT BAL switch (p. 47) qs AUDIO LEVEL knob (p. 54) This mark indicates that you purchase accessories with this product is a genuine accessory for Sony video products. Quick Reference -

Operating Instructions
Page 178
Identifying the parts and controls qd qf qg qk ql w; ZEBRA selector (p. 42) wa CUSTOM PRESET/MENU switch (p. 120) ws AE SHIFT switch (p. 44) wd WHT PRESET switch (p. 48) 178 wa qh qj 5800K B A PRESET 3200K GAIN HML WHITE BAL CUSTOM PRESET MENU AE SHIFT ws wd qd AUTO MODE switch (p. 36) qf ATW switch (p. 47) qg AGC switch (p. 38) qh GAIN selector (p. 38) qj WHITE BAL switch (p. 47) qk DISPLAY button (p. 31) ql AUDIO LEVEL button (p. 54) w;
Identifying the parts and controls qd qf qg qk ql w; ZEBRA selector (p. 42) wa CUSTOM PRESET/MENU switch (p. 120) ws AE SHIFT switch (p. 44) wd WHT PRESET switch (p. 48) 178 wa qh qj 5800K B A PRESET 3200K GAIN HML WHITE BAL CUSTOM PRESET MENU AE SHIFT ws wd qd AUTO MODE switch (p. 36) qf ATW switch (p. 47) qg AGC switch (p. 38) qh GAIN selector (p. 38) qj WHITE BAL switch (p. 47) qk DISPLAY button (p. 31) ql AUDIO LEVEL button (p. 54) w;

Operating Instructions
Page 179
wh wj ea es wk ed wl ef eg wf Remote sensor wg TALLY lamp (p. 16) wh TALLY switch (p. 16) wj EJECT button (p. 13) wk DC IN 12V connector (p. 11) wl DC OUT 12V connector (p. 58) e; LIGHT connector (p. 60) ea START/STOP button (p. 15) es S VIDEO (ID-2) jack (p. 35, 63, 85, 96, 138) ed VIDEO (ID-2) IN/OUT jack (p. 35, 63, 85, 96, 138) ef AUDIO IN/OUT CH-1 jack (p. 35, 85, 96, 102) eg AUDIO IN/OUT CH-2 jack (p. 35, 85, 96, 102) Quick Reference 179 Identifying the parts and controls wf wg e;
wh wj ea es wk ed wl ef eg wf Remote sensor wg TALLY lamp (p. 16) wh TALLY switch (p. 16) wj EJECT button (p. 13) wk DC IN 12V connector (p. 11) wl DC OUT 12V connector (p. 58) e; LIGHT connector (p. 60) ea START/STOP button (p. 15) es S VIDEO (ID-2) jack (p. 35, 63, 85, 96, 138) ed VIDEO (ID-2) IN/OUT jack (p. 35, 63, 85, 96, 138) ef AUDIO IN/OUT CH-1 jack (p. 35, 85, 96, 102) eg AUDIO IN/OUT CH-2 jack (p. 35, 85, 96, 102) Quick Reference 179 Identifying the parts and controls wf wg e;

Operating Instructions
Page 180
... button (p. 31) rs TITLE button (p. 110) rd END SEARCH button (p. 29) rf DIGITAL EFFECT button (p. 69) rg AUDIO MONITOR selector (p. 31) rh DISPLAY SELECT switch (p. 109) rj RESET button (p. 167) 180 Identifying the parts and controls eh ej ek el r; MEMORY +/- ra rs rd rf MEMORY PLAY INDEX DELETE... MEMORY MIX AUDIO MONITOR CH-1 MIX CH-2 DATA CODE TITLE END SEARCH DIGITAL EFFECT DISPLAY SELECT TC U-BIT RESET AUDIO INPUT AUDIO SELECT FRONT...
... button (p. 31) rs TITLE button (p. 110) rd END SEARCH button (p. 29) rf DIGITAL EFFECT button (p. 69) rg AUDIO MONITOR selector (p. 31) rh DISPLAY SELECT switch (p. 109) rj RESET button (p. 167) 180 Identifying the parts and controls eh ej ek el r; MEMORY +/- ra rs rd rf MEMORY PLAY INDEX DELETE... MEMORY MIX AUDIO MONITOR CH-1 MIX CH-2 DATA CODE TITLE END SEARCH DIGITAL EFFECT DISPLAY SELECT TC U-BIT RESET AUDIO INPUT AUDIO SELECT FRONT...

Operating Instructions
Page 181
AUDIO SELECT (CH-1) switch (p. 7) ta AUDIO INPUT (CH-1) switch (p. 7) ts AUDIO INPUT (CH-2) switch (p. 7) td AUDIO SELECT (CH-2) switch (p. 7) tf PHONES jack tg AUDIO LEVEL (CH-2) knob (p. 54) Quick Reference 181 Identifying the parts and controls rk rl t; ta MEMORY PLAY INDEX DELETE MEMORY MIX AUDIO MONITOR CH-1 MIX CH-2 DATA CODE TITLE END SEARCH DIGITAL EFFECT DISPLAY SELECT TC U-BIT RESET AUDIO INPUT AUDIO SELECT FRONT REAR AUTO MANUAL CH-1 FRONT REAR AUTO MANUAL CH-2 ts td tf tg rk Speaker rl AUDIO LEVEL (CH-1) knob (p. 54) t;
AUDIO SELECT (CH-1) switch (p. 7) ta AUDIO INPUT (CH-1) switch (p. 7) ts AUDIO INPUT (CH-2) switch (p. 7) td AUDIO SELECT (CH-2) switch (p. 7) tf PHONES jack tg AUDIO LEVEL (CH-2) knob (p. 54) Quick Reference 181 Identifying the parts and controls rk rl t; ta MEMORY PLAY INDEX DELETE MEMORY MIX AUDIO MONITOR CH-1 MIX CH-2 DATA CODE TITLE END SEARCH DIGITAL EFFECT DISPLAY SELECT TC U-BIT RESET AUDIO INPUT AUDIO SELECT FRONT REAR AUTO MANUAL CH-1 FRONT REAR AUTO MANUAL CH-2 ts td tf tg rk Speaker rl AUDIO LEVEL (CH-1) knob (p. 54) t;

Operating Instructions
Page 182
Identifying the parts and controls th tj tk tl LINE MIC +48V ON LINE MIC +48V ON y; FRAME AUDIO DUB REC STOP REW PLAY FF PAUSE SLOW ya ...
Identifying the parts and controls th tj tk tl LINE MIC +48V ON LINE MIC +48V ON y; FRAME AUDIO DUB REC STOP REW PLAY FF PAUSE SLOW ya ...

Operating Instructions
Page 183
... 13941995 specifications and their revisions. us yj OPEN button (p. 13) yk Cassette lid (p. 13) yl LANC jack LANC stands for controlling the tape transport of Sony Corporation and indicates that this product is i.LINK compatible. ua us Shoulder pad Quick Reference 183 Identifying the...
... 13941995 specifications and their revisions. us yj OPEN button (p. 13) yk Cassette lid (p. 13) yl LANC jack LANC stands for controlling the tape transport of Sony Corporation and indicates that this product is i.LINK compatible. ua us Shoulder pad Quick Reference 183 Identifying the...

Operating Instructions
Page 184
...screws for attachment of the wide teleconversion lens, etc., loosen the lens hood fixing screw, and unscrew the lens hood counterclockwise. Identifying the parts and controls uf i; ih Lens ij Lens hood fixing screw Removing the lens hood To remove the lens hood for optional microphone holder (p. ...37) ul Grip strap i; Fastening the grip strap Fasten the grip strap firmly. 184 When using additional filters We recommend that you use the Sony made filters having the genuine accessory mark. ia ug is Viewfinder fitting shoe (p. 187) id IRIS PUSH AUTO button (p. 37) if Remote ...
...screws for attachment of the wide teleconversion lens, etc., loosen the lens hood fixing screw, and unscrew the lens hood counterclockwise. Identifying the parts and controls uf i; ih Lens ij Lens hood fixing screw Removing the lens hood To remove the lens hood for optional microphone holder (p. ...37) ul Grip strap i; Fastening the grip strap Fasten the grip strap firmly. 184 When using additional filters We recommend that you use the Sony made filters having the genuine accessory mark. ia ug is Viewfinder fitting shoe (p. 187) id IRIS PUSH AUTO button (p. 37) if Remote ...


