
Instruction Manual
Page 1
Printed on a computer Printing images Digital Single Lens Reflex Camera Instruction Manual DSLR-A900 Preparing the camera Before your operation Shooting images Using the shooting function Using the viewing function Using the menu Viewing images on 70% or more recycled paper using VOC (Volatile Organic Compound)-free vegetable oil based ink. Additional information on this product and answers to frequently asked questions can be found at our Customer Support Website.
Printed on a computer Printing images Digital Single Lens Reflex Camera Instruction Manual DSLR-A900 Preparing the camera Before your operation Shooting images Using the shooting function Using the viewing function Using the menu Viewing images on 70% or more recycled paper using VOC (Volatile Organic Compound)-free vegetable oil based ink. Additional information on this product and answers to frequently asked questions can be found at our Customer Support Website.

Instruction Manual
Page 9
...loss, always copy (back up , the monitor will function normally. • Do not press against the LCD monitor. When turning on the camera in a cold location. Unauthorized recording of the recording cannot be contrary to the provisions of the copyright laws. This is focused on copyright ... The LCD monitor is manufactured using extremely high-precision technology so over 99.99% of the pixels are not actual images shot using your camera No compensation for contents of the recording The contents of such materials may cause a malfunction. 9 Notes on the LCD monitor in a cold...
...loss, always copy (back up , the monitor will function normally. • Do not press against the LCD monitor. When turning on the camera in a cold location. Unauthorized recording of the recording cannot be contrary to the provisions of the copyright laws. This is focused on copyright ... The LCD monitor is manufactured using extremely high-precision technology so over 99.99% of the pixels are not actual images shot using your camera No compensation for contents of the recording The contents of such materials may cause a malfunction. 9 Notes on the LCD monitor in a cold...

Instruction Manual
Page 10
... the accessories supplied 13 Preparing the battery pack 14 Attaching a lens 21 Inserting a memory card 23 Preparing the camera 27 Using the accessories supplied 29 Checking the number of recordable images 33 Cleaning 35 Before your operation Identifying parts and screen indicators 38 Front ...
... the accessories supplied 13 Preparing the battery pack 14 Attaching a lens 21 Inserting a memory card 23 Preparing the camera 27 Using the accessories supplied 29 Checking the number of recordable images 33 Cleaning 35 Before your operation Identifying parts and screen indicators 38 Front ...

Instruction Manual
Page 12
... Copying images to your computer 137 on a computer Viewing images on your computer 141 Using the software 145 Printing images Printing images by connecting the camera to a PictBridge compliant printer 152 Others Specifications 157 Troubleshooting 160 Warning messages 167 Precautions 170 Index 172 12
... Copying images to your computer 137 on a computer Viewing images on your computer 141 Using the software 145 Printing images Printing images by connecting the camera to a PictBridge compliant printer 152 Others Specifications 157 Troubleshooting 160 Warning messages 167 Precautions 170 Index 172 12

Instruction Manual
Page 13
... of pieces. • BC-VM10 Battery charger (1)/ Power cord (mains lead) (1) • Shoulder strap (1) • Rechargeable battery pack NPFM500H (1) • Body cap (1) (Attached on the camera) • Wireless Remote Commander (Remote Commander) (1) • Remote Commander clip (1) • Accessory shoe cap (1) (Attached on the...
... of pieces. • BC-VM10 Battery charger (1)/ Power cord (mains lead) (1) • Shoulder strap (1) • Rechargeable battery pack NPFM500H (1) • Body cap (1) (Attached on the camera) • Wireless Remote Commander (Remote Commander) (1) • Remote Commander clip (1) • Accessory shoe cap (1) (Attached on the...

Instruction Manual
Page 14
... a wall outlet (wall socket) About charging time • Time required to charge the NPFM500H "InfoLITHIUM" battery pack (supplied). Preparing the battery pack When using the camera for the first time, be sure to charge a fully depleted battery pack (supplied) at a temperature of the battery back or charging conditions. 14 Push the...
... a wall outlet (wall socket) About charging time • Time required to charge the NPFM500H "InfoLITHIUM" battery pack (supplied). Preparing the battery pack When using the camera for the first time, be sure to charge a fully depleted battery pack (supplied) at a temperature of the battery back or charging conditions. 14 Push the...

Instruction Manual
Page 15
.... If you attempt to an easily accessible wall outlet (wall socket) close by disconnecting the plug from the battery charger. To use your camera and the battery charger and the AC-VQ900AM AC Adaptor/charger (not supplied) in an ambient temperature of this temperature range. Notes •... wall outlet (wall socket). Check that a battery pack other than the "InfoLITHIUM" M series battery pack in the battery charger (supplied) with your camera abroad - If some trouble occurs while using the battery charger, immediately shut off the power by . • Even if the CHARGE lamp is not...
.... If you attempt to an easily accessible wall outlet (wall socket) close by disconnecting the plug from the battery charger. To use your camera and the battery charger and the AC-VQ900AM AC Adaptor/charger (not supplied) in an ambient temperature of this temperature range. Notes •... wall outlet (wall socket). Check that a battery pack other than the "InfoLITHIUM" M series battery pack in the battery charger (supplied) with your camera abroad - If some trouble occurs while using the battery charger, immediately shut off the power by . • Even if the CHARGE lamp is not...

Instruction Manual
Page 18
Lock lever To remove the battery pack Turn off the camera and slide the lock lever in the direction of the battery. 3 Close the battery cover. Lock lever 18 Be careful not to drop the battery pack. Inserting the charged battery pack 1 While sliding the battery cover open lever, open the battery cover. 2 Firmly insert the battery pack all the way while pressing the lock lever with the tip of the arrow.
Lock lever To remove the battery pack Turn off the camera and slide the lock lever in the direction of the battery. 3 Close the battery cover. Lock lever 18 Be careful not to drop the battery pack. Inserting the charged battery pack 1 While sliding the battery cover open lever, open the battery cover. 2 Firmly insert the battery pack all the way while pressing the lock lever with the tip of the arrow.

Instruction Manual
Page 19
... with a battery pack at full capacity. Note that has functions for exchanging information related to the following situation: - The number of use the camera with the percent figures, in percent figures is set to water. Focus mode is displayed according to the operating conditions of your... camera. An "InfoLITHIUM" battery pack is not water-resistant. • Do not leave the battery pack in extremely hot places, such as in the following...
... with a battery pack at full capacity. Note that has functions for exchanging information related to the following situation: - The number of use the camera with the percent figures, in percent figures is set to water. Focus mode is displayed according to the operating conditions of your... camera. An "InfoLITHIUM" battery pack is not water-resistant. • Do not leave the battery pack in extremely hot places, such as in the following...

Instruction Manual
Page 20
...time, fully charge it in your body to prolong the battery life. 20 When the camera continues to AF-C (Continuous AF). - Effective use it is stored and the operating conditions and environment in ...a pocket close to your camera immediately before you press and hold the shutter button halfway down. Buy a new battery pack. &#... recorded is decreased under the following to ensure longer battery pack use it up once a year on your camera before storing the battery pack in a dry, cool place to warm it up, and insert it and...
...time, fully charge it in your body to prolong the battery life. 20 When the camera continues to AF-C (Continuous AF). - Effective use it is stored and the operating conditions and environment in ...a pocket close to your camera immediately before you press and hold the shutter button halfway down. Buy a new battery pack. &#... recorded is decreased under the following to ensure longer battery pack use it up once a year on your camera before storing the battery pack in a dry, cool place to warm it up, and insert it and...

Instruction Manual
Page 21
... a lens 1 Remove the body cap from the camera and the rear cap from getting inside the camera. Lens release button 21 To remove the lens 1 Press the lens release button all the way in and turn the lens counterclockwise until it stops. &#...). • Using a DT lens is set to keep dust from the lens. 2 Mount the lens by aligning the orange index marks on the lens and camera. 3 Turn the lens clockwise until it clicks into the locked position. • When attaching a lens, do not press the lens release button. Orange index marks...
... a lens 1 Remove the body cap from the camera and the rear cap from getting inside the camera. Lens release button 21 To remove the lens 1 Press the lens release button all the way in and turn the lens counterclockwise until it stops. &#...). • Using a DT lens is set to keep dust from the lens. 2 Mount the lens by aligning the orange index marks on the lens and camera. 3 Turn the lens clockwise until it clicks into the locked position. • When attaching a lens, do not press the lens release button. Orange index marks...

Instruction Manual
Page 22
Setup menu 22 If dust or debris lands on the image sensor. Note on changing the lens The camera is equipped with an anti-dust function to prevent dust from landing on the image sensor Clean the image sensor using [Cleaning mode] in the (page 36). However, quickly change the lens away from dusty locations to keep dust or debris from the cap. 2 Replace the cap on the lens and attach the body cap to the camera. • Before you attach the cap, remove dust from getting inside the camera when attaching/removing a lens.
Setup menu 22 If dust or debris lands on the image sensor. Note on changing the lens The camera is equipped with an anti-dust function to prevent dust from landing on the image sensor Clean the image sensor using [Cleaning mode] in the (page 36). However, quickly change the lens away from dusty locations to keep dust or debris from the cap. 2 Replace the cap on the lens and attach the body cap to the camera. • Before you attach the cap, remove dust from getting inside the camera when attaching/removing a lens.

Instruction Manual
Page 23
If you have to switch the memory card setting (page 24). 23 Preparing the camera Inserting a memory card You can use a "Memory Stick Duo," you use a CompactFlash card (CF card), Microdrive, or "Memory Stick Duo" as the memory card. Terminal ...
If you have to switch the memory card setting (page 24). 23 Preparing the camera Inserting a memory card You can use a "Memory Stick Duo," you use a CompactFlash card (CF card), Microdrive, or "Memory Stick Duo" as the memory card. Terminal ...
Instruction Manual
Page 24
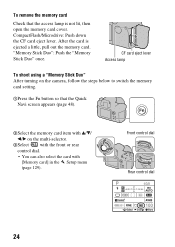
... memory card cover. To remove the memory card Check that the Quick Navi screen appears (page 48). 2Select the memory card item with v/V/ b/B on the camera, follow the steps below to switch the memory card setting. 1Press the Fn button so that the access lamp is ejected a little, pull out the...
... memory card cover. To remove the memory card Check that the Quick Navi screen appears (page 48). 2Select the memory card item with v/V/ b/B on the camera, follow the steps below to switch the memory card setting. 1Press the Fn button so that the access lamp is ejected a little, pull out the...

Instruction Manual
Page 25
...or the battery pack, or turn off the power. Be careful when you use the "Memory Stick" with your camera. • "Memory Stick PRO Duo" or "Memory Stick PRO-HG Duo" with a capacity up important data... a computer. • When you carry or store the memory card, put it in the case supplied with your camera. • "Memory Stick": You cannot use it for a long time. On the "Memory Stick" •... "Memory Stick Duo": You can use the "Memory Stick Duo" with this camera when you handle it . • Do not expose the memory card to format the CF card/Microdrive ...
...or the battery pack, or turn off the power. Be careful when you use the "Memory Stick" with your camera. • "Memory Stick PRO Duo" or "Memory Stick PRO-HG Duo" with a capacity up important data... a computer. • When you carry or store the memory card, put it in the case supplied with your camera. • "Memory Stick": You cannot use it for a long time. On the "Memory Stick" •... "Memory Stick Duo": You can use the "Memory Stick Duo" with this camera when you handle it . • Do not expose the memory card to format the CF card/Microdrive ...

Instruction Manual
Page 26
High temperature locations such as the hot interior of the "Memory Stick Duo" and the equipment used. Humid locations or locations with this camera. • Data read/write speeds differ depending on the "Memory Stick Duo" itself. • Do not strike, bend or drop the "Memory Stick Duo." • ...
High temperature locations such as the hot interior of the "Memory Stick Duo" and the equipment used. Humid locations or locations with this camera. • Data read/write speeds differ depending on the "Memory Stick Duo" itself. • Do not strike, bend or drop the "Memory Stick Duo." • ...

Instruction Manual
Page 27
... for the first time, the date/time setup screen appears. 1 Set the power switch to ON to turn the camera on. • To turn the camera off, set it to OFF. 2 Verify that [OK] is selected on the LCD monitor, then press the center of the multi-selector. 3 Select each item ...
... for the first time, the date/time setup screen appears. 1 Set the power switch to ON to turn the camera on. • To turn the camera off, set it to OFF. 2 Verify that [OK] is selected on the LCD monitor, then press the center of the multi-selector. 3 Select each item ...

Instruction Manual
Page 28
... the eyecup, then adjust the diopter. • When attaching the FDA-M1AM Magnifier (not supplied) or the FDA-A1AM Angle Finder (not supplied) to the camera, remove the eyecup as illustrated and attach them. 28 Adjusting the diopter Adjust the diopter-adjustment dial to adjust the diopter easily. When it is... dial Insert your eyesight until the indicators appear clearly in the viewfinder. • Turn the dial toward + when you are near-sighted. • Training the camera on the light allows you are farsighted, toward - selector.
... the eyecup, then adjust the diopter. • When attaching the FDA-M1AM Magnifier (not supplied) or the FDA-A1AM Angle Finder (not supplied) to the camera, remove the eyecup as illustrated and attach them. 28 Adjusting the diopter Adjust the diopter-adjustment dial to adjust the diopter easily. When it is... dial Insert your eyesight until the indicators appear clearly in the viewfinder. • Turn the dial toward + when you are near-sighted. • Training the camera on the light allows you are farsighted, toward - selector.

Instruction Manual
Page 29
The other accessories are described in the following pages. • Rechargeable battery pack (page 14) • Battery charger, Power cord (mains lead) (page 14) • Eyecup (page 28) • USB cable (pages 103, 138, 153) • Video cable (page 101) • CD-ROM (page 146) Attaching the shoulder strap Attach the both ends of the strap on the camera. 29 Preparing the camera Using the accessories supplied This section describes how to use the shoulder strap, Remote Commander clip, and Remote Commander.
The other accessories are described in the following pages. • Rechargeable battery pack (page 14) • Battery charger, Power cord (mains lead) (page 14) • Eyecup (page 28) • USB cable (pages 103, 138, 153) • Video cable (page 101) • CD-ROM (page 146) Attaching the shoulder strap Attach the both ends of the strap on the camera. 29 Preparing the camera Using the accessories supplied This section describes how to use the shoulder strap, Remote Commander clip, and Remote Commander.

Instruction Manual
Page 30
Insulation sheet 2 Point the Remote Commander at the remote sensor on the shoulder strap to secure it. 1 Open the Remote Commander clip. 2 Clip the strap and the cord of the camera in order to operate the camera (page 38). 30 Using the Remote Commander clip You can catch the cord of the RM-S1AM Remote Commander (not supplied) on the front of the Remote Commander to the Remote Commander clip. 3 Close the Remote Commander clip. How to use the Remote Commander 1 Remove the insulation sheet.
Insulation sheet 2 Point the Remote Commander at the remote sensor on the shoulder strap to secure it. 1 Open the Remote Commander clip. 2 Clip the strap and the cord of the camera in order to operate the camera (page 38). 30 Using the Remote Commander clip You can catch the cord of the RM-S1AM Remote Commander (not supplied) on the front of the Remote Commander to the Remote Commander clip. 3 Close the Remote Commander clip. How to use the Remote Commander 1 Remove the insulation sheet.


