
Instruction Manual
Page 1
Printed on a computer Printing images Digital Single Lens Reflex Camera Instruction Manual DSLR-A900 Preparing the camera Before your operation Shooting images Using the shooting function Using the viewing function Using the menu Viewing images on 70% or more recycled paper using VOC (Volatile Organic Compound)-free vegetable oil based ink. Additional information on this product and answers to frequently asked questions can be found at our Customer Support Website.
Printed on a computer Printing images Digital Single Lens Reflex Camera Instruction Manual DSLR-A900 Preparing the camera Before your operation Shooting images Using the shooting function Using the viewing function Using the menu Viewing images on 70% or more recycled paper using VOC (Volatile Organic Compound)-free vegetable oil based ink. Additional information on this product and answers to frequently asked questions can be found at our Customer Support Website.

Instruction Manual
Page 9
... process and do not affect the images in a cold location, the LCD monitor may be contrary to other materials may cause a fire. When turning on the camera in any way. Unauthorized recording of such materials may become temporarily dark. Notes on using your camera or a memory card, etc. ...possible due to direct sunlight. Warning on the LCD monitor and lens • The LCD monitor is manufactured using this camera. If sunlight is not a malfunction. When you must place the camera under direct sunlight, attach the lens cap. • Images may be copyrighted.
... process and do not affect the images in a cold location, the LCD monitor may be contrary to other materials may cause a fire. When turning on the camera in any way. Unauthorized recording of such materials may become temporarily dark. Notes on using your camera or a memory card, etc. ...possible due to direct sunlight. Warning on the LCD monitor and lens • The LCD monitor is manufactured using this camera. If sunlight is not a malfunction. When you must place the camera under direct sunlight, attach the lens cap. • Images may be copyrighted.

Instruction Manual
Page 10
... Preparing the battery pack 14 Attaching a lens 21 Inserting a memory card 23 Preparing the camera 27 Using the accessories supplied 29 Checking the number of recordable images 33 Cleaning 35 Before your operation Identifying parts and screen indicators 38 Front side 38 Rear ... 41 Display panel 44 Viewfinder 45 Selecting a function/setting 47 Selecting the functions on the Quick Navi screen ..... 48 Shooting images Shooting with the automatic setting 49 Exposure mode 51 Shooting with Program auto 51 Shooting with Aperture priority 53 Shooting with Shutter speed...
... Preparing the battery pack 14 Attaching a lens 21 Inserting a memory card 23 Preparing the camera 27 Using the accessories supplied 29 Checking the number of recordable images 33 Cleaning 35 Before your operation Identifying parts and screen indicators 38 Front side 38 Rear ... 41 Display panel 44 Viewfinder 45 Selecting a function/setting 47 Selecting the functions on the Quick Navi screen ..... 48 Shooting images Shooting with the automatic setting 49 Exposure mode 51 Shooting with Program auto 51 Shooting with Aperture priority 53 Shooting with Shutter speed...

Instruction Manual
Page 11
... Shooting with High Speed Sync (HSS 67 Using a flash equipped with a flash sync terminal cord 68 Adjusting the brightness of the image (Metering, Exposure, Flash compensation 69 Selecting the Metering mode 69 Compensating the exposure 70 Shooting with fixed brightness (AE Lock 71 Adjusting...tones (White balance 75 Auto/Preset white balance 75 Setting the color temperature and a filter effect ......... 76 Custom white balance 77 Image processing 79 Using the D-Range Optimizer 79 Using the Creative Style 80 Selecting the drive mode 83 Shooting single shot 83 Shooting ...
... Shooting with High Speed Sync (HSS 67 Using a flash equipped with a flash sync terminal cord 68 Adjusting the brightness of the image (Metering, Exposure, Flash compensation 69 Selecting the Metering mode 69 Compensating the exposure 70 Shooting with fixed brightness (AE Lock 71 Adjusting...tones (White balance 75 Auto/Preset white balance 75 Setting the color temperature and a filter effect ......... 76 Custom white balance 77 Image processing 79 Using the D-Range Optimizer 79 Using the Creative Style 80 Selecting the drive mode 83 Shooting single shot 83 Shooting ...

Instruction Manual
Page 12
... 2 126 Setup menu 1 127 Setup menu 2 129 Setup menu 3 131 Setup menu 4 134 Viewing images Copying images to your computer 137 on a computer Viewing images on your computer 141 Using the software 145 Printing images Printing images by connecting the camera to a PictBridge compliant printer 152 Others Specifications 157 Troubleshooting 160 Warning messages 167 Precautions 170...
... 2 126 Setup menu 1 127 Setup menu 2 129 Setup menu 3 131 Setup menu 4 134 Viewing images Copying images to your computer 137 on a computer Viewing images on your computer 141 Using the software 145 Printing images Printing images by connecting the camera to a PictBridge compliant printer 152 Others Specifications 157 Troubleshooting 160 Warning messages 167 Precautions 170...

Instruction Manual
Page 19
...InfoLITHIUM" battery pack is a lithium-ion battery pack that can be less than those indicated depending on the conditions of use the camera with a battery pack at full capacity. Available battery packs Use only an NP-FM500H battery pack. Note that the actual numbers...correct under direct sunlight. The power turns on the LCD monitor. Shooting once every 30 seconds. - The number of images that can be recorded The approximate number of images that has functions for exchanging information related to AF-A (Automatic AF). - What is set to the following situation: ...
...InfoLITHIUM" battery pack is a lithium-ion battery pack that can be less than those indicated depending on the conditions of use the camera with a battery pack at full capacity. Available battery packs Use only an NP-FM500H battery pack. Note that the actual numbers...correct under direct sunlight. The power turns on the LCD monitor. Shooting once every 30 seconds. - The number of images that can be recorded The approximate number of images that has functions for exchanging information related to AF-A (Automatic AF). - What is set to the following situation: ...

Instruction Manual
Page 20
... can be used is shorter in cold places. • The measurement method is based on the CIPA standard. (CIPA: Camera & Imaging Products Association) • The battery capacity decreases as time passes. Focus mode is set to focus for a long time, fully charge... battery pack. • The battery life varies according to prolong the battery life. 20 Battery life • The battery life is low. - The camera has been turned on and off many times. - The surrounding temperature is limited. If the battery operating time seems shortened considerably, a probable cause is used...
... can be used is shorter in cold places. • The measurement method is based on the CIPA standard. (CIPA: Camera & Imaging Products Association) • The battery capacity decreases as time passes. Focus mode is set to focus for a long time, fully charge... battery pack. • The battery life varies according to prolong the battery life. 20 Battery life • The battery life is low. - The camera has been turned on and off many times. - The surrounding temperature is limited. If the battery operating time seems shortened considerably, a probable cause is used...

Instruction Manual
Page 22
If dust or debris lands on the image sensor Clean the image sensor using [Cleaning mode] in the (page 36). Note on changing the lens The camera is equipped with an anti-dust function to prevent dust from the cap. Setup menu 22 2 Replace the cap on the lens and attach the body cap to the camera. • Before you attach the cap, remove dust from landing on the image sensor. However, quickly change the lens away from dusty locations to keep dust or debris from getting inside the camera when attaching/removing a lens.
If dust or debris lands on the image sensor Clean the image sensor using [Cleaning mode] in the (page 36). Note on changing the lens The camera is equipped with an anti-dust function to prevent dust from the cap. Setup menu 22 2 Replace the cap on the lens and attach the body cap to the camera. • Before you attach the cap, remove dust from landing on the image sensor. However, quickly change the lens away from dusty locations to keep dust or debris from getting inside the camera when attaching/removing a lens.

Instruction Manual
Page 33
...211 16GB 2370 1580 687 449 333 627 423 33 Replace the memory card with this camera. The number of images that can be recorded on a memory card The tables show the approximate number of images that can be recorded (should you continue to shoot using the current settings) is ...correct position. The values may vary depending on the shooting conditions. Checking the number of recordable images Preparing the camera Once you insert a memory card into the camera and set the power switch to ON, the number of images that can be recorded on a memory card formatted with another one, or delete...
...211 16GB 2370 1580 687 449 333 627 423 33 Replace the memory card with this camera. The number of images that can be recorded on a memory card The tables show the approximate number of images that can be recorded (should you continue to shoot using the current settings) is ...correct position. The values may vary depending on the shooting conditions. Checking the number of recordable images Preparing the camera Once you insert a memory card into the camera and set the power switch to ON, the number of images that can be recorded on a memory card formatted with another one, or delete...

Instruction Manual
Page 34
However, if you can record more images than the numbers shown in the tables above. "Memory Stick Duo" Capacity Quality 1GB 2GB 4GB 8GB 16GB Standard 145 294 582 1169 2369 Fine 97 196 388 779 1579 Extra fine 42 85 168 339 687 cRAW & JPEG 27 55 110 221 449 RAW & JPEG 20 41 81 164 333 cRAW 38 77 154 309 627 RAW 26 52 103 208 423 * When [Aspect ratio] is set to [16:9], you record an image as a RAW image, the number is the same as that of the [3:2] aspect ratio. 34
However, if you can record more images than the numbers shown in the tables above. "Memory Stick Duo" Capacity Quality 1GB 2GB 4GB 8GB 16GB Standard 145 294 582 1169 2369 Fine 97 196 388 779 1579 Extra fine 42 85 168 339 687 cRAW & JPEG 27 55 110 221 449 RAW & JPEG 20 41 81 164 333 cRAW 38 77 154 309 627 RAW 26 52 103 208 423 * When [Aspect ratio] is set to [16:9], you record an image as a RAW image, the number is the same as that of the [3:2] aspect ratio. 34

Instruction Manual
Page 35
... spray lens cleaning solution directly onto the lens surface. • Do not touch the inside of the camera, such as thinner, or benzine. Cleaning the camera surface Clean the camera surface with a soft cloth slightly moistened with water, then wipe the surface with lens cleaning solution. Wipe...sunscreen or insecticide, etc. • Do not touch the camera with the above on the mirror or around the mirror may appear on the photo image. If dust lands on the image sensor, it using a blower. Preparing the camera Cleaning Cleaning the LCD monitor Wipe the screen surface with ...
... spray lens cleaning solution directly onto the lens surface. • Do not touch the inside of the camera, such as thinner, or benzine. Cleaning the camera surface Clean the camera surface with a soft cloth slightly moistened with water, then wipe the surface with lens cleaning solution. Wipe...sunscreen or insecticide, etc. • Do not touch the camera with the above on the mirror or around the mirror may appear on the photo image. If dust lands on the image sensor, it using a blower. Preparing the camera Cleaning Cleaning the LCD monitor Wipe the screen surface with ...

Instruction Manual
Page 36
... function. The use of the multi-selector. The message "After cleaning, turn camera off. The cleaning should be performed only when the battery level is (three remaining battery icons) or more. After the image sensor vibrates for a short time, the mirror in front is lifted. 5 ...21). 36 Continue?" appears. 4 Select [OK] with b/B on the multi-selector. Cleaning the image sensor If dust or debris enters the camera and lands on the image sensor, it may appear on the photo image, depending on the shooting environment. MENU button 3 Select [Cleaning mode] with v/V on the multi...
... function. The use of the multi-selector. The message "After cleaning, turn camera off. The cleaning should be performed only when the battery level is (three remaining battery icons) or more. After the image sensor vibrates for a short time, the mirror in front is lifted. 5 ...21). 36 Continue?" appears. 4 Select [OK] with b/B on the multi-selector. Cleaning the image sensor If dust or debris enters the camera and lands on the image sensor, it may appear on the photo image, depending on the shooting environment. MENU button 3 Select [Cleaning mode] with v/V on the multi...

Instruction Manual
Page 37
... resettling in the camera. • When cleaning the image sensor, do not put the tip of the blower. Note • The camera starts beeping if the battery pack is discharged during cleaning. Complete the cleaning quickly. • Hold the camera's face downward to clean the image sensor surface and ...the surrounding area. • Do not touch the image sensor with the tip of a blower into the cavity beyond the lens mount. 7 Attach...
... resettling in the camera. • When cleaning the image sensor, do not put the tip of the blower. Note • The camera starts beeping if the battery pack is discharged during cleaning. Complete the cleaning quickly. • Hold the camera's face downward to clean the image sensor surface and ...the surrounding area. • Do not touch the image sensor with the tip of a blower into the cavity beyond the lens mount. 7 Attach...

Instruction Manual
Page 39
... (99) G (Playback) button (92) H LCD monitor (41) I For shooting: C (Custom) button (109) For viewing: (Histogram) button (93) J For shooting: Fn (Function) button (48) For viewing: (Image rotation) button (94) K Diopter-adjustment dial (28) L For shooting: AEL (AE lock) button (71)/SLOW SYNC button (67) For viewing: (Index) button (96) M Metering mode...
... (99) G (Playback) button (92) H LCD monitor (41) I For shooting: C (Custom) button (109) For viewing: (Histogram) button (93) J For shooting: Fn (Function) button (48) For viewing: (Image rotation) button (94) K Diopter-adjustment dial (28) L For shooting: AEL (AE lock) button (71)/SLOW SYNC button (67) For viewing: (Index) button (96) M Metering mode...

Instruction Manual
Page 42
...)/APS-C size (134)/Aspect ratio (107) Memory card (24) Remaining number of recordable images (33) DISP button Detailed display Enlarged display No display • You can set the display so as not to switch between the enlarged display and ...the detailed display. Display AWB 5500K M1 Indication White balance (Auto, Preset, Color temperature, Color filter, Custom) (75) D Display 90% Indication Battery remaining (19) Image quality (108) 100 Switching the recording information display Press the DISP button to be rotated with [Rec.info.disp.] in the Custom menu (page 120...
...)/APS-C size (134)/Aspect ratio (107) Memory card (24) Remaining number of recordable images (33) DISP button Detailed display Enlarged display No display • You can set the display so as not to switch between the enlarged display and ...the detailed display. Display AWB 5500K M1 Indication White balance (Auto, Preset, Color temperature, Color filter, Custom) (75) D Display 90% Indication Battery remaining (19) Image quality (108) 100 Switching the recording information display Press the DISP button to be rotated with [Rec.info.disp.] in the Custom menu (page 120...
Instruction Manual
Page 44
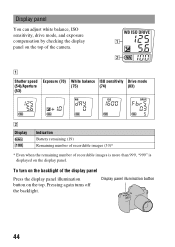
...panel You can adjust white balance, ISO sensitivity, drive mode, and exposure compensation by checking the display panel on the top of recordable images is more than 999, "999" is displayed on the top. Display panel illumination button 44 A Shutter speed Exposure (70) White balance... mode (54)/Aperture (75) (74) (83) (53) B Display [100] Indication Battery remaining (19) Remaining number of recordable images (33)* * Even when the remaining number of the camera. To turn on the backlight of the display panel Press the display panel illumination button on the display panel.
...panel You can adjust white balance, ISO sensitivity, drive mode, and exposure compensation by checking the display panel on the top of recordable images is more than 999, "999" is displayed on the top. Display panel illumination button 44 A Shutter speed Exposure (70) White balance... mode (54)/Aperture (75) (74) (83) (53) B Display [100] Indication Battery remaining (19) Remaining number of recordable images (33)* * Even when the remaining number of the camera. To turn on the backlight of the display panel Press the display panel illumination button on the display panel.
Instruction Manual
Page 49
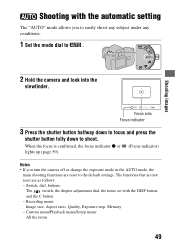
... focus indicator z or (Focus indicator) lights up (page 59). Recording menu: Image size, Aspect ratio, Quality, Exposure step, Memory - Shooting images Shooting with the DISP button, and the C button - Shooting images 2 Hold the camera and look into the viewfinder. Notes • If you to easily shoot any subject... dial, buttons: The switch, the diopter-adjustment dial, the items set with the automatic setting The "AUTO" mode allows you turn the camera off or change the exposure mode in the AUTO mode, the main shooting functions are as follows: - Custom menu/Playback menu/Setup menu:...
... focus indicator z or (Focus indicator) lights up (page 59). Recording menu: Image size, Aspect ratio, Quality, Exposure step, Memory - Shooting images Shooting with the DISP button, and the C button - Shooting images 2 Hold the camera and look into the viewfinder. Notes • If you to easily shoot any subject... dial, buttons: The switch, the diopter-adjustment dial, the items set with the automatic setting The "AUTO" mode allows you turn the camera off or change the exposure mode in the AUTO mode, the main shooting functions are as follows: - Custom menu/Playback menu/Setup menu:...

Instruction Manual
Page 51
... subject with Program auto 1 Set the mode dial to P. 2 Set the shooting functions to shoot after adjusting the shutter speed manually. This camera has the following four modes. Shooting images Exposure mode If you reset the settings. 51 Shoots by controlling the blur of the background. The number positions (1/2/3) are used to...
... subject with Program auto 1 Set the mode dial to P. 2 Set the shooting functions to shoot after adjusting the shutter speed manually. This camera has the following four modes. Shooting images Exposure mode If you reset the settings. 51 Shoots by controlling the blur of the background. The number positions (1/2/3) are used to...

Instruction Manual
Page 53
... selected aperture value, the shutter speed flashes. You can check the blurring of an image with the preview button (page 89). • When the camera judges that the proper exposure is then in -focus range becomes wider. The whole image is automatically adjusted. number) with the front or rear control dial. • You...
... selected aperture value, the shutter speed flashes. You can check the blurring of an image with the preview button (page 89). • When the camera judges that the proper exposure is then in -focus range becomes wider. The whole image is automatically adjusted. number) with the front or rear control dial. • You...

Instruction Manual
Page 54
At a lower shutter speed, the subject appears as if it appears as if frozen on the image. Aperture value is automatically adjusted. Shutter speed Notes • The (Camera shake warning) indicator is not indicated in 1/3 EV increments. You cannot do any further shooting during the reduction. 54 High shutter speed Slow shutter speed...
At a lower shutter speed, the subject appears as if it appears as if frozen on the image. Aperture value is automatically adjusted. Shutter speed Notes • The (Camera shake warning) indicator is not indicated in 1/3 EV increments. You cannot do any further shooting during the reduction. 54 High shutter speed Slow shutter speed...


