
User's Guide
Page 1
Before your operation Using the shooting functions Using the viewing functions Using the menu Using your camera. Digital Single Lens Reflex Camera User's Guide/ Troubleshooting "Read This First" (separate volume) Explains the set-up and basic operations for shooting/ playback with your computer Printing images Troubleshooting Others Index
Before your operation Using the shooting functions Using the viewing functions Using the menu Using your camera. Digital Single Lens Reflex Camera User's Guide/ Troubleshooting "Read This First" (separate volume) Explains the set-up and basic operations for shooting/ playback with your computer Printing images Troubleshooting Others Index
User's Guide
Page 4
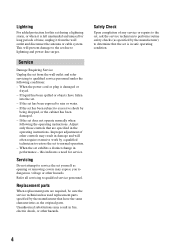
... added protection for this indicates a need for long periods of time, unplug it is left unattended and unused for service. When the set has been exposed to dangerous voltage or other hazards. Replacement parts When replacement parts are required, be sure the service technician has used replacement parts specified by a qualified technician to normal operation. - If the set exhibits a distinct change in fire, electric shock, or other controls...
... added protection for this indicates a need for long periods of time, unplug it is left unattended and unused for service. When the set has been exposed to dangerous voltage or other hazards. Replacement parts When replacement parts are required, be sure the service technician has used replacement parts specified by a qualified technician to normal operation. - If the set exhibits a distinct change in fire, electric shock, or other controls...
User's Guide
Page 9
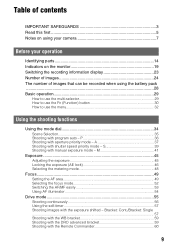
... (Function) button 30 How to use the menu 32 Using the shooting functions Using the mode dial 34 Scene Selection 35 Shooting with the Remote Commander 60 9 M 41 Exposure 45 Adjusting the exposure 45 Locking the exposure (AE lock 46 Selecting the metering mode 48 Focus...49 Setting the AF area 49 Selecting the focus mode 52 Switching the AF/MF easily 53 Using AF illuminator 54 Drive mode 55 Shooting continuously 56 Using the self-timer 57 Shooting images with manual exposure mode - S 39 Shooting...
... (Function) button 30 How to use the menu 32 Using the shooting functions Using the mode dial 34 Scene Selection 35 Shooting with the Remote Commander 60 9 M 41 Exposure 45 Adjusting the exposure 45 Locking the exposure (AE lock 46 Selecting the metering mode 48 Focus...49 Setting the AF area 49 Selecting the focus mode 52 Switching the AF/MF easily 53 Using AF illuminator 54 Drive mode 55 Shooting continuously 56 Using the self-timer 57 Shooting images with manual exposure mode - S 39 Shooting...

User's Guide
Page 22
... balance (Auto, Preset, Color temperature, Color filter, Custom) (61) D-range optimizer (66) Date of recording File number/total number of images Image size (94) Battery remaining (t step 1 in "Read This First") Playback image (85) B Display P A S M Indication Histogram (85) Mode dial (34) 1/125 F3.5 ISO100 -0.3 -0.3 35mm 22 Shutter speed (39) Aperture (37) ISO sensitivity (64) EV scale (45) Flash-compensation (75) Metering mode (48) Focal length (8) LCD monitor (Histogram display) Display Indication Creative Style (67) A Display 100-0003 DPOF3 Indication Memory card (123) Folder...
... balance (Auto, Preset, Color temperature, Color filter, Custom) (61) D-range optimizer (66) Date of recording File number/total number of images Image size (94) Battery remaining (t step 1 in "Read This First") Playback image (85) B Display P A S M Indication Histogram (85) Mode dial (34) 1/125 F3.5 ISO100 -0.3 -0.3 35mm 22 Shutter speed (39) Aperture (37) ISO sensitivity (64) EV scale (45) Flash-compensation (75) Metering mode (48) Focal length (8) LCD monitor (Histogram display) Display Indication Creative Style (67) A Display 100-0003 DPOF3 Indication Memory card (123) Folder...

User's Guide
Page 36
... auto mode In both auto adjustment and program auto mode, the shutter speed and aperture are two methods for the program shift function. The aperture value is recommended. There are automatically adjusted. P In program auto mode, the camera automatically adjusts the shutter speed and the aperture according to prevent the image from blurring. Night portrait Shoots portraits in the auto adjustment mode (mode dial: AUTO). You can temporarily change other settings. When the camera is in program auto mode and the flash...
... auto mode In both auto adjustment and program auto mode, the shutter speed and aperture are two methods for the program shift function. The aperture value is recommended. There are automatically adjusted. P In program auto mode, the camera automatically adjusts the shutter speed and the aperture according to prevent the image from blurring. Night portrait Shoots portraits in the auto adjustment mode (mode dial: AUTO). You can temporarily change other settings. When the camera is in program auto mode and the flash...

User's Guide
Page 58
..., five shots Exposure compensation 1.0 Flash bracket 0.7 steps, three shots Flash compensation -1.0 Shown in every shooting. Shoots five images shot by shot with the exposure shifted by 0.5 of a step. The focal point is fixed only in continuous bracket shooting when the focus mode is set at the first shot in flash bracket shooting. 58 You can change the aperture by pressing and holding the AEL (AE Lock) button while taking a picture. * Ambient light: Any light other than the flash light that...
..., five shots Exposure compensation 1.0 Flash bracket 0.7 steps, three shots Flash compensation -1.0 Shown in every shooting. Shoots five images shot by shot with the exposure shifted by 0.5 of a step. The focal point is fixed only in continuous bracket shooting when the focus mode is set at the first shot in flash bracket shooting. 58 You can change the aperture by pressing and holding the AEL (AE Lock) button while taking a picture. * Ambient light: Any light other than the flash light that...
User's Guide
Page 64
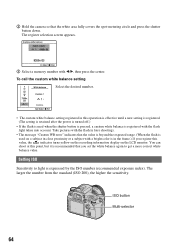
... or a subject with a bright color is in this value, the indicator turns yellow on the recording information display on the LCD monitor. Setting ISO Sensitivity to light is recommended that you register this operation is effective until a new setting is registered. (The setting is retained after the power is turned off.) • If the flash is used when the shutter button is pressed, a custom white balance is registered with b/B, then...
... or a subject with a bright color is in this value, the indicator turns yellow on the recording information display on the LCD monitor. Setting ISO Sensitivity to light is recommended that you register this operation is effective until a new setting is registered. (The setting is retained after the power is turned off.) • If the flash is used when the shutter button is pressed, a custom white balance is registered with b/B, then...
User's Guide
Page 67
.... To take pictures with four unswitchable styles ("Standard", "Vivid", "Neutral", and "Adobe RGB") and three styleboxes, to the stylebox. In program auto, aperture priority, shutter speed priority, or manual exposure mode: Standard - You can assign image styles of "Image Data Converter SR." • When DRO advanced bracket shooting is selected, the setting here is temporarily deactivated. t See "Basic operation" (page 69). Using a Creative Style This camera is...
.... To take pictures with four unswitchable styles ("Standard", "Vivid", "Neutral", and "Adobe RGB") and three styleboxes, to the stylebox. In program auto, aperture priority, shutter speed priority, or manual exposure mode: Standard - You can assign image styles of "Image Data Converter SR." • When DRO advanced bracket shooting is selected, the setting here is temporarily deactivated. t See "Basic operation" (page 69). Using a Creative Style This camera is...

User's Guide
Page 76
z Exposure compensation and flash compensation Exposure compensation changes the shutter speed, aperture, and ISO sensitivity (when [AUTO] is also changed*. On the other hand, flash compensation only changes the amount of flash light, thereby controlling the relative effect of flash light, if the subject is displayed in step 2, select the desired value with the multi-selector. You can set this exposure step to 1/2 EV increments with [Exposure step] in the Recording menu (page 98...
z Exposure compensation and flash compensation Exposure compensation changes the shutter speed, aperture, and ISO sensitivity (when [AUTO] is also changed*. On the other hand, flash compensation only changes the amount of flash light, thereby controlling the relative effect of flash light, if the subject is displayed in step 2, select the desired value with the multi-selector. You can set this exposure step to 1/2 EV increments with [Exposure step] in the Recording menu (page 98...
User's Guide
Page 90
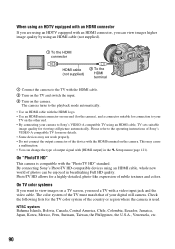
...; By connecting your camera to Sony's VIDEO-A compatible TV using an HDMI cable, TV sets suitable image quality for more details. • Some devices may cause a malfunction. • You can change the type of your TV on the camera. Please refer to the operating instructions of Sony's VIDEO-A compatible TV for viewing still picture automatically. PhotoTV HD allows for the TV color system of subtle textures and colors. The color system...
...; By connecting your camera to Sony's VIDEO-A compatible TV using an HDMI cable, TV sets suitable image quality for more details. • Some devices may cause a malfunction. • You can change the type of your TV on the camera. Please refer to the operating instructions of Sony's VIDEO-A compatible TV for viewing still picture automatically. PhotoTV HD allows for the TV color system of subtle textures and colors. The color system...
User's Guide
Page 96
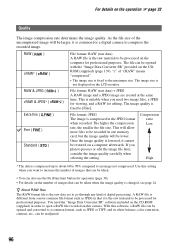
..., it is the raw data yet to increase the number of images that can be taken. • You can also use the Fn (Function) button for a digital camera to be recorded in order to the maximum size. With this setting when you need the "Image Data Converter SR" software included on the CDROM (supplied) (page 139). RAW ( ) cRAW* ( ) File format: RAW (raw data) A RAW file is changed, see page 24...
..., it is the raw data yet to increase the number of images that can be taken. • You can also use the Fn (Function) button for a digital camera to be recorded in order to the maximum size. With this setting when you need the "Image Data Converter SR" software included on the CDROM (supplied) (page 139). RAW ( ) cRAW* ( ) File format: RAW (raw data) A RAW file is changed, see page 24...
User's Guide
Page 109
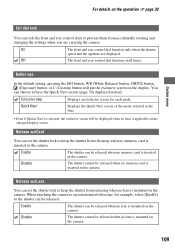
... the shutter speed and the aperture are carrying the camera. Off The front and rear control dial function at the time. • Even if [Quick Navi] is selected, the exclusive screen will put the exclusive screen on the camera. 109 In the default setting, pressing the ISO button, WB (White Balance) button, DRIVE button, (Exposure) button, or C (Custom) button will be released when no memory card is mounted on the display. You can set the shutter lock to...
... the shutter speed and the aperture are carrying the camera. Off The front and rear control dial function at the time. • Even if [Quick Navi] is selected, the exclusive screen will put the exclusive screen on the camera. 109 In the default setting, pressing the ISO button, WB (White Balance) button, DRIVE button, (Exposure) button, or C (Custom) button will be released when no memory card is mounted on the display. You can set the shutter lock to...
User's Guide
Page 123
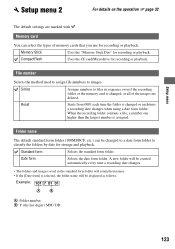
... use for storage and playback. A new folder will be created automatically every time a recording date changes. • The folders and images saved in sequence even if the recording folder or the memory card is changed to a date form folder to classify the folders by date for recording or playback. Folder name The default standard form folder (100MSDCF, etc.) can select the types of the images are marked with . Setup menu Setup menu 2 For details on the operation 1 page 32 The default settings...
... use for storage and playback. A new folder will be created automatically every time a recording date changes. • The folders and images saved in sequence even if the recording folder or the memory card is changed to a date form folder to classify the folders by date for recording or playback. Folder name The default standard form folder (100MSDCF, etc.) can select the types of the images are marked with . Setup menu Setup menu 2 For details on the operation 1 page 32 The default settings...
User's Guide
Page 125
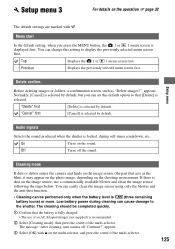
... deleting images or folders, a confirmation screen, such as the film), it may appear on the photo image, depending on the operation 1 page 32 The default settings are marked with v on the image sensor, use of an AC Adaptor/charger (not supplied) is selected by default. Low battery power during self-timer countdown, etc. Continue?" Top Displays the 1 or 1 menu screen first. Setup menu Delete confirm. Normally, [Cancel] is selected by default, but you press the MENU button...
... deleting images or folders, a confirmation screen, such as the film), it may appear on the photo image, depending on the operation 1 page 32 The default settings are marked with v on the image sensor, use of an AC Adaptor/charger (not supplied) is selected by default. Low battery power during self-timer countdown, etc. Continue?" Top Displays the 1 or 1 menu screen first. Setup menu Delete confirm. Normally, [Cancel] is selected by default, but you press the MENU button...
User's Guide
Page 133
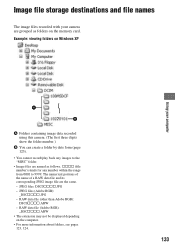
... extension may not be displayed depending on the memory card. RAW data file (other than Adobe RGB): DSC0ssss.ARW - ssss (file number) stands for any images to 9999. Image file storage destinations and file names The image files recorded with your computer A Folders containing image data recorded using this camera. (The first three digits show the folder number.) B You can create a folder by date form (page 123). • You cannot record/play back any number within the range...
... extension may not be displayed depending on the memory card. RAW data file (other than Adobe RGB): DSC0ssss.ARW - ssss (file number) stands for any images to 9999. Image file storage destinations and file names The image files recorded with your computer A Folders containing image data recorded using this camera. (The first three digits show the folder number.) B You can create a folder by date form (page 123). • You cannot record/play back any number within the range...
User's Guide
Page 136
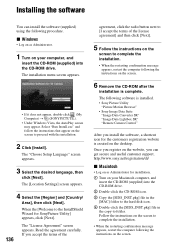
... you can install the software (supplied) using the following the instructions on your computer, and insert the CD-ROM (supplied) into the CD-ROM drive. 2 Double-click the CD-ROM icon. 3 Copy the [SIDS_INST.pkg] file in the [MAC] folder to the hard disk icon. 4 Double-click the [SIDS_INST.pkg] file in the copy-to the InstallShield Wizard for installation. 1 Turn on the screen. 6 Remove the CD...
... you can install the software (supplied) using the following the instructions on your computer, and insert the CD-ROM (supplied) into the CD-ROM drive. 2 Double-click the CD-ROM icon. 3 Copy the [SIDS_INST.pkg] file in the [MAC] folder to the hard disk icon. 4 Double-click the [SIDS_INST.pkg] file in the copy-to the InstallShield Wizard for installation. 1 Turn on the screen. 6 Remove the CD...
User's Guide
Page 137
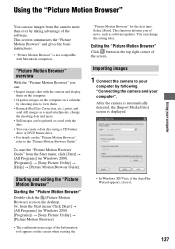
... ever by following "Connecting the camera and your computer". This function informs you can: • Import images shot with the camera and display them on the computer. • Organize images on the computer on a calendar by shooting date to view them. • Retouch (Red Eye Correction, etc.), print, and send still images as software updates. Exiting the "Picture Motion Browser" Click button in Windows 2000, [Programs]) t [Sony Picture Utility] t [Help] t [Picture Motion Browser Guide]. This section...
... ever by following "Connecting the camera and your computer". This function informs you can: • Import images shot with the camera and display them on the computer. • Organize images on the computer on a calendar by shooting date to view them. • Retouch (Red Eye Correction, etc.), print, and send still images as software updates. Exiting the "Picture Motion Browser" Click button in Windows 2000, [Programs]) t [Sony Picture Utility] t [Help] t [Picture Motion Browser Guide]. This section...

User's Guide
Page 142
... "Remote Camera Control" When the camera is set to a PC, you can also save recorded images directly on the camera from the [Application] folder. The USB mode is connected to [Remote PC]. 4 Turn the camera off. 142 Setting the camera MENU button Multiselector 1 Press MENU to the Help. To start up Double-click [Remote Camera Control] in the [Sony Image Data Suite] folder from the PC. You can use "Remote Camera Control" to take pictures or change settings on the PC. • For details, refer to display the menu. 2 Select (Setup) t [2] t [USB connection] with...
... "Remote Camera Control" When the camera is set to a PC, you can also save recorded images directly on the camera from the [Application] folder. The USB mode is connected to [Remote PC]. 4 Turn the camera off. 142 Setting the camera MENU button Multiselector 1 Press MENU to the Help. To start up Double-click [Remote Camera Control] in the [Sony Image Data Suite] folder from the PC. You can use "Remote Camera Control" to take pictures or change settings on the PC. • For details, refer to display the menu. 2 Select (Setup) t [2] t [USB connection] with...
User's Guide
Page 149
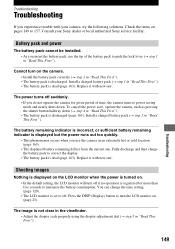
... and then charge the battery pack to turn the LCD monitor on the camera. • Install the battery pack correctly (t step 1 in "Read This First"). 149 Troubleshooting To cancel the power save, operate the camera, such as pressing the shutter button halfway down . You can change the time setting (page 120). • The LCD monitor is dead (page 163). Shooting images Nothing is displayed on the LCD monitor when the power is turned on...
... and then charge the battery pack to turn the LCD monitor on the camera. • Install the battery pack correctly (t step 1 in "Read This First"). 149 Troubleshooting To cancel the power save, operate the camera, such as pressing the shutter button halfway down . You can change the time setting (page 120). • The LCD monitor is dead (page 163). Shooting images Nothing is displayed on the LCD monitor when the power is turned on...

User's Guide
Page 156
... the recording data cannot be superimposed in the index mode depending on the printer. Cannot print the image at a time. • This is printed on the image when you change depending on the date-inserted part of the image. • Images that of either the camera (page 147) or the printer. Cannot operate the camera after the printer has been connected to whether the printer provides these functions. The message "Set date and time?" Others The lens...
... the recording data cannot be superimposed in the index mode depending on the printer. Cannot print the image at a time. • This is printed on the image when you change depending on the date-inserted part of the image. • Images that of either the camera (page 147) or the printer. Cannot operate the camera after the printer has been connected to whether the printer provides these functions. The message "Set date and time?" Others The lens...

