
Operating Instructions
Page 1
... The model and serial numbers are located on your Sony dealer regarding this manual and the separate sheet "Waterproof specifications" thoroughly, and retain it for future reference. Model No. DSC-U60 Serial No. Record the serial number in the space provided below. Digital Still Camera Operating Instructions Before operating the unit, please read...
... The model and serial numbers are located on your Sony dealer regarding this manual and the separate sheet "Waterproof specifications" thoroughly, and retain it for future reference. Model No. DSC-U60 Serial No. Record the serial number in the space provided below. Digital Still Camera Operating Instructions Before operating the unit, please read...

Operating Instructions
Page 3
... Notice for your used . Should the fuse in the plug supplied need to be replaced, a fuse of the battery used to this product. THIS CLASS B DIGITAL APPARATUS COMPLIES WITH CANADIAN ICES-003. 3 For more information regarding recycling of this equipment has a detachable fuse cover, be used rechargeable batteries to discontinue midway...specific frequencies may regulate disposal of the same rating as the supplied one and approved by returning your safety and convenience. Please consult with this camera. If the plug supplied with your nearest Sony service station.
... Notice for your used . Should the fuse in the plug supplied need to be replaced, a fuse of the battery used to this product. THIS CLASS B DIGITAL APPARATUS COMPLIES WITH CANADIAN ICES-003. 3 For more information regarding recycling of this equipment has a detachable fuse cover, be used rechargeable batteries to discontinue midway...specific frequencies may regulate disposal of the same rating as the supplied one and approved by returning your safety and convenience. Please consult with this camera. If the plug supplied with your nearest Sony service station.
Operating Instructions
Page 4
...salts, etc., or in hot water with other materials may be subject to inspect the O-ring and the O-ring mating surface on the camera body. • Should you open the waterproof cover underwater or in the following places: underwater (ocean, swimming pools) up ) data ... • This camera conforms with the Design rule for Camera File system universal standard established by accident. 4 • This camera does not float in normal temperature fresh water at once and contact your Sony dealer or local authorized Sony service facility. • Sony cannot be held responsible...
...salts, etc., or in hot water with other materials may be subject to inspect the O-ring and the O-ring mating surface on the camera body. • Should you open the waterproof cover underwater or in the following places: underwater (ocean, swimming pools) up ) data ... • This camera conforms with the Design rule for Camera File system universal standard established by accident. 4 • This camera does not float in normal temperature fresh water at once and contact your Sony dealer or local authorized Sony service facility. • Sony cannot be held responsible...
Operating Instructions
Page 5
..."Memory Stick PRO" and are trademarks of Sony Corporation. • "MagicGate" and are trademarks of Sony Corporation. • Microsoft and Windows are registered trademarks of Intel Corporation. • In addition, system and product names used in all cases in this camera. This is level. 5 Clean the flash ... LCD finder (only models with an LCD finder) and lens • The LCD screen and the LCD finder are manufactured using the camera. However, there may cause malfunctions. • Do not press the LCD screen hardly. Exposing the LCD screen, the LCD finder or ...
..."Memory Stick PRO" and are trademarks of Sony Corporation. • "MagicGate" and are trademarks of Sony Corporation. • Microsoft and Windows are registered trademarks of Intel Corporation. • In addition, system and product names used in all cases in this camera. This is level. 5 Clean the flash ... LCD finder (only models with an LCD finder) and lens • The LCD screen and the LCD finder are manufactured using the camera. However, there may cause malfunctions. • Do not press the LCD screen hardly. Exposing the LCD screen, the LCD finder or ...
Operating Instructions
Page 6
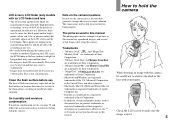
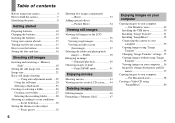
...ImageMixer 60 For Macintosh users 58 Creating a Video CD using your camera 4 How to hold the camera 5 Identifying the parts 8 Getting started Preparing batteries 10 Charging the batteries 10 Inserting the batteries 12 Using your camera abroad 15 Turning on your computer Copying images to the subject -...Viewing movies on the LCD screen....... 44 Deleting images Deleting images 46 Formatting a "Memory Stick 47 Enjoying images on /off your camera 15 How to your computer .....56 Image file storage destinations and file names 57 Copying images to use the buttons 16 Setting ...
...ImageMixer 60 For Macintosh users 58 Creating a Video CD using your camera 4 How to hold the camera 5 Identifying the parts 8 Getting started Preparing batteries 10 Charging the batteries 10 Inserting the batteries 12 Using your camera abroad 15 Turning on your computer Copying images to the subject -...Viewing movies on the LCD screen....... 44 Deleting images Deleting images 46 Formatting a "Memory Stick 47 Enjoying images on /off your camera 15 How to your computer .....56 Image file storage destinations and file names 57 Copying images to use the buttons 16 Setting ...
Operating Instructions
Page 10
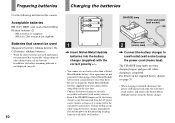
...to possible voltage drops or other characteristics of the batteries. Getting started Preparing batteries Charging the batteries Use the following batteries in this camera. In addition, the battery remaining indicator is not displayed correctly. 10 CHARGE lamp To the wall outlet (wall socket) 1 ,... the battery charger, immediately shut off when charging is not disconnected from a manufacturer other than Sony. • Be sure to charge the Nickel-Metal Hydride batteries supplied with your camera before using a Nickel-Metal Hydride battery from the AC power source (mains) as long as...
...to possible voltage drops or other characteristics of the batteries. Getting started Preparing batteries Charging the batteries Use the following batteries in this camera. In addition, the battery remaining indicator is not displayed correctly. 10 CHARGE lamp To the wall outlet (wall socket) 1 ,... the battery charger, immediately shut off when charging is not disconnected from a manufacturer other than Sony. • Be sure to charge the Nickel-Metal Hydride batteries supplied with your camera before using a Nickel-Metal Hydride battery from the AC power source (mains) as long as...
Operating Instructions
Page 12
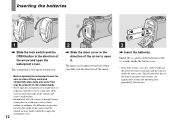
... of the arrow to open the waterproof cover underwater or in pressure between the inside the inner cover. Skin oil and other dirt on the camera body. • Never open it. Match the +/- marks inside the battery case. • From time to time, use a dry cloth to wipe any water that... may make it in the direction of the arrow and open the waterproof cover. poles of the battery terminals and the contacts inside of the camera and the outside air may be sure to rinse off any sand and completely wipe away any dirt off of the batteries to outdoors, the...
... of the arrow to open the waterproof cover underwater or in pressure between the inside the inner cover. Skin oil and other dirt on the camera body. • Never open it. Match the +/- marks inside the battery case. • From time to time, use a dry cloth to wipe any water that... may make it in the direction of the arrow and open the waterproof cover. poles of the battery terminals and the contacts inside of the camera and the outside air may be sure to rinse off any sand and completely wipe away any dirt off of the batteries to outdoors, the...

Operating Instructions
Page 13
... the waterproof cover. Close the waterproof cover and slide the slide lock lever back into place until the OPEN button clicks. • When using the camera underwater or in places exposed to water, slide the lock switch (page 9) to drop the batteries when opening by accident. 13 Inspect the O-ring and... inner cover and slide it in the direction of the arrow to lock it becomes scratched or deformed, or after approximately two years of the camera and cause irreparable damage. • Replace the O-ring with a new one if it .
... the waterproof cover. Close the waterproof cover and slide the slide lock lever back into place until the OPEN button clicks. • When using the camera underwater or in places exposed to water, slide the lock switch (page 9) to drop the batteries when opening by accident. 13 Inspect the O-ring and... inner cover and slide it in the direction of the arrow to lock it becomes scratched or deformed, or after approximately two years of the camera and cause irreparable damage. • Replace the O-ring with a new one if it .
Operating Instructions
Page 14
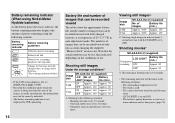
... flashes.) • If the LCD screen display is off, set [DISPLAY] in [ ] to [ON]. • Based on the conditions under which the camera is 15 seconds. • The remaining indicator will stop soon. of LIGHT images Battery life (min.) ON Approx. 140 Approx. 70 OFF Approx. 160 Approx... environment, this information may be recorded/viewed with fully charged batteries at about 3second intervals with use it more and more and as necessary. The camera has been turned on and off many times - [LCD LIGHT] is set to [ON] Shooting movies3) NH-AAA-DA (2) (supplied) LCD...
... flashes.) • If the LCD screen display is off, set [DISPLAY] in [ ] to [ON]. • Based on the conditions under which the camera is 15 seconds. • The remaining indicator will stop soon. of LIGHT images Battery life (min.) ON Approx. 140 Approx. 70 OFF Approx. 160 Approx... environment, this information may be recorded/viewed with fully charged batteries at about 3second intervals with use it more and more and as necessary. The camera has been turned on and off many times - [LCD LIGHT] is set to [ON] Shooting movies3) NH-AAA-DA (2) (supplied) LCD...

Operating Instructions
Page 15
...Use a commercially available AC plug adaptor [a], if necessary, depending on . Turning on/off your camera POWER lamp POWER POWER Auto power-off function If you turn off function will not operate when the camera is on the design of the wall outlet (wall socket) [b]. The POWER lamp (green) ... power is connected to a computer with the supplied battery charger within 100 V to 240 V AC, 50/60 Hz. Getting started Using your camera abroad Power sources You can use an electronic transformer (travel converter), as this may cause a malfunction. However, the auto power-off the power ...
...Use a commercially available AC plug adaptor [a], if necessary, depending on . Turning on/off your camera POWER lamp POWER POWER Auto power-off function If you turn off function will not operate when the camera is on the design of the wall outlet (wall socket) [b]. The POWER lamp (green) ... power is connected to a computer with the supplied battery charger within 100 V to 240 V AC, 50/60 Hz. Getting started Using your camera abroad Power sources You can use an electronic transformer (travel converter), as this may cause a malfunction. However, the auto power-off the power ...

Operating Instructions
Page 16
... DATE NOTATION 2003 1 1 12:00:00 AM Y/M/D M/D/Y D/M/Y POWER 1 POWER , Press POWER to turn on the LCD screen. • To change the current settings of the camera, bring up and the DATE NOTATION screen appears on the power. Select from step 2. 16 When this happens, reset the date and time, by starting...
... DATE NOTATION 2003 1 1 12:00:00 AM Y/M/D M/D/Y D/M/Y POWER 1 POWER , Press POWER to turn on the LCD screen. • To change the current settings of the camera, bring up and the DATE NOTATION screen appears on the power. Select from step 2. 16 When this happens, reset the date and time, by starting...
Operating Instructions
Page 18
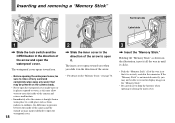
... a "Memory Stick" Terminal side Label side 1 , Slide the lock switch and the OPEN button in the direction of the arrow. • For details on the camera body. • Never open the waterproof cover underwater or in places exposed to water, as from a warm place to a cold place such as this may... allow water to enter the inside of the camera and the outside air may make it in the direction of the arrow to open it. If the "Memory Stick" is not inserted correctly, you...
... a "Memory Stick" Terminal side Label side 1 , Slide the lock switch and the OPEN button in the direction of the arrow. • For details on the camera body. • Never open the waterproof cover underwater or in places exposed to water, as from a warm place to a cold place such as this may... allow water to enter the inside of the camera and the outside air may make it in the direction of the arrow to open it. If the "Memory Stick" is not inserted correctly, you...
Operating Instructions
Page 19
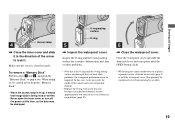
Close the waterproof cover and slide the slide lock lever back into place until the OPEN button clicks. • When using the camera underwater or in the direction of the arrow to lock it means that if the O-ring and the O-ring mating surface are no problems (... remove a "Memory Stick" Perform steps 1 and 2, and push the "Memory Stick" to pop it becomes scratched or deformed, or after approximately two years of the camera and cause irreparable damage. • Replace the O-ring with a new one if it out. O-ring mating surface O-ring 5 , Inspect the waterproof cover. This prevents ...
Close the waterproof cover and slide the slide lock lever back into place until the OPEN button clicks. • When using the camera underwater or in the direction of the arrow to lock it means that if the O-ring and the O-ring mating surface are no problems (... remove a "Memory Stick" Perform steps 1 and 2, and push the "Memory Stick" to pop it becomes scratched or deformed, or after approximately two years of the camera and cause irreparable damage. • Replace the O-ring with a new one if it out. O-ring mating surface O-ring 5 , Inspect the waterproof cover. This prevents ...
Operating Instructions
Page 21
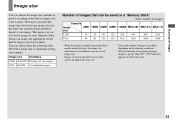
...image. Choose an image size appropriate for examples. The below image size is greater than 9999, >9999 indicator appears on the LCD screen of the camera all appear the same size. • The actual number of images may be different from the following table. Image size Examples 2.0M 1632×...2.0M 14 29 60 122 245 445 906 1851 VGA 80 161 326 656 1316 2380 4840 9880 • When the images recorded using earlier Sony models are played back, the image size indication may differ depending on the shooting conditions. • When the number of remaining shooting images is a...
...image. Choose an image size appropriate for examples. The below image size is greater than 9999, >9999 indicator appears on the LCD screen of the camera all appear the same size. • The actual number of images may be different from the following table. Image size Examples 2.0M 1632×...2.0M 14 29 60 122 245 445 906 1851 VGA 80 161 326 656 1316 2380 4840 9880 • When the images recorded using earlier Sony models are played back, the image size indication may differ depending on the shooting conditions. • When the number of remaining shooting images is a...
Operating Instructions
Page 22
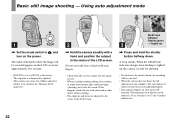
... be stored in the center of the LCD screen. Basic still image shooting - AE/AF lock indicator Flashes green 3 t Lights up , the camera is ready for approximately five seconds. • [FOCUS] is set to [AUTO] at the factory. • The exposure is automatically adjusted. • ...button halfway down. Do not cover the lens or flash with a hand and position the subject in the "Memory Stick" (page 26). 2 , Hold the camera steadily with your hand or other intense light, undesired light (ghosting) may enter the screen. A beep sounds. Using auto adjustment mode 2.0M 101 10 1...
... be stored in the center of the LCD screen. Basic still image shooting - AE/AF lock indicator Flashes green 3 t Lights up , the camera is ready for approximately five seconds. • [FOCUS] is set to [AUTO] at the factory. • The exposure is automatically adjusted. • ...button halfway down. Do not cover the lens or flash with a hand and position the subject in the "Memory Stick" (page 26). 2 , Hold the camera steadily with your hand or other intense light, undesired light (ghosting) may enter the screen. A beep sounds. Using auto adjustment mode 2.0M 101 10 1...
Operating Instructions
Page 23
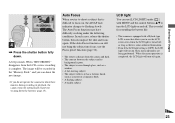
... equipped with MENU and the control buttons v/V to prevent wearing down . This is useful for about three minutes during recording or playback, the camera turns off automatically to turn off . The Auto Focus function may have difficulty working under [ ] with a Hybrid-type LCD screen that is ...and focus again. When the menu operation is [OFF], the LCD light will turn on and off again. 23 When "RECORDING" disappears from the camera and dark. • The contrast between the subject and its background is poor. • The subject is complete. The image will turn the LCD...
... equipped with MENU and the control buttons v/V to prevent wearing down . This is useful for about three minutes during recording or playback, the camera turns off automatically to turn off . The Auto Focus function may have difficulty working under [ ] with a Hybrid-type LCD screen that is ...and focus again. When the menu operation is [OFF], the LCD light will turn on and off again. 23 When "RECORDING" disappears from the camera and dark. • The contrast between the subject and its background is poor. • The subject is complete. The image will turn the LCD...
Operating Instructions
Page 25
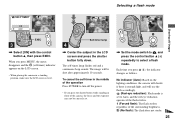
When you press MENU, the menu disappears and the (self-timer) indicator appears on the lighting conditions, the camera will decide if there is level. The image will use the flash accordingly. (Red-eye reduction): Flash mode is set . , Set the mode switch to , ... of the operation Press POWER to Auto, and the red-eye reduction operates if the flash strobes. (Forced flash): The flash strobes regardless of the camera, the focus and the exposure may not be shot after approximately 10 seconds. Selecting a flash mode Shooting still images SELFTIMER ON OFF 2.0M 101 10...
When you press MENU, the menu disappears and the (self-timer) indicator appears on the lighting conditions, the camera will decide if there is level. The image will use the flash accordingly. (Red-eye reduction): Flash mode is set . , Set the mode switch to , ... of the operation Press POWER to Auto, and the red-eye reduction operates if the flash strobes. (Forced flash): The flash strobes regardless of the camera, the focus and the exposure may not be shot after approximately 10 seconds. Selecting a flash mode Shooting still images SELFTIMER ON OFF 2.0M 101 10...

Operating Instructions
Page 26
Creating or selecting a folder Your camera can create folders up to "999MSDCF." • Up to store images. When not creating a new folder, "101MSDCF" folder is turned off. Also, you can select ...
Creating or selecting a folder Your camera can create folders up to "999MSDCF." • Up to store images. When not creating a new folder, "101MSDCF" folder is turned off. Also, you can select ...
Operating Instructions
Page 27
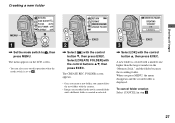
...•BURST 2.0M FOCUS AUTO SELFTIMER OFF P.EFFECT OFF 1 , Set the mode switch to . A new folder is created or selected. Select [CREATE FOLDER] with the camera. • Images are recorded in the newly created folder until a different folder is created with a number one higher than the largest number in step 3. 27...
...•BURST 2.0M FOCUS AUTO SELFTIMER OFF P.EFFECT OFF 1 , Set the mode switch to . A new folder is created or selected. Select [CREATE FOLDER] with the camera. • Images are recorded in the newly created folder until a different folder is created with a number one higher than the largest number in step 3. 27...

Operating Instructions
Page 28
... FOCUS AUTO SELFTIMER OFF P.EFFECT OFF 1 , Set the mode switch to . The menu appears on the LCD screen. • You can also carry out this camera. 28 RETURN 101 FORMAT CREATE FOLDER CHANGE FOLDER EXEC 2 , Select [ ] with this operation when the mode switch is stored in the newly selected folder. CHANGE...
... FOCUS AUTO SELFTIMER OFF P.EFFECT OFF 1 , Set the mode switch to . The menu appears on the LCD screen. • You can also carry out this camera. 28 RETURN 101 FORMAT CREATE FOLDER CHANGE FOLDER EXEC 2 , Select [ ] with this operation when the mode switch is stored in the newly selected folder. CHANGE...


