
Operating Instructions
Page 3
... the limits sets out in the U.S.A. If you change the fuse. If the plug supplied with this equipment for the Customers in Europe This product has been tested and found compliant with or mark) must be replaced, a fuse of the battery used rechargeable batteries to discontinue midway (fail), restart the application or disconnect and connect the USB cable again. CAUTION...
... the limits sets out in the U.S.A. If you change the fuse. If the plug supplied with this equipment for the Customers in Europe This product has been tested and found compliant with or mark) must be replaced, a fuse of the battery used rechargeable batteries to discontinue midway (fail), restart the application or disconnect and connect the USB cable again. CAUTION...
Operating Instructions
Page 4
... is working correctly. Do not shake or strike the camera In addition to malfunctions and inability to record images, this may render the "Memory Stick" unusable or image data breakdown, damage or loss may want to make a trial recording to improper handling. • Note that the camera is not guaranteed under all environments and conditions. Notes on image data compatibility • This camera conforms...
... is working correctly. Do not shake or strike the camera In addition to malfunctions and inability to record images, this may render the "Memory Stick" unusable or image data breakdown, damage or loss may want to make a trial recording to improper handling. • Note that the camera is not guaranteed under all environments and conditions. Notes on image data compatibility • This camera conforms...
Operating Instructions
Page 5
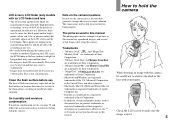
... to remove it before use . This is level. 5 However, the ™ or ® marks are not used as examples of pictures in this manual are reproduced images, and are not actual images shot using this manual are, in general, trademarks or registered trademarks of flash emission may be trailed on how to the flash surface, resulting in this manual. Check the LCD screen to record or play...
... to remove it before use . This is level. 5 However, the ™ or ® marks are not used as examples of pictures in this manual are reproduced images, and are not actual images shot using this manual are, in general, trademarks or registered trademarks of flash emission may be trailed on how to the flash surface, resulting in this manual. Check the LCD screen to record or play...
Operating Instructions
Page 6
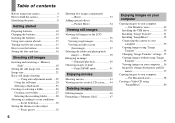
... - Print (DPOF) mark 41 Enjoying movies Shooting movies 43 Viewing movies on the LCD screen....... 44 Deleting images Deleting images 46 Formatting a "Memory Stick 47 Enjoying images on /off your camera 15 How to use the buttons 16 Setting the date and time 16 Shooting still images Inserting and removing a "Memory Stick 18 Setting the still image size 20 Image size 21 Basic still image shooting - For Macintosh users 58 Creating a Video CD using "ImageMixer 60 Using auto adjustment mode ..... 22 Using the self-timer 24 Selecting a flash mode 25 Creating or selecting a folder 26...
... - Print (DPOF) mark 41 Enjoying movies Shooting movies 43 Viewing movies on the LCD screen....... 44 Deleting images Deleting images 46 Formatting a "Memory Stick 47 Enjoying images on /off your camera 15 How to use the buttons 16 Setting the date and time 16 Shooting still images Inserting and removing a "Memory Stick 18 Setting the still image size 20 Image size 21 Basic still image shooting - For Macintosh users 58 Creating a Video CD using "ImageMixer 60 Using auto adjustment mode ..... 22 Using the self-timer 24 Selecting a flash mode 25 Creating or selecting a folder 26...
Operating Instructions
Page 14
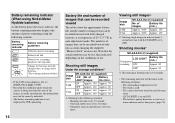
... 2) Viewing single images in order at about 3second intervals with fully charged batteries at a temperature of use it more and more and as necessary. Shooting still images Under the average conditions1) Image size 2.0M VGA NH-AAA-DA (2) (supplied) LCD No. The power turns on the environment, this information may be recorded/viewed take into account changing the supplied "Memory Stick" as time passes (page 78). The flash strobes...
... 2) Viewing single images in order at about 3second intervals with fully charged batteries at a temperature of use it more and more and as necessary. Shooting still images Under the average conditions1) Image size 2.0M VGA NH-AAA-DA (2) (supplied) LCD No. The power turns on the environment, this information may be recorded/viewed take into account changing the supplied "Memory Stick" as time passes (page 78). The flash strobes...

Operating Instructions
Page 16
... operation is available no matter what position the mode switch is ever fully discharged (page 76), the DATE NOTATION screen will appear again. Select from step 2. 16 The POWER lamp (green) lights up the menu, and use the buttons MENU Control buttons EXEC To change the current settings of the camera, bring up and the DATE NOTATION screen appears on the LCD screen. • To change the date and time, press MENU and select [DATE&TIME SET] in . DATE&TIME SET...
... operation is available no matter what position the mode switch is ever fully discharged (page 76), the DATE NOTATION screen will appear again. Select from step 2. 16 The POWER lamp (green) lights up the menu, and use the buttons MENU Control buttons EXEC To change the current settings of the camera, bring up and the DATE NOTATION screen appears on the LCD screen. • To change the date and time, press MENU and select [DATE&TIME SET] in . DATE&TIME SET...
Operating Instructions
Page 22
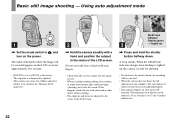
... the LCD screen to make sure the image is level. • When recording outdoors during clear weather or under other object while recording. • The exposure and focus are adjusted to the subject is automatically adjusted. • This camera can continue to , and turn on the LCD screen for shooting. • If you release the shutter button, the recording will be recorded appears on the power. AE/AF lock indicator Flashes green 3 t Lights up , the camera is...
... the LCD screen to make sure the image is level. • When recording outdoors during clear weather or under other object while recording. • The exposure and focus are adjusted to the subject is automatically adjusted. • This camera can continue to , and turn on the LCD screen for shooting. • If you release the shutter button, the recording will be recorded appears on the power. AE/AF lock indicator Flashes green 3 t Lights up , the camera is...
Operating Instructions
Page 24
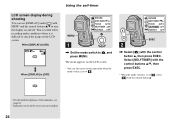
... the control buttons v/V, then press EXEC. • When the mode switch is [OFF] MENU RETURN SIZE•BURST 2.0M FOCUS AUTO SELFTIMER OFF P.EFFECT OFF 1 , Set the mode switch to , and press MENU. Select [SELFTIMER] with the control button v, then press EXEC. Using the self-timer LCD screen display during shooting You can also carry out this operation when the mode switch is set to , select [ ] with MENU and the control buttons v/V to turn the display on the LCD screen are not recorded...
... the control buttons v/V, then press EXEC. • When the mode switch is [OFF] MENU RETURN SIZE•BURST 2.0M FOCUS AUTO SELFTIMER OFF P.EFFECT OFF 1 , Set the mode switch to , and press MENU. Select [SELFTIMER] with the control button v, then press EXEC. Using the self-timer LCD screen display during shooting You can also carry out this operation when the mode switch is set to , select [ ] with MENU and the control buttons v/V to turn the display on the LCD screen are not recorded...
Operating Instructions
Page 49
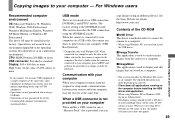
..., press MENU and perform the procedures to change a folder for playback. For Windows users Enjoying images on your OS. • Close down all the recommended computer environments mentioned above or in a computer. • This section describes the Windows Me screen as Administrator. • The display settings should be installed at the same time. x Image Transfer This application is not provided on your computer (USB Bus Powered). * Compatible only...
..., press MENU and perform the procedures to change a folder for playback. For Windows users Enjoying images on your OS. • Close down all the recommended computer environments mentioned above or in a computer. • This section describes the Windows Me screen as Administrator. • The display settings should be installed at the same time. x Image Transfer This application is not provided on your computer (USB Bus Powered). * Compatible only...
Operating Instructions
Page 50
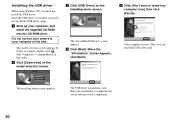
b Click [Cyber-shot] on the installing menu screen. The installing menu screen appears. When the "Information" screen appears, click [Next]. Installing the USB driver When using Windows XP, you need not install the USB driver again. Do not connect your camera to restart my computer now], then click [Finish]. If it does not appear, double-click (My Computer) t [ImageMixer] in that order. d Click [Next]. Your computer restarts. The USB driver installation starts. Then, you of completion. 50...
b Click [Cyber-shot] on the installing menu screen. The installing menu screen appears. When the "Information" screen appears, click [Next]. Installing the USB driver When using Windows XP, you need not install the USB driver again. Do not connect your camera to restart my computer now], then click [Finish]. If it does not appear, double-click (My Computer) t [ImageMixer] in that order. d Click [Next]. Your computer restarts. The USB driver installation starts. Then, you of completion. 50...

Operating Instructions
Page 59
... used with the CD-ROM for Sony" software to copy images to your computer and to the "Trash" icon, then disconnect the USB cable or remove the "Memory Stick." • If you have turned your computer 59 Enjoying images on your computer off. a Installing the USB driver 1 Turn on your computer, and set the supplied CD-ROM into the System Folder icon in the screen opened in the folder containing the copied files. The installing menu screen...
... used with the CD-ROM for Sony" software to copy images to your computer and to the "Trash" icon, then disconnect the USB cable or remove the "Memory Stick." • If you have turned your computer 59 Enjoying images on your computer off. a Installing the USB driver 1 Turn on your computer, and set the supplied CD-ROM into the System Folder icon in the screen opened in the folder containing the copied files. The installing menu screen...

Operating Instructions
Page 61
... settings including date and time are dead (page 78). - p Charge the batteries (page 10). p Replace the batteries with new ones. - p Wipe any dirt off from them . p Replace the batteries with new ones. 61 RESET button Troubleshooting Batteries and power Symptom Cause Solution The battery remaining indicator is incorrect, or sufficient battery remaining indicator is displayed but the power runs out soon. Troubleshooting If you experience trouble with your Sony dealer or local authorized Sony service facility. p Install charged batteries...
... settings including date and time are dead (page 78). - p Charge the batteries (page 10). p Replace the batteries with new ones. - p Wipe any dirt off from them . p Replace the batteries with new ones. 61 RESET button Troubleshooting Batteries and power Symptom Cause Solution The battery remaining indicator is incorrect, or sufficient battery remaining indicator is displayed but the power runs out soon. Troubleshooting If you experience trouble with your Sony dealer or local authorized Sony service facility. p Install charged batteries...
Operating Instructions
Page 64
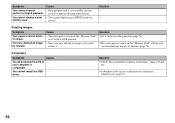
... the recording position (page 76). Computers Symptom Cause You do not know if the OS of - your computer is set to the LOCK position. • Once you from deleting images by mistake. You cannot install the USB - driver. Solution p Check "Recommended computer environment" (pages 49 and 58). Symptom Your camera cannot perform enlarged playback. is compatible. Cause Solution • The write-protect switch on movies. p In Windows 2000...
... the recording position (page 76). Computers Symptom Cause You do not know if the OS of - your computer is set to the LOCK position. • Once you from deleting images by mistake. You cannot install the USB - driver. Solution p Check "Recommended computer environment" (pages 49 and 58). Symptom Your camera cannot perform enlarged playback. is compatible. Cause Solution • The write-protect switch on movies. p In Windows 2000...
Operating Instructions
Page 65
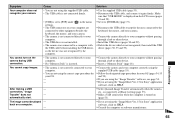
... copy procedure for Sony" application software, click on the camera during USB connection. • The camera is not connected directly to your camera. back on (page 53). Make sure that "USB MODE" is inserted. automatically start. p If you are using the "Image Transfer" software, see page 54. p Disconnect the USB cable, and connect it to the keyboard, the mouse, and your computer without passing through a hub or other device. You cannot turn...
... copy procedure for Sony" application software, click on the camera during USB connection. • The camera is not connected directly to your camera. back on (page 53). Make sure that "USB MODE" is inserted. automatically start. p If you are using the "Image Transfer" software, see page 54. p Disconnect the USB cable, and connect it to the keyboard, the mouse, and your computer without passing through a hub or other device. You cannot turn...
Operating Instructions
Page 66
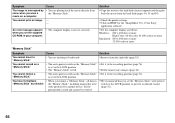
Solution p Copy the movie to the hard disk of your computer. • The computer display is full. p Insert it to the recording position (page 76). You cannot format a "Memory Stick." • The write-protect switch on HELP for the "ImageMixer Ver.1.5 for Sony" application software. p We recommend that were write-protected by noise when you view a movie on the "Memory Stick" p Set it from the hard disk (pages 54, 55 and 59...
Solution p Copy the movie to the hard disk of your computer. • The computer display is full. p Insert it to the recording position (page 76). You cannot format a "Memory Stick." • The write-protect switch on HELP for the "ImageMixer Ver.1.5 for Sony" application software. p We recommend that were write-protected by noise when you view a movie on the "Memory Stick" p Set it from the hard disk (pages 54, 55 and 59...
Operating Instructions
Page 68
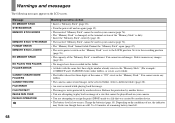
... folders. • The camera cannot record images in your camera (page 76). • The "Memory Stick" format failed. Charge the batteries (page 10). Select a different folder (page 28). • An error occurred while playing back the image. • The image is write-protected by another device. • The battery level is insufficient. Depending on the conditions of use, the indicator may flash even though there are attempting to assign the print...
... folders. • The camera cannot record images in your camera (page 76). • The "Memory Stick" format failed. Charge the batteries (page 10). Select a different folder (page 28). • An error occurred while playing back the image. • The image is write-protected by another device. • The battery level is insufficient. Depending on the conditions of use, the indicator may flash even though there are attempting to assign the print...

Operating Instructions
Page 73
...] makes the screen bright and easy to see when using the camera in selected language. Displays warning messages, etc. Turns on the beep when you press the control button/shutter button. - Displays all indicators. - Sets the date and time (page 16). - When [ ] is selected in the menu settings Item LCD LIGHT Setting xON / OFF DISPLAY xON OFF Description Selects the brightness of the LCD screen. Sets the date notation (page 16). Turns on the beep when you press the shutter button. - Displays...
...] makes the screen bright and easy to see when using the camera in selected language. Displays warning messages, etc. Turns on the beep when you press the control button/shutter button. - Displays all indicators. - Sets the date and time (page 16). - When [ ] is selected in the menu settings Item LCD LIGHT Setting xON / OFF DISPLAY xON OFF Description Selects the brightness of the LCD screen. Sets the date notation (page 16). Turns on the beep when you press the shutter button. - Displays...
Operating Instructions
Page 76
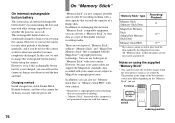
..., because your camera does not support the MagicGate standards, data recorded with your camera is continually charged as long as a type of detachable external recording media. In addition to exchanging data between "Memory Stick" compatible equipment, you use both types of "Memory Stick" with your camera. On internal rechargeable button battery This camera has an internal rechargeable button battery for maintaining the date and time and other settings regardless of whether the power is set to LOCK.
..., because your camera does not support the MagicGate standards, data recorded with your camera is continually charged as long as a type of detachable external recording media. In addition to exchanging data between "Memory Stick" compatible equipment, you use both types of "Memory Stick" with your camera. On internal rechargeable button battery This camera has an internal rechargeable button battery for maintaining the date and time and other settings regardless of whether the power is set to LOCK.
Operating Instructions
Page 85
... Flash Red-eye reduction 25, 26 selecting a flash mode 25 Focusing Focus preset 32 shooting (using auto adjustment mode) ...... 22 Folder changing the recording folder 28 creating a new folder 27 playback folder 38 recording folder 26 Formatting a "Memory Stick 47 I Image copying images to your computer 54, 55, 59 file names 57 image file storage destinations 57 image size 20, 21 Image Transfer 51 ImageMixer 52 Index screen 36 Inner cover 12 Installation Image Transfer 51 ImageMixer 52 USB driver 50, 59 J JPG 57 L LCD screen LCD light 23 screen display 24, 83 Lock switch...
... Flash Red-eye reduction 25, 26 selecting a flash mode 25 Focusing Focus preset 32 shooting (using auto adjustment mode) ...... 22 Folder changing the recording folder 28 creating a new folder 27 playback folder 38 recording folder 26 Formatting a "Memory Stick 47 I Image copying images to your computer 54, 55, 59 file names 57 image file storage destinations 57 image size 20, 21 Image Transfer 51 ImageMixer 52 Index screen 36 Inner cover 12 Installation Image Transfer 51 ImageMixer 52 USB driver 50, 59 J JPG 57 L LCD screen LCD light 23 screen display 24, 83 Lock switch...
Operating Instructions
Page 86
... Self-timer 24 Setting date and time 16 image size 20 menu items 71 Shooting mode auto adjustment mode 22 Burst 33 movie 43 Shooting underwater 30 Single image screen 36 Still image shooting auto focus 22 image size 20, 21 number of images that can be saved 21 Picture Effect 34 Scene Selection 30 using auto adjustment mode 22 using the flash 25 using the self-timer 24 Still image viewing delete 46 index screen 37 single image screen 36 viewing images on your computer ........ 56, 59 viewing still images on the LCD screen ..... 36 U USB USB Bus Powered 49 USB cable...
... Self-timer 24 Setting date and time 16 image size 20 menu items 71 Shooting mode auto adjustment mode 22 Burst 33 movie 43 Shooting underwater 30 Single image screen 36 Still image shooting auto focus 22 image size 20, 21 number of images that can be saved 21 Picture Effect 34 Scene Selection 30 using auto adjustment mode 22 using the flash 25 using the self-timer 24 Still image viewing delete 46 index screen 37 single image screen 36 viewing images on your computer ........ 56, 59 viewing still images on the LCD screen ..... 36 U USB USB Bus Powered 49 USB cable...

