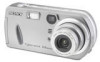
Operating Instructions (primary manual)
Page 7
...images shot in Multi Burst mode 61 Playing back continuously 61 Playing back frame by frame - Jog playback 61 Still image editing Protecting images - Protect 63 On the single screen 63 On the Index (nine-image) screen.......63 On the Index (triple-image) screen .....64 Changing image... Choosing images to your computer Copying images to print -...Image Transfer 76 Installing "ImageMixer 77 Connecting the camera to your computer 78 Copying images using "Image Transfer" 79 Changing "Image Transfer" settings .. 80 Copying images without using "Image Transfer 80 Viewing the images...
...images shot in Multi Burst mode 61 Playing back continuously 61 Playing back frame by frame - Jog playback 61 Still image editing Protecting images - Protect 63 On the single screen 63 On the Index (nine-image) screen.......63 On the Index (triple-image) screen .....64 Changing image... Choosing images to your computer Copying images to print -...Image Transfer 76 Installing "ImageMixer 77 Connecting the camera to your computer 78 Copying images using "Image Transfer" 79 Changing "Image Transfer" settings .. 80 Copying images without using "Image Transfer 80 Viewing the images...
Operating Instructions (primary manual)
Page 13
...Power Save function is turned off , press to [On] when using alkaline batteries. When the Power Save function is On • In shooting still images, the focus only focuses when the shutter is pushed down halfway. • While charging the flash, the lamp flashes and the LCD screen is... started Battery remaining indicator (When using the Nickel-Metal Hydride batteries) As the battery power decreases with use, the battery remaining indicator displays the amount of the camera is completely charged, the LCD screen turns on. 13 Turn the mode selector to SET UP, and set to [On]. After ...
...Power Save function is turned off , press to [On] when using alkaline batteries. When the Power Save function is On • In shooting still images, the focus only focuses when the shutter is pushed down halfway. • While charging the flash, the lamp flashes and the LCD screen is... started Battery remaining indicator (When using the Nickel-Metal Hydride batteries) As the battery power decreases with use, the battery remaining indicator displays the amount of the camera is completely charged, the LCD screen turns on. 13 Turn the mode selector to SET UP, and set to [On]. After ...
Operating Instructions (primary manual)
Page 23
..., and white balance. Landscape mode [ ] See page 54. To change according to (Camera) and [Mode] (REC Mode). When the recording lamp (page 9) goes out, you can shoot the next image. • When you can display are performed for a while with v/ V on , power is saved in the menu settings... mode shooting [Auto] You can be selected change the camera mode 1 Set the mode selector to your subject easily since this mode, (P. Twilight mode [ ] See page 54. The shutter clicks, the shooting is completed, and the still image is automatically shut off to multi-pattern metering (pages 44...
..., and white balance. Landscape mode [ ] See page 54. To change according to (Camera) and [Mode] (REC Mode). When the recording lamp (page 9) goes out, you can shoot the next image. • When you can display are performed for a while with v/ V on , power is saved in the menu settings... mode shooting [Auto] You can be selected change the camera mode 1 Set the mode selector to your subject easily since this mode, (P. Twilight mode [ ] See page 54. The shutter clicks, the shooting is completed, and the still image is automatically shut off to multi-pattern metering (pages 44...
Operating Instructions (primary manual)
Page 24
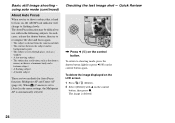
...shooting mode, press the shutter button lightly or press b (7) on the control button, then press z. Checking the last image shot - Basic still image shooting - When (Camera) is automatically selected. The image is a luminous body and a lustrous subject • A flashing subject. • A backlit subject There are two ...to focus on the control button. The Auto Focus function may be difficult to [Auto] in the following subjects. To delete the image displayed on the LCD screen 1 Press (Delete). 2 Select [Delete] with in the menu settings, the Multipoint AF is set to ...
...shooting mode, press the shutter button lightly or press b (7) on the control button, then press z. Checking the last image shot - Basic still image shooting - When (Camera) is automatically selected. The image is a luminous body and a lustrous subject • A flashing subject. • A backlit subject There are two ...to focus on the control button. The Auto Focus function may be difficult to [Auto] in the following subjects. To delete the image displayed on the LCD screen 1 Press (Delete). 2 Select [Delete] with in the menu settings, the Multipoint AF is set to ...
Operating Instructions (primary manual)
Page 25
Smart zoom You can zoom in on the image using a digital zoom process with no effect on the recorded image. • AF range finder is not shown when using the smart zoom. Pressing the zoom buttons displays the zoom scaling indicator on the LCD screen may look rough. When 9 (Focus) is [5.0M] or ... 60 cm (23 5/8 inches) from the end of this phenomenon has no deterioration in the SET UP settings (page 102). Using the zoom feature Shooting still images W (wide-angle) T (telephoto) x1.1 VGA 101 98 x5.0 VGA 101 98 , Press the zoom buttons to touch the lens. • You cannot...
Smart zoom You can zoom in on the image using a digital zoom process with no effect on the recorded image. • AF range finder is not shown when using the smart zoom. Pressing the zoom buttons displays the zoom scaling indicator on the LCD screen may look rough. When 9 (Focus) is [5.0M] or ... 60 cm (23 5/8 inches) from the end of this phenomenon has no deterioration in the SET UP settings (page 102). Using the zoom feature Shooting still images W (wide-angle) T (telephoto) x1.1 VGA 101 98 x5.0 VGA 101 98 , Press the zoom buttons to touch the lens. • You cannot...
Operating Instructions (primary manual)
Page 27
... hear a beeping sound. Using the self-timer VGA 101 98 VGA FINE 101 98 F2.8 30 Shooting still images 1 , Set the mode selector to , and press V ( ) on the control button again. To cancel the self-timer during the operation Press V ( ) on the control button. ...-timer) indicator appears on the LCD screen. • If the menu is currently displayed, press MENU first to . 2 , Center the subject in front of the camera and press the shutter button, the focus and the exposure may not be shot after approximately 10 seconds. The Self-timer lamp (page 8) will flash in orange...
... hear a beeping sound. Using the self-timer VGA 101 98 VGA FINE 101 98 F2.8 30 Shooting still images 1 , Set the mode selector to , and press V ( ) on the control button again. To cancel the self-timer during the operation Press V ( ) on the control button. ...-timer) indicator appears on the LCD screen. • If the menu is currently displayed, press MENU first to . 2 , Center the subject in front of the camera and press the shutter button, the focus and the exposure may not be shot after approximately 10 seconds. The Self-timer lamp (page 8) will flash in orange...

Operating Instructions (primary manual)
Page 29
...the subject, and whether or not the subject has seen pre-strobe light begin to strobe may also reduce the effectiveness of the image somewhat, the camera will focus properly as long as it directly at short distances, do not aim it reaches the subject. • When the ... no contrast, focus will not be achieved. (A distance up to approximately 3.8 m (12 feet 5 19/32 inches) (W)/2.5 m (8 feet 2 7/16 inches) (T) is not displayed. Shooting still images To reduce "red-eye" when shooting live subjects The flash pre-strobes before shooting to [Auto] in the SET UP settings (page 102). If you...
...the subject, and whether or not the subject has seen pre-strobe light begin to strobe may also reduce the effectiveness of the image somewhat, the camera will focus properly as long as it directly at short distances, do not aim it reaches the subject. • When the ... no contrast, focus will not be achieved. (A distance up to approximately 3.8 m (12 feet 5 19/32 inches) (W)/2.5 m (8 feet 2 7/16 inches) (T) is not displayed. Shooting still images To reduce "red-eye" when shooting live subjects The flash pre-strobes before shooting to [Auto] in the SET UP settings (page 102). If you...

Operating Instructions (primary manual)
Page 30
... the recordable range, use the LCD screen. • For details on the items displayed, see page 109. • Just as with the AE/AF lock indicator on .... • This setting is maintained even when the power is difficult to confirm the image using the LCD screen. VGA 101 98 • The image through the finder does not indicate the actual recordable range. Each time you can start ... indicators are turned on the screen for approximately two seconds so you press , the display changes in the following order. 30 r The LCD screen is turned off. Shooting with the LCD screen turned off...
... the recordable range, use the LCD screen. • For details on the items displayed, see page 109. • Just as with the AE/AF lock indicator on .... • This setting is maintained even when the power is difficult to confirm the image using the LCD screen. VGA 101 98 • The image through the finder does not indicate the actual recordable range. Each time you can start ... indicators are turned on the screen for approximately two seconds so you press , the display changes in the following order. 30 r The LCD screen is turned off. Shooting with the LCD screen turned off...

Operating Instructions (primary manual)
Page 31
... the LCD screen, and is displayed in "Setting the date and time" (page 17). • This setting is maintained even when the power is played back. 2 , Select (Camera) with the date and time inserted, the actual date and time are shot with the date and time inserted, the date and time... to to SET UP. The actual date and time are indicated in red on the lower-right corner when the image is turned off. 31 Inserting the date and time on a still image Shooting still images Camera Moving Image: Smart Zoom: Date/Time: Red Eye Reduction: AF Illuminator: MPEG Movie On Off Off Auto SELECT...
... the LCD screen, and is displayed in "Setting the date and time" (page 17). • This setting is maintained even when the power is played back. 2 , Select (Camera) with the date and time inserted, the actual date and time are shot with the date and time inserted, the date and time... to to SET UP. The actual date and time are indicated in red on the lower-right corner when the image is turned off. 31 Inserting the date and time on a still image Shooting still images Camera Moving Image: Smart Zoom: Date/Time: Red Eye Reduction: AF Illuminator: MPEG Movie On Off Off Auto SELECT...

Operating Instructions (primary manual)
Page 32
...-0002 2003 7 4 10:30PM SINGLE DISPLAY BACK/NEXT You can view images shot with the camera almost immediately on the camera. The newest image in the selected recording folder (page 43) is displayed. 32 Single (single-image) screen You can select the following three methods for viewing images. Viewing still images Viewing on the single-image screen VGA 101 8/9 101-0008 2003...
...-0002 2003 7 4 10:30PM SINGLE DISPLAY BACK/NEXT You can view images shot with the camera almost immediately on the camera. The newest image in the selected recording folder (page 43) is displayed. 32 Single (single-image) screen You can select the following three methods for viewing images. Viewing still images Viewing on the single-image screen VGA 101 8/9 101-0008 2003...

Operating Instructions (primary manual)
Page 33
... 3/9 101-0003 2003 7 4 10:30PM BACK/NEXT VOLUME SINGLE DISPLAY MOVE Aperture Value: F2.8 Shutter Speed: 1/30 Exposure Value: 0.0 ISO: 100 101-0002 2003 7 4 10:30PM SINGLE DISPLAY BACK/NEXT 2 , Select the desired still image with b/B on the control button shows the remaining image information. The display switches to move the yellow frame up/down/left...
... 3/9 101-0003 2003 7 4 10:30PM BACK/NEXT VOLUME SINGLE DISPLAY MOVE Aperture Value: F2.8 Shutter Speed: 1/30 Exposure Value: 0.0 ISO: 100 101-0002 2003 7 4 10:30PM SINGLE DISPLAY BACK/NEXT 2 , Select the desired still image with b/B on the control button shows the remaining image information. The display switches to move the yellow frame up/down/left...

Operating Instructions (primary manual)
Page 37
... and press z again. The (Delete) mark is displayed, press (Delete). 2 , Select [Select] with b/B on the control button, then press z. Put the mark on all the images in the folder are deleted. To delete all of the unprotected images in the folder Select [All In Folder] with v/V/b/B.... The mark disappears. 37 All of the images you want to delete. • To cancel your selection, select images you want to delete with B on the control button, then press z. Deleting on the Index (nine-image) screen Deleting still images Delete Exit Select All In Folder Delete Exit ...
... and press z again. The (Delete) mark is displayed, press (Delete). 2 , Select [Select] with b/B on the control button, then press z. Put the mark on all the images in the folder are deleted. To delete all of the unprotected images in the folder Select [All In Folder] with v/V/b/B.... The mark disappears. 37 All of the images you want to delete. • To cancel your selection, select images you want to delete with B on the control button, then press z. Deleting on the Index (nine-image) screen Deleting still images Delete Exit Select All In Folder Delete Exit ...

Operating Instructions (primary manual)
Page 38
...(Delete). To cancel the deletion Select [Exit] with b on the control button, then press z. 1 , While an Index (triple-image) screen (page 33) is displayed, move the image you want to delete to the center with b/B on the screen. Deleting on the Index (nineimage) screen (continued) Deleting on the ...not yet been deleted at this message disappears, all of the images with B on the Index (triple-image) screen Delete Exit OK Aperture Value: F2.8 Shutter Speed: 1/30 Exposure Value: 0.0 ISO: 100 101-0002 2003 7 4 10:30PM SINGLE DISPLAY BACK/NEXT Delete Exit 101-0002 2003 7 4 10:30PM...
...(Delete). To cancel the deletion Select [Exit] with b on the control button, then press z. 1 , While an Index (triple-image) screen (page 33) is displayed, move the image you want to delete to the center with b/B on the screen. Deleting on the Index (nineimage) screen (continued) Deleting on the ...not yet been deleted at this message disappears, all of the images with B on the Index (triple-image) screen Delete Exit OK Aperture Value: F2.8 Shutter Speed: 1/30 Exposure Value: 0.0 ISO: 100 101-0002 2003 7 4 10:30PM SINGLE DISPLAY BACK/NEXT Delete Exit 101-0002 2003 7 4 10:30PM...

Operating Instructions (primary manual)
Page 41
... yellow, and the setting is entered. The frame of the item you want to change with v/V on the control button to enter the setting. Camera Moving Image: Smart Zoom: Date/Time: Red Eye Reduction: AF Illuminator: MPEG Movie On Off Off Auto SELECT b Select the setting item you select turn... Press z on the control button. How to SET UP. To turn off the SET UP screen display Set the mode selector to change with b/B on the control button. To turn off the menu display Press MENU. Control button MENU Mode selector Changing menu settings a Press MENU. The frame of the ...
... yellow, and the setting is entered. The frame of the item you want to change with v/V on the control button to enter the setting. Camera Moving Image: Smart Zoom: Date/Time: Red Eye Reduction: AF Illuminator: MPEG Movie On Off Off Auto SELECT b Select the setting item you select turn... Press z on the control button. How to SET UP. To turn off the SET UP screen display Set the mode selector to change with b/B on the control button. To turn off the menu display Press MENU. Control button MENU Mode selector Changing menu settings a Press MENU. The frame of the ...

Operating Instructions (primary manual)
Page 44
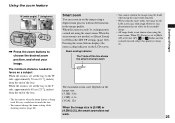
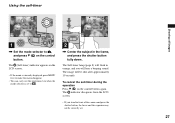
... because it is convenient when you want to focus only on the center of the image, so it is adjusted automatically. Before operation When shooting still images, set (Camera) to the left, and right and in the center of the image, letting you choose Multipoint AF, the distance to or . c Select 9 (Focus) with b/B, ...white to green after the focus is estimated as an average, so the AF works even with v/V. Center AF The AF range finder is not displayed. 44 The Center AF automatically focuses only on what you aim at. • When you use the smart zoom or AF illuminator, priority AF...
... because it is convenient when you want to focus only on the center of the image, so it is adjusted automatically. Before operation When shooting still images, set (Camera) to the left, and right and in the center of the image, letting you choose Multipoint AF, the distance to or . c Select 9 (Focus) with b/B, ...white to green after the focus is estimated as an average, so the AF works even with v/V. Center AF The AF range finder is not displayed. 44 The Center AF automatically focuses only on what you aim at. • When you use the smart zoom or AF illuminator, priority AF...

Operating Instructions (primary manual)
Page 46
... distance to any mode other than [Auto] in 1/3EV increments. You can be set (Camera) to the subject with b/B. c Select (EV) with v/V. To return to auto adjust ...flashes with v/V. The value can select from +2.0EV to 0EV. • When the subject is displayed. 0EV 0EV EV WB d Select the exposure adjustment value. The value of the subject on the... your own choice. Control button MENU Mode selector a Set the mode selector to or . Before operation When shooting still images, set a range from the following distance settings. 0.5m, 1.0m, 3.0m, 7.0m, ∞ (unlimited ...
... distance to any mode other than [Auto] in 1/3EV increments. You can be set (Camera) to the subject with b/B. c Select (EV) with v/V. To return to auto adjust ...flashes with v/V. The value can select from +2.0EV to 0EV. • When the subject is displayed. 0EV 0EV EV WB d Select the exposure adjustment value. The value of the subject on the... your own choice. Control button MENU Mode selector a Set the mode selector to or . Before operation When shooting still images, set a range from the following distance settings. 0.5m, 1.0m, 3.0m, 7.0m, ∞ (unlimited ...

Operating Instructions (primary manual)
Page 50
... order, from the actual image recorded. • GIF files made on other cameras may appear different from the latest one frame. c Select the desired mode with v/V. f Press z. All of the frames will be displayed correctly on this operation until you can select from [Normal] or [Mobile]. 50 d Shoot one shot. • If you do...
... order, from the actual image recorded. • GIF files made on other cameras may appear different from the latest one frame. c Select the desired mode with v/V. f Press z. All of the frames will be displayed correctly on this operation until you can select from [Normal] or [Mobile]. 50 d Shoot one shot. • If you do...

Operating Instructions (primary manual)
Page 58
... You cannot use Playback zoom with movies (MPEG movie), or images recorded in Steps 3 to enlarge. b Display the image you are viewing images that have not been enlarged, the Index screen will appear (page 33). • The images displayed in Quick Review (page 24) can be enlarged using the ... side of the image B: To view a portion of the right side of the original image. Enlarging a portion of a still image Mode selector: You can enlarge an image up to enlarge with v/V/b/B. Control button MENU Mode selector Zoom buttons Enlarging an image - d Select a portion of the image to five times ...
... You cannot use Playback zoom with movies (MPEG movie), or images recorded in Steps 3 to enlarge. b Display the image you are viewing images that have not been enlarged, the Index screen will appear (page 33). • The images displayed in Quick Review (page 24) can be enlarged using the ... side of the image B: To view a portion of the right side of the original image. Enlarging a portion of a still image Mode selector: You can enlarge an image up to enlarge with v/V/b/B. Control button MENU Mode selector Zoom buttons Enlarging an image - d Select a portion of the image to five times ...

Operating Instructions (primary manual)
Page 63
... - (Protect) mark is indicated on the selected image. SELECT MOVE MENU TO NEXT f To protect other images, display the image you want to protect with b/B. c Press MENU. The image currently being displayed is now protected, and the - (Protect) mark is indicated on the screen. Still image editing On the Index (nine-image) screen a Set the mode selector to , press...
... - (Protect) mark is indicated on the selected image. SELECT MOVE MENU TO NEXT f To protect other images, display the image you want to protect with b/B. c Press MENU. The image currently being displayed is now protected, and the - (Protect) mark is indicated on the screen. Still image editing On the Index (nine-image) screen a Set the mode selector to , press...

Operating Instructions (primary manual)
Page 66
...Digital Print Order Format) standard. On the single screen a Set the mode selector to the Index (nine-image) screen. c Press MENU. The menu appears. VGA 101 2/9 OK BACK/NEXT DPOF Exit e To mark other images, repeat Step 5 for each of them. SELECT MOVE MENU TO NEXT f To mark other images, display the image you mark images shot...Zoom buttons • You cannot mark movies (MPEG movie) or images recorded in Multi Burst mode, all the images are printed on the selected image. c Select [DPOF] with b/B. b Display the image you want to print with B, then press z. Print (DPOF...
...Digital Print Order Format) standard. On the single screen a Set the mode selector to the Index (nine-image) screen. c Press MENU. The menu appears. VGA 101 2/9 OK BACK/NEXT DPOF Exit e To mark other images, repeat Step 5 for each of them. SELECT MOVE MENU TO NEXT f To mark other images, display the image you mark images shot...Zoom buttons • You cannot mark movies (MPEG movie) or images recorded in Multi Burst mode, all the images are printed on the selected image. c Select [DPOF] with b/B. b Display the image you want to print with B, then press z. Print (DPOF...


