Operating Instructions
Page 7
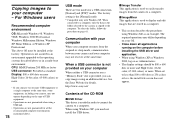
... 111 Specifications 111 The LCD screen 113 Index Index 116 7 For Windows users 78 Installing the USB driver 79 Installing "Image Transfer 80 Installing "ImageMixer 81 Connecting the camera to your computer 82 Copying images using "Image Transfer" 83 Changing "Image Transfer" settings .. 84 Copying... back successive images - Slide show 63 Rotating still images - Playback zoom 62 Recording an enlarged image - Rotate 64 Playing back images shot in Multi Burst mode 65 Playing back continuously 65 Playing back frame by frame - Print (DPOF) mark 70 On the single screen ...
... 111 Specifications 111 The LCD screen 113 Index Index 116 7 For Windows users 78 Installing the USB driver 79 Installing "Image Transfer 80 Installing "ImageMixer 81 Connecting the camera to your computer 82 Copying images using "Image Transfer" 83 Changing "Image Transfer" settings .. 84 Copying... back successive images - Slide show 63 Rotating still images - Playback zoom 62 Recording an enlarged image - Rotate 64 Playing back images shot in Multi Burst mode 65 Playing back continuously 65 Playing back frame by frame - Print (DPOF) mark 70 On the single screen ...
Operating Instructions
Page 78
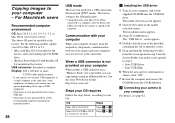
...to connect the camera to the computer. Communication with Windows XP. http://www.sony.net/ Contents of USB equipment. • Operations are not guaranteed when using a USB hub. • Operations are not guaranteed for all applications running on the computer before installing the USB driver and application. ... you can copy images using an additional device. The required operations may not operate depending on your camera, may differ depending on the type of the CD-ROM x USB Driver This driver is copied to a computer. Copying images to display and edit images that are stored in a ...
...to connect the camera to the computer. Communication with Windows XP. http://www.sony.net/ Contents of USB equipment. • Operations are not guaranteed when using a USB hub. • Operations are not guaranteed for all applications running on the computer before installing the USB driver and application. ... you can copy images using an additional device. The required operations may not operate depending on your camera, may differ depending on the type of the CD-ROM x USB Driver This driver is copied to a computer. Copying images to display and edit images that are stored in a ...
Operating Instructions
Page 79
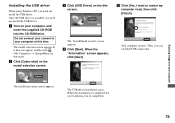
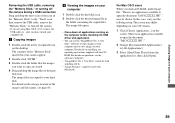
... USB connection. Do not connect your camera to restart my computer now], then click [Finish]. If it does not appear, double-click (My Computer) t [ImageMixer] in that order. The "InstallShield wizard" screen appears. c Click [USB Driver] on your computer, and insert the... USB driver installation starts. Installing the USB driver When using Windows XP, you need not install the USB driver. e Click [Yes, I want to your computer The installation menu screen appears. The model selection screen appears. When the "Information" screen appears, click [Next]. b Click [Cyber-shot] on...
... USB connection. Do not connect your camera to restart my computer now], then click [Finish]. If it does not appear, double-click (My Computer) t [ImageMixer] in that order. The "InstallShield wizard" screen appears. c Click [USB Driver] on your computer, and insert the... USB driver installation starts. Installing the USB driver When using Windows XP, you need not install the USB driver. e Click [Yes, I want to your computer The installation menu screen appears. The model selection screen appears. When the "Information" screen appears, click [Next]. b Click [Cyber-shot] on...
Operating Instructions
Page 81
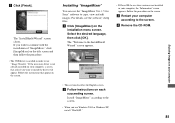
...; This section describes the English screen. Installing "ImageMixer" You can use "Image Transfer." The "InstallShield Wizard" screen closes. If the necessary driver is needed in your computer, a screen that appear on the installation menu screen. d Remove the CD-ROM. Follow the procedure on your ..., the "Information" screen appears. Enjoying images on your computer according to use the "ImageMixer Ver. 1.5 for Sony" software to install the driver will appear. Install "ImageMixer" according to the screen. • When you want to copy, view and edit images.
...; This section describes the English screen. Installing "ImageMixer" You can use "Image Transfer." The "InstallShield Wizard" screen closes. If the necessary driver is needed in your computer, a screen that appear on the installation menu screen. d Remove the CD-ROM. Follow the procedure on your ..., the "Information" screen appears. Enjoying images on your computer according to use the "ImageMixer Ver. 1.5 for Sony" software to install the driver will appear. Install "ImageMixer" according to the screen. • When you want to copy, view and edit images.

Operating Instructions
Page 84
...deleted. Right-click the "Image Transfer" icon on the "System Properties" screen. 2 Confirm if other devices are copied to a folder in your camera appear. • This section describes an example of Windows 2000, click [Uninstall].) The "Confirm Device Removal" screen appears. 3 Click [OK]. ... Try the USB driver installation again using Windows XP, see the right column. • When using the supplied CD-ROM (page 79). Right-click here When the "Image Transfer" starts, the below to delete them. 1 Click [ Sony DSC]. (In case of Windows 2000, right-click [ Sony DSC].) 2 Click [Remove...
...deleted. Right-click the "Image Transfer" icon on the "System Properties" screen. 2 Confirm if other devices are copied to a folder in your camera appear. • This section describes an example of Windows 2000, click [Uninstall].) The "Confirm Device Removal" screen appears. 3 Click [OK]. ... Try the USB driver installation again using Windows XP, see the right column. • When using the supplied CD-ROM (page 79). Right-click here When the "Image Transfer" starts, the below to delete them. 1 Click [ Sony DSC]. (In case of Windows 2000, right-click [ Sony DSC].) 2 Click [Remove...
Operating Instructions
Page 88
... using an additional device. See the Sony Website for a USB connection, [Normal] and [PTP]* modes. The "USB Driver" screen appears. 4 Double-click the icon of USB equipment. • Operations are two modes for details. Communication with Mac OS X. The model selection screen appears. 2 Click [Cyber-shot] on your camera, may not recover at the same...
... using an additional device. See the Sony Website for a USB connection, [Normal] and [PTP]* modes. The "USB Driver" screen appears. 4 Double-click the icon of USB equipment. • Operations are two modes for details. Communication with Mac OS X. The model selection screen appears. 2 Click [Cyber-shot] on your camera, may not recover at the same...
Operating Instructions
Page 89
... hard disk. The image file opens. • Close down all applications running on the computer before installing the USB driver and application. • You can use the "ImageMixer Ver. 1.5 for Sony" cannot be used with Mac OS X. • "Image Transfer" cannot be shown. The screen may be used ... carry out the follwing setup. Enjoying images on your computer 1 Double-click the hard disk icon. 2 Double-click the desired image file in your camera appear. 2 Double-click "DCIM." 3 Double-click the folder that the images you click an E-MAIL mode image file, "There is no application ...
... hard disk. The image file opens. • Close down all applications running on the computer before installing the USB driver and application. • You can use the "ImageMixer Ver. 1.5 for Sony" cannot be used with Mac OS X. • "Image Transfer" cannot be shown. The screen may be used ... carry out the follwing setup. Enjoying images on your computer 1 Double-click the hard disk icon. 2 Double-click the desired image file in your camera appear. 2 Double-click "DCIM." 3 Double-click the folder that the images you click an E-MAIL mode image file, "There is no application ...
Operating Instructions
Page 95
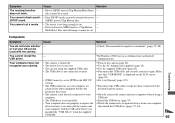
...[USB Connect] is set to other equipment besides the keyboard and the mouse. your computer, device because you installed the "USB Driver" from your computer with the camera. You cannot attach a print (DPOF) mark. You cannot install the - p Disconnect the USB cable, and securely connect it... supplied USB cable (page 82). • The USB cable is not installed. keyboard, the mouse. • The camera is turned off. p Install the USB driver (page 79). • Your computer does not properly recognize the p Delete the erroneously recognized device from the supplied CD...
...[USB Connect] is set to other equipment besides the keyboard and the mouse. your computer, device because you installed the "USB Driver" from your computer with the camera. You cannot attach a print (DPOF) mark. You cannot install the - p Disconnect the USB cable, and securely connect it... supplied USB cable (page 82). • The USB cable is not installed. keyboard, the mouse. • The camera is turned off. p Install the USB driver (page 79). • Your computer does not properly recognize the p Delete the erroneously recognized device from the supplied CD...
Operating Instructions
Page 112
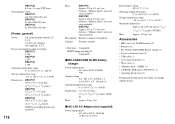
...;220) dots [Power, general] Power AA nickel hydride batteries (2) 2.4 V AC-LS5 AC Adaptor (not supplied), 4.2 V Power consumption (when recording) DSC-P72 1.7W DSC-P52 1.6W DSC-P32 1.7W Operating temperature range 0° to +40°C (32° to +104°F) Storage temperature range −20° to +60°... cord (mains lead) (1) • USB cable (1) • A/V connecting cable (1) • Wrist strap (1) • "Memory Stick" (16MB) (1) • CD-ROM (USB driver: SPVD-010) (1) • Operating Instructions (1) Design and specifications are subject to change without notice.
...;220) dots [Power, general] Power AA nickel hydride batteries (2) 2.4 V AC-LS5 AC Adaptor (not supplied), 4.2 V Power consumption (when recording) DSC-P72 1.7W DSC-P52 1.6W DSC-P32 1.7W Operating temperature range 0° to +40°C (32° to +104°F) Storage temperature range −20° to +60°... cord (mains lead) (1) • USB cable (1) • A/V connecting cable (1) • Wrist strap (1) • "Memory Stick" (16MB) (1) • CD-ROM (USB driver: SPVD-010) (1) • Operating Instructions (1) Design and specifications are subject to change without notice.

Operating Instructions
Page 116
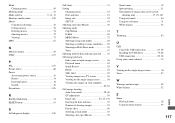
... recording folder 47 Charging Charging the battery 14 Charging time 15 Cleaning 108 Computer Copying images to your computer ........ 78, 88 USB cable 82 USB driver 79, 88 Control button 20 Creating a new folder 47 116 D Date and time 21, 35 DC plug 19 Deleting images 40, 74 Divide 76 E Editing...
... recording folder 47 Charging Charging the battery 14 Charging time 15 Cleaning 108 Computer Copying images to your computer ........ 78, 88 USB cable 82 USB driver 79, 88 Control button 20 Creating a new folder 47 116 D Date and time 21, 35 DC plug 19 Deleting images 40, 74 Divide 76 E Editing...
Operating Instructions
Page 117
... 26 Using the self-timer 31 White balance 52 T Trimming 63 U USB Cancel the USB connection 83, 89 Installing the USB driver 79, 88 USB connection 82, 88 Using your camera abroad 19 V Viewing on the single-image screen 36 Voice 57 W Warnings and messages 98 White balance 52 Z Zoom Playback zoom...
... 26 Using the self-timer 31 White balance 52 T Trimming 63 U USB Cancel the USB connection 83, 89 Installing the USB driver 79, 88 USB connection 82, 88 Using your camera abroad 19 V Viewing on the single-image screen 36 Voice 57 W Warnings and messages 98 White balance 52 Z Zoom Playback zoom...


