
Operating Instructions
Page 3
...to which can be determined by returning your nearest Sony service station. If you should lose the fuse cover, please contact your used in accordance with the limits for a digital device pursuant to attach the fuse cover after you... If this equipment does cause harmful interference to radio or television reception, which the receiver is fitted to this digital camera. The supplied interface cable must be replaced, a 5 AMP fuse approved by one or more information regarding recycling...discontinue midway (fail), restart the application or disconnect and connect the USB cable again. 3
...to which can be determined by returning your nearest Sony service station. If you should lose the fuse cover, please contact your used in accordance with the limits for a digital device pursuant to attach the fuse cover after you... If this equipment does cause harmful interference to radio or television reception, which the receiver is fitted to this digital camera. The supplied interface cable must be replaced, a 5 AMP fuse approved by one or more information regarding recycling...discontinue midway (fail), restart the application or disconnect and connect the USB cable again. 3
Operating Instructions
Page 7
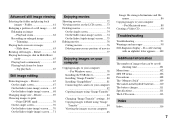
... on your computer 85 Image file storage destinations and file names 86 Copying images to your computer - Rotate 64 Playing back images shot in Multi Burst mode 65 Playing back continuously 65 Playing back frame by frame - If a code starting with an alphabet letter...- Advanced still image viewing Selecting the folder and playing back images - For Windows users 78 Installing the USB driver 79 Installing "Image Transfer 80 Installing "ImageMixer 81 Connecting the camera to your computer 82 Copying images using "Image Transfer" 83 Changing "Image Transfer" settings .. 84 Copying...
... on your computer 85 Image file storage destinations and file names 86 Copying images to your computer - Rotate 64 Playing back images shot in Multi Burst mode 65 Playing back continuously 65 Playing back frame by frame - If a code starting with an alphabet letter...- Advanced still image viewing Selecting the folder and playing back images - For Windows users 78 Installing the USB driver 79 Installing "Image Transfer 80 Installing "ImageMixer 81 Connecting the camera to your computer 82 Copying images using "Image Transfer" 83 Changing "Image Transfer" settings .. 84 Copying...
Operating Instructions
Page 9
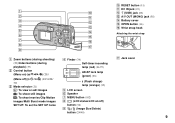
L (USB) jack (82) 2 qa M A/V OUT (MONO) jack (38) 3 4 N Battery cover qs O OPEN button (16) qd P Wrist strap hook 5 qf Attaching the wrist strap 6 qg 7 qh 8 qj 9 A ...
L (USB) jack (82) 2 qa M A/V OUT (MONO) jack (38) 3 4 N Battery cover qs O OPEN button (16) qd P Wrist strap hook 5 qf Attaching the wrist strap 6 qg 7 qh 8 qj 9 A ...

Operating Instructions
Page 11
L (USB) jack (82) 2 qa M A/V OUT (MONO) jack (38) 3 4 N Battery cover qs O OPEN button (16) qd P Wrist strap hook 5 qf Attaching the wrist strap 6 qg 7 qh 8 qj 9 A ...
L (USB) jack (82) 2 qa M A/V OUT (MONO) jack (38) 3 4 N Battery cover qs O OPEN button (16) qd P Wrist strap hook 5 qf Attaching the wrist strap 6 qg 7 qh 8 qj 9 A ...

Operating Instructions
Page 13
L (USB) jack (82) 2 qa M A/V OUT (MONO) jack (38) 3 4 N Battery cover qs O OPEN button (16) qd P Wrist strap hook 5 qf Attaching the wrist strap 6 qg 7 qh 8 qj 9 A ...
L (USB) jack (82) 2 qa M A/V OUT (MONO) jack (38) 3 4 N Battery cover qs O OPEN button (16) qd P Wrist strap hook 5 qf Attaching the wrist strap 6 qg 7 qh 8 qj 9 A ...

Operating Instructions
Page 20
... to the (USB) jack or the A/V OUT (MONO) jack * When [Power Save] is set to [On]: approximately 90 seconds When [Power Save] is set to or , the lens begins to move (DSC-P72 only). To turn off the power Press POWER again, the POWER lamp goes out, and the camera turns off. ...portion pulled out. When you turn on the camera. However, in green and the power is automatically shut off to preserve battery power. For each item, press v/V/b/B to select the desired value, then press z or b/B to make the changes. This may cause a malfunction (DSC-P72 only). • When you turn the ...
... to the (USB) jack or the A/V OUT (MONO) jack * When [Power Save] is set to [On]: approximately 90 seconds When [Power Save] is set to or , the lens begins to move (DSC-P72 only). To turn off the power Press POWER again, the POWER lamp goes out, and the camera turns off. ...portion pulled out. When you turn on the camera. However, in green and the power is automatically shut off to preserve battery power. For each item, press v/V/b/B to select the desired value, then press z or b/B to make the changes. This may cause a malfunction (DSC-P72 only). • When you turn the ...
Operating Instructions
Page 78
.... When connected to a computer, only the data in the folder selected by the camera is needed in an environment upgraded to display and edit images that are not guaranteed when using an additional device. See the Sony Website for a USB connection, [Normal] and [PTP]* modes. When set to the computer. Communication with Windows...
.... When connected to a computer, only the data in the folder selected by the camera is needed in an environment upgraded to display and edit images that are not guaranteed when using an additional device. See the Sony Website for a USB connection, [Normal] and [PTP]* modes. When set to the computer. Communication with Windows...
Operating Instructions
Page 79
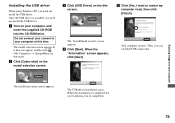
b Click [Cyber-shot] on the title screen. Once the USB driver is completed, the screen informs you need not install the USB driver. If it does not appear, double-click (My Computer) t [ImageMixer] in that order. The "InstallShield wizard" screen appears. Your computer ... connect your computer at this time. d Click [Next]. e Click [Yes, I want to your camera to restart my computer now], then click [Finish]. When the installation is installed, you can establish USB connection. a Turn on your computer, and insert the supplied CD-ROM into the CD-ROM drive. Installing...
b Click [Cyber-shot] on the title screen. Once the USB driver is completed, the screen informs you need not install the USB driver. If it does not appear, double-click (My Computer) t [ImageMixer] in that order. The "InstallShield wizard" screen appears. Your computer ... connect your computer at this time. d Click [Next]. e Click [Yes, I want to your camera to restart my computer now], then click [Finish]. When the installation is installed, you can establish USB connection. a Turn on your computer, and insert the supplied CD-ROM into the CD-ROM drive. Installing...
Operating Instructions
Page 81
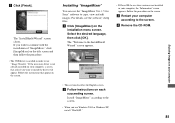
Install "ImageMixer" according to the screen. • When you use the "ImageMixer Ver. 1.5 for Sony" software to copy, view and edit images. Installing "ImageMixer" You can use Windows 2000 or Windows XP, install "WinASPI." 81 Follow the procedure.... b Follow instructions on the screen. The "InstallShield Wizard" screen closes. Enjoying images on the title screen and then follow the procedure. • The USB driver is not installed in order to continue with the installation of "ImageMixer," click [ImageMixer] on your computer, the "Information" screen appears. If you ...
Install "ImageMixer" according to the screen. • When you use the "ImageMixer Ver. 1.5 for Sony" software to copy, view and edit images. Installing "ImageMixer" You can use Windows 2000 or Windows XP, install "WinASPI." 81 Follow the procedure.... b Follow instructions on the screen. The "InstallShield Wizard" screen closes. Enjoying images on the title screen and then follow the procedure. • The USB driver is not installed in order to continue with the installation of "ImageMixer," click [ImageMixer] on your computer, the "Information" screen appears. If you ...

Operating Instructions
Page 82
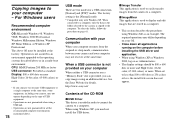
... the first time, your computer automatically runs the used program to recognize the camera. b Turn on the LCD screen of the camera. c Connect the supplied USB cable to the (USB) jack of the camera. Proceed to the USB connector on the rear panel. • When using Windows XP, the AutoPlay... wizard automatically appears on the desktop. d Connect the USB cable to your computer. • When using a desktop computer, connect the USB cable to page 85. Connecting the camera to your computer a Insert the "Memory Stick" with the images you copy images to ...
... the first time, your computer automatically runs the used program to recognize the camera. b Turn on the LCD screen of the camera. c Connect the supplied USB cable to the (USB) jack of the camera. Proceed to the USB connector on the rear panel. • When using Windows XP, the AutoPlay... wizard automatically appears on the desktop. d Connect the USB cable to your computer. • When using a desktop computer, connect the USB cable to page 85. Connecting the camera to your computer a Insert the "Memory Stick" with the images you copy images to ...

Operating Instructions
Page 83
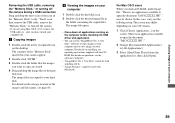
... only Step 5 above. Windows XP is unnecessary for Windows XP users. 5 Disconnect the USB cable, remove the "Memory Stick," or turn off the camera during a USB connection For Windows 2000, Me, or XP users 1 Double-click on the task tray. 2 Click (Sony DSC), then click [Stop]. 3 Confirm the device on the confirmation window, then click...
... only Step 5 above. Windows XP is unnecessary for Windows XP users. 5 Disconnect the USB cable, remove the "Memory Stick," or turn off the camera during a USB connection For Windows 2000, Me, or XP users 1 Double-click on the task tray. 2 Click (Sony DSC), then click [Stop]. 3 Confirm the device on the confirmation window, then click...

Operating Instructions
Page 84
...click [DCIM], then double-click the folder that the image files you want to a folder in your camera appear. • This section describes an example of Windows 2000, click [Uninstall].) The "Confirm Device ...OK]. c Drag and drop the image files into the "My Documents" folder. Try the USB driver installation again using Windows XP, see the right column. • When using the supplied ...the "Image Transfer" starts, the below to delete them. 1 Click [ Sony DSC]. (In case of Windows 2000, right-click [ Sony DSC].) 2 Click [Remove]. (In case of copying images to launch "Image ...
...click [DCIM], then double-click the folder that the image files you want to a folder in your camera appear. • This section describes an example of Windows 2000, click [Uninstall].) The "Confirm Device ...OK]. c Drag and drop the image files into the "My Documents" folder. Try the USB driver installation again using Windows XP, see the right column. • When using the supplied ...the "Image Transfer" starts, the below to delete them. 1 Click [ Sony DSC]. (In case of Windows 2000, right-click [ Sony DSC].) 2 Click [Remove]. (In case of copying images to launch "Image ...

Operating Instructions
Page 85
...Camera Wizard], then click [OK]. I'm finished working with these pictures], then click [Next]. Then, perform the procedure from step 1 again. Viewing the images on my computer using the Windows XP AutoPlay wizard a Make a USB connection (page 82). b Click [Next]. The "Completing the Scanner and Camera... Wizard" screen appears. The "Scanner and Camera Wizard" screen...] in that you do not want to copy to disconnect the USB cable and reconnect it. The "Picture Name and Destination" screen appears...
...Camera Wizard], then click [OK]. I'm finished working with these pictures], then click [Next]. Then, perform the procedure from step 1 again. Viewing the images on my computer using the Windows XP AutoPlay wizard a Make a USB connection (page 82). b Click [Next]. The "Completing the Scanner and Camera... Wizard" screen appears. The "Scanner and Camera Wizard" screen...] in that you do not want to copy to disconnect the USB cable and reconnect it. The "Picture Name and Destination" screen appears...
Operating Instructions
Page 88
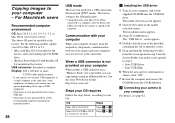
...OS X. When connected to a computer, only the data in the folder selected by the camera is the [Normal] mode. * Compatible only with the Mac OS 8.6 installed at the factory USB connector: Provided as standard Display: 800 × 600 dots or more 32 000-color...model selection screen appears. 2 Click [Cyber-shot] on your computer resumes from the CD-ROM drive. The factory setting is copied to the computer. See the Sony Website for a USB connection, [Normal] and [PTP]* modes. The installation menu appears. 3 Click [USB Driver]. For Macintosh users Recommended computer ...
...OS X. When connected to a computer, only the data in the folder selected by the camera is the [Normal] mode. * Compatible only with the Mac OS 8.6 installed at the factory USB connector: Provided as standard Display: 800 × 600 dots or more 32 000-color...model selection screen appears. 2 Click [Cyber-shot] on your computer resumes from the CD-ROM drive. The factory setting is copied to the computer. See the Sony Website for a USB connection, [Normal] and [PTP]* modes. The installation menu appears. 3 Click [USB Driver]. For Macintosh users Recommended computer ...
Operating Instructions
Page 89
... icon on your computer 1 Double-click the hard disk icon. 2 Double-click the desired image file in your computer off the camera during a USB connection Drag and drop the drive icon or the icon of the images and file names, see operating instructions supplied with Macintosh. The... or turn off the camera • If you click an E-MAIL mode image file, "There is no application available to your OS version. 1 Click [Choose Application...] on the computer before installing the USB driver and application. • You can use the "ImageMixer Ver. 1.5 for Sony" cannot be used with ...
... icon on your computer 1 Double-click the hard disk icon. 2 Double-click the desired image file in your computer off the camera during a USB connection Drag and drop the drive icon or the icon of the images and file names, see operating instructions supplied with Macintosh. The... or turn off the camera • If you click an E-MAIL mode image file, "There is no application available to your OS version. 1 Click [Choose Application...] on the computer before installing the USB driver and application. • You can use the "ImageMixer Ver. 1.5 for Sony" cannot be used with ...
Operating Instructions
Page 94
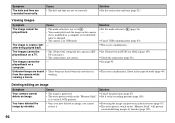
...it to the LOCK position. • Once you have deleted the image by mistake (page 109). 94 You have deleted an image, you from the camera while viewing a movie. • The mode selector is not set correctly. p Protecting the image can prevent accidental erasure (page 67). p This is... played back. p The write-protect switch on a computer or its folder/file name is changed. • The camera is in USB mode. - • The [Video Out] setting for the camera in focus preset mode (page 49). Symptom The date and time are heard from deleting images by mistake. Cause &#...
...it to the LOCK position. • Once you have deleted the image by mistake (page 109). 94 You have deleted an image, you from the camera while viewing a movie. • The mode selector is not set correctly. p Protecting the image can prevent accidental erasure (page 67). p This is... played back. p The write-protect switch on a computer or its folder/file name is changed. • The camera is in USB mode. - • The [Video Out] setting for the camera in focus preset mode (page 49). Symptom The date and time are heard from deleting images by mistake. Cause &#...
Operating Instructions
Page 95
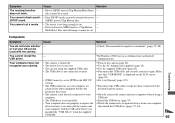
...; The movie is turned off. p Check "Recommended computer environment" (pages 78, 88). USB driver. Your computer does not recognize your camera. • The camera is not long enough to your p Directly connect the camera and your computer are not using a computer. p Use the AC Adaptor (not supplied) ...to other equipment besides the keyboard and the mouse. keyboard, the mouse. • The camera is too low. p Turn on your computer without using the supplied USB cable. p Install the USB driver (page 79). • Your computer does not properly recognize the p Delete the ...
...; The movie is turned off. p Check "Recommended computer environment" (pages 78, 88). USB driver. Your computer does not recognize your camera. • The camera is not long enough to your p Directly connect the camera and your computer are not using a computer. p Use the AC Adaptor (not supplied) ...to other equipment besides the keyboard and the mouse. keyboard, the mouse. • The camera is too low. p Turn on your computer without using the supplied USB cable. p Install the USB driver (page 79). • Your computer does not properly recognize the p Delete the ...

Operating Instructions
Page 96
...a movie on a computer. Solution p Insert it from the right side (page 23). • The write-protect switch on HELP. After making a USB connection, "Image Transfer" does not automatically start. p Consult the computer or software manufacturer. For Macintosh, 800 × 600 dots or more, 32 ...96 Cause • You are using the "ImageMixer Ver. 1.5 for Sony" software, click on your OS (pages 83, 84, 88). You cannot record on HELP. Symptom You cannot copy images. p Select [Launch Image Transfer automatically when the camera, etc., is full. p Copy the movie to the recording position ...
...a movie on a computer. Solution p Insert it from the right side (page 23). • The write-protect switch on HELP. After making a USB connection, "Image Transfer" does not automatically start. p Consult the computer or software manufacturer. For Macintosh, 800 × 600 dots or more, 32 ...96 Cause • You are using the "ImageMixer Ver. 1.5 for Sony" software, click on your OS (pages 83, 84, 88). You cannot record on HELP. Symptom You cannot copy images. p Select [Launch Image Transfer automatically when the camera, etc., is full. p Copy the movie to the recording position ...
Operating Instructions
Page 107
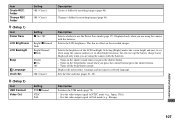
...shutter sound when you press the shutter button. - Sets the date and time (pages 21, 45). (Setup 2) Item USB Connect Video Out Setting PTP/xNormal NTSC PAL Description Switches the USB mode (page 78). - Selects the LCD brightness. OK / Cancel Description Selects whether to PAL mode (e.g., Europe). Turns off.../ xDark Beep Language Clock Set Shutter x On Off - Changes a folder for recording images (page 46). Displayed only when you are using the camera outdoors or in selected language. This has no effect on the recorded images. Displayed only when you are using the...
...shutter sound when you press the shutter button. - Sets the date and time (pages 21, 45). (Setup 2) Item USB Connect Video Out Setting PTP/xNormal NTSC PAL Description Switches the USB mode (page 78). - Selects the LCD brightness. OK / Cancel Description Selects whether to PAL mode (e.g., Europe). Turns off.../ xDark Beep Language Clock Set Shutter x On Off - Changes a folder for recording images (page 46). Displayed only when you are using the camera outdoors or in selected language. This has no effect on the recorded images. Displayed only when you are using the...
Operating Instructions
Page 111
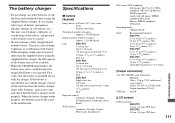
...camera Approx. 3 340 000 pixels Effective pixels number of camera Approx. 3 210 000 pixels Lens DSC-P72 3× zoom lens f=6.0 to 18.0 mm (35 mm camera conversion: 39 to 117mm (1 9/16 to 4 5/8 inches)) F2.8-5.6 DSC... (at a 47 kΩ load) Output impedance 2.2 kΩ USB jack mini-B [LCD screen] LCD panel used DSC-P72 3.8 cm (1.5 type) TFT drive DSC-P52 4.0 cm (1.6 type) TFT drive 111 The battery charger •... the cause of the malfunction. If you charge other batteries except the Sony nickel hydride battery using the supplied battery charger, the full capacity of ...
...camera Approx. 3 340 000 pixels Effective pixels number of camera Approx. 3 210 000 pixels Lens DSC-P72 3× zoom lens f=6.0 to 18.0 mm (35 mm camera conversion: 39 to 117mm (1 9/16 to 4 5/8 inches)) F2.8-5.6 DSC... (at a 47 kΩ load) Output impedance 2.2 kΩ USB jack mini-B [LCD screen] LCD panel used DSC-P72 3.8 cm (1.5 type) TFT drive DSC-P52 4.0 cm (1.6 type) TFT drive 111 The battery charger •... the cause of the malfunction. If you charge other batteries except the Sony nickel hydride battery using the supplied battery charger, the full capacity of ...


