Operating Instructions
Page 1
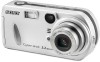
... manual thoroughly, and retain it for future reference. Refer to these numbers whenever you call upon your computer ______ Troubleshooting Additional information Index Model No. Digital Still Camera Operating Instructions Before operating the unit, please read this product. DSC-P32/P52/P72 © 2003 Sony Corporation 3-082-146-11(1) Getting started Shooting still images Viewing still images Deleting still images Before advanced operations Advanced still image shooting Advanced still image viewing Still image editing Enjoying movies...
... manual thoroughly, and retain it for future reference. Refer to these numbers whenever you call upon your computer ______ Troubleshooting Additional information Index Model No. Digital Still Camera Operating Instructions Before operating the unit, please read this product. DSC-P32/P52/P72 © 2003 Sony Corporation 3-082-146-11(1) Getting started Shooting still images Viewing still images Deleting still images Before advanced operations Advanced still image shooting Advanced still image viewing Still image editing Enjoying movies...

Operating Instructions
Page 3
... EXTENSION CORD, RECEPTACLE OR OTHER OUTLET UNLESS THE BLADES CAN BE FULLY INSERTED TO PREVENT BLADE EXPOSURE. If you change the fuse. Attention The electromagnetic fields at the specific frequencies may cause harmful interference to which can help . You can be determined by turning the equipment off and on, the user is encouraged to try to operate this manual...
... EXTENSION CORD, RECEPTACLE OR OTHER OUTLET UNLESS THE BLADES CAN BE FULLY INSERTED TO PREVENT BLADE EXPOSURE. If you change the fuse. Attention The electromagnetic fields at the specific frequencies may cause harmful interference to which can help . You can be determined by turning the equipment off and on, the user is encouraged to try to operate this manual...

Operating Instructions
Page 4
... on image data compatibility • This camera conforms with the Design rule for the DSCP72 only) This camera is equipped with a LCD finder) and lens • The LCD screen and the LCD finder are operational for if recording or playback is not a malfunction. Do not shake or strike the camera In addition to malfunctions and inability to make a trial recording to record images, this product. The power zoom lens (for Camera File system...
... on image data compatibility • This camera conforms with the Design rule for the DSCP72 only) This camera is equipped with a LCD finder) and lens • The LCD screen and the LCD finder are operational for if recording or playback is not a malfunction. Do not shake or strike the camera In addition to malfunctions and inability to make a trial recording to record images, this product. The power zoom lens (for Camera File system...

Operating Instructions
Page 6
... use the control button 20 Setting the date and time 21 Shooting still images Inserting and removing a "Memory Stick 23 Setting the still image size 24 Image size and quality 25 Basic still image shooting - Table of your camera 36 Viewing images on a TV screen 38 Deleting still images Deleting images 40 Formatting a "Memory Stick 44 Before advanced operations How to setup and operate your camera on the LCD screen of contents Before using auto mode 26 Checking the last image shot - using your camera 4 Identifying the parts 8 Getting started Preparing batteries 14 Charging...
... use the control button 20 Setting the date and time 21 Shooting still images Inserting and removing a "Memory Stick 23 Setting the still image size 24 Image size and quality 25 Basic still image shooting - Table of your camera 36 Viewing images on a TV screen 38 Deleting still images Deleting images 40 Formatting a "Memory Stick 44 Before advanced operations How to setup and operate your camera on the LCD screen of contents Before using auto mode 26 Checking the last image shot - using your camera 4 Identifying the parts 8 Getting started Preparing batteries 14 Charging...
Operating Instructions
Page 7
...Jog playback 65 Still image editing Protecting images - For Windows users 78 Installing the USB driver 79 Installing "Image Transfer 80 Installing "ImageMixer 81 Connecting the camera to your computer 82 Copying images using "Image Transfer" 83 Changing "Image Transfer" settings .. 84 Copying images without using "Image Transfer 84 Viewing the images on your computer Copying images to print - Slide show 63 Rotating still images - Protect 67 On the single screen 67 On the Index (nine-image) screen.......67 On the Index (triple-image) screen .....68 Changing image size...
...Jog playback 65 Still image editing Protecting images - For Windows users 78 Installing the USB driver 79 Installing "Image Transfer 80 Installing "ImageMixer 81 Connecting the camera to your computer 82 Copying images using "Image Transfer" 83 Changing "Image Transfer" settings .. 84 Copying images without using "Image Transfer 84 Viewing the images on your computer Copying images to print - Slide show 63 Rotating still images - Protect 67 On the single screen 67 On the Index (nine-image) screen.......67 On the Index (triple-image) screen .....68 Changing image size...
Operating Instructions
Page 17
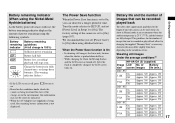
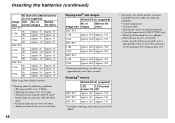
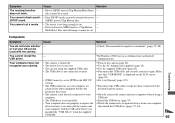
... number of images that can be recorded/ played back The tables show approximate guidelines for changing the supplied "Memory Stick" as necessary. The guidelines for the number of time the camera can be recorded or played back allow for the length of images that you shoot in Normal mode in Setup 1 to On, you can be used , the remaining battery information is not displayed. The Power Save function When the Power Save function is turned...
... number of images that can be recorded/ played back The tables show approximate guidelines for changing the supplied "Memory Stick" as necessary. The guidelines for the number of time the camera can be recorded or played back allow for the length of images that you shoot in Normal mode in Setup 1 to On, you can be used , the remaining battery information is not displayed. The Power Save function When the Power Save function is turned...
Operating Instructions
Page 18
... of time or after charging (page 110). Using the flash once in order, one image every 30 seconds. - of images recordable decrease under the following conditions: - Using the zoom heavily (DSC-P72/P52 only) - Shooting one approximately every three seconds Shooting3) movies DSC-P72 DSC-P52 DSC-P32 NH-AA-DA (2) (supplied) LCD LCD screen screen On Off Approx. 160 Approx. 210 Approx. 160 Approx. 210 Approx. 160 Approx. 210 3) Continuous shooting with a picture size...
... of time or after charging (page 110). Using the flash once in order, one image every 30 seconds. - of images recordable decrease under the following conditions: - Using the zoom heavily (DSC-P72/P52 only) - Shooting one approximately every three seconds Shooting3) movies DSC-P72 DSC-P52 DSC-P32 NH-AA-DA (2) (supplied) LCD LCD screen screen On Off Approx. 160 Approx. 210 Approx. 160 Approx. 210 Approx. 160 Approx. 210 3) Continuous shooting with a picture size...
Operating Instructions
Page 26
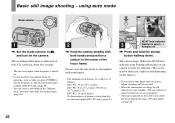
... lens cover opens when the power is turned on the power or when the zoom function is operating, such as follows: DSC-P72: 50 cm (19 3/4 inches) DSC-P52: 8 cm (3 1/4 inches) (W)/40 cm (15 3/4 inches) (T) DSC-P32: 10 cm (4 inches) To shoot subjects at distances closer than this, use the macro mode (DSC-P72 only) (page 30). The recording folder name is indicated on the LCD screen for a split second depending on the camera...
... lens cover opens when the power is turned on the power or when the zoom function is operating, such as follows: DSC-P72: 50 cm (19 3/4 inches) DSC-P52: 8 cm (3 1/4 inches) (W)/40 cm (15 3/4 inches) (T) DSC-P32: 10 cm (4 inches) To shoot subjects at distances closer than this, use the macro mode (DSC-P72 only) (page 30). The recording folder name is indicated on the LCD screen for a split second depending on the camera...
Operating Instructions
Page 79
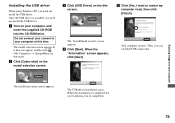
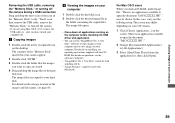
... this time. a Turn on your computer, and insert the supplied CD-ROM into the CD-ROM drive. d Click [Next]. The "InstallShield wizard" screen appears. Enjoying images on your computer The installation menu screen appears. Your computer restarts. Installing the USB driver When using Windows XP, you need not install the USB driver. Once the USB driver is completed, the screen informs you of completion. 79 Do not connect your camera to restart my...
... this time. a Turn on your computer, and insert the supplied CD-ROM into the CD-ROM drive. d Click [Next]. The "InstallShield wizard" screen appears. Enjoying images on your computer The installation menu screen appears. Your computer restarts. Installing the USB driver When using Windows XP, you need not install the USB driver. Once the USB driver is completed, the screen informs you of completion. 79 Do not connect your camera to restart my...
Operating Instructions
Page 88
... a USB connection, [Normal] and [PTP]* modes. OS Mac OS 8.5.1/8.6/9.0 Mac OS 9.1/9.2/Mac OS X (v 10.0/v 10.1/v10.2) Steps Steps 1 to 4 Steps 2 to 4 a Installing the USB driver 1 Turn on the model selection screen. The installation menu appears. 3 Click [USB Driver]. Copying images to your computer, and set the supplied CD-ROM into the System Folder icon in the screen opened in step 4. • Sony USB Driver • Sony USB Shim 6 When the message for details. When connected to a computer, only the data in...
... a USB connection, [Normal] and [PTP]* modes. OS Mac OS 8.5.1/8.6/9.0 Mac OS 9.1/9.2/Mac OS X (v 10.0/v 10.1/v10.2) Steps Steps 1 to 4 Steps 2 to 4 a Installing the USB driver 1 Turn on the model selection screen. The installation menu appears. 3 Click [USB Driver]. Copying images to your computer, and set the supplied CD-ROM into the System Folder icon in the screen opened in step 4. • Sony USB Driver • Sony USB Shim 6 When the message for details. When connected to a computer, only the data in...
Operating Instructions
Page 89
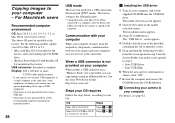
... images on operation, see the software's help files. • "ImageMixer Ver. 1.5 for Sony" software to copy images to open the document "DSC0ssss.JPE"." 2 Change [Recommended Applications] to the hard disk icon. c Copying images 1 Double-click the newly recognized icon on your computer Removing the USB cable, removing the "Memory Stick," or turning off the camera during a USB connection Drag and drop the drive icon or the icon of the "Memory Stick" inserted in the folder containing the copied files. d Viewing the images on...
... images on operation, see the software's help files. • "ImageMixer Ver. 1.5 for Sony" software to copy images to open the document "DSC0ssss.JPE"." 2 Change [Recommended Applications] to the hard disk icon. c Copying images 1 Double-click the newly recognized icon on your computer Removing the USB cable, removing the "Memory Stick," or turning off the camera during a USB connection Drag and drop the drive icon or the icon of the "Memory Stick" inserted in the folder containing the copied files. d Viewing the images on...

Operating Instructions
Page 93
... flash). • When shooting still images, (Camera) is set to . • [Moving Image] is not set to [Clip Motion] (page 106). p Set it . come out red. p Set [Red Eye Reduction] to (page 26). p This is monochrome (black and white). • [PFX] (P. p Delete the images saved in the SET UP settings. p Set the mode selector to "Auto" (No indicator), (Forced flash), or (Slow synchro) (page 32). p Set it to [Clip Motion] in the "Memory Stick," or format it...
... flash). • When shooting still images, (Camera) is set to . • [Moving Image] is not set to [Clip Motion] (page 106). p Set it . come out red. p Set [Red Eye Reduction] to (page 26). p This is monochrome (black and white). • [PFX] (P. p Delete the images saved in the SET UP settings. p Set the mode selector to "Auto" (No indicator), (Forced flash), or (Slow synchro) (page 32). p Set it to [Clip Motion] in the "Memory Stick," or format it...
Operating Instructions
Page 95
... movie is too low. or not your computer without using the supplied USB cable. p In Windows 2000, log on the camera (page 20). • The battery level is not long enough to your p Directly connect the camera and your OS can be cut. p Use the supplied USB cable (page 82). • The USB cable is not installed. settings. • The USB connectors on the LCD screen (page 82). • [USB Connect] is displayed...
... movie is too low. or not your computer without using the supplied USB cable. p In Windows 2000, log on the camera (page 20). • The battery level is not long enough to your p Directly connect the camera and your OS can be cut. p Use the supplied USB cable (page 82). • The USB cable is not installed. settings. • The USB connectors on the LCD screen (page 82). • [USB Connect] is displayed...

Operating Instructions
Page 96
... write-protect switch on a "Memory Stick." 96 Cause • You are playing back the movie directly from the "Memory Stick." - p If you are using the "ImageMixer Ver. 1.5 for Sony" software, click on a computer. "Memory Stick" Symptom You cannot insert a "Memory Stick." After making a USB connection, "Image Transfer" does not automatically start. For Macintosh, 800 × 600 dots or more, 32 000 colors or more . p Check the printer settings. Symptom You cannot copy images. The error message - Solution p Connect...
... write-protect switch on a "Memory Stick." 96 Cause • You are playing back the movie directly from the "Memory Stick." - p If you are using the "ImageMixer Ver. 1.5 for Sony" software, click on a computer. "Memory Stick" Symptom You cannot insert a "Memory Stick." After making a USB connection, "Image Transfer" does not automatically start. For Macintosh, 800 × 600 dots or more, 32 000 colors or more . p Check the printer settings. Symptom You cannot copy images. The error message - Solution p Connect...

Operating Instructions
Page 98
... indicator may flash even though there are still 5 to 10 minutes of remaining battery time left. 98 File protect • The image is dirty. • The inserted "Memory Stick" cannot be used with your camera. System error Memory Stick error Memory Stick type error • Turn the power off and on your camera. • The battery level is set to the recording position (page 109). Folder error • A folder with your camera (page 109). Invalid operation...
... indicator may flash even though there are still 5 to 10 minutes of remaining battery time left. 98 File protect • The image is dirty. • The inserted "Memory Stick" cannot be used with your camera. System error Memory Stick error Memory Stick type error • Turn the power off and on your camera. • The battery level is set to the recording position (page 109). Folder error • A folder with your camera (page 109). Invalid operation...

Operating Instructions
Page 106
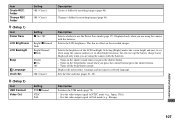
... Tool) Item Format Setting OK / Cancel File Number x Series Reset Description Formats the "Memory Stick." When shooting movies, or images recorded in Clip Motion/Multi Burst modes, the date and time cannot be inserted in the dark. Resets the file numbering and starts from 0001 each time the folder is changed. (When the recording folder contains a file, a number one higher than the largest number is changed or the recording folder is assigned.) 106 Reduces the red-eye phenomenon when using a flash (page 33...
... Tool) Item Format Setting OK / Cancel File Number x Series Reset Description Formats the "Memory Stick." When shooting movies, or images recorded in Clip Motion/Multi Burst modes, the date and time cannot be inserted in the dark. Resets the file numbering and starts from 0001 each time the folder is changed. (When the recording folder contains a file, a number one higher than the largest number is changed or the recording folder is assigned.) 106 Reduces the red-eye phenomenon when using a flash (page 33...
Operating Instructions
Page 107
... use the Power Save mode (page 17). Sets the date and time (pages 21, 45). (Setup 2) Item USB Connect Video Out Setting PTP/xNormal NTSC PAL Description Switches the USB mode (page 78). - Sets the video output signal to NTSC mode (e.g., Japan, USA). - Changes a folder for recording images (page 46). Selects the brightness of the LCD backlight. Item Create REC. Selects the LCD brightness. Displayed only when you are using the camera with the batteries. - Turns off the beep/shutter sound...
... use the Power Save mode (page 17). Sets the date and time (pages 21, 45). (Setup 2) Item USB Connect Video Out Setting PTP/xNormal NTSC PAL Description Switches the USB mode (page 78). - Sets the video output signal to NTSC mode (e.g., Japan, USA). - Changes a folder for recording images (page 46). Selects the brightness of the LCD backlight. Item Create REC. Selects the LCD brightness. Displayed only when you are using the camera with the batteries. - Turns off the beep/shutter sound...
Operating Instructions
Page 109
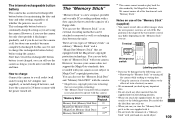
..." Recording/ Playback Memory Stick (Memory Stick Duo) a MagicGate Memory Stick (MagicGate Memory Stick Duo) a** Memory Stick PRO a** ** The camera cannot record or play back the data needed by the MagicGate function. Be careful that the label does not stick out. • When you do not record the date and time. The position or the shape of the "Memory Stick" (supplied) • You cannot record, edit, or delete images when the write-protect switch...
..." Recording/ Playback Memory Stick (Memory Stick Duo) a MagicGate Memory Stick (MagicGate Memory Stick Duo) a** Memory Stick PRO a** ** The camera cannot record or play back the data needed by the MagicGate function. Be careful that the label does not stick out. • When you do not record the date and time. The position or the shape of the "Memory Stick" (supplied) • You cannot record, edit, or delete images when the write-protect switch...

Operating Instructions
Page 116
... USB cable 82 USB driver 79, 88 Control button 20 Creating a new folder 47 116 D Date and time 21, 35 DC plug 19 Deleting images 40, 74 Divide 76 E Editing still images Print (DPOF) mark 70 Protect 67 Resize 69 E-Mail 56 EV adjustment 50 Exposure EV adjustment 50 F File File names 87 Image file storage destinations 86 Finder 34 Flash Daylight synchro 32 Flash Level 53 Red Eye Reduction 33 Selecting a flash mode 32 Focus AE/AF lock...
... USB cable 82 USB driver 79, 88 Control button 20 Creating a new folder 47 116 D Date and time 21, 35 DC plug 19 Deleting images 40, 74 Divide 76 E Editing still images Print (DPOF) mark 70 Protect 67 Resize 69 E-Mail 56 EV adjustment 50 Exposure EV adjustment 50 F File File names 87 Image file storage destinations 86 Finder 34 Flash Daylight synchro 32 Flash Level 53 Red Eye Reduction 33 Selecting a flash mode 32 Focus AE/AF lock...
Operating Instructions
Page 117
... movies 76 Deleting movies 74 Shooting movies 72 Viewing 73 MPG 87 N NR slow shutter 59 NTSC 107 P PAL 107 Picture effect 60 Power An external power source 19 Battery 14 Inserting battery 16 On/Off 20 Precautions 108 R Red Eye Reduction 33 RESET button 91 S Self-diagnosis display 100 Self-timer 31 Setting Changing menu 45 Date and time 21 Image size 24 SET UP 45 Shooting close-ups (Macro 30 Shooting mode Clip Motion 54 E-Mail 56 MPEG Movie 72 Shooting (using auto mode 26 Shooting...
... movies 76 Deleting movies 74 Shooting movies 72 Viewing 73 MPG 87 N NR slow shutter 59 NTSC 107 P PAL 107 Picture effect 60 Power An external power source 19 Battery 14 Inserting battery 16 On/Off 20 Precautions 108 R Red Eye Reduction 33 RESET button 91 S Self-diagnosis display 100 Self-timer 31 Setting Changing menu 45 Date and time 21 Image size 24 SET UP 45 Shooting close-ups (Macro 30 Shooting mode Clip Motion 54 E-Mail 56 MPEG Movie 72 Shooting (using auto mode 26 Shooting...


