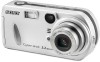

Operating Instructions
Page 4
... avoid the potential risk of the battery used to power this may render the "Memory Stick" unusable or image data breakdown, damage or loss may cause malfunctions. • Do not press the LCD screen hardly. Please consult with your camera or recording medium, etc. Back up ) data to a disk. Do not ... are not guaranteed. The power zoom lens (for long periods may occur. The screen may be contrary to it. and Canada THIS CLASS B DIGITAL DEVICE COMPLIES WITH PART 15 OF THE FCC RULES AND THE CANADIAN ICES-003 OPERATION IS SUBJECT TO THE FOLLOWING TWO CONDITIONS: (1) THIS DEVICE MAY...
... avoid the potential risk of the battery used to power this may render the "Memory Stick" unusable or image data breakdown, damage or loss may cause malfunctions. • Do not press the LCD screen hardly. Please consult with your camera or recording medium, etc. Back up ) data to a disk. Do not ... are not guaranteed. The power zoom lens (for long periods may occur. The screen may be contrary to it. and Canada THIS CLASS B DIGITAL DEVICE COMPLIES WITH PART 15 OF THE FCC RULES AND THE CANADIAN ICES-003 OPERATION IS SUBJECT TO THE FOLLOWING TWO CONDITIONS: (1) THIS DEVICE MAY...
Operating Instructions
Page 5
... are not actual images shot using the camera. The illustrations and screen...camera in sandy or dusty locations may cause a malfunction. Trademarks • "Memory Stick," , and "MagicGate Memory Stick" are trademarks of Sony Corporation. • "Memory Stick Duo" and are trademarks of Sony Corporation. • "Memory Stick PRO" and are trademarks of Sony Corporation. • "MagicGate" and are trademarks of Sony...DSC-P72 unless noted otherwise. Do not get the camera wet. The camera may cause irrecoverable damage to record or play back properly. • Do not use the camera...
... are not actual images shot using the camera. The illustrations and screen...camera in sandy or dusty locations may cause a malfunction. Trademarks • "Memory Stick," , and "MagicGate Memory Stick" are trademarks of Sony Corporation. • "Memory Stick Duo" and are trademarks of Sony Corporation. • "Memory Stick PRO" and are trademarks of Sony Corporation. • "MagicGate" and are trademarks of Sony...DSC-P72 unless noted otherwise. Do not get the camera wet. The camera may cause irrecoverable damage to record or play back properly. • Do not use the camera...

Operating Instructions
Page 6
... a still image 35 Viewing still images Viewing images on the LCD screen of contents Before using auto mode 26 Checking the last image shot - Macro (DSC-P72 only 30 Using the self-timer 31 Selecting a flash mode 32 Shooting with audio files - White Balance...52 Adjusting the flash level...the batteries 16 Using an external power source 19 Using your camera abroad 19 Turning your camera on a TV screen 38 Deleting still images Deleting images 40 Formatting a "Memory Stick 44 Before advanced operations How to setup and operate your camera 36 Viewing images on /off 20 How to use the...
... a still image 35 Viewing still images Viewing images on the LCD screen of contents Before using auto mode 26 Checking the last image shot - Macro (DSC-P72 only 30 Using the self-timer 31 Selecting a flash mode 32 Shooting with audio files - White Balance...52 Adjusting the flash level...the batteries 16 Using an external power source 19 Using your camera abroad 19 Turning your camera on a TV screen 38 Deleting still images Deleting images 40 Formatting a "Memory Stick 44 Before advanced operations How to setup and operate your camera 36 Viewing images on /off 20 How to use the...
Operating Instructions
Page 7
...image editing Protecting images - For Windows users 78 Installing the USB driver 79 Installing "Image Transfer 80 Installing "ImageMixer 81 Connecting the camera to your computer 82 Copying images using "Image Transfer" 83 Changing "Image Transfer" settings .. 84 Copying images without using "Image Transfer... Playing back images shot in Multi Burst mode 65 Playing back continuously 65 Playing back frame by frame - Folder 61 Enlarging a portion of images that can be saved/ shooting time 101 Menu items 102 SET UP items 106 Precautions 108 The "Memory Stick 109 The nickel-metal...
...image editing Protecting images - For Windows users 78 Installing the USB driver 79 Installing "Image Transfer 80 Installing "ImageMixer 81 Connecting the camera to your computer 82 Copying images using "Image Transfer" 83 Changing "Image Transfer" settings .. 84 Copying images without using "Image Transfer... Playing back images shot in Multi Burst mode 65 Playing back continuously 65 Playing back frame by frame - Folder 61 Enlarging a portion of images that can be saved/ shooting time 101 Menu items 102 SET UP items 106 Precautions 108 The "Memory Stick 109 The nickel-metal...

Operating Instructions
Page 8
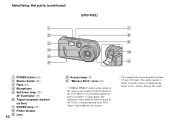
... CCD. Identifying the parts (DSC-P72) 1 7 2 8 3 9 4 q; 5 qa 6 A POWER button (20) B Shutter button (26) C Flash (32) D Microphone E Self-timer lamp (31)/ AF illuminator (33) F Tripod receptacle (bottom surface) G POWER lamp (20) H Finder window I Lens 8 J Access lamp (23) K "Memory Stick" cover (23) • "3.2MEGA PIXELS" shown on the surface of the camera is the number of effective...
... CCD. Identifying the parts (DSC-P72) 1 7 2 8 3 9 4 q; 5 qa 6 A POWER button (20) B Shutter button (26) C Flash (32) D Microphone E Self-timer lamp (31)/ AF illuminator (33) F Tripod receptacle (bottom surface) G POWER lamp (20) H Finder window I Lens 8 J Access lamp (23) K "Memory Stick" cover (23) • "3.2MEGA PIXELS" shown on the surface of the camera is the number of effective...
Operating Instructions
Page 10
... having longer screws, and may damage the camera. Identifying the parts (continued) (DSC-P52) 1 7 2 8 3 9 4 q; 5 6 qa A POWER button (20) B Shutter button (26) C Flash (32) D Microphone E Self-timer lamp (31)/ AF illuminator (33) F Tripod receptacle (bottom surface) G POWER lamp (20) H Finder window I Lens 10 J Access lamp (23) K "Memory Stick" cover (23) • "3.2MEGA PIXELS" shown on...
... having longer screws, and may damage the camera. Identifying the parts (continued) (DSC-P52) 1 7 2 8 3 9 4 q; 5 6 qa A POWER button (20) B Shutter button (26) C Flash (32) D Microphone E Self-timer lamp (31)/ AF illuminator (33) F Tripod receptacle (bottom surface) G POWER lamp (20) H Finder window I Lens 10 J Access lamp (23) K "Memory Stick" cover (23) • "3.2MEGA PIXELS" shown on...

Operating Instructions
Page 12
Identifying the parts (continued) (DSC-P32) 1 7 2 8 3 9 4 5 q; 6 qa A POWER button (20) B Shutter button (26) C Flash (32) D Finder window E Lens F Tripod receptacle (bottom surface) G POWER lamp (20) H Microphone I Self-timer lamp (31)/ 12 AF illuminator (33) J Access lamp (23) K "Memory Stick" cover (23) • "3.2MEGA PIXELS" shown on the surface of the camera is 3.1 mega pixels. However...
Identifying the parts (continued) (DSC-P32) 1 7 2 8 3 9 4 5 q; 6 qa A POWER button (20) B Shutter button (26) C Flash (32) D Finder window E Lens F Tripod receptacle (bottom surface) G POWER lamp (20) H Microphone I Self-timer lamp (31)/ 12 AF illuminator (33) J Access lamp (23) K "Memory Stick" cover (23) • "3.2MEGA PIXELS" shown on the surface of the camera is 3.1 mega pixels. However...
Operating Instructions
Page 17
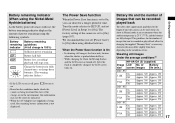
...Save function When the Power Save function is not displayed. Change the batteries for changing the supplied "Memory Stick" as necessary. Turn the mode selector to SET UP, and set [Power Save] in an ...-Metal Hydride batteries) As the battery power decreases with use . The factory setting of time the camera can be used , the remaining battery information is set to On, you can be correctly indicated....show approximate guidelines for a longer period of Battery size screen images life (min.) DSC-P72 3.1M On Off Approx. 300 Approx. 150 Approx. 500 Approx. 250 VGA On Off Approx. ...
...Save function When the Power Save function is not displayed. Change the batteries for changing the supplied "Memory Stick" as necessary. Turn the mode selector to SET UP, and set [Power Save] in an ...-Metal Hydride batteries) As the battery power decreases with use . The factory setting of time the camera can be used , the remaining battery information is set to On, you can be correctly indicated....show approximate guidelines for a longer period of Battery size screen images life (min.) DSC-P72 3.1M On Off Approx. 300 Approx. 150 Approx. 500 Approx. 250 VGA On Off Approx. ...

Operating Instructions
Page 23
... is lit, the camera is recording or reading out an image. If you insert a "Memory Stick," push it as far as it can go. Shooting still images Inserting and removing a "Memory Stick" Label side Terminal side Shooting still images Access lamp 1 , Open the "Memory Stick" cover. To remove the "Memory Stick" Open the "Memory Stick" cover, then push the "Memory Stick" to pop...
... is lit, the camera is recording or reading out an image. If you insert a "Memory Stick," push it as far as it can go. Shooting still images Inserting and removing a "Memory Stick" Label side Terminal side Shooting still images Access lamp 1 , Open the "Memory Stick" cover. To remove the "Memory Stick" Open the "Memory Stick" cover, then push the "Memory Stick" to pop...

Operating Instructions
Page 25
... fewer images in other Sony devices are played back, the image size indication may be saved in your image, but also the larger the amount of data needed to match the size of the print paper used. The number of images that can be saved in a "Memory Stick"2) The number of images... number of images recordable is more information about the image quality mode, see page 46. • "3.2MEGA PIXELS" shown on the surface of the camera is indicated. 25 Image size and quality Shooting still images You can choose image size (number of pixels) and image quality (compression ratio) based on...
... fewer images in other Sony devices are played back, the image size indication may be saved in your image, but also the larger the amount of data needed to match the size of the print paper used. The number of images that can be saved in a "Memory Stick"2) The number of images... number of images recordable is more information about the image quality mode, see page 46. • "3.2MEGA PIXELS" shown on the surface of the camera is indicated. 25 Image size and quality Shooting still images You can choose image size (number of pixels) and image quality (compression ratio) based on...
Operating Instructions
Page 26
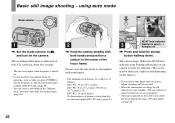
...DSC-P72 only) (page 30). Do not cover the lens, flash, or microphone with both hands and position a subject in green t Remains on . • Do not touch the lens portion while it is not set properly. • The frame indicated on the camera. You can create a new folder in the "Memory Stick..." and select the folder for storing images (page 46). 2 , Hold the camera steadily with your finger from the shutter button, shooting will be canceled. • When...
...DSC-P72 only) (page 30). Do not cover the lens, flash, or microphone with both hands and position a subject in green t Remains on . • Do not touch the lens portion while it is not set properly. • The frame indicated on the camera. You can create a new folder in the "Memory Stick..." and select the folder for storing images (page 46). 2 , Hold the camera steadily with your finger from the shutter button, shooting will be canceled. • When...

Operating Instructions
Page 27
...range finder is set to [Multi AF], and the metering mode is set to , the functions that can be selected change the camera mode 1 Set the mode selector to (Camera) and [Mode] (REC Mode). In this mode automatically adjusts the focus, exposure, and white balance. Twilight portratit mode [ ...no tasks are limited to . 2 Press MENU. 3 Select (Camera) with b on the control button. 4 Select the desired camera mode with the camera turned on the mode selector When the mode selector is set the shooting functions in the "Memory Stick." The position on , power is saved in the menu settings ...
...range finder is set to [Multi AF], and the metering mode is set to , the functions that can be selected change the camera mode 1 Set the mode selector to (Camera) and [Mode] (REC Mode). In this mode automatically adjusts the focus, exposure, and white balance. Twilight portratit mode [ ...no tasks are limited to . 2 Press MENU. 3 Select (Camera) with b on the control button. 4 Select the desired camera mode with the camera turned on the mode selector When the mode selector is set the shooting functions in the "Memory Stick." The position on , power is saved in the menu settings ...

Operating Instructions
Page 40
... want to delete with b/B on the control button. "Memory Stick access" appears on the control button, then press z. 40 To delete other images continuously Select the image you want to delete with V on the screen. To cancel the deletion Select [Exit] with b/ B on the camera. OK BACK/NEXT Delete Exit 3 , Select [Delete] with...
... want to delete with b/B on the control button. "Memory Stick access" appears on the control button, then press z. 40 To delete other images continuously Select the image you want to delete with V on the screen. To cancel the deletion Select [Exit] with b/ B on the camera. OK BACK/NEXT Delete Exit 3 , Select [Delete] with...
Operating Instructions
Page 42
... center with marks have been deleted. The image has not yet been deleted at this message disappears, all of the images with b/B on the screen. "Memory Stick access" appears on the control button. 2 , Press (Delete).
... center with marks have been deleted. The image has not yet been deleted at this message disappears, all of the images with b/B on the screen. "Memory Stick access" appears on the control button. 2 , Press (Delete).
Operating Instructions
Page 43
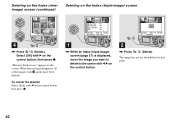
Deleting still images Delete Exit 101-0002 2003 7 4 10:30PM OK BACK/NEXT 3 , Select [Delete] with V on the control button, then press z. 43 When this message disappears, the image has been deleted. To cancel the deletion Select [Exit] with v on the screen. "Memory Stick access" appears on the control button, then press z.
Deleting still images Delete Exit 101-0002 2003 7 4 10:30PM OK BACK/NEXT 3 , Select [Delete] with V on the control button, then press z. 43 When this message disappears, the image has been deleted. To cancel the deletion Select [Exit] with v on the screen. "Memory Stick access" appears on the control button, then press z.
Operating Instructions
Page 44
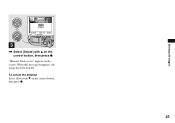
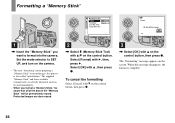
...) with v on the screen. To cancel the formatting Select [Cancel] with V on the control button, then press z. 3 , Select [OK] with v/V on the camera. • The term "formatting" means preparing a "Memory Stick" to record images; Select [Format] with v , then press z. Select [OK] with B, then, press B. Folder: OK Cancel OK Format All data will be...
...) with v on the screen. To cancel the formatting Select [Cancel] with V on the control button, then press z. 3 , Select [OK] with v/V on the camera. • The term "formatting" means preparing a "Memory Stick" to record images; Select [Format] with v , then press z. Select [OK] with B, then, press B. Folder: OK Cancel OK Format All data will be...
Operating Instructions
Page 46
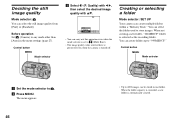
... selected here is preserved even when the camera is set to 4000 images can carry out this operation even when the mode selector is turned off. Deciding the still image quality Mode selector: You can create multiple folders within a "Memory Stick." FINE Fine Standard ISO P.Quality Mode ...PFX • You can be stored in the menu settings (page 27). Creating or selecting a folder Mode selector: SET UP Your camera can select the still image quality from [Fine] or [...
... selected here is preserved even when the camera is set to 4000 images can carry out this operation even when the mode selector is turned off. Deciding the still image quality Mode selector: You can create multiple folders within a "Memory Stick." FINE Fine Standard ISO P.Quality Mode ...PFX • You can be stored in the menu settings (page 27). Creating or selecting a folder Mode selector: SET UP Your camera can select the still image quality from [Fine] or [...
Operating Instructions
Page 47
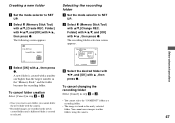
... selector to other created folder until a different folder is stored in the newly selected • Recorded images are recorded in the "Memory Stick," and the folder becomes the recording folder. b Select (Memory Stick Tool) with v , then press z. The recording folder selection screen appears. folder 102MSDCF Ready? To cancel changing the recording folder Select [... or selected. 47 Folder Creating REC. Select REC. Selecting the recording folder a Set the mode selector to SET UP. A new folder is created with the camera. • The image is created folders using the...
... selector to other created folder until a different folder is stored in the newly selected • Recorded images are recorded in the "Memory Stick," and the folder becomes the recording folder. b Select (Memory Stick Tool) with v , then press z. The recording folder selection screen appears. folder 102MSDCF Ready? To cancel changing the recording folder Select [... or selected. 47 Folder Creating REC. Select REC. Selecting the recording folder a Set the mode selector to SET UP. A new folder is created with the camera. • The image is created folders using the...
Operating Instructions
Page 54
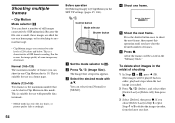
.... Control button Mode selector Shutter button a Set the mode selector to delete the images in the "Memory Stick." This is a characteristic of the frames will be saved in order, from [Normal] or [Mobile]. 54 d Shoot one shot. This is suitable for attaching to an email message. • Clip Motion images are ideal for...
.... Control button Mode selector Shutter button a Set the mode selector to delete the images in the "Memory Stick." This is a characteristic of the frames will be saved in order, from [Normal] or [Mobile]. 54 d Shoot one shot. This is suitable for attaching to an email message. • Clip Motion images are ideal for...

Operating Instructions
Page 55
... button once records 16 frames in Multi Burst mode - This is not displayed on the menu of the DSC-P52/P32. • When you play back images recorded in Multi Burst mode on other cameras may appear different from the menu settings (page 104). The menu appears. b Press MENU. d Shoot ... recorded as one image (image size: 1.2M). • (Metering Mode) is convenient for checking your image. 16 frames will not be saved in the "Memory Stick." • In Clip Motion, the date and time cannot be inserted. • When you view Clip Motion images using the Index screen, the images may...
... button once records 16 frames in Multi Burst mode - This is not displayed on the menu of the DSC-P52/P32. • When you play back images recorded in Multi Burst mode on other cameras may appear different from the menu settings (page 104). The menu appears. b Press MENU. d Shoot ... recorded as one image (image size: 1.2M). • (Metering Mode) is convenient for checking your image. 16 frames will not be saved in the "Memory Stick." • In Clip Motion, the date and time cannot be inserted. • When you view Clip Motion images using the Index screen, the images may...


