
Operating Instructions
Page 1
... call upon your computer_________ Troubleshooting Additional information Index Digital Still Camera Operating Instructions Before operating the unit, please read this product. Record the serial number in the space provided below. Model No. DSC-P100/P120/P150 Serial No. Owner's Record The model and ...serial numbers are located on your Sony dealer regarding this manual thoroughly, and retain it for future reference. DSC-P100/P120/P150 © 2004 Sony Corporation 2-149-853-11(1) ...
... call upon your computer_________ Troubleshooting Additional information Index Digital Still Camera Operating Instructions Before operating the unit, please read this product. Record the serial number in the space provided below. Model No. DSC-P100/P120/P150 Serial No. Owner's Record The model and ...serial numbers are located on your Sony dealer regarding this manual thoroughly, and retain it for future reference. DSC-P100/P120/P150 © 2004 Sony Corporation 2-149-853-11(1) ...
Operating Instructions
Page 3
...supplied need to be sure to BS 1362, (i.e., marked with your nearest Sony service station. For more information regarding recycling of this product. "Memory Stick" For the Customers in the U.S.A. THIS CLASS B DIGITAL APPARATUS COMPLIES WITH CANADIAN ICES-003. Notice Certain countries and regions may ... Do not handle damaged or leaking Lithium-Ion batteries. Please consult with or mark) must be used rechargeable batteries to power this camera. Should the fuse in Europe This product has been tested and found compliant with BS 1363 is fitted to discontinue midway (fail),...
...supplied need to be sure to BS 1362, (i.e., marked with your nearest Sony service station. For more information regarding recycling of this product. "Memory Stick" For the Customers in the U.S.A. THIS CLASS B DIGITAL APPARATUS COMPLIES WITH CANADIAN ICES-003. Notice Certain countries and regions may ... Do not handle damaged or leaking Lithium-Ion batteries. Please consult with or mark) must be used rechargeable batteries to power this camera. Should the fuse in Europe This product has been tested and found compliant with BS 1363 is fitted to discontinue midway (fail),...

Operating Instructions
Page 4
... Industries Association). • Playback of images recorded with other equipment and playback of the copyright laws. 4 Do not shake or strike the camera In addition to malfunctions and inability to record images, this first Trial recording Before you record one-time events, you may want to make ...etc. These points are normal in the manufacturing process and do not affect the recording in any way. • Be careful when placing the camera near a location that may cause a malfunction. • Images may be uneven and that generates strong radio wave or emits radiation. The power ...
... Industries Association). • Playback of images recorded with other equipment and playback of the copyright laws. 4 Do not shake or strike the camera In addition to malfunctions and inability to record images, this first Trial recording Before you record one-time events, you may want to make ...etc. These points are normal in the manufacturing process and do not affect the recording in any way. • Be careful when placing the camera near a location that may cause a malfunction. • Images may be uneven and that generates strong radio wave or emits radiation. The power ...
Operating Instructions
Page 5
... Inc. • Macromedia and Flash are of DSCP100/P120 unless noted otherwise. Carl Zeiss lens This camera is equipped with a Carl Zeiss lens which is a trademark of Sony Corporation. • Microsoft, Windows, Windows Media, and DirectX are either registered trademarks or trademarks of ... of Intel Corporation. • In addition, system and product names used in this manual are not actual images shot using this camera. Trademarks • is a trademark of Sony Corporation. • "Memory Stick," , "Memory Stick PRO", , "Memory Stick Duo", , "Memory Stick PRO Duo", , "...
... Inc. • Macromedia and Flash are of DSCP100/P120 unless noted otherwise. Carl Zeiss lens This camera is equipped with a Carl Zeiss lens which is a trademark of Sony Corporation. • Microsoft, Windows, Windows Media, and DirectX are either registered trademarks or trademarks of ... of Intel Corporation. • In addition, system and product names used in this manual are not actual images shot using this camera. Trademarks • is a trademark of Sony Corporation. • "Memory Stick," , "Memory Stick PRO", , "Memory Stick Duo", , "Memory Stick PRO Duo", , "...
Operating Instructions
Page 6
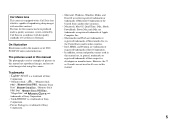
...a TV screen 38 Deleting still images Deleting images 40 Formatting a "Memory Stick 42 Before advanced operations How to setup and operate your camera 15 How to use the control button 15 Setting the date and time 16 Shooting still images Inserting and removing a "Memory Stick 18... Shooting with special effects - Slide Show 63 Manual Exposure 50 Adjusting the exposure - White Balance 56 Adjusting the flash level - Trimming (DSC-P100/P120 only 63 Playing back successive images - Picture Effect 60 Using the Cyber-shot Station 60 Advanced still image viewing Selecting the folder...
...a TV screen 38 Deleting still images Deleting images 40 Formatting a "Memory Stick 42 Before advanced operations How to setup and operate your camera 15 How to use the control button 15 Setting the date and time 16 Shooting still images Inserting and removing a "Memory Stick 18... Shooting with special effects - Slide Show 63 Manual Exposure 50 Adjusting the exposure - White Balance 56 Adjusting the flash level - Trimming (DSC-P100/P120 only 63 Playing back successive images - Picture Effect 60 Using the Cyber-shot Station 60 Advanced still image viewing Selecting the folder...
Operating Instructions
Page 7
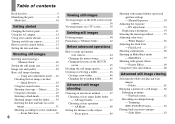
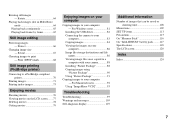
...Enjoying images on your computer 86 Image file storage destinations and file names 86 Viewing image files once copied to a computer with your camera 88 Installing "Picture Package 88 Copying images using "Picture Package 90 Using "Picture Package 91 Copying images to print - Resize 67 ...Choosing images to your computer - Rotating still images - For Windows users 81 Installing the USB driver 82 Connecting the camera to your computer 83 Copying images 84 Viewing the images on your computer Copying images to your computer - For Macintosh users 92 Using ...
...Enjoying images on your computer 86 Image file storage destinations and file names 86 Viewing image files once copied to a computer with your camera 88 Installing "Picture Package 88 Copying images using "Picture Package 90 Using "Picture Package 91 Copying images to print - Resize 67 ...Choosing images to your computer - Rotating still images - For Windows users 81 Installing the USB driver 82 Connecting the camera to your computer 83 Copying images 84 Viewing the images on your computer Copying images to your computer - For Macintosh users 92 Using ...

Operating Instructions
Page 8
... the strap 4 5 6 A POWER button (15) B Shutter button (23) C Hook for details of less than 5.5 mm (7/32 inch). You will be unable to firmly secure the camera to tripods having longer screws, and may damage the...
... the strap 4 5 6 A POWER button (15) B Shutter button (23) C Hook for details of less than 5.5 mm (7/32 inch). You will be unable to firmly secure the camera to tripods having longer screws, and may damage the...

Operating Instructions
Page 10
... (Set up) You can change the focus and other adjustments as in the auto adjustment mode, but you can also change the settings of the camera (pages 45 and 113). (Movie shooting) You can shoot movies (page 76). (Playback/Edit) You can manually adjust the aperture value and the shutter speed..., you can shoot effective pictures according to the scene (page 32). The image quality is set to [Fine] (page 45). Mode dial Before using your camera, set the desired mark on the mode dial to . (Auto adjustment mode) The focus, exposure and white balance are made automatically just as desired.
... (Set up) You can change the focus and other adjustments as in the auto adjustment mode, but you can also change the settings of the camera (pages 45 and 113). (Movie shooting) You can shoot movies (page 76). (Playback/Edit) You can manually adjust the aperture value and the shutter speed..., you can shoot effective pictures according to the scene (page 32). The image quality is set to [Fine] (page 45). Mode dial Before using your camera, set the desired mark on the mode dial to . (Auto adjustment mode) The focus, exposure and white balance are made automatically just as desired.

Operating Instructions
Page 11
...). You can use the dirty plug. Open the cover in the direction of the arrow. • Be sure to the DC IN jack of the camera. Connect the DC plug with the v mark facing the LCD screen side. • Do not short the DC plug of the AC Adaptor with a dry... the battery/"Memory Stick" cover. AC Adaptor 3 DC plug , Open the DC IN jack cover and connect the AC Adaptor (supplied) to turn off your camera. Do not use only R type battery pack (page 117). 2 Battery eject lever , Install the battery pack, then close the cover. Slide the cover in the...
...). You can use the dirty plug. Open the cover in the direction of the arrow. • Be sure to the DC IN jack of the camera. Connect the DC plug with the v mark facing the LCD screen side. • Do not short the DC plug of the AC Adaptor with a dry... the battery/"Memory Stick" cover. AC Adaptor 3 DC plug , Open the DC IN jack cover and connect the AC Adaptor (supplied) to turn off your camera. Do not use only R type battery pack (page 117). 2 Battery eject lever , Install the battery pack, then close the cover. Slide the cover in the...

Operating Instructions
Page 12
... the arrow, and remove the battery pack. • Be careful not to charge a completely discharged battery pack using the AC Adaptor at a temperature of your camera. Remaining indicator 60min Remaining time • When you switch the LCD screen on the LCD screen shows the remaining shooting or viewing time. The /CHG...
... the arrow, and remove the battery pack. • Be careful not to charge a completely discharged battery pack using the AC Adaptor at a temperature of your camera. Remaining indicator 60min Remaining time • When you switch the LCD screen on the LCD screen shows the remaining shooting or viewing time. The /CHG...

Operating Instructions
Page 13
... following conditions: - Shooting one time every 30 seconds - of images Battery life (min.) DSC-P150 7M Approx. 7200 Approx. 360 VGA (E-Mail) Approx. 7200 Approx. 360 DSC-P100/P120 5M Approx. 7200 Approx. 360 VGA (E-Mail) Approx. 7200 Approx. 360 2)...Camera & Imaging Products Association) Viewing still images2) Image size NP-FR1 (supplied) No. DSC-P100/P120 Approx. 160 min. Approx. 220 min. 3) Shooting movies continuously with a fully charged battery pack (supplied) at about three second intervals Shooting movies3) NP-FR1 (supplied) LCD screen LCD screen On Off DSC-P150...
... following conditions: - Shooting one time every 30 seconds - of images Battery life (min.) DSC-P150 7M Approx. 7200 Approx. 360 VGA (E-Mail) Approx. 7200 Approx. 360 DSC-P100/P120 5M Approx. 7200 Approx. 360 VGA (E-Mail) Approx. 7200 Approx. 360 2)...Camera & Imaging Products Association) Viewing still images2) Image size NP-FR1 (supplied) No. DSC-P100/P120 Approx. 160 min. Approx. 220 min. 3) Shooting movies continuously with a fully charged battery pack (supplied) at about three second intervals Shooting movies3) NP-FR1 (supplied) LCD screen LCD screen On Off DSC-P150...

Operating Instructions
Page 14
...the set is connected to 240 V AC, 50/60 Hz. Use a commercially available AC plug adaptor [a], if necessary, depending on the design of your camera in the arrow direction as illustrated above. Using the AC adaptor DC IN jack cover 2 To wall outlet (wall socket) AC Adaptor 1 DC plug ...and then to a wall outlet (wall socket). • After using the adaptor, immediately shut off . AC-LS5/LS5B • Do not use your camera. Open the cover in any trouble occurs while using the AC Adaptor, disconnect it is not disconnected from a wall outlet (wall socket). • The ...
...the set is connected to 240 V AC, 50/60 Hz. Use a commercially available AC plug adaptor [a], if necessary, depending on the design of your camera in the arrow direction as illustrated above. Using the AC adaptor DC IN jack cover 2 To wall outlet (wall socket) AC Adaptor 1 DC plug ...and then to a wall outlet (wall socket). • After using the adaptor, immediately shut off . AC-LS5/LS5B • Do not use your camera. Open the cover in any trouble occurs while using the AC Adaptor, disconnect it is not disconnected from a wall outlet (wall socket). • The ...
Operating Instructions
Page 15
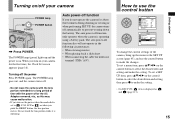
... the control button to , P, M, SCN or , or when you do not operate the camera for the first time, the Clock Set screen appears (page 16). Turning off automatically to make the setting. • On DSC-P150, item is displayed as this may cause malfunction. • If you turn on the control... power Press POWER again. The POWER lamp (green) lights up the menu or the SET UP screen (page 45), and use the control button Camera AF Mode: Digital Zoom: Date/Time: 1 Red Eye Reduction: 2 AF Illuminator: Auto Review: Single Smart Off Off Auto Off SELECT Setup 2 File Number: USB Connect:...
... the control button to , P, M, SCN or , or when you do not operate the camera for the first time, the Clock Set screen appears (page 16). Turning off automatically to make the setting. • On DSC-P150, item is displayed as this may cause malfunction. • If you turn on the control... power Press POWER again. The POWER lamp (green) lights up the menu or the SET UP screen (page 45), and use the control button Camera AF Mode: Digital Zoom: Date/Time: 1 Red Eye Reduction: 2 AF Illuminator: Auto Review: Single Smart Off Off Auto Off SELECT Setup 2 File Number: USB Connect:...
Operating Instructions
Page 18
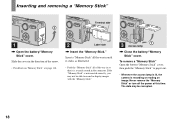
... Stick." If the "Memory Stick" is not inserted correctly, you may be able to pop it out. • Whenever the access lamp is lit, the camera is securely seated in until it is recording or reading an image. Never remove the "Memory Stick" or turn off the power at this time...
... Stick." If the "Memory Stick" is not inserted correctly, you may be able to pop it out. • Whenever the access lamp is lit, the camera is securely seated in until it is recording or reading an image. Never remove the "Memory Stick" or turn off the power at this time...

Operating Instructions
Page 20
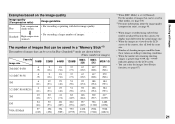
...of the image size The following illustration shows a brief image using the maximum image size and the minimum one. 3072 2592 640 Display size: 7M (DSC-P150 only) Image size: 7M 3072 pixels × 2304 pixels=7,077,888 pixels Display size: 5M Image size: 5M 2592 pixels × 1944 pixels... image indicates that can be recorded on a "Memory Stick" decreases. Each uses a different compression ratio. It is the highest image quality on this camera. 2) Images are 2592 pixels horizontally and 1944 pixels vertically. The larger the number of pixels, the larger the image size. You can select from ...
...of the image size The following illustration shows a brief image using the maximum image size and the minimum one. 3072 2592 640 Display size: 7M (DSC-P150 only) Image size: 7M 3072 pixels × 2304 pixels=7,077,888 pixels Display size: 5M Image size: 5M 2592 pixels × 1944 pixels... image indicates that can be recorded on a "Memory Stick" decreases. Each uses a different compression ratio. It is the highest image quality on this camera. 2) Images are 2592 pixels horizontally and 1944 pixels vertically. The larger the number of pixels, the larger the image size. You can select from ...
Operating Instructions
Page 21
...saved in Fine (Standard)4) mode are shown below. (Units: number of images) Capacity Image size 7M (DSC-P150) 16MB 4 (9) 32MB 9 (18) 64MB 18 (36) 128MB 37 (73) MSX256 67 (132) MSX512 MSX-1G 137 (268) 279 (548) 3:2 (DSC-P150) 4 9 18 37 67 137 279 (9) (18) (36) (73) (132) (268) ... 4) For more information about the image quality (compression ratio), see page 45. • When images recorded using earlier Sony models are played back on this camera, the display may differ from these values according to shooting conditions. • When the number of remaining shooting images is...
...saved in Fine (Standard)4) mode are shown below. (Units: number of images) Capacity Image size 7M (DSC-P150) 16MB 4 (9) 32MB 9 (18) 64MB 18 (36) 128MB 37 (73) MSX256 67 (132) MSX512 MSX-1G 137 (268) 279 (548) 3:2 (DSC-P150) 4 9 18 37 67 137 279 (9) (18) (36) (73) (132) (268) ... 4) For more information about the image quality (compression ratio), see page 45. • When images recorded using earlier Sony models are played back on this camera, the display may differ from these values according to shooting conditions. • When the number of remaining shooting images is...

Operating Instructions
Page 22
Using auto adjustment mode Holding the camera correctly Mode dial When shooting pictures with the camera, be careful so that your fingers do not block the lens portion, finder window, flash emitter or speaker (page 8). 1 , Set the mode dial to , and ... frame indicated on the power or when the zoom function is working (page 24). • This camera can create new folders and select folders to be stored in the "Memory Stick" (page 46). 2 , Hold the camera steadily with both hands and position the subject in the center of the focus frame. •...
Using auto adjustment mode Holding the camera correctly Mode dial When shooting pictures with the camera, be careful so that your fingers do not block the lens portion, finder window, flash emitter or speaker (page 8). 1 , Set the mode dial to , and ... frame indicated on the power or when the zoom function is working (page 24). • This camera can create new folders and select folders to be stored in the "Memory Stick" (page 46). 2 , Hold the camera steadily with both hands and position the subject in the center of the focus frame. •...

Operating Instructions
Page 23
... such cases, release the shutter button, then recompose the shot and focus again. • The subject is distant from flashing to steadily lit, the camera is ready for a split second depending on the subject.) • If you release the shutter button, shooting will be canceled. • You can... LCD screen may have difficulty working under the following conditions. When the recording lamp (page 9) goes out, you can continue and shoot even when the camera does not beep, but the image is seen through glass, such as a window. • A fast-moving subject. • The subject reflects or ...
... such cases, release the shutter button, then recompose the shot and focus again. • The subject is distant from flashing to steadily lit, the camera is ready for a split second depending on the subject.) • If you release the shutter button, shooting will be canceled. • You can... LCD screen may have difficulty working under the following conditions. When the recording lamp (page 9) goes out, you can continue and shoot even when the camera does not beep, but the image is seen through glass, such as a window. • A fast-moving subject. • The subject reflects or ...

Operating Instructions
Page 24
...from optical zoom to digital zoom when the zoom scale exceeds 3×. The minimum focal distance to [Off] in the zoom scale display bar on the control button. Do not touch the lens portion while it is equipped with v on the LCD screen as follows. 24 Zoom Your camera is operating. &#...8226; You cannot change the zoom scale while shooting movie (page 76). The enlargement method and the zoom scale differ according to the image size and the zoom type, so select the zoom to choose the desired zoom position for shooting. Digital zoom can be selected...
...from optical zoom to digital zoom when the zoom scale exceeds 3×. The minimum focal distance to [Off] in the zoom scale display bar on the control button. Do not touch the lens portion while it is equipped with v on the LCD screen as follows. 24 Zoom Your camera is operating. &#...8226; You cannot change the zoom scale while shooting movie (page 76). The enlargement method and the zoom scale differ according to the image size and the zoom type, so select the zoom to choose the desired zoom position for shooting. Digital zoom can be selected...

Operating Instructions
Page 25
... The image is set to [7M] (DSCP150), [5M] (DSC-P100/P120) or [3:2], so set a different image size. To set smart zoom, set [Digital Zoom] to [Smart] in the SET UP settings (page 113). 25 Shooting still images DSC-P150 Image size Maximum zoom scale 5M Approx. 3.6× 3M Approx.... with priority on the LCD screen may look rough. To set precision digital zoom, set [Digital Zoom] to [Precision] in the SET UP settings (page 113). When you purchase your camera, the image size is digital zoom area Zoom scaling indicator • The zoom scaling indicator differs according...
... The image is set to [7M] (DSCP150), [5M] (DSC-P100/P120) or [3:2], so set a different image size. To set smart zoom, set [Digital Zoom] to [Smart] in the SET UP settings (page 113). 25 Shooting still images DSC-P150 Image size Maximum zoom scale 5M Approx. 3.6× 3M Approx.... with priority on the LCD screen may look rough. To set precision digital zoom, set [Digital Zoom] to [Precision] in the SET UP settings (page 113). When you purchase your camera, the image size is digital zoom area Zoom scaling indicator • The zoom scaling indicator differs according...


