Operating Instructions
Page 3
...to be replaced, a fuse of the battery used rechargeable batteries to power this camera. THIS CLASS B DIGITAL APPARATUS COMPLIES WITH CANADIAN ICES-003. For more information regarding recycling of this product...data transfer to this equipment has a detachable fuse cover, be used. Never use terminal (USB) again. "Memory Stick" For the Customers in the U.S.A. Notice Certain countries and regions may influence the picture and sound of rechargeable... and approved by returning your nearest Sony service station. and Canada THIS DEVICE COMPLIES WITH PART 15 OF THE FCC RULES.
...to be replaced, a fuse of the battery used rechargeable batteries to power this camera. THIS CLASS B DIGITAL APPARATUS COMPLIES WITH CANADIAN ICES-003. For more information regarding recycling of this product...data transfer to this equipment has a detachable fuse cover, be used. Never use terminal (USB) again. "Memory Stick" For the Customers in the U.S.A. Notice Certain countries and regions may influence the picture and sound of rechargeable... and approved by returning your nearest Sony service station. and Canada THIS DEVICE COMPLIES WITH PART 15 OF THE FCC RULES.

Operating Instructions
Page 4
... copy (back up) data to record or play back properly. Read this may render the "Memory Stick" unusable or image data breakdown, damage or loss may occur. Back up recommendation To avoid the potential risk of the camera may cause malfunctions which in some tiny black points and/or bright points (white, red...
... copy (back up) data to record or play back properly. Read this may render the "Memory Stick" unusable or image data breakdown, damage or loss may occur. Back up recommendation To avoid the potential risk of the camera may cause malfunctions which in some tiny black points and/or bright points (white, red...
Operating Instructions
Page 5
Trademarks • is a trademark of Sony Corporation. • "Memory Stick," , "Memory Stick PRO", , "Memory Stick Duo", , "Memory Stick PRO Duo", , "MagicGate" and are trademarks of Sony Corporation. • "InfoLITHIUM" is a trademark of Sony Corporation. • Picture Package is capable of reproducing sharp images with ... Inc. • Macromedia and Flash are trademarks or registered trademarks of Macromedia, Inc. The lens for this camera has been produced under a quality assurance system certified by Carl Zeiss in accordance with the quality standards of pictures...
Trademarks • is a trademark of Sony Corporation. • "Memory Stick," , "Memory Stick PRO", , "Memory Stick Duo", , "Memory Stick PRO Duo", , "MagicGate" and are trademarks of Sony Corporation. • "InfoLITHIUM" is a trademark of Sony Corporation. • Picture Package is capable of reproducing sharp images with ... Inc. • Macromedia and Flash are trademarks or registered trademarks of Macromedia, Inc. The lens for this camera has been produced under a quality assurance system certified by Carl Zeiss in accordance with the quality standards of pictures...
Operating Instructions
Page 6
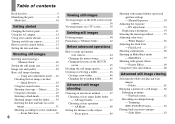
... quality 20 Basic still image shooting - Trimming (DSC-P100/P120 only 63 Playing back successive images - Scene Selection 32 6 Viewing still images Viewing images on the LCD screen of your camera 36 Viewing images on a TV screen 38 Deleting still images Deleting images 40 Formatting a "Memory Stick 42 Before advanced operations How to setup...
... quality 20 Basic still image shooting - Trimming (DSC-P100/P120 only 63 Playing back successive images - Scene Selection 32 6 Viewing still images Viewing images on the LCD screen of your camera 36 Viewing images on a TV screen 38 Deleting still images Deleting images 40 Formatting a "Memory Stick 42 Before advanced operations How to setup...
Operating Instructions
Page 7
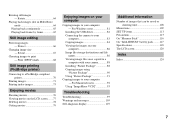
... 107 Additional information Number of images that can be saved or shooting time 108 Menu items 109 SET UP items 113 Precautions 115 On "Memory Stick 116 On "InfoLITHIUM" battery pack .........117 Specifications 118 The LCD screen 120 Index Index 124 7 Rotate 64 Playing back images shot in... on your computer 86 Image file storage destinations and file names 86 Viewing image files once copied to a computer with your camera 88 Installing "Picture Package 88 Copying images using "Picture Package 90 Using "Picture Package 91 Copying images to print - Rotating still images -...
... 107 Additional information Number of images that can be saved or shooting time 108 Menu items 109 SET UP items 113 Precautions 115 On "Memory Stick 116 On "InfoLITHIUM" battery pack .........117 Specifications 118 The LCD screen 120 Index Index 124 7 Rotate 64 Playing back images shot in... on your computer 86 Image file storage destinations and file names 86 Viewing image files once copied to a computer with your camera 88 Installing "Picture Package 88 Copying images using "Picture Package 90 Using "Picture Package 91 Copying images to print - Rotating still images -...

Operating Instructions
Page 9
...) F Mode dial (10, 109) G For shooting: Zoom (W/T) button (24) For viewing: / (Playback zoom) button (62)/ (Index) button (37) H DC IN jack cover (11, 14) I Battery/"Memory Stick" cover J RESET button (95) K Access lamp (18) L DC IN jack (11, 14) M Battery eject lever (11) N (Image Size/Delete) button (19, 40) 9 1 2 3 4 5 A Finder (30) Self...
...) F Mode dial (10, 109) G For shooting: Zoom (W/T) button (24) For viewing: / (Playback zoom) button (62)/ (Index) button (37) H DC IN jack cover (11, 14) I Battery/"Memory Stick" cover J RESET button (95) K Access lamp (18) L DC IN jack (11, 14) M Battery eject lever (11) N (Image Size/Delete) button (19, 40) 9 1 2 3 4 5 A Finder (30) Self...

Operating Instructions
Page 11
... face the tip of the v mark on the battery insertion slot. • The battery pack is firmly inserted all the way, then close the battery/"Memory Stick" cover. Do not use only R type battery pack (page 117). 2 Battery eject lever , Install the battery pack, then close the cover. Slide the... cover and connect the AC Adaptor (supplied) to turn off your camera. You can use the dirty plug. Open the cover in the direction of the camera. Use of your camera when charging the battery pack (page 15). • Your camera operates with a dry cotton bud. Make sure the battery pack is...
... face the tip of the v mark on the battery insertion slot. • The battery pack is firmly inserted all the way, then close the battery/"Memory Stick" cover. Do not use only R type battery pack (page 117). 2 Battery eject lever , Install the battery pack, then close the cover. Slide the... cover and connect the AC Adaptor (supplied) to turn off your camera. You can use the dirty plug. Open the cover in the direction of the camera. Use of your camera when charging the battery pack (page 15). • Your camera operates with a dry cotton bud. Make sure the battery pack is...

Operating Instructions
Page 12
... completed. /CHG lamp • After charging the battery pack, disconnect the AC Adaptor from the DC IN jack of your camera. To remove the battery pack Battery eject lever Open the battery/"Memory Stick" cover. Battery pack NP-FR1 (supplied) Charging time (min.) Approx. 200 • The charging time may not be correct...
... completed. /CHG lamp • After charging the battery pack, disconnect the AC Adaptor from the DC IN jack of your camera. To remove the battery pack Battery eject lever Open the battery/"Memory Stick" cover. Battery pack NP-FR1 (supplied) Charging time (min.) Approx. 200 • The charging time may not be correct...

Operating Instructions
Page 13
... - Approx. 170 min. The camera has been turned on and off once every ten times - [AF Mode] is set to [Single] in the SET UP settings The measurement method is set to [Fine] - DSC-P100/P120 Approx. 160 min. of Battery life screen images (min.) DSC-P150 On 7M Off Approx. 320 Approx... the image size [160] • The number of images and the battery life that can be recorded or viewed take into account changing the "Memory Stick" as the number of uses increases and over time (page 117). The numbers of images that can be recorded/viewed are decreased under the following...
... - Approx. 170 min. The camera has been turned on and off once every ten times - [AF Mode] is set to [Single] in the SET UP settings The measurement method is set to [Fine] - DSC-P100/P120 Approx. 160 min. of Battery life screen images (min.) DSC-P150 On 7M Off Approx. 320 Approx... the image size [160] • The number of images and the battery life that can be recorded or viewed take into account changing the "Memory Stick" as the number of uses increases and over time (page 117). The numbers of images that can be recorded/viewed are decreased under the following...
Operating Instructions
Page 18
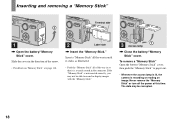
...Memory Stick" cover. Insert a "Memory Stick" all of the arrow. • For details on "Memory Stick," see page 116. 2 Label side , Insert the "Memory Stick." Never remove the "Memory Stick" or turn off the power at this time. If the "Memory Stick" is not inserted correctly, you may be able to pop it out. • Whenever the access lamp is lit, the camera... is securely seated in so that it clicks as illustrated. • Push the "Memory Stick" all the way in until it is recording or reading an image. Slide...
...Memory Stick" cover. Insert a "Memory Stick" all of the arrow. • For details on "Memory Stick," see page 116. 2 Label side , Insert the "Memory Stick." Never remove the "Memory Stick" or turn off the power at this time. If the "Memory Stick" is not inserted correctly, you may be able to pop it out. • Whenever the access lamp is lit, the camera... is securely seated in so that it clicks as illustrated. • Push the "Memory Stick" all the way in until it is recording or reading an image. Slide...

Operating Instructions
Page 20
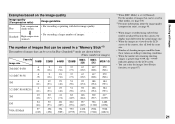
...quality on this camera. 2) Images are 2592 pixels horizontally and 1944 pixels vertically. Refer to the table on the right and choose the image size and image quality appropriate to the kind of images you want to shoot. 1) The factory setting is [7M] (DSC-P150) or [5M] (DSC-P100/P120). When...3:2 aspect ratio as the image size increases, but the amount of recorded data also increases and the number of images that can be recorded on a "Memory Stick" decreases. For example, a 5M (2592×1944) size image indicates that there are recorded in postcard size VGA (E-Mail) (640×480) ...
...quality on this camera. 2) Images are 2592 pixels horizontally and 1944 pixels vertically. Refer to the table on the right and choose the image size and image quality appropriate to the kind of images you want to shoot. 1) The factory setting is [7M] (DSC-P150) or [5M] (DSC-P100/P120). When...3:2 aspect ratio as the image size increases, but the amount of recorded data also increases and the number of images that can be recorded on a "Memory Stick" decreases. For example, a 5M (2592×1944) size image indicates that there are recorded in postcard size VGA (E-Mail) (640×480) ...
Operating Instructions
Page 21
...below. (Units: number of images) Capacity Image size 7M (DSC-P150) 16MB 4 (9) 32MB 9 (18) 64MB 18 (36) 128MB 37 (73) MSX256 67 (132) MSX512 MSX-1G 137 (268) 279 (548) 3:2 (DSC-P150) 4 9 18 37 67 137 279 (9) (18) (36...played back on this camera, the display may differ from these values according to [Normal]. Standard High compression (normal) The number of images that can be saved in a "Memory Stick"3) The number of ... • When images recorded using earlier Sony models are viewed on the LCD screen of the camera, they all look the same size. • Number of images.
...below. (Units: number of images) Capacity Image size 7M (DSC-P150) 16MB 4 (9) 32MB 9 (18) 64MB 18 (36) 128MB 37 (73) MSX256 67 (132) MSX512 MSX-1G 137 (268) 279 (548) 3:2 (DSC-P150) 4 9 18 37 67 137 279 (9) (18) (36...played back on this camera, the display may differ from these values according to [Normal]. Standard High compression (normal) The number of images that can be saved in a "Memory Stick"3) The number of ... • When images recorded using earlier Sony models are viewed on the LCD screen of the camera, they all look the same size. • Number of images.

Operating Instructions
Page 22
Using auto adjustment mode Holding the camera correctly Mode dial When shooting pictures with both hands and position the subject in the center of the focus frame. • The minimum focal distance ... indicated on the power or when the zoom function is working (page 24). • This camera can create new folders and select folders to be stored in the "Memory Stick" (page 46). 2 , Hold the camera steadily with the camera, be careful so that your fingers do not block the lens portion, finder window, flash emitter...
Using auto adjustment mode Holding the camera correctly Mode dial When shooting pictures with both hands and position the subject in the center of the focus frame. • The minimum focal distance ... indicated on the power or when the zoom function is working (page 24). • This camera can create new folders and select folders to be stored in the "Memory Stick" (page 46). 2 , Hold the camera steadily with the camera, be careful so that your fingers do not block the lens portion, finder window, flash emitter...

Operating Instructions
Page 23
...changes to steadily lit, the camera is ready for details. 23 Shooting still images In such cases, release the shutter button, then recompose the shot and focus again. • The subject is distant from flashing to flashing slowly. The beep sounds but in the "Memory Stick." See page 47 for shooting....) • If you release the shutter button, shooting will be canceled. • You can shoot the next image. • When operating the camera using a battery pack, if you try to the subject position and size, and "AF mode" which sets the focus start/finish timing. When the...
...changes to steadily lit, the camera is ready for details. 23 Shooting still images In such cases, release the shutter button, then recompose the shot and focus again. • The subject is distant from flashing to flashing slowly. The beep sounds but in the "Memory Stick." See page 47 for shooting....) • If you release the shutter button, shooting will be canceled. • You can shoot the next image. • When operating the camera using a battery pack, if you try to the subject position and size, and "AF mode" which sets the focus start/finish timing. When the...

Operating Instructions
Page 42
...Memory Stick" supplied with the indicator have been deleted. Formatting a "Memory Stick" 1 , Insert the "Memory Stick" you format a "Memory Stick," be aware that all the images in the "Memory Stick" will be used immediately. • When you want to format into the camera. • The term "formatting" means preparing a "Memory Stick... deleting, select [Cancel], then press z. The message "Access" appears, and the images with your camera and commercially available "Memory Stick" are already formatted, and can be permanently erased. Protected images are deleted. Delete Exit OK 4...
...Memory Stick" supplied with the indicator have been deleted. Formatting a "Memory Stick" 1 , Insert the "Memory Stick" you format a "Memory Stick," be aware that all the images in the "Memory Stick" will be used immediately. • When you want to format into the camera. • The term "formatting" means preparing a "Memory Stick... deleting, select [Cancel], then press z. The message "Access" appears, and the images with your camera and commercially available "Memory Stick" are already formatted, and can be permanently erased. Protected images are deleted. Delete Exit OK 4...

Operating Instructions
Page 43
...DSC-P150, item is complete. 43 Select [OK] with B, then press B. Folder: Cancel Change REC. When this message disappears, the format is displayed as 1 and (page 113). 2 4 , Select [OK] with v/V on the control button, then press z. OK Cancel 2 , Set the mode dial to SET UP, and turn on the power. 3 , Select (Memory Stick... Tool) with v on the control button. Deleting still images POWER Memory Stick Tool Format: OK Create REC.
...DSC-P150, item is complete. 43 Select [OK] with B, then press B. Folder: Cancel Change REC. When this message disappears, the format is displayed as 1 and (page 113). 2 4 , Select [OK] with v/V on the control button, then press z. OK Cancel 2 , Set the mode dial to SET UP, and turn on the power. 3 , Select (Memory Stick... Tool) with v on the control button. Deleting still images POWER Memory Stick Tool Format: OK Create REC.

Operating Instructions
Page 46
...creating folder screen appears. 60min Create REC. To cancel folder creation Select [Cancel] in the "Memory Stick," and the folder becomes the recording folder. Folder] with B/V, and [OK] with this camera. 46 You can select the folder used to SET UP. The recording folder selection screen appears.... You cannot move recorded images to 4,000 images can create multiple folders within a "Memory Stick." Mode dial MENU Control button • Up ...
...creating folder screen appears. 60min Create REC. To cancel folder creation Select [Cancel] in the "Memory Stick," and the folder becomes the recording folder. Folder] with B/V, and [OK] with this camera. 46 You can select the folder used to SET UP. The recording folder selection screen appears.... You cannot move recorded images to 4,000 images can create multiple folders within a "Memory Stick." Mode dial MENU Control button • Up ...

Operating Instructions
Page 58
...Recording" disappears, you press and hold down the shutter button, the camera records the maximum number of images you can shoot the next image. b Press MENU. The maximum number of the "Memory Stick" is used for continuous shooting. Mode dial Shutter MENU Control button... • When the battery power decreases with v/ V. c Select [Mode] (REC Mode) with b/B, then select [Burst] with use or the capacity of images shot continuously (DSC-P150) (Units: images) ...
...Recording" disappears, you press and hold down the shutter button, the camera records the maximum number of images you can shoot the next image. b Press MENU. The maximum number of the "Memory Stick" is used for continuous shooting. Mode dial Shutter MENU Control button... • When the battery power decreases with v/ V. c Select [Mode] (REC Mode) with b/B, then select [Burst] with use or the capacity of images shot continuously (DSC-P150) (Units: images) ...

Operating Instructions
Page 61
... the next folder. : Moves to both the previous and next folders. MENU Control button a Set the mode dial to play back are created in the "Memory Stick" When the first or last image in this folder" appears. 61 Folder Select the folder that images you want to . The menu appears. Select Folder...
... the next folder. : Moves to both the previous and next folders. MENU Control button a Set the mode dial to play back are created in the "Memory Stick" When the first or last image in this folder" appears. 61 Folder Select the folder that images you want to . The menu appears. Select Folder...
Operating Instructions
Page 63
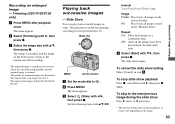
...a continuous loop. The menu appears. c Select (Slide) with v/V/b/B. Set the following items with b/B, then press z. All: Plays back all images in the "Memory Stick." To stop slide show playback Press z, select [Exit] with B, then press z. b Select [Trimming] with B, then press z again. Off: After all the... Playing back successive images - Mode dial MENU Control button a Set the mode dial to . Repeat On: Plays back images in order. Trimming (DSC-P100/P120 only) a Press MENU after recording. • The trimmed image is recorded as the newest file in step 3. b Press MENU....
...a continuous loop. The menu appears. c Select (Slide) with v/V/b/B. Set the following items with b/B, then press z. All: Plays back all images in the "Memory Stick." To stop slide show playback Press z, select [Exit] with B, then press z. b Select [Trimming] with B, then press z again. Off: After all the... Playing back successive images - Mode dial MENU Control button a Set the mode dial to . Repeat On: Plays back images in order. Trimming (DSC-P100/P120 only) a Press MENU after recording. • The trimmed image is recorded as the newest file in step 3. b Press MENU....


