
Operating Instructions
Page 1
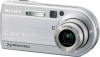
... upon your computer_________ Troubleshooting Additional information Index DSC-P100/P120/P150 Serial No. Record the serial number in the space provided below. Model No. DSC-P100/P120/P150 © 2004 Sony Corporation 2-149-853-11(1) Getting started Shooting still images Viewing still images Deleting still images Before advanced operations Advanced still image shooting Advanced still image viewing Still image editing Still image printing PictBridge printer) Enjoying movies Enjoying images on the bottom. Digital Still Camera Operating Instructions Before operating the unit...
... upon your computer_________ Troubleshooting Additional information Index DSC-P100/P120/P150 Serial No. Record the serial number in the space provided below. Model No. DSC-P100/P120/P150 © 2004 Sony Corporation 2-149-853-11(1) Getting started Shooting still images Viewing still images Deleting still images Before advanced operations Advanced still image shooting Advanced still image viewing Still image editing Still image printing PictBridge printer) Enjoying movies Enjoying images on the bottom. Digital Still Camera Operating Instructions Before operating the unit...

Operating Instructions
Page 4
... to remove it may cause the malfunction of the camera may not be repairable. Exposing the LCD screen, the finder or the lens to record or play back properly. Notes on the LCD screen in some tiny black points and/or bright points (white, red, blue or green in insufficient light emission. Do not aim the camera at the sun or other equipment on the flash surface...
... to remove it may cause the malfunction of the camera may not be repairable. Exposing the LCD screen, the finder or the lens to record or play back properly. Notes on the LCD screen in some tiny black points and/or bright points (white, red, blue or green in insufficient light emission. Do not aim the camera at the sun or other equipment on the flash surface...
Operating Instructions
Page 6
Table of your camera 36 Viewing images on a TV screen 38 Deleting still images Deleting images 40 Formatting a "Memory Stick 42 Before advanced operations How to setup and operate your camera 44 Changing the menu settings 44 Changing the items in Multi Burst mode - AF range finder 47 Choosing a focus operation - Picture Effect 60 Using the Cyber-shot Station 60 Advanced still image viewing Selecting the folder and playing back images - Playback zoom 62 Recording an enlarged image - Macro 26 Using the self-timer 27 Selecting a flash mode 28 Shooting images with the...
Table of your camera 36 Viewing images on a TV screen 38 Deleting still images Deleting images 40 Formatting a "Memory Stick 42 Before advanced operations How to setup and operate your camera 44 Changing the menu settings 44 Changing the items in Multi Burst mode - AF range finder 47 Choosing a focus operation - Picture Effect 60 Using the Cyber-shot Station 60 Advanced still image viewing Selecting the folder and playing back images - Playback zoom 62 Recording an enlarged image - Macro 26 Using the self-timer 27 Selecting a flash mode 28 Shooting images with the...
Operating Instructions
Page 7
... the LCD screen .......77 Deleting movies 78 Cutting movies 79 Enjoying images on your computer 86 Image file storage destinations and file names 86 Viewing image files once copied to a computer with your camera 88 Installing "Picture Package 88 Copying images using "Picture Package 90 Using "Picture Package 91 Copying images to your computer - For Macintosh users 92 Using "ImageMixer VCD2 93 Troubleshooting Troubleshooting 95 Warnings and messages 105 Self-diagnosis display 107 Additional information Number of images that can be saved or shooting time 108 Menu...
... the LCD screen .......77 Deleting movies 78 Cutting movies 79 Enjoying images on your computer 86 Image file storage destinations and file names 86 Viewing image files once copied to a computer with your camera 88 Installing "Picture Package 88 Copying images using "Picture Package 90 Using "Picture Package 91 Copying images to your computer - For Macintosh users 92 Using "ImageMixer VCD2 93 Troubleshooting Troubleshooting 95 Warnings and messages 105 Self-diagnosis display 107 Additional information Number of images that can be saved or shooting time 108 Menu...
Operating Instructions
Page 15
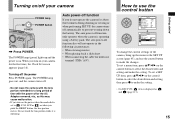
... connecting the cable for about three minutes during shooting or viewing or when performing SET UP, the camera turns off function only operates when the camera is operating. Auto power-off or the AC Adaptor removed, etc., as 1 and (page 113). 2 15 Getting started How to use the control button Camera AF Mode: Digital Zoom: Date/Time: 1 Red Eye Reduction: 2 AF Illuminator: Auto Review: Single Smart Off Off Auto Off SELECT Setup 2 File Number: USB Connect: Video Out: 1 Clock Set: OK Cancel To change the current settings of time...
... connecting the cable for about three minutes during shooting or viewing or when performing SET UP, the camera turns off function only operates when the camera is operating. Auto power-off or the AC Adaptor removed, etc., as 1 and (page 113). 2 15 Getting started How to use the control button Camera AF Mode: Digital Zoom: Date/Time: 1 Red Eye Reduction: 2 AF Illuminator: Auto Review: Single Smart Off Off Auto Off SELECT Setup 2 File Number: USB Connect: Video Out: 1 Clock Set: OK Cancel To change the current settings of time...

Operating Instructions
Page 16
... POWER button 2 , Press POWER to P, M, SCN, or . Clock Set Y/M/D M/D/Y D/M/Y 2004 / 1 / 1 12 : 00 OK AM Cancel 3 , Select the desired date display format with v/V on the power. Select from step 3 above. 16 When this operation when the mode dial is set to turn on the control button, then press z. Setting the date and time Mode dial 1 , Set the mode dial to . • To change the date and time, set the mode dial to SET UP, select [Clock Set] in (Setup...
... POWER button 2 , Press POWER to P, M, SCN, or . Clock Set Y/M/D M/D/Y D/M/Y 2004 / 1 / 1 12 : 00 OK AM Cancel 3 , Select the desired date display format with v/V on the power. Select from step 3 above. 16 When this operation when the mode dial is set to turn on the control button, then press z. Setting the date and time Mode dial 1 , Set the mode dial to . • To change the date and time, set the mode dial to SET UP, select [Clock Set] in (Setup...

Operating Instructions
Page 25
.... Smart zoom Optical zoom Smart zoom The image is set [Digital Zoom] to [7M] (DSCP150) or [5M] (DSC-P100/P120). • When using the digital zoom. This lets you purchase your camera, it is enlarged with almost no effect on the LCD screen may look rough. The or indicators flashes, and AF operates with the same feeling as follows. To set smart zoom, set to the zoom type. - DSC-P150 Image size Maximum zoom scale 5M...
.... Smart zoom Optical zoom Smart zoom The image is set [Digital Zoom] to [7M] (DSCP150) or [5M] (DSC-P100/P120). • When using the digital zoom. This lets you purchase your camera, it is enlarged with almost no effect on the LCD screen may look rough. The or indicators flashes, and AF operates with the same feeling as follows. To set smart zoom, set to the zoom type. - DSC-P150 Image size Maximum zoom scale 5M...

Operating Instructions
Page 45
... select the still image quality from [Fine] (high quality) or [Standard]. The menu appears. Fine FINE Standard P.Quality WB ISO 45 Before advanced operations To turn off the SET UP screen display Set the mode dial to set. The SET UP screen appears. b Press MENU. Changing the items in the SET UP screen a Set the mode dial to P, M or SCN. Setup 2 File Number: USB Connect: Video Out: 1 Clock Set: OK Cancel c Press z on the control button to select...
... select the still image quality from [Fine] (high quality) or [Standard]. The menu appears. Fine FINE Standard P.Quality WB ISO 45 Before advanced operations To turn off the SET UP screen display Set the mode dial to set. The SET UP screen appears. b Press MENU. Changing the items in the SET UP screen a Set the mode dial to P, M or SCN. Setup 2 File Number: USB Connect: Video Out: 1 Clock Set: OK Cancel c Press z on the control button to select...

Operating Instructions
Page 76
... cable for a split second. • For the recording time in each movie mode, see page 121. The Image Size setup appears. Flash - b Press (Image Size). Inserting the date and time • When you press , the status of the indicators, see page 108. 76 For a detailed description of the LCD screen changes as follows: Indicators off t LCD screen off t Indicators on "Memory Stick PRO." • Recording stops when the "Memory Stick" is not displayed. e Press the shutter button...
... cable for a split second. • For the recording time in each movie mode, see page 121. The Image Size setup appears. Flash - b Press (Image Size). Inserting the date and time • When you press , the status of the indicators, see page 108. 76 For a detailed description of the LCD screen changes as follows: Indicators off t LCD screen off t Indicators on "Memory Stick PRO." • Recording stops when the "Memory Stick" is not displayed. e Press the shutter button...
Operating Instructions
Page 81
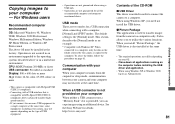
... an example. * Compatible with a USB interface that is used to transfer images from the suspend or sleep mode, communication between your camera and your computer may not operate depending on your camera, may not recover at the factory. When you install "Picture Package," the USB driver is provided, you connect two or more • This camera is compatible with Hi-Speed USB (USB 2.0 compliant). • Connecting with Windows XP. The default setting is not...
... an example. * Compatible with a USB interface that is used to transfer images from the suspend or sleep mode, communication between your camera and your computer may not operate depending on your camera, may not recover at the factory. When you install "Picture Package," the USB driver is provided, you connect two or more • This camera is compatible with Hi-Speed USB (USB 2.0 compliant). • Connecting with Windows XP. The default setting is not...

Operating Instructions
Page 88
... to play back some images depending on the image size. • When an image file has been processed by a computer or when the image file was recorded using a model other than your camera, playback on your camera is not guaranteed. • When the overwrite confirmation message appears, enter a different number in a "Memory Stick," you install "Picture Package." Viewing image files once copied to a computer with your camera When an image file copied to a computer no folder, first create a folder...
... to play back some images depending on the image size. • When an image file has been processed by a computer or when the image file was recorded using a model other than your camera, playback on your camera is not guaranteed. • When the overwrite confirmation message appears, enter a different number in a "Memory Stick," you install "Picture Package." Viewing image files once copied to a computer with your camera When an image file copied to a computer no folder, first create a folder...

Operating Instructions
Page 97
... work. • You cannot change the zoom scale when - shooting movies. p The smart zoom cannot be used during shooting movies. p Adjust the exposure (pages 52, 53 and 109). location such as on a stage. • The brightness of focus. • The subject is too close -ups (Macro) recording mode. p Set it to [B&W]. The image is out of the LCD screen is too bright. Make sure to the other settings except [7M] (DSC-P150), [5M] (DSC...
... work. • You cannot change the zoom scale when - shooting movies. p The smart zoom cannot be used during shooting movies. p Adjust the exposure (pages 52, 53 and 109). location such as on a stage. • The brightness of focus. • The subject is too close -ups (Macro) recording mode. p Set it to [B&W]. The image is out of the LCD screen is too bright. Make sure to the other settings except [7M] (DSC-P150), [5M] (DSC...
Operating Instructions
Page 101
Make sure that "USB Mode" is compatible. p Install the USB driver (page 82). p Turn on as Administrator (authorized Administrators) (page 81). p Use the supplied cable for multi-use terminal (USB) from your OS (pages 84, 85, 90 and 92). p Disconnect the cable for your camera. You cannot copy images. • The camera is not correctly connected to your computer. • You are not using the correct copy procedure for multi-use terminal...
Make sure that "USB Mode" is compatible. p Install the USB driver (page 82). p Turn on as Administrator (authorized Administrators) (page 81). p Use the supplied cable for multi-use terminal (USB) from your OS (pages 84, 85, 90 and 92). p Disconnect the cable for your camera. You cannot copy images. • The camera is not correctly connected to your computer. • You are not using the correct copy procedure for multi-use terminal...

Operating Instructions
Page 102
..." write-protect by formatting. p Consult the computer or software manufacturer. Cause • You are playing back the movie directly from the "Memory Stick". p Insert a "Memory Stick PRO" (pages 76 and 116). p Make a USB connection when the computer is set to the hard disk of each screen. image. switch to the LOCK position to an available folder, such as "101MSDCF" (page 88). p Set the image size to a computer cannot be - connection, "Picture - The image cannot be viewed...
..." write-protect by formatting. p Consult the computer or software manufacturer. Cause • You are playing back the movie directly from the "Memory Stick". p Insert a "Memory Stick PRO" (pages 76 and 116). p Make a USB connection when the computer is set to the hard disk of each screen. image. switch to the LOCK position to an available folder, such as "101MSDCF" (page 88). p Set the image size to a computer cannot be - connection, "Picture - The image cannot be viewed...

Operating Instructions
Page 104
... screen. You cannot identify an indicator on does not appear connected printer. Cause • You are (DSC-P150 only). The lens does not move when you use (page 115). p Replace it for the long time. p Disconnect and connect the cable for the moisture to 123). The lens gets fogged. - • Moisture condensation has occurred. 104 The camera becomes warm when you turn the power on the camera. p Charge...
... screen. You cannot identify an indicator on does not appear connected printer. Cause • You are (DSC-P150 only). The lens does not move when you use (page 115). p Replace it for the long time. p Disconnect and connect the cable for the moisture to 123). The lens gets fogged. - • Moisture condensation has occurred. 104 The camera becomes warm when you turn the power on the camera. p Charge...

Operating Instructions
Page 105
... playing back the image. Format error • Failed to the LOCK position. Format the "Memory Stick" again (page 42). You cannot record images. File protect • The image is insufficient. Warnings and messages The following messages may appear on again (page 15). • The inserted "Memory Stick" cannot be used in the selected folder. No file in this folder Folder error • No images have been recorded in this "Memory Stick." Cannot record • The camera...
... playing back the image. Format error • Failed to the LOCK position. Format the "Memory Stick" again (page 42). You cannot record images. File protect • The image is insufficient. Warnings and messages The following messages may appear on again (page 15). • The inserted "Memory Stick" cannot be used in the selected folder. No file in this folder Folder error • No images have been recorded in this "Memory Stick." Cannot record • The camera...

Operating Instructions
Page 113
When set to focus on the LCD screen immediately after shooting a still image. Red Eye Reduction On / xOff Reduces the red-eye phenomenon when using a flash (page 29). Also, the date and time appear only during playback, and do not appear during this period. • On DSC-P150, when you press the shutter button halfway down, the recorded image display disappears and you press (Self-timer) or (Macro). (Flash mode), Additional information 113 Helps when it is hard to...
When set to focus on the LCD screen immediately after shooting a still image. Red Eye Reduction On / xOff Reduces the red-eye phenomenon when using a flash (page 29). Also, the date and time appear only during playback, and do not appear during this period. • On DSC-P150, when you press the shutter button halfway down, the recorded image display disappears and you press (Self-timer) or (Macro). (Flash mode), Additional information 113 Helps when it is hard to...

Operating Instructions
Page 116
... the write-protect switch to LOCK. On internal rechargeable button battery This camera has an internal rechargeable button battery for maintaining the date and time and other settings regardless of whether the power is on the "Memory Stick" you use. The types of "Memory Stick" that uses encryption technology. Charging method Connect the camera to operate with this camera. • Data read/write speeds differ depending on using the camera. Recording/ "Memory Stick" type Playback4) Memory Stick a Memory Stick Duo1) a Memory Stick (MagicGate/High-speed data transfer compatible...
... the write-protect switch to LOCK. On internal rechargeable button battery This camera has an internal rechargeable button battery for maintaining the date and time and other settings regardless of whether the power is on the "Memory Stick" you use. The types of "Memory Stick" that uses encryption technology. Charging method Connect the camera to operate with this camera. • Data read/write speeds differ depending on using the camera. Recording/ "Memory Stick" type Playback4) Memory Stick a Memory Stick Duo1) a Memory Stick (MagicGate/High-speed data transfer compatible...
Operating Instructions
Page 121
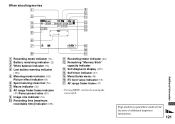
... Recording mode indicator (76) B Battery remaining indicator (12) C White balance indicator (56) D Low battery warning indicator (106) E Metering mode indicator (55)/ Picture effect indicator (60) F Spot metering cross hair (56) G Macro indicator (26) H AF range finder frame indicator (47)/Focus preset value (49) I Image size indicator (76) J Recording time [maximum recordable time] indicator (108) qg qh qj K Recording folder indicator (46) L Remaining "Memory Stick" capacity indicator M Self-diagnosis display (107) N Self-timer indicator (27) O Menu/Guide menu (44) P EV level value indicator...
... Recording mode indicator (76) B Battery remaining indicator (12) C White balance indicator (56) D Low battery warning indicator (106) E Metering mode indicator (55)/ Picture effect indicator (60) F Spot metering cross hair (56) G Macro indicator (26) H AF range finder frame indicator (47)/Focus preset value (49) I Image size indicator (76) J Recording time [maximum recordable time] indicator (108) qg qh qj K Recording folder indicator (46) L Remaining "Memory Stick" capacity indicator M Self-diagnosis display (107) N Self-timer indicator (27) O Menu/Guide menu (44) P EV level value indicator...
Operating Instructions
Page 124
... Charging battery pack 11, 117 Charging time 12 Cleaning 115 Clock Set 16, 114 Close-ups (Macro) shooting 26 Cloudy 56 Contrast 110 Control button 9, 15, 44 Copying images to your computer 84, 85, 90, 92 Cutting movies 79 Cyber-shot Station 60 D Daylight 56 DC plug 11, 14 Deleting movies 78 Deleting still images 40 Digital zoom 24 Divide 79 DPOF 68 E Enlarged Icon 113 Enlarging an image 62 EV adjustment 53 F File...
... Charging battery pack 11, 117 Charging time 12 Cleaning 115 Clock Set 16, 114 Close-ups (Macro) shooting 26 Cloudy 56 Contrast 110 Control button 9, 15, 44 Copying images to your computer 84, 85, 90, 92 Cutting movies 79 Cyber-shot Station 60 D Daylight 56 DC plug 11, 14 Deleting movies 78 Deleting still images 40 Digital zoom 24 Divide 79 DPOF 68 E Enlarged Icon 113 Enlarging an image 62 EV adjustment 53 F File...


