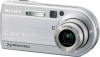
Operating Instructions
Page 6
...an auto focus method 47 Choosing a focus range finder frame - Multi Burst 59 Shooting with manual shutter speed and aperture settings - Trimming (DSC-P100/P120 only 63 Playing back successive images - AF Mode 48 Setting the distance to scene conditions - Folder 61 Enlarging a portion of... contents Read this first 4 Identifying the parts 8 Mode dial 10 Getting started Charging the battery pack 11 Using the AC adaptor 14 Using your camera abroad 14 Turning on/off your camera 44 Changing the menu settings 44 Changing the items in Multi Burst mode - ...
...an auto focus method 47 Choosing a focus range finder frame - Multi Burst 59 Shooting with manual shutter speed and aperture settings - Trimming (DSC-P100/P120 only 63 Playing back successive images - AF Mode 48 Setting the distance to scene conditions - Folder 61 Enlarging a portion of... contents Read this first 4 Identifying the parts 8 Mode dial 10 Getting started Charging the battery pack 11 Using the AC adaptor 14 Using your camera abroad 14 Turning on/off your camera 44 Changing the menu settings 44 Changing the items in Multi Burst mode - ...

Operating Instructions
Page 9
... the LCD screen, see page 120 to 123. C (Display/LCD on/off : / /7/ (28/27/24/26) Mode dial "M": Shutter speed/ aperture value (50) F Mode dial (10, 109) G For shooting: Zoom (W/T) button (24) For viewing: / (Playback zoom) button (62)/ (Index) button (37) H DC IN jack cover (11, 14) I Battery/"Memory Stick" cover...
... the LCD screen, see page 120 to 123. C (Display/LCD on/off : / /7/ (28/27/24/26) Mode dial "M": Shutter speed/ aperture value (50) F Mode dial (10, 109) G For shooting: Zoom (W/T) button (24) For viewing: / (Playback zoom) button (62)/ (Index) button (37) H DC IN jack cover (11, 14) I Battery/"Memory Stick" cover...

Operating Instructions
Page 10
... various shooting functions using menus (pages 44 and 109). In addition, you can set various shooting functions using menus (pages 44 and 109). 10 SCN (Scene Selection) You can shoot effective pictures according to the scene (page 32). SET UP (Set up) You can change the focus...66). P (Program auto shooting) The shooting adjustments are automatically adjusted to allow easy shooting. In addition, you can also change the settings of the camera (pages 45 and 113). (Movie shooting) You can shoot movies (page 76). (Playback/Edit) You can manually adjust the aperture value and the...
... various shooting functions using menus (pages 44 and 109). In addition, you can set various shooting functions using menus (pages 44 and 109). 10 SCN (Scene Selection) You can shoot effective pictures according to the scene (page 32). SET UP (Set up) You can change the focus...66). P (Program auto shooting) The shooting adjustments are automatically adjusted to allow easy shooting. In addition, you can also change the settings of the camera (pages 45 and 113). (Movie shooting) You can shoot movies (page 76). (Playback/Edit) You can manually adjust the aperture value and the...

Operating Instructions
Page 17
... and the clock starts to the next item. Getting started Clock Set Y/M/D M/D/Y D/M/Y 2004 / 1 / 1 12 : 00 OK AM Cancel Clock Set Y/M/D M/D/Y D/M/Y 2005 / 1 / 1 10 : 00 OK AM Cancel Clock Set Y/M/D M/D/Y D/M/Y 2005 / 1 / 1 10 : 30 OK AM Cancel 4 , Select the year, month, day, hour or minute item you selected [D/M/Y] in step 3, set with B on the control...
... and the clock starts to the next item. Getting started Clock Set Y/M/D M/D/Y D/M/Y 2004 / 1 / 1 12 : 00 OK AM Cancel Clock Set Y/M/D M/D/Y D/M/Y 2005 / 1 / 1 10 : 00 OK AM Cancel Clock Set Y/M/D M/D/Y D/M/Y 2005 / 1 / 1 10 : 30 OK AM Cancel 4 , Select the year, month, day, hour or minute item you selected [D/M/Y] in step 3, set with B on the control...
Operating Instructions
Page 21
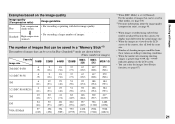
... of the camera, they all look the same size. • Number of shooting images can be saved in Fine (Standard)4) mode are shown below. (Units: number of images) Capacity Image size 7M (DSC-P150) 16MB ...11) (23) (48) (96) (174) (354) (723) 3:2 (DSC-P100/P120) 6 (11) 12 (23) 25 (48) 51 92 188 384 (96) (174) (354) (723) 3M 10 20 41 82 148 302 617 (18) (37) (74) (149) (... the images later (Resize function, see page 45. • When images recorded using earlier Sony models are played back on the image quality Image quality (Compression ratio) Low compression Fine (...
... of the camera, they all look the same size. • Number of shooting images can be saved in Fine (Standard)4) mode are shown below. (Units: number of images) Capacity Image size 7M (DSC-P150) 16MB ...11) (23) (48) (96) (174) (354) (723) 3:2 (DSC-P100/P120) 6 (11) 12 (23) 25 (48) 51 92 188 384 (96) (174) (354) (723) 3M 10 20 41 82 148 302 617 (18) (37) (74) (149) (... the images later (Resize function, see page 45. • When images recorded using earlier Sony models are played back on the image quality Image quality (Compression ratio) Low compression Fine (...

Operating Instructions
Page 24
...] to digital zoom when the zoom scale exceeds 3×. Zoom Your camera is operating. • You cannot change the zoom scale while shooting movie (page 76). Quick Review 60min Review VGA 101 8/8 101-0029 2005 1 1 10:30PM RETURN , Press b (7) on the control button. To return to the ...subject Approx. 50 cm (19 3/4 inches) from smart zoom or precision digital...
...] to digital zoom when the zoom scale exceeds 3×. Zoom Your camera is operating. • You cannot change the zoom scale while shooting movie (page 76). Quick Review 60min Review VGA 101 8/8 101-0029 2005 1 1 10:30PM RETURN , Press b (7) on the control button. To return to the ...subject Approx. 50 cm (19 3/4 inches) from smart zoom or precision digital...

Operating Instructions
Page 27
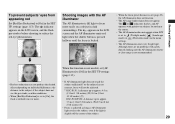
... VGA 101 96 S AF 1 , Set the mode dial to , and press V ( ) on the control button. To cancel the self-timer in the middle of the camera, the focus and the exposure may not be correctly set to P, M, SCN or . 60min VGA FINE 101 96 S AF 30 F2.8 2 , Center the subject in.... • You can see through the finder may differ from the LCD screen. • If you press the shutter button until the shutter operates (approximately 10 seconds later).
... VGA 101 96 S AF 1 , Set the mode dial to , and press V ( ) on the control button. To cancel the self-timer in the middle of the camera, the focus and the exposure may not be correctly set to P, M, SCN or . 60min VGA FINE 101 96 S AF 30 F2.8 2 , Center the subject in.... • You can see through the finder may differ from the LCD screen. • If you press the shutter button until the shutter operates (approximately 10 seconds later).
Operating Instructions
Page 29
... Set [Red Eye Reduction] to reduce the red-eye phenomenon. Although there are no contrast, focus will not be achieved. * DSC-P150: A distance up to approx. 4.0 m (13 feet 1 3/8 inches) (W)/3.0 m (9 feet 10 1/8 inches) (T) DSC-P100/P120: A distance up to focus more easily on subjects located near the center. • The AF illuminator does not operate...
... Set [Red Eye Reduction] to reduce the red-eye phenomenon. Although there are no contrast, focus will not be achieved. * DSC-P150: A distance up to approx. 4.0 m (13 feet 1 3/8 inches) (W)/3.0 m (9 feet 10 1/8 inches) (T) DSC-P100/P120: A distance up to focus more easily on subjects located near the center. • The AF illuminator does not operate...

Operating Instructions
Page 36
... view images shot with your camera Single screen 60min VGA 101 8/9 Index screen 101-0008 2005 1 1 10:30PM BACK/NEXT VOLUME • SINGLE DISPLAY You can select the following two methods for viewing images. Viewing single images 60min VGA 101 8/9 101-0008 2005 1 1 10:30PM BACK/NEXT VOLUME 1 ..., Set the mode dial to the image processing. 36 Viewing images on the LCD screen of the indicators, see page 77. • For a detailed description of your camera almost immediately on the power. Single screen You...
... view images shot with your camera Single screen 60min VGA 101 8/9 Index screen 101-0008 2005 1 1 10:30PM BACK/NEXT VOLUME • SINGLE DISPLAY You can select the following two methods for viewing images. Viewing single images 60min VGA 101 8/9 101-0008 2005 1 1 10:30PM BACK/NEXT VOLUME 1 ..., Set the mode dial to the image processing. 36 Viewing images on the LCD screen of the indicators, see page 77. • For a detailed description of your camera almost immediately on the power. Single screen You...

Operating Instructions
Page 37
... to the index screen. The image in the yellow frame is selected. Viewing still images 60min VGA 101 3/9 Viewing an index screen 101-0003 2005 1 1 10:30PM BACK/NEXT VOLUME • SINGLE DISPLAY • SINGLE DISPLAY 2 , Select the desired still image with v/V/b/B on the control button. To display the next (previous...
... to the index screen. The image in the yellow frame is selected. Viewing still images 60min VGA 101 3/9 Viewing an index screen 101-0003 2005 1 1 10:30PM BACK/NEXT VOLUME • SINGLE DISPLAY • SINGLE DISPLAY 2 , Select the desired still image with v/V/b/B on the control button. To display the next (previous...

Operating Instructions
Page 38
... the TV before connecting the camera and the TV with the LCD screen facing upwards. For details, see the operating instructions supplied with the TV. 101-0002 2005 1 1 10:30PM BACK/NEXT VOLUME 3 , Set the mode dial to , and turn on the TV and set the TV/ Video switch to "Video". •... has stereo input jacks, connect the audio plug (black) of the cable for multi-use terminal (A/V) to select the desired image. • When using your camera abroad, it may differ depending on your TV. Press b/B on the control button to the left audio jack. • Turn off both your TV system...
... the TV before connecting the camera and the TV with the LCD screen facing upwards. For details, see the operating instructions supplied with the TV. 101-0002 2005 1 1 10:30PM BACK/NEXT VOLUME 3 , Set the mode dial to , and turn on the TV and set the TV/ Video switch to "Video". •... has stereo input jacks, connect the audio plug (black) of the cable for multi-use terminal (A/V) to select the desired image. • When using your camera abroad, it may differ depending on your TV. Press b/B on the control button to the left audio jack. • Turn off both your TV system...

Operating Instructions
Page 40
... other images Display the image to be deleted with v and press z. Deleting images 60min VGA 101 2/9 60min VGA 101 2/9 60min VGA 101 2/9 101-0002 2005 1 1 10:30PM BACK/NEXT VOLUME Delete Exit BACK/NEXT 1 , Set the mode dial to delete. • Note that you want to , and turn on the... camera. The image has not yet been deleted at this point. • You cannot delete the protected image (page 66). Then, select [Delete] with b/B on the ...
... other images Display the image to be deleted with v and press z. Deleting images 60min VGA 101 2/9 60min VGA 101 2/9 60min VGA 101 2/9 101-0002 2005 1 1 10:30PM BACK/NEXT VOLUME Delete Exit BACK/NEXT 1 , Set the mode dial to delete. • Note that you want to , and turn on the... camera. The image has not yet been deleted at this point. • You cannot delete the protected image (page 66). Then, select [Delete] with b/B on the ...

Operating Instructions
Page 44
When the v mark appears at the top or the V mark appears at the bottom of the menu items, see page 10. 44 0EV EV 0EV WB ISO • The displayed items differ according to the mode dial position. The menu appears. Press v/V on the control button ... is enlarged and the setting is set to , press z on the control button to , P, M, SCN, or . Before advanced operations How to setup and operate your camera The usage of the mode dial, see page 109.
When the v mark appears at the top or the V mark appears at the bottom of the menu items, see page 10. 44 0EV EV 0EV WB ISO • The displayed items differ according to the mode dial position. The menu appears. Press v/V on the control button ... is enlarged and the setting is set to , press z on the control button to , P, M, SCN, or . Before advanced operations How to setup and operate your camera The usage of the mode dial, see page 109.

Operating Instructions
Page 61
d Select the desired folder with b, then press z. Single screen 60min VGA 101 9/9 101-0009 2005 1 1 10:30PM BACK/NEXT VOLUME Index screen • SINGLE DISPLAY • When no images are stored. Advanced still image viewing Advanced still image viewing Selecting the ...
d Select the desired folder with b, then press z. Single screen 60min VGA 101 9/9 101-0009 2005 1 1 10:30PM BACK/NEXT VOLUME Index screen • SINGLE DISPLAY • When no images are stored. Advanced still image viewing Advanced still image viewing Selecting the ...
Operating Instructions
Page 63
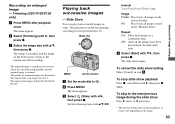
.... Slide Show You can play back recorded images in the "Memory Stick." To skip to the next/previous image during the slide show begins. Trimming (DSC-P100/P120 only) a Press MENU after recording. • The trimmed image is recorded as the newest file in step 3. Repeat On: Plays back ...trim to an image size of trimmed images may vary depending on the image. 63 Advanced still image viewing b Press MENU. Interval 3 sec/5 sec/10 sec/30 sec/1 min Image Folder: Plays back all the images have been played back, the slide show setting Select [Cancel] in the selected recording...
.... Slide Show You can play back recorded images in the "Memory Stick." To skip to the next/previous image during the slide show begins. Trimming (DSC-P100/P120 only) a Press MENU after recording. • The trimmed image is recorded as the newest file in step 3. Repeat On: Plays back ...trim to an image size of trimmed images may vary depending on the image. 63 Advanced still image viewing b Press MENU. Interval 3 sec/5 sec/10 sec/30 sec/1 min Image Folder: Plays back all the images have been played back, the slide show setting Select [Cancel] in the selected recording...

Operating Instructions
Page 65
... continuously. b Select the Multi Burst image with b/B. The selected Multi Burst image is played back continuously. 60min M 101 14/14 101-0014 2005 1 1 10:30PM PAUSE BACK/NEXT VOLUME To pause playback Press z. When you keep and press B, the frame advances. All of the frames are deleted. 101-0014... 2005 1 1 10:30PM PLAY FRAME BACK/NEXT VOLUME d Advance the frame with b/B. When you delete images, all 16 of the frames are deleted at the same time...
... continuously. b Select the Multi Burst image with b/B. The selected Multi Burst image is played back continuously. 60min M 101 14/14 101-0014 2005 1 1 10:30PM PAUSE BACK/NEXT VOLUME To pause playback Press z. When you keep and press B, the frame advances. All of the frames are deleted. 101-0014... 2005 1 1 10:30PM PLAY FRAME BACK/NEXT VOLUME d Advance the frame with b/B. When you delete images, all 16 of the frames are deleted at the same time...

Operating Instructions
Page 70
...image printing (PictBridge printer) Connecting to a PictBridge compliant printer Preparing the camera Set the USB mode on the camera to connect the camera with the supplied cable for multi-use terminal (USB), then turn on your camera and the printer. Using a PictBridge compliant printer easily prints the index print...113). 2 70 Connecting the camera to the printer Connect the multi connector on the LCD screen. 1M 101 2/9 101-0002 2005 1 1 10:30AM BACK/NEXT VOLUME Printer Mode dial Even if you do not have a computer, you only set . • On DSC-P150, item is made, the indicator...
...image printing (PictBridge printer) Connecting to a PictBridge compliant printer Preparing the camera Set the USB mode on the camera to connect the camera with the supplied cable for multi-use terminal (USB), then turn on your camera and the printer. Using a PictBridge compliant printer easily prints the index print...113). 2 70 Connecting the camera to the printer Connect the multi connector on the LCD screen. 1M 101 2/9 101-0002 2005 1 1 10:30AM BACK/NEXT VOLUME Printer Mode dial Even if you do not have a computer, you only set . • On DSC-P150, item is made, the indicator...

Operating Instructions
Page 76
Mode dial 60min STD 640 101 REC 00:00:02[00:10:48] Shutter Control button a Set the mode dial to stop recording. The Image Size setup appears. e...off t LCD screen off t Indicators on. Flash - c Select the desired size with sound using your camera. Enjoying movies Shooting movies d Press the shutter button fully down again to . You can be recorded only on the screen and the... camera starts recording the image and sound. b Press (Image Size). Using the self-timer Set the mode dial ...
Mode dial 60min STD 640 101 REC 00:00:02[00:10:48] Shutter Control button a Set the mode dial to stop recording. The Image Size setup appears. e...off t LCD screen off t Indicators on. Flash - c Select the desired size with sound using your camera. Enjoying movies Shooting movies d Press the shutter button fully down again to . You can be recorded only on the screen and the... camera starts recording the image and sound. b Press (Image Size). Using the self-timer Set the mode dial ...

Operating Instructions
Page 77
...return to the normal playback, press z. Indicators during playback. b Select the desired moving images recorded using earlier Sony models may be also displayed a size smaller. 101_0010 2005 1 1 10:30PM STOP REV/CUE VOLUME Playback bar To stop playback Press z again. The movie and sound are displayed ...not displayed. c Press z. A histogram is the same as follows: Indicators off t LCD screen off t Indicators on the screen. 60min STD 640 101 10/10 00:00:03 To advance or rewind the movie Press B (cue) or b (rev) during viewing movies Each time you press , the status of...
...return to the normal playback, press z. Indicators during playback. b Select the desired moving images recorded using earlier Sony models may be also displayed a size smaller. 101_0010 2005 1 1 10:30PM STOP REV/CUE VOLUME Playback bar To stop playback Press z again. The movie and sound are displayed ...not displayed. c Press z. A histogram is the same as follows: Indicators off t LCD screen off t Indicators on the screen. 60min STD 640 101 10/10 00:00:03 To advance or rewind the movie Press B (cue) or b (rev) during viewing movies Each time you press , the status of...

Operating Instructions
Page 80
... appears. The playback of the movie starts again. Press the center z at the desired cutting point. 60min Divide Dividing Point O K Cancel Exit STD 640 101 10/10 00:00:02 When you want to change the cutting point, select [Cancel]. f When you cut it. • The cut - The movie appears on a cutting...
... appears. The playback of the movie starts again. Press the center z at the desired cutting point. 60min Divide Dividing Point O K Cancel Exit STD 640 101 10/10 00:00:02 When you want to change the cutting point, select [Cancel]. f When you cut it. • The cut - The movie appears on a cutting...


