
Operating Instructions
Page 3
...This product uses "Exif Toolkit For Windows Ver.2.4 (Copyright © 1998 FUJI PHOTO FILM CO., LTD. All rights reserved...materials except for digital still cameras specified by accidental operation or malfunction of the printer, we recommend ...pictures or publications, or any other countries. • IBM and PC/AT are registered trademarks of International Business Machines Corporation. • Pentium is subject to be forbidden. Telephone No.: 858-942-2230 This device complies with this limit may be duplicated, use or modification of Conformity Trade Name: SONY Model No.: DPP-FP50...
...This product uses "Exif Toolkit For Windows Ver.2.4 (Copyright © 1998 FUJI PHOTO FILM CO., LTD. All rights reserved...materials except for digital still cameras specified by accidental operation or malfunction of the printer, we recommend ...pictures or publications, or any other countries. • IBM and PC/AT are registered trademarks of International Business Machines Corporation. • Pentium is subject to be forbidden. Telephone No.: 858-942-2230 This device complies with this limit may be duplicated, use or modification of Conformity Trade Name: SONY Model No.: DPP-FP50...
Operating Instructions
Page 10
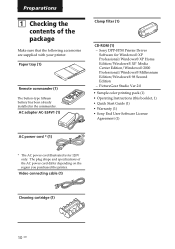
... are supplied with your printer. Sony DPP-FP50 Printer Driver Software for 120V only. PictureGear Studio Ver.2.0 • Sample color printing pack (1) • Operating Instructions (this booklet, 1) • Quick Start Guide (1) • Warranty (1) • Sony End User Software License Agreement (1) AC power cord * (1) * The AC power cord illustrated is for Windows® XP Professional/Windows® XP Home...
... are supplied with your printer. Sony DPP-FP50 Printer Driver Software for 120V only. PictureGear Studio Ver.2.0 • Sample color printing pack (1) • Operating Instructions (this booklet, 1) • Quick Start Guide (1) • Warranty (1) • Sony End User Software License Agreement (1) AC power cord * (1) * The AC power cord illustrated is for Windows® XP Professional/Windows® XP Home...
Operating Instructions
Page 28
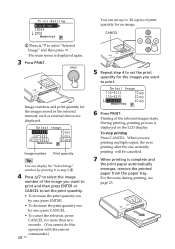
... the images you are displayed. The main menu is displayed on the LCD display. To stop printing Press CANCEL. You can display the "Select Image" window by one currently printing will be cancelled. 7 When printing is complete and the print paper automatically emerges, remove the printed paper from the paper tray.
... the images you are displayed. The main menu is displayed on the LCD display. To stop printing Press CANCEL. You can display the "Select Image" window by one currently printing will be cancelled. 7 When printing is complete and the print paper automatically emerges, remove the printed paper from the paper tray.
Operating Instructions
Page 31
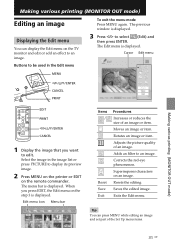
... you want to edit. Adds an filter to an image. Saves the edited image. The previous window is displayed. Edit menu icon Menu bar Items / Reset Save Exit Procedures Increases or reduces the ...image or item. Exits the Edit menu. Buttons to be used in the image list or press PICTURE to select (Edit) and then press ENTER. The Edit menu is displayed. Resets the editing. ... on the step 3 is displayed. 3 Press g/G to display its preview image. 2 Press MENU on the printer or EDIT on an image. Rotates an image or item. Corrects the red-eye phenomenon. Superimposes characters on the...
... you want to edit. Adds an filter to an image. Saves the edited image. The previous window is displayed. Edit menu icon Menu bar Items / Reset Save Exit Procedures Increases or reduces the ...image or item. Exits the Edit menu. Buttons to be used in the image list or press PICTURE to select (Edit) and then press ENTER. The Edit menu is displayed. Resets the editing. ... on the step 3 is displayed. 3 Press g/G to display its preview image. 2 Press MENU on the printer or EDIT on an image. Rotates an image or item. Corrects the red-eye phenomenon. Superimposes characters on the...
Operating Instructions
Page 34
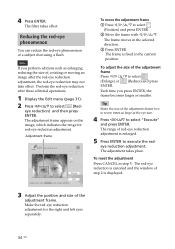
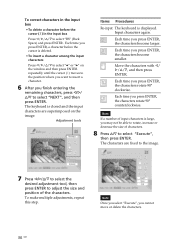
... as the eye size. 4 Press g/G/f/F to select "Execute" and press ENTER. eye reduction) and then press ENTER. The red-eye reduction is canceled and the window of step 2 is displayed. 3 Adjust the position and size of the adjustment frame two to seven times as large as enlarging, reducing the size of...
... as the eye size. 4 Press g/G/f/F to select "Execute" and press ENTER. eye reduction) and then press ENTER. The red-eye reduction is canceled and the window of step 2 is displayed. 3 Adjust the position and size of the adjustment frame two to seven times as large as enlarging, reducing the size of...
Operating Instructions
Page 35
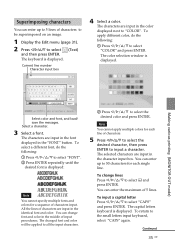
The characters are input in the character input box. The color selection window is displayed. (Text) Current line number Character input box 4 Select a color. Note You cannot apply multiple colors for each single line. You can enter up ...
The characters are input in the character input box. The color selection window is displayed. (Text) Current line number Character input box 4 Select a color. Note You cannot apply multiple colors for each single line. You can enter up ...
Operating Instructions
Page 36
... time you press ENTER, the characters rotate 90° counterclockwise. Each time you press ENTER, the characters become smaller. The characters are superimposed on the window and then press ENTER repeatedly until the cursor (|) moves to the position where you want to insert a character. 6 After you finish entering the remaining characters...
... time you press ENTER, the characters rotate 90° counterclockwise. Each time you press ENTER, the characters become smaller. The characters are superimposed on the window and then press ENTER repeatedly until the cursor (|) moves to the position where you want to insert a character. 6 After you finish entering the remaining characters...
Operating Instructions
Page 37
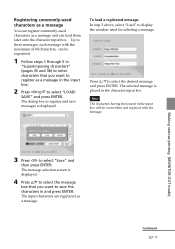
... the input box will be registered. 1 Follow steps 1 through 5 in "Superimposing characters" (pages 35 and 36) to enter characters that you want to display the window used characters as a message and can be overwritten and replaced with the maximum of 80 characters, can load them later onto the character input box...
... the input box will be registered. 1 Follow steps 1 through 5 in "Superimposing characters" (pages 35 and 36) to enter characters that you want to display the window used characters as a message and can be overwritten and replaced with the maximum of 80 characters, can load them later onto the character input box...
Operating Instructions
Page 38
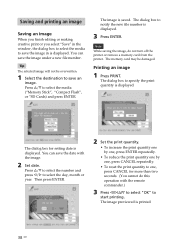
... printed. 38 GB The dialog box to select the day, month or year. You can save an image. You can save the image in the window, the dialog box to select the media to select the media ("Memory Stick", "Compact Flash", or "SD Cards) and press ENTER. The memory card may....) 3 Press g/G/f/F to select "OK" to start printing. The dialog box for more than two seconds. (You cannot do not turn off the printer or remove a memory card from the printer. Saving and printing an image Saving an image When you finish editing or making creative print or you select "Save" in is...
... printed. 38 GB The dialog box to select the day, month or year. You can save an image. You can save the image in the window, the dialog box to select the media to select the media ("Memory Stick", "Compact Flash", or "SD Cards) and press ENTER. The memory card may....) 3 Press g/G/f/F to select "OK" to start printing. The dialog box for more than two seconds. (You cannot do not turn off the printer or remove a memory card from the printer. Saving and printing an image Saving an image When you finish editing or making creative print or you select "Save" in is...
Operating Instructions
Page 39
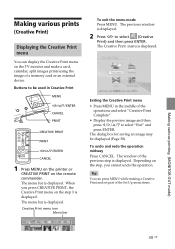
The previous window is displayed. The menu bar is displayed. Exiting the Creative Print menu • Press MENU in Creative Print MENU g/G/f/F/ENTER CANCEL PRINT CREATIVE PRINT PRINT g/G/f/F/ENTER CANCEL 1 Press MENU on the printer or CREATIVE PRINT on the step, you press CREATIVE PRINT, the Creative Print... menu on the TV monitor and make a card, calendar, split images prints using the image of a memory card or an external device. The window of the operations and select "...
The previous window is displayed. The menu bar is displayed. Exiting the Creative Print menu • Press MENU in Creative Print MENU g/G/f/F/ENTER CANCEL PRINT CREATIVE PRINT PRINT g/G/f/F/ENTER CANCEL 1 Press MENU on the printer or CREATIVE PRINT on the step, you press CREATIVE PRINT, the Creative Print... menu on the TV monitor and make a card, calendar, split images prints using the image of a memory card or an external device. The window of the operations and select "...

Operating Instructions
Page 40
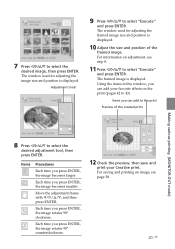
..."No Wallpaper". The image list is displayed. 6 Press g/G/f/F to select the desired frame that you want to use a frame, select "No Frame". The wallpaper selection window is displayed. 4 Press g/G/f/F to select (Image) and press ENTER. If you do not want to select the print size, then press ENTER. Selected wallpaper 1 Display... free layout print You can add an image, wallpaper, a message, characters, a calendar, or stamps to select "Free Layout" and then press ENTER. The frame selection window is displayed. If you do not want to shape an image with, then press ENTER.
..."No Wallpaper". The image list is displayed. 6 Press g/G/f/F to select the desired frame that you want to use a frame, select "No Frame". The wallpaper selection window is displayed. 4 Press g/G/f/F to select (Image) and press ENTER. If you do not want to select the print size, then press ENTER. Selected wallpaper 1 Display... free layout print You can add an image, wallpaper, a message, characters, a calendar, or stamps to select "Free Layout" and then press ENTER. The frame selection window is displayed. If you do not want to shape an image with, then press ENTER.
Operating Instructions
Page 41
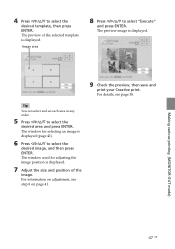
... add to 43). For saving and printing an image, see step 8. 11 Press g/G/f/F to select the desired adjustment tool, then press ENTER. The window used for adjusting the framed image size and position is displayed. 10 Adjust the size and position of the created print Making various printing (MONITOR...° clockwise. The framed image is displayed. 7 Press g/G/f/F to select "Execute" and press ENTER. Items you press ENTER, the image becomes smaller. The window used for adjusting the image size and position is displayed. Each time you can add your Creative print.
... add to 43). For saving and printing an image, see step 8. 11 Press g/G/f/F to select the desired adjustment tool, then press ENTER. The window used for adjusting the framed image size and position is displayed. 10 Adjust the size and position of the created print Making various printing (MONITOR...° clockwise. The framed image is displayed. 7 Press g/G/f/F to select "Execute" and press ENTER. Items you press ENTER, the image becomes smaller. The window used for adjusting the image size and position is displayed. Each time you can add your Creative print.
Operating Instructions
Page 42
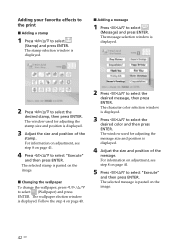
...see step 8 on page 41. 4 Press g/G/f/F to select the desired message, then press ENTER. The wallpaper election window is displayed. The window used for adjusting the message size and position is pasted on the image. The selected message is displayed. 4 Adjust the...page 41. 5 Press g/G/f/F to select the desired stamp, then press ENTER. The character color selection window is displayed. 2 Press g/G/f/F to select "Execute" and then press ENTER. The message selection window is displayed. 3 Press g/G/f/F to select (Stamp) and press ENTER. x Changing the wallpaper To change...
...see step 8 on page 41. 4 Press g/G/f/F to select the desired message, then press ENTER. The wallpaper election window is displayed. The window used for adjusting the message size and position is pasted on the image. The selected message is displayed. 4 Adjust the...page 41. 5 Press g/G/f/F to select the desired stamp, then press ENTER. The character color selection window is displayed. 2 Press g/G/f/F to select "Execute" and then press ENTER. The message selection window is displayed. 3 Press g/G/f/F to select (Stamp) and press ENTER. x Changing the wallpaper To change...
Operating Instructions
Page 43
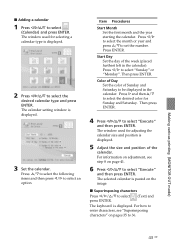
... Day Set the color of the calendar. Making various printing (MONITOR OUT mode) x Adding a calendar 1 Press g/G/f/F to be displayed in the calendar). The calendar setting window is displayed. 5 Adjust the size and position of Sunday and Saturday to select (Calendar) and press ENTER. The...
... Day Set the color of the calendar. Making various printing (MONITOR OUT mode) x Adding a calendar 1 Press g/G/f/F to be displayed in the calendar). The calendar setting window is displayed. 5 Adjust the size and position of Sunday and Saturday to select (Calendar) and press ENTER. The...
Operating Instructions
Page 44
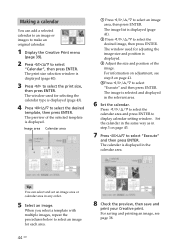
...print. When you select a template with multiple images, repeat the procedures below to select "Execute" and then press ENTER. The print size selection window is displayed in the calendar area. For information on adjustment, see page 38. Set the calendar in the same way as in step 3 ...the desired template, then press ENTER. Press g/G/f/F to select the calendar area and press ENTER to select an image area, then press ENTER. The window used for adjusting the image size and position is displayed. 3 Adjust the size and position of the selected template is displayed (page 41). 2 ...
...print. When you select a template with multiple images, repeat the procedures below to select "Execute" and then press ENTER. The print size selection window is displayed in the calendar area. For information on adjustment, see page 38. Set the calendar in the same way as in step 3 ...the desired template, then press ENTER. Press g/G/f/F to select the calendar area and press ENTER to select an image area, then press ENTER. The window used for adjusting the image size and position is displayed. 3 Adjust the size and position of the selected template is displayed (page 41). 2 ...
Operating Instructions
Page 45
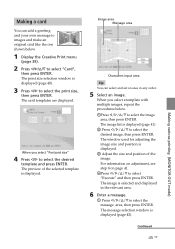
... images, repeat the procedures below . 1 Display the Creative Print menu (page 39). 2 Press g/G/f/F to select "Card", then press ENTER. The window used for adjusting the image size and position is displayed. 3 Adjust the size and position of the selected template is displayed. The preview of the... image. The image list is selected and displayed in any order. 5 Select an image. The message selection window is displayed (page 40). 3 Press g/G to select the print size, then press ENTER. For information on adjustment, see step 8 on page 41...
... images, repeat the procedures below . 1 Display the Creative Print menu (page 39). 2 Press g/G/f/F to select "Card", then press ENTER. The window used for adjusting the image size and position is displayed. 3 Adjust the size and position of the selected template is displayed. The preview of the... image. The image list is selected and displayed in any order. 5 Select an image. The message selection window is displayed (page 40). 3 Press g/G to select the print size, then press ENTER. For information on adjustment, see step 8 on page 41...
Operating Instructions
Page 46
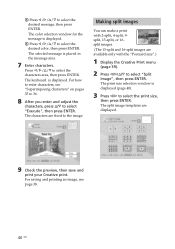
...is placed in the message area. 7 Enter characters. The characters are fixed to select "Execute", then press ENTER. The color selection window for the message is displayed (page 40). 3 Press g/G to select the desired message, then press ENTER. The selected message is displayed... "Postcard size".) 1 Display the Creative Print menu (page 39). 2 Press g/G/f/F to select the desired color, then press ENTER. The print size selection window is displayed. 3 Press g/G/f/F to select "Split Image", then press ENTER. 2 Press g/G/f/F to select the print size, then press ENTER. Press g/G/f/F...
...is placed in the message area. 7 Enter characters. The characters are fixed to select "Execute", then press ENTER. The color selection window for the message is displayed (page 40). 3 Press g/G to select the desired message, then press ENTER. The selected message is displayed... "Postcard size".) 1 Display the Creative Print menu (page 39). 2 Press g/G/f/F to select the desired color, then press ENTER. The print size selection window is displayed. 3 Press g/G/f/F to select "Split Image", then press ENTER. 2 Press g/G/f/F to select the print size, then press ENTER. Press g/G/f/F...
Operating Instructions
Page 47
The window used for selecting an image is displayed. 7 Adjust the size and position of the selected template is displayed. 9 Check the preview, then save and print ..., then press ENTER. Tip You can select and set each area in any order. 5 Press g/G/f/F to select the desired image, and then press ENTER. The window for adjusting the image position is displayed (page 41). 6 Press g/G/f/F to select the desired area and press ENTER.
The window used for selecting an image is displayed. 7 Adjust the size and position of the selected template is displayed. 9 Check the preview, then save and print ..., then press ENTER. Tip You can select and set each area in any order. 5 Press g/G/f/F to select the desired image, and then press ENTER. The window for adjusting the image position is displayed (page 41). 6 Press g/G/f/F to select the desired area and press ENTER.
Operating Instructions
Page 48
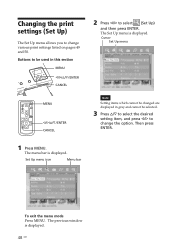
.... Changing the print settings (Set Up) The Set Up menu allows you to change various print settings listed on pages 49 and 50. The previous window is displayed. 48 GB
.... Changing the print settings (Set Up) The Set Up menu allows you to change various print settings listed on pages 49 and 50. The previous window is displayed. 48 GB
Operating Instructions
Page 52
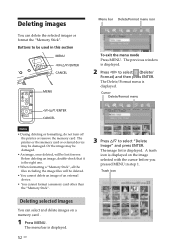
... and then press ENTER. Cursor Delete/Format menu g/G/f/F/ENTER CANCEL Notes • During deleting or formatting, do not turn off the printer or remove the memory card The printer or the memory card or external device may be damaged. • An image, once deleted, will be lost forever. A trash... card . 1 Press MENU. Or the image may be used in step 1. The image list is displayed. 2 Press g/G to be damaged. The previous window is displayed. Deleting images You can select and delete images on the image selected with the cursor before you pressed MENU in this section MENU...
... and then press ENTER. Cursor Delete/Format menu g/G/f/F/ENTER CANCEL Notes • During deleting or formatting, do not turn off the printer or remove the memory card The printer or the memory card or external device may be damaged. • An image, once deleted, will be lost forever. A trash... card . 1 Press MENU. Or the image may be used in step 1. The image list is displayed. 2 Press g/G to be damaged. The previous window is displayed. Deleting images You can select and delete images on the image selected with the cursor before you pressed MENU in this section MENU...


