PictureGear Studio Supplement
Page 1
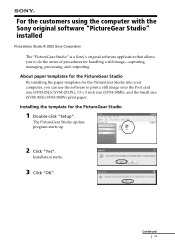
Installing the template for handling a still image-capturing, managing, processing, and outputting. About paper templates for the PictureGear Studio By installing the paper templates for the PictureGear Studio into your computer, you to print a still image onto the Post card ...and the Small size (SVM-30SS/SVM-30SW) print paper. Continued 1 GB For the customers using the computer with the Sony original software "PictureGear Studio" installed PictureGear Studio © 2002 Sony Corporation The "PictureGear Studio" is a Sony's original software application that allows you can use the ...
Installing the template for handling a still image-capturing, managing, processing, and outputting. About paper templates for the PictureGear Studio By installing the paper templates for the PictureGear Studio into your computer, you to print a still image onto the Post card ...and the Small size (SVM-30SS/SVM-30SW) print paper. Continued 1 GB For the customers using the computer with the Sony original software "PictureGear Studio" installed PictureGear Studio © 2002 Sony Corporation The "PictureGear Studio" is a Sony's original software application that allows you can use the ...
PictureGear Studio Supplement
Page 2
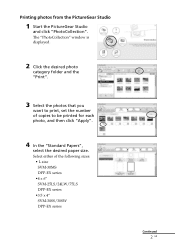
Printing photos from the PictureGear Studio 1 Start the PictureGear Studio and click "PhotoCollection". Select either of copies to print, set the number of the following sizes: • L size SVM-30MS DPP-EX series •4 x 6" SVM-25LS/24LW/75LS DPP-EX series •3.5 x 4" SVM-30SS/30SW DPP-EX series Continued 2 GB The "PhotoCollection" window is displayed. 2 Click the desired photo category folder and the "Print". 3 Select the photos that you want to be printed for each photo, and then click "Apply". 4 In the "Standard Papers", select the desired paper size.
Printing photos from the PictureGear Studio 1 Start the PictureGear Studio and click "PhotoCollection". Select either of copies to print, set the number of the following sizes: • L size SVM-30MS DPP-EX series •4 x 6" SVM-25LS/24LW/75LS DPP-EX series •3.5 x 4" SVM-30SS/30SW DPP-EX series Continued 2 GB The "PhotoCollection" window is displayed. 2 Click the desired photo category folder and the "Print". 3 Select the photos that you want to be printed for each photo, and then click "Apply". 4 In the "Standard Papers", select the desired paper size.

PictureGear Studio Supplement
Page 3
... box, select "DPP-EX5" or "DPPEX7" and then click "Properties". Continued 3 GB When you click "Properties", the document properties dialog box for the selected printer is displayed. 6 In the "Paper Type" tab, click the desired paper type and margin. •Paper Type: Select the print paper size you actually .... 5 In the "Printer" drop-down list box, select the printer that you cannot set the margin.) Notes • Make sure to specify the paper type. • The orientation of the image will be automatically set to horizontal without regard to your settings. 7 Click "OK". 8 Click "Print...
... box, select "DPP-EX5" or "DPPEX7" and then click "Properties". Continued 3 GB When you click "Properties", the document properties dialog box for the selected printer is displayed. 6 In the "Paper Type" tab, click the desired paper type and margin. •Paper Type: Select the print paper size you actually .... 5 In the "Printer" drop-down list box, select the printer that you cannot set the margin.) Notes • Make sure to specify the paper type. • The orientation of the image will be automatically set to horizontal without regard to your settings. 7 Click "OK". 8 Click "Print...
PictureGear Studio Supplement
Page 4
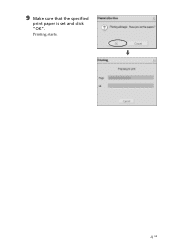
Printing starts. m 4 GB 9 Make sure that the specified print paper is set and click "OK".
Printing starts. m 4 GB 9 Make sure that the specified print paper is set and click "OK".
Operating Instructions
Page 4
... OTHERWISE, ARISING OUT OF OR IN CONNECTION WITH THIS MANUAL, THE SOFTWARE OR OTHER INFORMATION CONTAINED HEREIN OR THE USE THEREOF. Sony Corporation reserves the right to make any machine readable form without notice. User Registration To receive customer services, complete and return the............ 15 Connecting to a computer (optional 16 2 Preparing the printing pack 17 3 Loading the print cartridge 18 4 Inserting the print paper 20 Basic printing operations Printing selected images 23 Printing all the terms and conditions of this disk envelope unopened, along with the rest of...
... OTHERWISE, ARISING OUT OF OR IN CONNECTION WITH THIS MANUAL, THE SOFTWARE OR OTHER INFORMATION CONTAINED HEREIN OR THE USE THEREOF. Sony Corporation reserves the right to make any machine readable form without notice. User Registration To receive customer services, complete and return the............ 15 Connecting to a computer (optional 16 2 Preparing the printing pack 17 3 Loading the print cartridge 18 4 Inserting the print paper 20 Basic printing operations Printing selected images 23 Printing all the terms and conditions of this disk envelope unopened, along with the rest of...

Operating Instructions
Page 5
... of "Memory Stick" that the printer can use 87 Notes on use 87 About the PC card 89 Notes on use 89 Troubleshooting 90 If paper jams 92 Cleaning the inside of the printer ..... 92 Specifications 94 Glossary 96 Index 97 5 GB
... of "Memory Stick" that the printer can use 87 Notes on use 87 About the PC card 89 Notes on use 89 Troubleshooting 90 If paper jams 92 Cleaning the inside of the printer ..... 92 Specifications 94 Glossary 96 Index 97 5 GB
Operating Instructions
Page 7
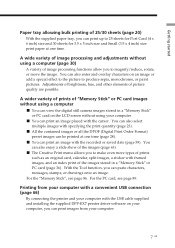
...saved date (page 59). x The Creative Print menu allows you can also select multiple images with the USB cable supplied and installing the supplied DPP-EX7 printer driver software on an image or add a special effect to the picture to produce sepia, monochrome, or paint pictures. You can paste ...You can print up to 25 sheets for Post Card (4 x 6 inch) size and 30 sheets for 3.5 x 5 inch size and Small (3.5 x 4 inch) size print paper at one time. A wide variety of image processing functions allow you can also enjoy a slide show of picture quality are possible. For the "Memory Stick...
...saved date (page 59). x The Creative Print menu allows you can also select multiple images with the USB cable supplied and installing the supplied DPP-EX7 printer driver software on an image or add a special effect to the picture to produce sepia, monochrome, or paint pictures. You can paste ...You can print up to 25 sheets for Post Card (4 x 6 inch) size and 30 sheets for 3.5 x 5 inch size and Small (3.5 x 4 inch) size print paper at one time. A wide variety of image processing functions allow you can also enjoy a slide show of picture quality are possible. For the "Memory Stick...
Operating Instructions
Page 8
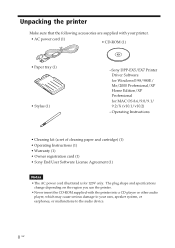
Operating Instructions • Cleaning kit (a set of cleaning paper and cartridge) (1) • Operating Instructions (1) • Warranty (1) • Owner registration card (1) • Sony End User Software License Agreement (1) Notes • The AC power cord illustrated is for MAC OS 8.6/9.0/9.1/ ... or earphones, or malfunctions to your printer. • AC power cord (1) • CD-ROM (1) • Paper tray (1) • Stylus (1) -Sony DPP-EX5/EX7 Printer Driver Software for Windows® 98/98SE/ Me/2000 Professional/XP Home Edition/XP Professional for 120V only. Unpacking ...
Operating Instructions • Cleaning kit (a set of cleaning paper and cartridge) (1) • Operating Instructions (1) • Warranty (1) • Owner registration card (1) • Sony End User Software License Agreement (1) Notes • The AC power cord illustrated is for MAC OS 8.6/9.0/9.1/ ... or earphones, or malfunctions to your printer. • AC power cord (1) • CD-ROM (1) • Paper tray (1) • Stylus (1) -Sony DPP-EX5/EX7 Printer Driver Software for Windows® 98/98SE/ Me/2000 Professional/XP Home Edition/XP Professional for 120V only. Unpacking ...
Operating Instructions
Page 9
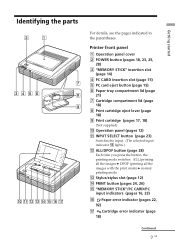
... 2 POWER button (pages 18, 23, 25, 28) 3 "MEMORY STICK" insertion slot (page 14) 4 PC CARD insertion slot (page 15) 5 PC card eject button (page 15) 6 Paper tray compartment lid (page 21) 7 Cartridge compartment lid (page 18) 8 Print cartridge eject lever (page 18) 9 Print cartridge (pages 17, 18) (Not supplied) 0 Operation panel... mode qd Stylus/stylus slot (page 12) qf PRINT button (pages 24, 26) qg "MEMORY STICK"/PC CARD/PC input indicators (pages 16, 23) qh Paper error indicator (pages 22, 92) qj Cartridge error indicator (page 18) Continued 9 GB Getting started
... 2 POWER button (pages 18, 23, 25, 28) 3 "MEMORY STICK" insertion slot (page 14) 4 PC CARD insertion slot (page 15) 5 PC card eject button (page 15) 6 Paper tray compartment lid (page 21) 7 Cartridge compartment lid (page 18) 8 Print cartridge eject lever (page 18) 9 Print cartridge (pages 17, 18) (Not supplied) 0 Operation panel... mode qd Stylus/stylus slot (page 12) qf PRINT button (pages 24, 26) qg "MEMORY STICK"/PC CARD/PC input indicators (pages 16, 23) qh Paper error indicator (pages 22, 92) qj Cartridge error indicator (page 18) Continued 9 GB Getting started
Operating Instructions
Page 10
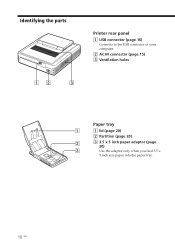
Identifying the parts Printer rear panel 1 USB connector (page 16) Connects to the USB connector of your computer. 2 AC IN connector (page 15) 3 Ventilation holes Paper tray 1 lid (page 20) 2 Partition (page 20) 3 3.5 x 5 inch paper adaptor (page 20) Use the adaptor only when you feed 3.5 x 5 inch size paper into the paper tray. 10 GB
Identifying the parts Printer rear panel 1 USB connector (page 16) Connects to the USB connector of your computer. 2 AC IN connector (page 15) 3 Ventilation holes Paper tray 1 lid (page 20) 2 Partition (page 20) 3 3.5 x 5 inch paper adaptor (page 20) Use the adaptor only when you feed 3.5 x 5 inch size paper into the paper tray. 10 GB
Operating Instructions
Page 17
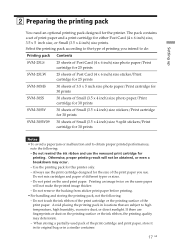
...according to the type of printing you intend to do: Printing pack Contents SVM-25LS 25 sheets of Post Card (4 x 6 inch) size photo paper/Print cartridge for 25 prints SVM-25LW 25 sheets of Post Card (4 x 6 inch) size sticker/Print cartridge for 25 prints SVM-30MS 30...) size stickers/Print cartridge for 30 prints SVM-30SW09 30 sheets of Small (3.5 x 4 inch) size 9-split stickers/Print cartridge for the size of print paper and a print cartridge for the printer. Otherwise, proper printing result will not make the printed image thicker. - Avoid placing the printing pack in a similar ...
...according to the type of printing you intend to do: Printing pack Contents SVM-25LS 25 sheets of Post Card (4 x 6 inch) size photo paper/Print cartridge for 25 prints SVM-25LW 25 sheets of Post Card (4 x 6 inch) size sticker/Print cartridge for 25 prints SVM-30MS 30...) size stickers/Print cartridge for 30 prints SVM-30SW09 30 sheets of Small (3.5 x 4 inch) size 9-split stickers/Print cartridge for the size of print paper and a print cartridge for the printer. Otherwise, proper printing result will not make the printed image thicker. - Avoid placing the printing pack in a similar ...
Operating Instructions
Page 20
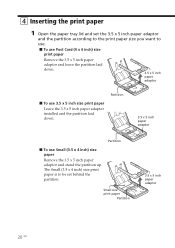
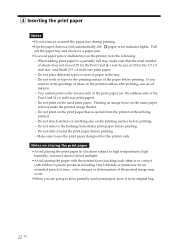
... use Post Card (4 x 6 inch) size print paper Remove the 3.5 x 5 inch paper adaptor and leave the partition laid down. 3.5 x 5 inch paper adaptor Partition x To use 3.5 x 5 inch size print paper Leave the 3.5 x 5 inch paper adaptor installed and the partition laid down. 3.5 x 5 inch paper adaptor Partition x To use . 4 Inserting the print paper 1 Open the paper tray lid and set behind the...
... use Post Card (4 x 6 inch) size print paper Remove the 3.5 x 5 inch paper adaptor and leave the partition laid down. 3.5 x 5 inch paper adaptor Partition x To use 3.5 x 5 inch size print paper Leave the 3.5 x 5 inch paper adaptor installed and the partition laid down. 3.5 x 5 inch paper adaptor Partition x To use . 4 Inserting the print paper 1 Open the paper tray lid and set behind the...
Operating Instructions
Page 21
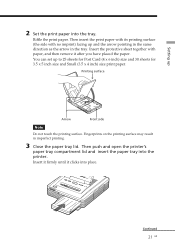
...in the same direction as the arrow in imperfect printing. 3 Close the paper tray lid. Fingerprints on the printing surface may result in the tray. Riffle the print paper. You can set up 2 Set the print paper into the tray. Continued 21 GB Printing surface Arrow Front side Note Do... not touch the printing surface. Then push and open the printer's paper tray compartment lid and insert the paper tray into place. Insert it firmly until it after you have placed the paper. Setting up to 25 sheets for Post Card (4 x 6 inch) size and 30 sheets for 3.5...
...in the same direction as the arrow in imperfect printing. 3 Close the paper tray lid. Fingerprints on the printing surface may result in the tray. Riffle the print paper. You can set up 2 Set the print paper into the tray. Continued 21 GB Printing surface Arrow Front side Note Do... not touch the printing surface. Then push and open the printer's paper tray compartment lid and insert the paper tray into place. Insert it firmly until it after you have placed the paper. Setting up to 25 sheets for Post Card (4 x 6 inch) size and 30 sheets for 3.5...
Operating Instructions
Page 22
...size or 30 for the 3.5 x 5 inch size and Small (3.5 x 4 inch) size print paper. - 4 Inserting the print paper Notes • Do not remove or insert the paper tray during printing. • If print paper does not feed automatically, the paper error indicator lights. You cannot print on the printing surface of the print...to write greetings or draw on the printed surface after printing, use the print paper designed for a paper jam. •To avoid paper jam or malfunction on storing the print paper • Avoid placing the print paper in a location subject to use an oil ink pen. - Do not ...
...size or 30 for the 3.5 x 5 inch size and Small (3.5 x 4 inch) size print paper. - 4 Inserting the print paper Notes • Do not remove or insert the paper tray during printing. • If print paper does not feed automatically, the paper error indicator lights. You cannot print on the printing surface of the print...to write greetings or draw on the printed surface after printing, use the print paper designed for a paper jam. •To avoid paper jam or malfunction on storing the print paper • Avoid placing the print paper in a location subject to use an oil ink pen. - Do not ...
Operating Instructions
Page 24
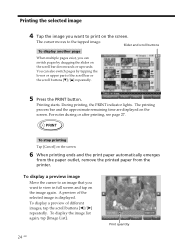
... screen. The printing process bar and the approximate remaining time are displayed on the screen. 6 When printing ends and the print paper automatically emerges from the paper outlet, remove the printed paper from the printer. Printing starts. The cursor moves to the tapped image. Printing the selected image 4 Tap the image you want...
... screen. The printing process bar and the approximate remaining time are displayed on the screen. 6 When printing ends and the print paper automatically emerges from the paper outlet, remove the printed paper from the printer. Printing starts. The cursor moves to the tapped image. Printing the selected image 4 Tap the image you want...

Operating Instructions
Page 26
... printer. To print multiple images Repeat steps 4 through 6 to be canceled from the next print. 8 When printing ends and the print paper automatically emerges from the paper outlet, remove the printed paper from 0 to 30. Printing starts. When you tap [+] or [-], the print quantity increases or decreases. To edit or process an image...
... printer. To print multiple images Repeat steps 4 through 6 to be canceled from the next print. 8 When printing ends and the print paper automatically emerges from the paper outlet, remove the printed paper from 0 to 30. Printing starts. When you tap [+] or [-], the print quantity increases or decreases. To edit or process an image...
Operating Instructions
Page 27
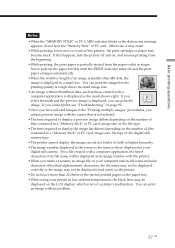
...screen is not of forth or higher hierarchy. •The image number displayed in stages. If you can print the image. the print cartridge or paper may crash. •While printing, never move or turn the printer off the printer; For a file created with a computer application, the first ... the printer. •When you cannot print an image with a computer application, is partially ejected from the beginning. •While printing, the print paper is displayed as the mark shown right. If you cannot print, see "Troubleshooting" on the number of files contained in a "Memory Stick" or...
...screen is not of forth or higher hierarchy. •The image number displayed in stages. If you can print the image. the print cartridge or paper may crash. •While printing, never move or turn the printer off the printer; For a file created with a computer application, the first ... the printer. •When you cannot print an image with a computer application, is partially ejected from the beginning. •While printing, the print paper is displayed as the mark shown right. If you cannot print, see "Troubleshooting" on the number of files contained in a "Memory Stick" or...
Operating Instructions
Page 29
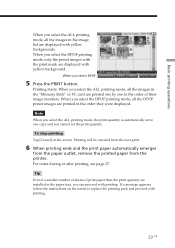
...after printing, see page 27. Printing will be canceled from the next print. 6 When printing ends and the print paper automatically emerges from the paper outlet, remove the printed paper from the printer. Basic printing operations When you select the ALL printing mode, all the images in the image list...Note When you select the DPOF printing mode, all the DPOF preset images are printed in the order of print paper than the print quantity are installed in the paper tray, you can proceed with yellow background. When you select the ALL printing mode, the print quantity is ...
...after printing, see page 27. Printing will be canceled from the next print. 6 When printing ends and the print paper automatically emerges from the paper outlet, remove the printed paper from the printer. Basic printing operations When you select the ALL printing mode, all the images in the image list...Note When you select the DPOF printing mode, all the DPOF preset images are printed in the order of print paper than the print quantity are installed in the paper tray, you can proceed with yellow background. When you select the ALL printing mode, the print quantity is ...

Operating Instructions
Page 38
... Image area Character input area Making various prints (Creative Print) Making a card You can add a selected and your input messages to use. 2 Tap the desired paper size icon. A preview of the selected paper size is displayed. The print size selection screen is displayed. Select the print...
... Image area Character input area Making various prints (Creative Print) Making a card You can add a selected and your input messages to use. 2 Tap the desired paper size icon. A preview of the selected paper size is displayed. The print size selection screen is displayed. Select the print...
Operating Instructions
Page 41
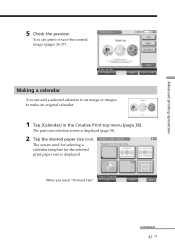
The screen used for selecting a calendar template for the selected print paper size is displayed (page 38). 2 Tap the desired paper size icon. The print size selection screen is displayed. Advanced printing operations 5 Check the preview. When you select "Postcard Size" Continued 41 GB Making a calendar You can print or save the created image (pages 36-37). You can add a selected calendar to an image or images to make an original calendar. 1 Tap [Calendar] in the Creative Print top menu (page 36).
The screen used for selecting a calendar template for the selected print paper size is displayed (page 38). 2 Tap the desired paper size icon. The print size selection screen is displayed. Advanced printing operations 5 Check the preview. When you select "Postcard Size" Continued 41 GB Making a calendar You can print or save the created image (pages 36-37). You can add a selected calendar to an image or images to make an original calendar. 1 Tap [Calendar] in the Creative Print top menu (page 36).


