
PictureGear Studio Supplement
Page 3
...-down list box, select the printer that you cannot set the margin.) Notes • Make sure to specify the paper type...Print All" or "Print the selected page only". Continued 3 GB When you click "Properties", the document properties dialog box for the selected printer is displayed. 6 In the "Paper Type" tab, click the desired paper type and margin. •Paper Type: Select the print ..." paper type, select "with border" or "borderless". (When you select "Small" paper type, you actually use. In the "Printer" drop-down list box, select "DPP-EX5" or "DPPEX7" and then click "Properties".
...-down list box, select the printer that you cannot set the margin.) Notes • Make sure to specify the paper type...Print All" or "Print the selected page only". Continued 3 GB When you click "Properties", the document properties dialog box for the selected printer is displayed. 6 In the "Paper Type" tab, click the desired paper type and margin. •Paper Type: Select the print ..." paper type, select "with border" or "borderless". (When you select "Small" paper type, you actually use. In the "Printer" drop-down list box, select "DPP-EX5" or "DPPEX7" and then click "Properties".

Warranty Card
Page 1
... the Product. This warranty is invalid if the factory applied serial number has been altered or removed from your convenience, Sony Electronics Inc. 4-557-157-02 ® Video Printer LIMITED WARRANTY Sony Electronics Inc. ("Sony") warrants this Product is available from the date of 90 days from state to state. LABOR: For a period of...
... the Product. This warranty is invalid if the factory applied serial number has been altered or removed from your convenience, Sony Electronics Inc. 4-557-157-02 ® Video Printer LIMITED WARRANTY Sony Electronics Inc. ("Sony") warrants this Product is available from the date of 90 days from state to state. LABOR: For a period of...
Operating Instructions
Page 2
...this product is encouraged to try to which may contact: Sony's Customer Information Services Center (CISC) at 1-866-328-SONY (7669) or Sony Web site at www.sony.com 2 GB If a fault should occur during operation of the printer, "Memory Stick" or PC card. Increase the separation ...upon your authority to operate this equipment does cause harmful interference to rain or moisture. ATTENTION Sony shall assume no responsibility for a digital device pursuant to radio communications. DPP-EX7 Serial No. Reorient or relocate the receiving antenna. - If you have any questions about this...
...this product is encouraged to try to which may contact: Sony's Customer Information Services Center (CISC) at 1-866-328-SONY (7669) or Sony Web site at www.sony.com 2 GB If a fault should occur during operation of the printer, "Memory Stick" or PC card. Increase the separation ...upon your authority to operate this equipment does cause harmful interference to rain or moisture. ATTENTION Sony shall assume no responsibility for a digital device pursuant to radio communications. DPP-EX7 Serial No. Reorient or relocate the receiving antenna. - If you have any questions about this...
Operating Instructions
Page 3
...use only. Furthermore, "™" and "®" are trademarks of Sony Corporation. •"MagicGate" is subject to infringe the provisions of others' portrait may be forbidden. Declaration of Sony Corporation. •This printer uses Exif Print (Exif 2.2) technology. •All other materials ... of the printer, we recommend that may infringe the provisions of the copyright law and be duplicated, use or GB modification of the copyright law. Operation is the trademark of Conformity Trade Name: SONY Model No.: DPP-EX7 Responsible Party: Sony Electronics Inc....
...use only. Furthermore, "™" and "®" are trademarks of Sony Corporation. •"MagicGate" is subject to infringe the provisions of others' portrait may be forbidden. Declaration of Sony Corporation. •This printer uses Exif Print (Exif 2.2) technology. •All other materials ... of the printer, we recommend that may infringe the provisions of the copyright law and be duplicated, use or GB modification of the copyright law. Operation is the trademark of Conformity Trade Name: SONY Model No.: DPP-EX7 Responsible Party: Sony Electronics Inc....
Operating Instructions
Page 4
... obtained it. Any unauthorized duplication of this software cannot be governed by right holders. 4 GB Getting started Features 6 Unpacking the printer 8 Identifying the parts 9 Using the stylus and operation panel ... 12 Opening the operation panel 12 Using the stylus 13 Setting up 1 ............ 15 Connecting to the dealer where you do not accept these terms and conditions, please return this agreement. IN NO EVENT SHALL SONY CORPORATION BE LIABLE FOR ANY INCIDENTAL, CONSEQUENTIAL OR SPECIAL DAMAGES, WHETHER BASED ON TORT, CONTACT, OR OTHERWISE, ARISING OUT OF OR ...
... obtained it. Any unauthorized duplication of this software cannot be governed by right holders. 4 GB Getting started Features 6 Unpacking the printer 8 Identifying the parts 9 Using the stylus and operation panel ... 12 Opening the operation panel 12 Using the stylus 13 Setting up 1 ............ 15 Connecting to the dealer where you do not accept these terms and conditions, please return this agreement. IN NO EVENT SHALL SONY CORPORATION BE LIABLE FOR ANY INCIDENTAL, CONSEQUENTIAL OR SPECIAL DAMAGES, WHETHER BASED ON TORT, CONTACT, OR OTHERWISE, ARISING OUT OF OR ...

Operating Instructions
Page 5
... image (Tool 48 Drawing freehand line art ( ) .. 49 Typing characters 50 Pasting stamps 53 Pasting cut out images ( ) ...... 54 Pasting messages 55 Setting up the printer (MENU 57 What you can do with the Menu ...... 57 Changing the print preferences (Print Setting 58 Changing the... Additional information Precautions 84 About the "Memory Stick 86 What is "Memory Stick 86 Types of "Memory Stick 86 Types of "Memory Stick" that the printer can use 87 Notes on use 87 About the PC card 89 Notes on use 89 Troubleshooting 90 If paper jams 92 Cleaning the inside...
... image (Tool 48 Drawing freehand line art ( ) .. 49 Typing characters 50 Pasting stamps 53 Pasting cut out images ( ) ...... 54 Pasting messages 55 Setting up the printer (MENU 57 What you can do with the Menu ...... 57 Changing the print preferences (Print Setting 58 Changing the... Additional information Precautions 84 About the "Memory Stick 86 What is "Memory Stick 86 Types of "Memory Stick 86 Types of "Memory Stick" that the printer can use 87 Notes on use 87 About the PC card 89 Notes on use 89 Troubleshooting 90 If paper jams 92 Cleaning the inside...
Operating Instructions
Page 6
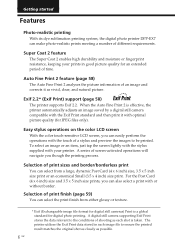
...of screen-activated operations will navigate you can make photo-realistic prints meeting a number of time. Exif 2.2* (Exif Print) support (page 58) The printer supports Exif 2.2. The printer utilises the Exif Print data stored in good picture quality for digital photo printing. Selection of shooting as vivid, clear, and natural picture. A digital...image file format for digital still cameras) Print is taken. Getting started Features Photo-realistic printing With its dye sublimation printing system, the digital photo printer DPP-EX7 can also select a print with or without border.
...of screen-activated operations will navigate you can make photo-realistic prints meeting a number of time. Exif 2.2* (Exif Print) support (page 58) The printer supports Exif 2.2. The printer utilises the Exif Print data stored in good picture quality for digital photo printing. Selection of shooting as vivid, clear, and natural picture. A digital...image file format for digital still cameras) Print is taken. Getting started Features Photo-realistic printing With its dye sublimation printing system, the digital photo printer DPP-EX7 can also select a print with or without border.
Operating Instructions
Page 7
..." or PC card images without using a computer x You can print images from your computer with a convenient USB connection (page 66) By connecting the printer and your computer with the cursor. A wider variety of prints of the images stored in a "Memory Stick" or PC card (page 36). With the..., messages, stamps, or drawings onto an image. x You can print an image placed with the USB cable supplied and installing the supplied DPP-EX7 printer driver software on your computer, you can print an image with specifying the print quantity (page 23). For the "Memory Stick", see page 89.
..." or PC card images without using a computer x You can print images from your computer with a convenient USB connection (page 66) By connecting the printer and your computer with the cursor. A wider variety of prints of the images stored in a "Memory Stick" or PC card (page 36). With the..., messages, stamps, or drawings onto an image. x You can print an image placed with the USB cable supplied and installing the supplied DPP-EX7 printer driver software on your computer, you can print an image with specifying the print quantity (page 23). For the "Memory Stick", see page 89.
Operating Instructions
Page 8
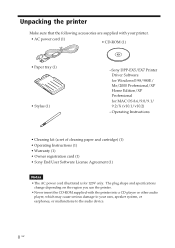
...• Owner registration card (1) • Sony End User Software License Agreement (1) Notes • The AC power cord illustrated is for MAC OS 8.6/9.0/9.1/ 9.2/X (v10.1/v10.2) - Unpacking the printer Make sure that the following accessories are supplied with the printer into a CD player or other audio player... you use the printer. • Never insert the CD-ROM supplied with your ears, speaker system, or earphones, or malfunctions to your printer. • AC power cord (1) • CD-ROM (1) • Paper tray (1) • Stylus (1) -Sony DPP-EX5/EX7 Printer Driver Software for...
...• Owner registration card (1) • Sony End User Software License Agreement (1) Notes • The AC power cord illustrated is for MAC OS 8.6/9.0/9.1/ 9.2/X (v10.1/v10.2) - Unpacking the printer Make sure that the following accessories are supplied with the printer into a CD player or other audio player... you use the printer. • Never insert the CD-ROM supplied with your ears, speaker system, or earphones, or malfunctions to your printer. • AC power cord (1) • CD-ROM (1) • Paper tray (1) • Stylus (1) -Sony DPP-EX5/EX7 Printer Driver Software for...
Operating Instructions
Page 9
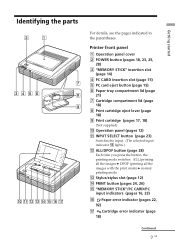
Identifying the parts For details, see the pages indicated in the parentheses. Printer front panel 1 Operation panel cover 2 POWER button (pages 18, 23, 25, 28) 3 "MEMORY STICK" insertion slot (page 14) 4 PC CARD insertion slot (page 15) 5 PC ...
Identifying the parts For details, see the pages indicated in the parentheses. Printer front panel 1 Operation panel cover 2 POWER button (pages 18, 23, 25, 28) 3 "MEMORY STICK" insertion slot (page 14) 4 PC CARD insertion slot (page 15) 5 PC ...
Operating Instructions
Page 10
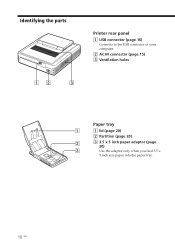
Identifying the parts Printer rear panel 1 USB connector (page 16) Connects to the USB connector of your computer. 2 AC IN connector (page 15) 3 Ventilation holes Paper tray 1 lid (page 20) 2 Partition (page 20) 3 3.5 x 5 inch paper adaptor (page 20) Use the adaptor only when you feed 3.5 x 5 inch size paper into the paper tray. 10 GB
Identifying the parts Printer rear panel 1 USB connector (page 16) Connects to the USB connector of your computer. 2 AC IN connector (page 15) 3 Ventilation holes Paper tray 1 lid (page 20) 2 Partition (page 20) 3 3.5 x 5 inch paper adaptor (page 20) Use the adaptor only when you feed 3.5 x 5 inch size paper into the paper tray. 10 GB
Operating Instructions
Page 11
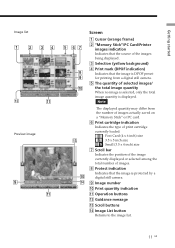
... indication) Indicates that the image is displayed. Getting started Image list 1 2 34 qa Preview image 9 qa Screen 5 67 8 9 q; 1 Cursor (orange frame) 2 "Memory Stick"/PC Card/Printer images indication Indicates that the source of selected images/ the total image quantity When no image is selected, only the total image quantity is protected...
... indication) Indicates that the image is displayed. Getting started Image list 1 2 34 qa Preview image 9 qa Screen 5 67 8 9 q; 1 Cursor (orange frame) 2 "Memory Stick"/PC Card/Printer images indication Indicates that the source of selected images/ the total image quantity When no image is selected, only the total image quantity is protected...
Operating Instructions
Page 12
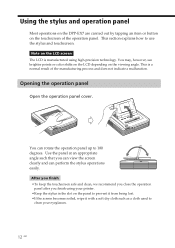
This is manufactured using your printer. • Keep the stylus in the slot on the panel to prevent it from being lost. • If the screen becomes soiled, wipe it with a ... LCD depending on the LCD screen The LCD is a normal result of the operation panel. Using the stylus and operation panel Most operations on the DPP-EX7 are carried out by tapping an item or button on the touchscreen of the manufacturing process and does not indicate a malfunction. Opening the operation panel...
This is manufactured using your printer. • Keep the stylus in the slot on the panel to prevent it from being lost. • If the screen becomes soiled, wipe it with a ... LCD depending on the LCD screen The LCD is a normal result of the operation panel. Using the stylus and operation panel Most operations on the DPP-EX7 are carried out by tapping an item or button on the touchscreen of the manufacturing process and does not indicate a malfunction. Opening the operation panel...
Operating Instructions
Page 14
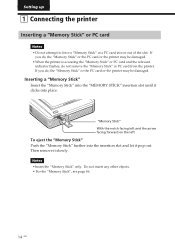
... "Memory Stick" Push the "Memory Stick" further into the insertion slot and let it clicks into or out of the slot. Setting up 1 Connecting the printer Inserting a "Memory Stick" or PC card Notes •Do not attempt to force a "Memory Stick" or a PC card into place. Notes •Insert the "Memory... Stick" only. Then remove it slowly. If you do, the "Memory Stick" or the PC card or the printer may be damaged. •When the printer is accessing the "Memory Stick" or PC card and the relevant indicator flashes, do , the "Memory Stick" or the PC card or...
... "Memory Stick" Push the "Memory Stick" further into the insertion slot and let it clicks into or out of the slot. Setting up 1 Connecting the printer Inserting a "Memory Stick" or PC card Notes •Do not attempt to force a "Memory Stick" or a PC card into place. Notes •Insert the "Memory... Stick" only. Then remove it slowly. If you do, the "Memory Stick" or the PC card or the printer may be damaged. •When the printer is accessing the "Memory Stick" or PC card and the relevant indicator flashes, do , the "Memory Stick" or the PC card or...
Operating Instructions
Page 15
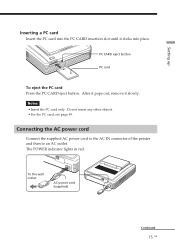
The POWER indicator lights in red. After it pops out, remove it clicks into place. Do not insert any other objects. •For the PC card, see page 89. Setting up Inserting a PC card Insert the PC card into the PC CARD insertion slot until it slowly. Notes •Insert the PC card only. To the wall outlet AC power cord (supplied) Continued 15 GB PC CARD eject button PC card To eject the PC card Press the PC CARD eject button. Connecting the AC power cord Connect the supplied AC power cord to the AC IN connector of the printer and then to an AC outlet.
The POWER indicator lights in red. After it pops out, remove it clicks into place. Do not insert any other objects. •For the PC card, see page 89. Setting up Inserting a PC card Insert the PC card into the PC CARD insertion slot until it slowly. Notes •Insert the PC card only. To the wall outlet AC power cord (supplied) Continued 15 GB PC CARD eject button PC card To eject the PC card Press the PC CARD eject button. Connecting the AC power cord Connect the supplied AC power cord to the AC IN connector of the printer and then to an AC outlet.
Operating Instructions
Page 16
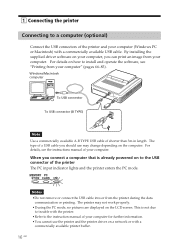
... the instructions manual of your computer (Windows PC or Macintosh) with a commercially available USB cable. The printer may change depending on your computer, you connect a computer that is not due to trouble with a commercially available printer buffer. 16 GB For details, see "Printing from your computer for further information. •You cannot...
... the instructions manual of your computer (Windows PC or Macintosh) with a commercially available USB cable. The printer may change depending on your computer, you connect a computer that is not due to trouble with a commercially available printer buffer. 16 GB For details, see "Printing from your computer for further information. •You cannot...
Operating Instructions
Page 17
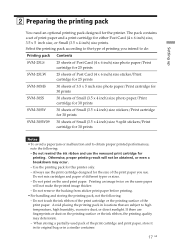
... the printing pack in a similar container. 17 GB Setting up 2 Preparing the printing pack You need an optional printing pack designed for this printer only. - If there are subject to obtain proper printed performances, note the following : - The pack contains a set of the print paper.... Use the printing pack for the printer. Always use the rewound print cartridge for either Post Card (4 x 6 inch) size, 3.5 x 5 inch size, or Small (3.5 x 4 inch) size ...
... the printing pack in a similar container. 17 GB Setting up 2 Preparing the printing pack You need an optional printing pack designed for this printer only. - If there are subject to obtain proper printed performances, note the following : - The pack contains a set of the print paper.... Use the printing pack for the printer. Always use the rewound print cartridge for either Post Card (4 x 6 inch) size, 3.5 x 5 inch size, or Small (3.5 x 4 inch) size ...
Operating Instructions
Page 18
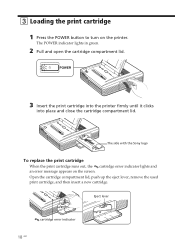
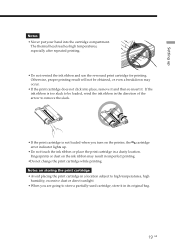
... 1 Press the POWER button to turn on the screen. The side with the Sony logo To replace the print cartridge When the print cartridge runs out, the cartridge error indicator lights and an error message appears on the printer. Open the cartridge compartment lid, push up the eject lever, remove the used... lever cartridge error indicator 18 GB The POWER indicator lights in green. 2 Pull and open the cartridge compartment lid. 3 Insert the print cartridge into the printer firmly until it clicks into place and close the cartridge compartment lid.
... 1 Press the POWER button to turn on the screen. The side with the Sony logo To replace the print cartridge When the print cartridge runs out, the cartridge error indicator lights and an error message appears on the printer. Open the cartridge compartment lid, push up the eject lever, remove the used... lever cartridge error indicator 18 GB The POWER indicator lights in green. 2 Pull and open the cartridge compartment lid. 3 Insert the print cartridge into the printer firmly until it clicks into place and close the cartridge compartment lid.
Operating Instructions
Page 19
... turn on storing the print cartridge •Avoid placing the print cartridge in a location subject to store a partially-used cartridge, store it . Notes on the printer, the cartridge error indicator lights up Notes •Never put your hand into place, remove it and then re-insert it in its original bag...
... turn on storing the print cartridge •Avoid placing the print cartridge in a location subject to store a partially-used cartridge, store it . Notes on the printer, the cartridge error indicator lights up Notes •Never put your hand into place, remove it and then re-insert it in its original bag...
Operating Instructions
Page 21
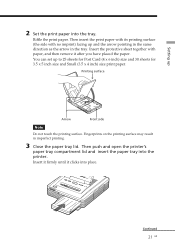
... can set up 2 Set the print paper into the tray. Fingerprints on the printing surface may result in the tray. Then push and open the printer's paper tray compartment lid and insert the paper tray into place. Insert the protective sheet together with no imprint) facing up and the arrow pointing... Small (3.5 x 4 inch) size print paper. Then insert the print paper with its printing surface (the side with paper, and then remove it clicks into the printer. Continued 21 GB Riffle the print paper.
... can set up 2 Set the print paper into the tray. Fingerprints on the printing surface may result in the tray. Then push and open the printer's paper tray compartment lid and insert the paper tray into place. Insert the protective sheet together with no imprint) facing up and the arrow pointing... Small (3.5 x 4 inch) size print paper. Then insert the print paper with its printing surface (the side with paper, and then remove it clicks into the printer. Continued 21 GB Riffle the print paper.


