
PictureGear Studio Supplement
Page 3
Continued 3 GB When you click "Properties", the document properties dialog box for the selected printer is displayed. 6 In the "Paper Type" tab, click the desired paper type and margin. •Paper Type: Select the print paper size you actually use ... "with border" or "borderless". (When you select "Small" paper type, you actually use. In the "Printer" drop-down list box, select "DPP-EX5" or "DPPEX7" and then click "Properties". 5 In the "Printer" drop-down list box, select the printer that you cannot set the margin.) Notes • Make sure to specify the paper type...
Continued 3 GB When you click "Properties", the document properties dialog box for the selected printer is displayed. 6 In the "Paper Type" tab, click the desired paper type and margin. •Paper Type: Select the print paper size you actually use ... "with border" or "borderless". (When you select "Small" paper type, you actually use. In the "Printer" drop-down list box, select "DPP-EX5" or "DPPEX7" and then click "Properties". 5 In the "Printer" drop-down list box, select the printer that you cannot set the margin.) Notes • Make sure to specify the paper type...

Warranty Card
Page 1
...THIS PRODUCT. has established telephone numbers for a period of a service problem, or for product information or operation, call : 1-800-488-SONY (7669) Printed in exchange for defective parts for frequently asked questions: To locate the servicer or dealer nearest you must pay the labor ...no charge, or pay for removal and installation is available from state to state. 4-557-157-02 ® Video Printer LIMITED WARRANTY Sony Electronics Inc. ("Sony") warrants this Product is determined to be presented to obtain warranty service. This warranty is valid only in material or ...
...THIS PRODUCT. has established telephone numbers for a period of a service problem, or for product information or operation, call : 1-800-488-SONY (7669) Printed in exchange for defective parts for frequently asked questions: To locate the servicer or dealer nearest you must pay the labor ...no charge, or pay for removal and installation is available from state to state. 4-557-157-02 ® Video Printer LIMITED WARRANTY Sony Electronics Inc. ("Sony") warrants this Product is determined to be presented to obtain warranty service. This warranty is valid only in material or ...
Operating Instructions
Page 2
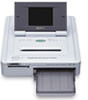
...to radio or television reception, which may contact: Sony's Customer Information Services Center (CISC) at 1-866-328-SONY (7669) or Sony Web site at www.sony.com 2 GB If you have any changes or ...cord to socket-outlet which the receiver is encouraged to try to Part 15 of the printer, "Memory Stick" or PC card. If this product. To avoid electrical shock, do ...the customers in the space provided below. You are cautioned that to equipment emitting electromagnetic radiation. DPP-EX7 Serial No. These limits are located on a circuit different from that any questions about this ...
...to radio or television reception, which may contact: Sony's Customer Information Services Center (CISC) at 1-866-328-SONY (7669) or Sony Web site at www.sony.com 2 GB If you have any changes or ...cord to socket-outlet which the receiver is encouraged to try to Part 15 of the printer, "Memory Stick" or PC card. If this product. To avoid electrical shock, do ...the customers in the space provided below. You are cautioned that to equipment emitting electromagnetic radiation. DPP-EX7 Serial No. These limits are located on a circuit different from that any questions about this ...
Operating Instructions
Page 3
... you save a backup copy of your own recording or creation is limited to infringe the provisions of Sony Corporation. •This printer uses Exif Print (Exif 2.2) technology. •All other materials except for your data. Duplication, edition...printer, we recommend that may also infringe their respective companies. Telephone No.: 201-930-6972 This device complies with this manual. 3 GB Backup recommendations To avoid potential risk of data loss caused by accidental operation or malfunction of Conformity Trade Name: SONY Model No.: DPP-EX7 Responsible Party: Sony...
... you save a backup copy of your own recording or creation is limited to infringe the provisions of Sony Corporation. •This printer uses Exif Print (Exif 2.2) technology. •All other materials except for your data. Duplication, edition...printer, we recommend that may also infringe their respective companies. Telephone No.: 201-930-6972 This device complies with this manual. 3 GB Backup recommendations To avoid potential risk of data loss caused by accidental operation or malfunction of Conformity Trade Name: SONY Model No.: DPP-EX7 Responsible Party: Sony...
Operating Instructions
Page 4
... be governed by right holders. 4 GB Please note that unauthorized duplication or modification of contents Program © 2002 Sony Corporation Documentation ©2002 Sony Corporation All rights reserved. Any unauthorized duplication of this disk envelope unopened, along with the rest of the package, ...at one time 28 Any design data such as sample pictures provided in this agreement. Getting started Features 6 Unpacking the printer 8 Identifying the parts 9 Using the stylus and operation panel ... 12 Opening the operation panel 12 Using the stylus 13 Setting...
... be governed by right holders. 4 GB Please note that unauthorized duplication or modification of contents Program © 2002 Sony Corporation Documentation ©2002 Sony Corporation All rights reserved. Any unauthorized duplication of this disk envelope unopened, along with the rest of the package, ...at one time 28 Any design data such as sample pictures provided in this agreement. Getting started Features 6 Unpacking the printer 8 Identifying the parts 9 Using the stylus and operation panel ... 12 Opening the operation panel 12 Using the stylus 13 Setting...

Operating Instructions
Page 5
... image (Tool 48 Drawing freehand line art ( ) .. 49 Typing characters 50 Pasting stamps 53 Pasting cut out images ( ) ...... 54 Pasting messages 55 Setting up the printer (MENU 57 What you can do with the Menu ...... 57 Changing the print preferences (Print Setting 58 Changing the... Additional information Precautions 84 About the "Memory Stick 86 What is "Memory Stick 86 Types of "Memory Stick 86 Types of "Memory Stick" that the printer can use 87 Notes on use 87 About the PC card 89 Notes on use 89 Troubleshooting 90 If paper jams 92 Cleaning the inside...
... image (Tool 48 Drawing freehand line art ( ) .. 49 Typing characters 50 Pasting stamps 53 Pasting cut out images ( ) ...... 54 Pasting messages 55 Setting up the printer (MENU 57 What you can do with the Menu ...... 57 Changing the print preferences (Print Setting 58 Changing the... Additional information Precautions 84 About the "Memory Stick 86 What is "Memory Stick 86 Types of "Memory Stick 86 Types of "Memory Stick" that the printer can use 87 Notes on use 87 About the PC card 89 Notes on use 89 Troubleshooting 90 If paper jams 92 Cleaning the inside...
Operating Instructions
Page 6
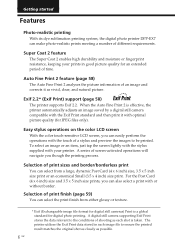
...Print is a global standard for JPEG files only). Getting started Features Photo-realistic printing With its dye sublimation printing system, the digital photo printer DPP-EX7 can easily perform the operations with optimal picture quality (for digital photo printing. For the Post Card (4 x 6 inch) size and 3.5...as possible. 6 GB Super Coat 2 feature The Super Coat 2 enables high durability and moisture or fingerprint resistance, keeping your printer. Easy stylus operations on the color LCD screen With the color touch-sensitive LCD screen, you can make photo-realistic prints ...
...Print is a global standard for JPEG files only). Getting started Features Photo-realistic printing With its dye sublimation printing system, the digital photo printer DPP-EX7 can easily perform the operations with optimal picture quality (for digital photo printing. For the Post Card (4 x 6 inch) size and 3.5...as possible. 6 GB Super Coat 2 feature The Super Coat 2 enables high durability and moisture or fingerprint resistance, keeping your printer. Easy stylus operations on the color LCD screen With the color touch-sensitive LCD screen, you can make photo-realistic prints ...
Operating Instructions
Page 7
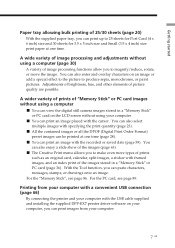
... (page 63). For the "Memory Stick", see page 89. x You can print images from your computer with a convenient USB connection (page 66) By connecting the printer and your computer, you can print up to 25 sheets for Post Card (4 x 6 inch) size and 30 sheets for 3.5 x 5 inch size and Small (3.5 x 4..."Memory Stick" or PC card images without using a computer x You can print an image with the USB cable supplied and installing the supplied DPP-EX7 printer driver software on an image or add a special effect to the picture to make even more types of prints such as an original card, calendar...
... (page 63). For the "Memory Stick", see page 89. x You can print images from your computer with a convenient USB connection (page 66) By connecting the printer and your computer, you can print up to 25 sheets for Post Card (4 x 6 inch) size and 30 sheets for 3.5 x 5 inch size and Small (3.5 x 4..."Memory Stick" or PC card images without using a computer x You can print an image with the USB cable supplied and installing the supplied DPP-EX7 printer driver software on an image or add a special effect to the picture to make even more types of prints such as an original card, calendar...
Operating Instructions
Page 8
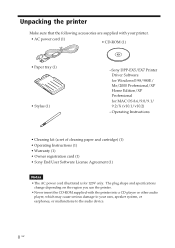
...; Never insert the CD-ROM supplied with your ears, speaker system, or earphones, or malfunctions to your printer. • AC power cord (1) • CD-ROM (1) • Paper tray (1) • Stylus (1) -Sony DPP-EX5/EX7 Printer Driver Software for Windows® 98/98SE/ Me/2000 Professional/XP Home Edition/XP Professional for 120V only. Operating Instructions...
...; Never insert the CD-ROM supplied with your ears, speaker system, or earphones, or malfunctions to your printer. • AC power cord (1) • CD-ROM (1) • Paper tray (1) • Stylus (1) -Sony DPP-EX5/EX7 Printer Driver Software for Windows® 98/98SE/ Me/2000 Professional/XP Home Edition/XP Professional for 120V only. Operating Instructions...
Operating Instructions
Page 9
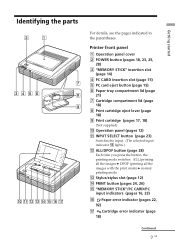
Identifying the parts For details, see the pages indicated in the parentheses. Printer front panel 1 Operation panel cover 2 POWER button (pages 18, 23, 25, 28) 3 "MEMORY STICK" insertion slot (page 14) 4 PC CARD insertion slot (page 15) 5 PC ...
Identifying the parts For details, see the pages indicated in the parentheses. Printer front panel 1 Operation panel cover 2 POWER button (pages 18, 23, 25, 28) 3 "MEMORY STICK" insertion slot (page 14) 4 PC CARD insertion slot (page 15) 5 PC ...
Operating Instructions
Page 10
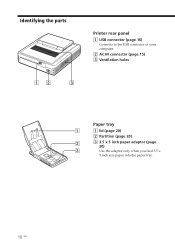
Identifying the parts Printer rear panel 1 USB connector (page 16) Connects to the USB connector of your computer. 2 AC IN connector (page 15) 3 Ventilation holes Paper tray 1 lid (page 20) 2 Partition (page 20) 3 3.5 x 5 inch paper adaptor (page 20) Use the adaptor only when you feed 3.5 x 5 inch size paper into the paper tray. 10 GB
Identifying the parts Printer rear panel 1 USB connector (page 16) Connects to the USB connector of your computer. 2 AC IN connector (page 15) 3 Ventilation holes Paper tray 1 lid (page 20) 2 Partition (page 20) 3 3.5 x 5 inch paper adaptor (page 20) Use the adaptor only when you feed 3.5 x 5 inch size paper into the paper tray. 10 GB
Operating Instructions
Page 11
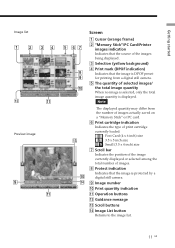
Getting started Image list 1 2 34 qa Preview image 9 qa Screen 5 67 8 9 q; 1 Cursor (orange frame) 2 "Memory Stick"/PC Card/Printer images indication Indicates that the source of the images being displayed. 3 Selection (yellow background) 4 Print mark (DPOF indication) Indicates that the image is displayed. Note ...
Getting started Image list 1 2 34 qa Preview image 9 qa Screen 5 67 8 9 q; 1 Cursor (orange frame) 2 "Memory Stick"/PC Card/Printer images indication Indicates that the source of the images being displayed. 3 Selection (yellow background) 4 Print mark (DPOF indication) Indicates that the image is displayed. Note ...
Operating Instructions
Page 12
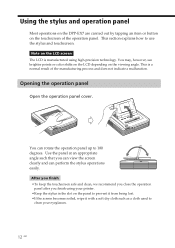
... section explains how to 180 degrees. Opening the operation panel Open the operation panel cover. Using the stylus and operation panel Most operations on the DPP-EX7 are carried out by tapping an item or button on the LCD screen The LCD is a normal result of the operation panel. You may, however... to prevent it from being lost. • If the screen becomes soiled, wipe it with a soft dry cloth such as a cloth used to clean your printer. • Keep the stylus in the slot on the viewing angle. Use the panel at an appropriate angle such that you finish using high-precision...
... section explains how to 180 degrees. Opening the operation panel Open the operation panel cover. Using the stylus and operation panel Most operations on the DPP-EX7 are carried out by tapping an item or button on the LCD screen The LCD is a normal result of the operation panel. You may, however... to prevent it from being lost. • If the screen becomes soiled, wipe it with a soft dry cloth such as a cloth used to clean your printer. • Keep the stylus in the slot on the viewing angle. Use the panel at an appropriate angle such that you finish using high-precision...
Operating Instructions
Page 14
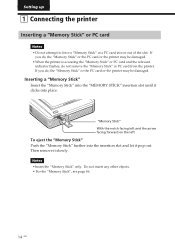
Setting up 1 Connecting the printer Inserting a "Memory Stick" or PC card Notes •Do not attempt to force a "Memory Stick" or a PC card into place. Then remove it pop out. ".... • For the "Memory Stick", see page 86. 14 GB If you do, the "Memory Stick" or the PC card or the printer may be damaged. •When the printer is accessing the "Memory Stick" or PC card and the relevant indicator flashes, do , the "Memory Stick" or the PC card or...
Setting up 1 Connecting the printer Inserting a "Memory Stick" or PC card Notes •Do not attempt to force a "Memory Stick" or a PC card into place. Then remove it pop out. ".... • For the "Memory Stick", see page 86. 14 GB If you do, the "Memory Stick" or the PC card or the printer may be damaged. •When the printer is accessing the "Memory Stick" or PC card and the relevant indicator flashes, do , the "Memory Stick" or the PC card or...
Operating Instructions
Page 15
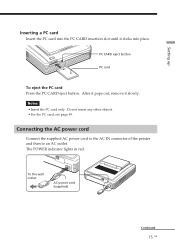
Setting up Inserting a PC card Insert the PC card into place. After it pops out, remove it clicks into the PC CARD insertion slot until it slowly. Connecting the AC power cord Connect the supplied AC power cord to the AC IN connector of the printer and then to an AC outlet. Do not insert any other objects. •For the PC card, see page 89. To the wall outlet AC power cord (supplied) Continued 15 GB PC CARD eject button PC card To eject the PC card Press the PC CARD eject button. The POWER indicator lights in red. Notes •Insert the PC card only.
Setting up Inserting a PC card Insert the PC card into place. After it pops out, remove it clicks into the PC CARD insertion slot until it slowly. Connecting the AC power cord Connect the supplied AC power cord to the AC IN connector of the printer and then to an AC outlet. Do not insert any other objects. •For the PC card, see page 89. To the wall outlet AC power cord (supplied) Continued 15 GB PC CARD eject button PC card To eject the PC card Press the PC CARD eject button. The POWER indicator lights in red. Notes •Insert the PC card only.
Operating Instructions
Page 16
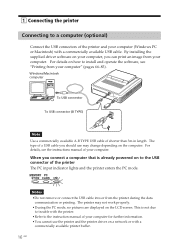
...how to the USB connector of shorter than 3m in length. This is already powered on your computer, you can print an image from the printer during the data communication or printing. For details, see "Printing from your computer. The type of your computer (Windows PC or Macintosh) ... PC Notes •Do not remove or connect the USB cable into or from your computer" (pages 66-83). When you should use the printer and the printer driver on a network or with a commercially available USB cable. Windows/Macintosh computer To USB connector To USB connector (B TYPE) Note Use a ...
...how to the USB connector of shorter than 3m in length. This is already powered on your computer, you can print an image from the printer during the data communication or printing. For details, see "Printing from your computer. The type of your computer (Windows PC or Macintosh) ... PC Notes •Do not remove or connect the USB cable into or from your computer" (pages 66-83). When you should use the printer and the printer driver on a network or with a commercially available USB cable. Windows/Macintosh computer To USB connector To USB connector (B TYPE) Note Use a ...
Operating Instructions
Page 17
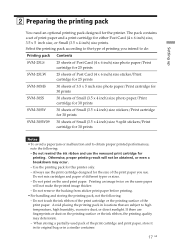
Do not rewind the ink ribbon and use the rewound print cartridge for the printer. Do not mix cartridges and paper of the print paper. Do not touch the ink ribbon of the print cartridge or the printing surface of ... it in its original bag or in locations that are fingerprints or dust on the used pack of print paper and a print cartridge for this printer only. -
Do not rewind the ink ribbon and use the rewound print cartridge for the printer. Do not mix cartridges and paper of the print paper. Do not touch the ink ribbon of the print cartridge or the printing surface of ... it in its original bag or in locations that are fingerprints or dust on the used pack of print paper and a print cartridge for this printer only. -
Operating Instructions
Page 18
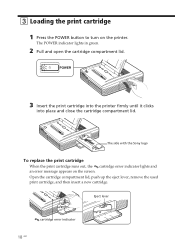
The side with the Sony logo To replace the print cartridge When the print cartridge runs out, the cartridge error indicator lights and an error message appears on the printer. Open the cartridge compartment lid, push up the eject lever, remove the used print cartridge, and then insert a ...new cartridge. The POWER indicator lights in green. 2 Pull and open the cartridge compartment lid. 3 Insert the print cartridge into the printer firmly until it clicks into place and close the cartridge compartment lid. Eject lever cartridge error indicator 18 GB 3 Loading the print cartridge 1 Press...
The side with the Sony logo To replace the print cartridge When the print cartridge runs out, the cartridge error indicator lights and an error message appears on the printer. Open the cartridge compartment lid, push up the eject lever, remove the used print cartridge, and then insert a ...new cartridge. The POWER indicator lights in green. 2 Pull and open the cartridge compartment lid. 3 Insert the print cartridge into the printer firmly until it clicks into place and close the cartridge compartment lid. Eject lever cartridge error indicator 18 GB 3 Loading the print cartridge 1 Press...
Operating Instructions
Page 19
Setting up . •Do not touch the ink ribbon or place the print cartridge in a dusty location. Fingerprints or dust on the printer, the cartridge error indicator lights up Notes •Never put your hand into place, remove it and then re-insert it in imperfect printing. •...
Setting up . •Do not touch the ink ribbon or place the print cartridge in a dusty location. Fingerprints or dust on the printer, the cartridge error indicator lights up Notes •Never put your hand into place, remove it and then re-insert it in imperfect printing. •...
Operating Instructions
Page 21
... Then insert the print paper with its printing surface (the side with paper, and then remove it clicks into place. Then push and open the printer's paper tray compartment lid and insert the paper tray into the tray. You can set up to 25 sheets for Post Card (4 x 6 inch) size and... it after you have placed the paper. Fingerprints on the printing surface may result in the tray. Setting up 2 Set the print paper into the printer.
... Then insert the print paper with its printing surface (the side with paper, and then remove it clicks into place. Then push and open the printer's paper tray compartment lid and insert the paper tray into the tray. You can set up to 25 sheets for Post Card (4 x 6 inch) size and... it after you have placed the paper. Fingerprints on the printing surface may result in the tray. Setting up 2 Set the print paper into the printer.


