Operating Instructions
Page 1
... call upon your Sony dealer regarding this manual thoroughly and retain it for future reference. Owner's Record The model and serial numbers are not available in the space provided below. DPF-D70/D80/D100 Serial No These models are located at the back or bottom. 4-114-914-11 (1) Digital Photo Frame DPF-D70/D80/D100 Operating Instructions Before...
... call upon your Sony dealer regarding this manual thoroughly and retain it for future reference. Owner's Record The model and serial numbers are not available in the space provided below. DPF-D70/D80/D100 Serial No These models are located at the back or bottom. 4-114-914-11 (1) Digital Photo Frame DPF-D70/D80/D100 Operating Instructions Before...
Operating Instructions
Page 3
...countries with this product shall not be treated as household waste. Disposal of Old Electrical & Electronic Equipment (Applicable in this digital photo frame. By ensuring these materials may influence the picture of this product contains mercury. Hand the battery over to remove the battery... contact your household waste disposal service or the shop where you will not occur in accordance with the limits for a Class B digital device, pursuant to the applicable collection point for using connection cables shorter than 3 meters (9.8 feet). However, there is disposed of...
...countries with this product shall not be treated as household waste. Disposal of Old Electrical & Electronic Equipment (Applicable in this digital photo frame. By ensuring these materials may influence the picture of this product contains mercury. Hand the battery over to remove the battery... contact your household waste disposal service or the shop where you will not occur in accordance with the limits for a Class B digital device, pursuant to the applicable collection point for using connection cables shorter than 3 meters (9.8 feet). However, there is disposed of...
Operating Instructions
Page 4
... any accidental or consequential damages or loss of the recording contents which may be caused by accidental operation or malfunction of the digital photo frame, we recommend that may cause a malfunction. • Exposing the LCD screen to direct sunlight for long periods may be subject...", , , "Memory Stick- Sony shall assume no responsibility for any service or guarantee matters please refer to the addresses given in this manual. 4 GB Backup recommendations To avoid potential risk of data loss caused by use or malfunction of the digital photo frame or memory card. These points ...
... any accidental or consequential damages or loss of the recording contents which may be caused by accidental operation or malfunction of the digital photo frame, we recommend that may cause a malfunction. • Exposing the LCD screen to direct sunlight for long periods may be subject...", , , "Memory Stick- Sony shall assume no responsibility for any service or guarantee matters please refer to the addresses given in this manual. 4 GB Backup recommendations To avoid potential risk of data loss caused by use or malfunction of the digital photo frame or memory card. These points ...

Operating Instructions
Page 6
Table of Contents Before operation Enjoy your photo frame in various ways 7 Features 8 Checking included items 9 Identifying the parts 9 Changing the various settings ......29 Setting procedure 29 Items to set 30 Connecting to a computer ... a computer to exchange images 33 Basic operations Preparing the remote control ........12 Connecting to the AC power source 13 Setting the stand 14 Turning the photo frame on ..........15 Setting the clock 16 Inserting a memory card and viewing images 17 Inserting a memory card 17 Displaying images 19 Advanced operations Specifying the playback...
Table of Contents Before operation Enjoy your photo frame in various ways 7 Features 8 Checking included items 9 Identifying the parts 9 Changing the various settings ......29 Setting procedure 29 Items to set 30 Connecting to a computer ... a computer to exchange images 33 Basic operations Preparing the remote control ........12 Connecting to the AC power source 13 Setting the stand 14 Turning the photo frame on ..........15 Setting the clock 16 Inserting a memory card and viewing images 17 Inserting a memory card 17 Displaying images 19 Advanced operations Specifying the playback...

Operating Instructions
Page 7
... card Various display functions In addition to slideshows, you inserted first are connected/ inserted to the photo frame. You can be exchanged with a memory card. (.page 33) Input to the photo frame As shown on the left, the photo frame gives priority to the album are saved in various ways Before operation Easy display of the... are displayed. 7 GB Images can also be copied from a computer easily. You can also export these images to a memory card. (.page 25) Connecting to your photo frame in the internal memory.
... card Various display functions In addition to slideshows, you inserted first are connected/ inserted to the photo frame. You can be exchanged with a memory card. (.page 33) Input to the photo frame As shown on the left, the photo frame gives priority to the album are saved in various ways Before operation Easy display of the... are displayed. 7 GB Images can also be copied from a computer easily. You can also export these images to a memory card. (.page 25) Connecting to your photo frame in the internal memory.
Operating Instructions
Page 8
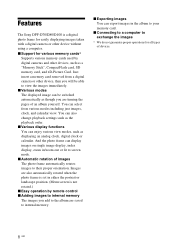
.... (Menu screen is not rotated.) x Easy operation by digital cameras and other devices, such as the playback order. Features The Sony DPF-D70/D80/D100 is a digital photo frame for easily displaying images taken with a digital camera or other device, then you will be switched automatically ...as displaying an analog clock, digital clock or calendar. x Exporting images You can...
.... (Menu screen is not rotated.) x Easy operation by digital cameras and other devices, such as the playback order. Features The Sony DPF-D70/D80/D100 is a digital photo frame for easily displaying images taken with a digital camera or other device, then you will be switched automatically ...as displaying an analog clock, digital clock or calendar. x Exporting images You can...
Operating Instructions
Page 9
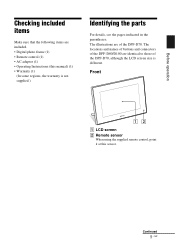
... the DPF-D80/D100 are of the DPF-D70, although the LCD screen size is not supplied.) Identifying the parts For details, see the pages indicated in the parentheses. The illustrations are identical to those of the DPF-D70. Before operation Checking included items Make sure that the following items are included. • Digital photo frame (1) •...
... the DPF-D80/D100 are of the DPF-D70, although the LCD screen size is not supplied.) Identifying the parts For details, see the pages indicated in the parentheses. The illustrations are identical to those of the DPF-D70. Before operation Checking included items Make sure that the following items are included. • Digital photo frame (1) •...
Operating Instructions
Page 10
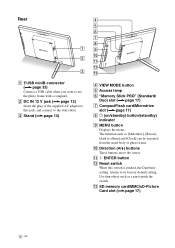
... memory card/MMC/xD-Picture Card slot (.page 17) 10 GB The function such as a pin to use the photo frame with a computer. B DC IN 12 V jack (.page 13) Insert the plug of photo frame. Rear A USB miniB connector (.page 33) Connect a USB cable when you want to push the switch. K ENTER button L Reset...
... memory card/MMC/xD-Picture Card slot (.page 17) 10 GB The function such as a pin to use the photo frame with a computer. B DC IN 12 V jack (.page 13) Insert the plug of photo frame. Rear A USB miniB connector (.page 33) Connect a USB cable when you want to push the switch. K ENTER button L Reset...
Operating Instructions
Page 12
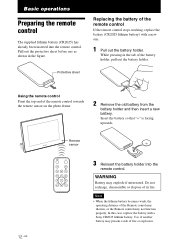
... a risk of another battery may explode if mistreated. Do not recharge, disassemble or dispose of the remote control towards the remote sensor on the photo frame. 2 Remove the old battery from the battery holder and then insert a new battery. Basic operations Preparing the remote control The supplied lithium battery ...becomes weak, the operating distance of the remote control If the remote control stops working, replace the battery (CR2025 lithium battery) with a Sony CR2025 lithium battery. In this case, replace the battery with a new one. 1 Pull out the battery holder.
... a risk of another battery may explode if mistreated. Do not recharge, disassemble or dispose of the remote control towards the remote sensor on the photo frame. 2 Remove the old battery from the battery holder and then insert a new battery. Basic operations Preparing the remote control The supplied lithium battery ...becomes weak, the operating distance of the remote control If the remote control stops working, replace the battery (CR2025 lithium battery) with a Sony CR2025 lithium battery. In this case, replace the battery with a new one. 1 Pull out the battery holder.
Operating Instructions
Page 13
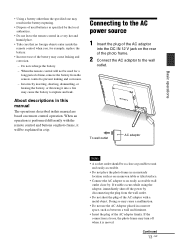
...to an easily accessible wall outlet close as possible to unit and easily accessible. • Do not place the photo frame in an unsteady location such as on the rear of the photo frame. 2 Connect the AC adaptor to prevent leaking and corrosion. - When the remote control will be as close ... metal object. Continued 13 GB Do not recharge the battery. - About descriptions in this manual The operations described in this manual are based on photo frame, it into the DC IN 12 V jack on an uneven table or tilted surface. • Connect the AC adaptor to rupture and leak. ...
...to an easily accessible wall outlet close as possible to unit and easily accessible. • Do not place the photo frame in an unsteady location such as on the rear of the photo frame. 2 Connect the AC adaptor to prevent leaking and corrosion. - When the remote control will be as close ... metal object. Continued 13 GB Do not recharge the battery. - About descriptions in this manual The operations described in this manual are based on photo frame, it into the DC IN 12 V jack on an uneven table or tilted surface. • Connect the AC adaptor to rupture and leak. ...
Operating Instructions
Page 14
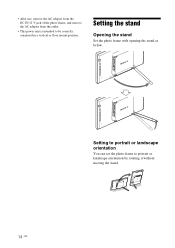
Setting the stand Opening the stand Set the photo frame with opening the stand as below. Setting to portrait or landscape orientation You can set the photo frame to be correctly orientated in a vertical or floor mount position. • After use, remove the AC adaptor from the DC IN 12 V jack of the photo frame, and remove the AC adaptor from the outlet. • This power unit is intended to portrait or landscape orientation by rotating it without moving the stand. 14 GB
Setting the stand Opening the stand Set the photo frame with opening the stand as below. Setting to portrait or landscape orientation You can set the photo frame to be correctly orientated in a vertical or floor mount position. • After use, remove the AC adaptor from the DC IN 12 V jack of the photo frame, and remove the AC adaptor from the outlet. • This power unit is intended to portrait or landscape orientation by rotating it without moving the stand. 14 GB
Operating Instructions
Page 15
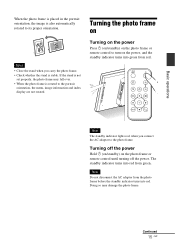
... Do not disconnect the AC adaptor from green. Turning the photo frame on Turning on the power Press 1 (on/standby) on the photo frame or remote control to the photo frame. Note The standby indicator lights red, when you carry the photo frame. • Check whether the stand is rotated to its ...are not rotated. Doing so may fall over. • When the photo frame is stable. If the stand is not set properly, the photo frame may damage the photo frame. The standby indicator turns into red from the photo frame before the standby indicator turns into green from red. Continued 15 GB...
... Do not disconnect the AC adaptor from green. Turning the photo frame on Turning on the power Press 1 (on/standby) on the photo frame or remote control to the photo frame. Note The standby indicator lights red, when you carry the photo frame. • Check whether the stand is rotated to its ...are not rotated. Doing so may fall over. • When the photo frame is stable. If the stand is not set properly, the photo frame may damage the photo frame. The standby indicator turns into red from the photo frame before the standby indicator turns into green from red. Continued 15 GB...
Operating Instructions
Page 16
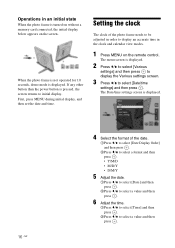
...] and then press . 2Press v/V to display an accurate time in the clock and calendar view modes. 1 Press MENU on the screen. When the photo frame is not operated for 10 seconds, demo mode is displayed. 2 Press v/V to select [Various settings] and then press to display the Various settings screen.... 3 Press v/V to select [Date/time settings] and then press . The menu screen is displayed. Operations in an initial state When the photo frame is pressed, the screen returns to initial display. If any other button than the power button is turned on without a memory card connected, the...
...] and then press . 2Press v/V to display an accurate time in the clock and calendar view modes. 1 Press MENU on the screen. When the photo frame is not operated for 10 seconds, demo mode is displayed. 2 Press v/V to select [Various settings] and then press to display the Various settings screen.... 3 Press v/V to select [Date/time settings] and then press . The menu screen is displayed. Operations in an initial state When the photo frame is pressed, the screen returns to initial display. If any other button than the power button is turned on without a memory card connected, the...
Operating Instructions
Page 17
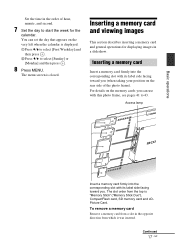
...and second. 7 Set the day to select [Sunday] or [Monday] and then press . 8 Press MENU. Set the time in the order of the photo frame). You can use with its label side facing toward you (when taking your position on the very left when the calendar is displayed. 1Press v/V to... in the opposite direction from the top is closed. Inserting a memory card Insert a memory card firmly into the corresponding slot with this photo frame, see pages 41 to 43. Inserting a memory card and viewing images This section describes inserting a memory card and general operations for the calendar.
...and second. 7 Set the day to select [Sunday] or [Monday] and then press . 8 Press MENU. Set the time in the order of the photo frame). You can use with its label side facing toward you (when taking your position on the very left when the calendar is displayed. 1Press v/V to... in the opposite direction from the top is closed. Inserting a memory card Insert a memory card firmly into the corresponding slot with this photo frame, see pages 41 to 43. Inserting a memory card and viewing images This section describes inserting a memory card and general operations for the calendar.
Operating Instructions
Page 18
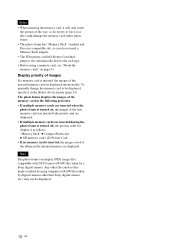
To manually change the memory card to be displayed. 18 GB Note The photo frame can display JPEG image files compatible with DCF format or RAW files taken by a Sony digital camera. Display priority of images If a memory card is inserted, the images of the inserted memory card are displayed. "...card type. • Before using computer or RAW files taken by digital cameras other than Sony digital camera etc.) may not be displayed, specify it as this could damage the memory card and/or photo frame. • This photo frame has "Memory Stick" standard and Duo size compatible slot, so you...
To manually change the memory card to be displayed. 18 GB Note The photo frame can display JPEG image files compatible with DCF format or RAW files taken by a Sony digital camera. Display priority of images If a memory card is inserted, the images of the inserted memory card are displayed. "...card type. • Before using computer or RAW files taken by digital cameras other than Sony digital camera etc.) may not be displayed, specify it as this could damage the memory card and/or photo frame. • This photo frame has "Memory Stick" standard and Duo size compatible slot, so you...
Operating Instructions
Page 19
If you turn the photo frame off and on and no images are displayed. Continued 19 GB Demonstration mode ends, if a memory card is inserted, the images in internal memory are ... display mode stays unchanged once you want to its original direction. However, rotated images return to keep an image rotated, save image rotated with the digital camera.
If you turn the photo frame off and on and no images are displayed. Continued 19 GB Demonstration mode ends, if a memory card is inserted, the images in internal memory are ... display mode stays unchanged once you want to its original direction. However, rotated images return to keep an image rotated, save image rotated with the digital camera.

Operating Instructions
Page 20
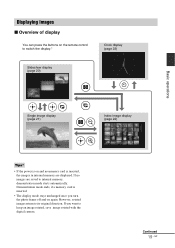
... on the single view and calendar view mode in the [Slideshow Settings] menu (page 30). To start the slideshow • To start a slideshow from the photo frame, press ENTER on the single image display mode. Single view mode Images are several slideshow modes. Note The present date and time cannot be displayed...
... on the single view and calendar view mode in the [Slideshow Settings] menu (page 30). To start the slideshow • To start a slideshow from the photo frame, press ENTER on the single image display mode. Single view mode Images are several slideshow modes. Note The present date and time cannot be displayed...
Operating Instructions
Page 21
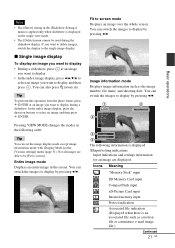
.... 1Input/setting indications Input indications and settings information for an image are able to be used during a slideshow. Tip To perform this operation from the photo frame, press ENTER at an image you want to display. • In the index image display, press B/b/v/V to select an image you want to delete images...
.... 1Input/setting indications Input indications and settings information for an image are able to be used during a slideshow. Tip To perform this operation from the photo frame, press ENTER at an image you want to display. • In the index image display, press B/b/v/V to select an image you want to delete images...
Operating Instructions
Page 22
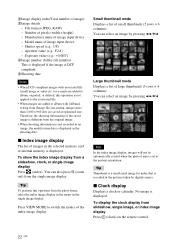
...index image display in an image, the modification date is displayed. x Index image display The list of images in the pictures taken by digital camera. Press VIEW MODE to album, exported, or deleted, this operation from [Image file size] menu, images more than 1,600 ×...Small thumbnail mode Displays a list of image input device - Note In the index image display, images will not be automatically rotated when the photo frame is displayed. Tip To perform this operation is recorded in the selected memory card or internal memory is displayed as the shooting date. for index...
...index image display in an image, the modification date is displayed. x Index image display The list of images in the pictures taken by digital camera. Press VIEW MODE to album, exported, or deleted, this operation from [Image file size] menu, images more than 1,600 ×...Small thumbnail mode Displays a list of image input device - Note In the index image display, images will not be automatically rotated when the photo frame is displayed. Tip To perform this operation is recorded in the selected memory card or internal memory is displayed as the shooting date. for index...

Operating Instructions
Page 23
... for the previous or next month. Press VIEW MODE to display a calendar for the calendar in the menu on the single image display. Digital clock mode Displays the date and time on analog clock. Tip There are black and white background types for the current month. Calendar mode... Displays a calendar for each of analogue clock, digital clock and calendar mode. You can select one from the photo frame, select the clock display in the [Date/time settings] menu. 23 GB You can press v/V to switch the...
... for the previous or next month. Press VIEW MODE to display a calendar for the calendar in the menu on the single image display. Digital clock mode Displays the date and time on analog clock. Tip There are black and white background types for the current month. Calendar mode... Displays a calendar for each of analogue clock, digital clock and calendar mode. You can select one from the photo frame, select the clock display in the [Date/time settings] menu. 23 GB You can press v/V to switch the...


