Operating Instructions
Page 1
... operations Advanced operations Connecting to these numbers whenever you call upon your Sony dealer regarding this manual thoroughly and retain it for future reference. DPF-D70/D80/D100 Serial No These models are located at the back or bottom. Owner's Record The model and serial numbers are not available in the space provided below. 4-114-914-11 (1) Digital Photo Frame DPF-D70/D80/D100 Operating Instructions Before operating this unit, please read...
... operations Advanced operations Connecting to these numbers whenever you call upon your Sony dealer regarding this manual thoroughly and retain it for future reference. DPF-D70/D80/D100 Serial No These models are located at the back or bottom. Owner's Record The model and serial numbers are not available in the space provided below. 4-114-914-11 (1) Digital Photo Frame DPF-D70/D80/D100 Operating Instructions Before operating this unit, please read...
Operating Instructions
Page 3
... the specific frequencies may cause harmful interference to radio communications. "Lamp in accordance with the instructions, may influence the picture of the FCC Rules. For disposal or recycling information, please contact your household waste disposal service or the shop where you will not occur in a particular installation. For the State of products that this digital photo frame. Attention...
... the specific frequencies may cause harmful interference to radio communications. "Lamp in accordance with the instructions, may influence the picture of the FCC Rules. For disposal or recycling information, please contact your household waste disposal service or the shop where you will not occur in a particular installation. For the State of products that this digital photo frame. Attention...
Operating Instructions
Page 4
... be caused by accidental operation or malfunction of the digital photo frame, we recommend that you hold copyright or have permission of a CD, TV programs, copyrighted materials such as just a reference. • Do not press against the LCD screen. Backup recommendations To avoid potential risk of data loss caused by use of the digital photo frame or memory card. Sony shall assume no responsibility...
... be caused by accidental operation or malfunction of the digital photo frame, we recommend that you hold copyright or have permission of a CD, TV programs, copyrighted materials such as just a reference. • Do not press against the LCD screen. Backup recommendations To avoid potential risk of data loss caused by use of the digital photo frame or memory card. Sony shall assume no responsibility...

Operating Instructions
Page 6
... remote control ........12 Connecting to the AC power source 13 Setting the stand 14 Turning the photo frame on ..........15 Setting the clock 16 Inserting a memory card and viewing images 17 Inserting a memory card 17 Displaying images 19 Advanced operations Specifying the playback device .....24 Adjusting the image size and position 24 Enlarging an image 24 Rotating an image 24 Adding to the internal memory .....25 Exporting an image 27 Deleting an image 28 Error messages If an error message appears .........35 Troubleshooting If trouble...
... remote control ........12 Connecting to the AC power source 13 Setting the stand 14 Turning the photo frame on ..........15 Setting the clock 16 Inserting a memory card and viewing images 17 Inserting a memory card 17 Displaying images 19 Advanced operations Specifying the playback device .....24 Adjusting the image size and position 24 Enlarging an image 24 Rotating an image 24 Adding to the internal memory .....25 Exporting an image 27 Deleting an image 28 Error messages If an error message appears .........35 Troubleshooting If trouble...
Operating Instructions
Page 8
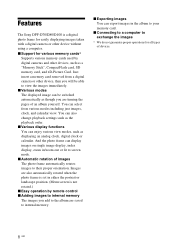
... view modes, such as displaying an analog clock, digital clock or calendar. x Various display functions You can be able to screen mode. And the photo frame can export images in the album to your memory card. x Exporting images You can display images on single image display, index display, zoom in either the portrait or landscape position. (Menu screen is a digital photo frame for easily displaying images taken with a digital camera or other device without using a computer. Features The Sony DPF-D70/D80/D100 is not rotated.) x Easy operation by digital cameras...
... view modes, such as displaying an analog clock, digital clock or calendar. x Various display functions You can be able to screen mode. And the photo frame can export images in the album to your memory card. x Exporting images You can display images on single image display, index display, zoom in either the portrait or landscape position. (Menu screen is a digital photo frame for easily displaying images taken with a digital camera or other device without using a computer. Features The Sony DPF-D70/D80/D100 is not rotated.) x Easy operation by digital cameras...
Operating Instructions
Page 9
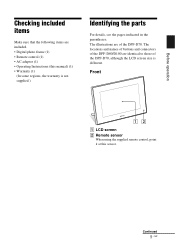
... the LCD screen size is not supplied.) Identifying the parts For details, see the pages indicated in the parentheses. The illustrations are identical to those of the DPF-D70. Before operation Checking included items Make sure that the following items are included. • Digital photo frame (1) • Remote control (1) • AC adaptor (1) • Operating Instructions (this sensor. Continued 9 GB Front A LCD screen B Remote sensor When using the supplied remote control, point it at this manual...
... the LCD screen size is not supplied.) Identifying the parts For details, see the pages indicated in the parentheses. The illustrations are identical to those of the DPF-D70. Before operation Checking included items Make sure that the following items are included. • Digital photo frame (1) • Remote control (1) • AC adaptor (1) • Operating Instructions (this sensor. Continued 9 GB Front A LCD screen B Remote sensor When using the supplied remote control, point it at this manual...
Operating Instructions
Page 10
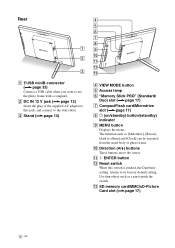
.... M SD memory card/MMC/xD-Picture Card slot (.page 17) 10 GB J Direction (v/V) buttons These buttons move the cursor. Use thin object such as [Slideshow], [Rotate], [Add to push the switch. K ENTER button L Reset switch When this jack, and connect to its factory default setting. B DC IN 12 V jack (.page 13) Insert the plug of photo frame. Rear A USB miniB connector (.page 33) Connect a USB cable when you want to use the photo frame with a computer...
.... M SD memory card/MMC/xD-Picture Card slot (.page 17) 10 GB J Direction (v/V) buttons These buttons move the cursor. Use thin object such as [Slideshow], [Rotate], [Add to push the switch. K ENTER button L Reset switch When this jack, and connect to its factory default setting. B DC IN 12 V jack (.page 13) Insert the plug of photo frame. Rear A USB miniB connector (.page 33) Connect a USB cable when you want to use the photo frame with a computer...
Operating Instructions
Page 12
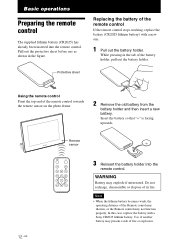
.... Pull out the protective sheet before use as shown in fire. Do not recharge, disassemble or dispose of the remote control If the remote control stops working, replace the battery (CR2025 lithium battery) with a Sony CR2025 lithium battery. WARNING Battery may not function properly. Basic operations Preparing the remote control The supplied lithium battery (CR2025) has already been inserted into the remote control. Insert the battery so that "+" is facing upwards.
.... Pull out the protective sheet before use as shown in fire. Do not recharge, disassemble or dispose of the remote control If the remote control stops working, replace the battery (CR2025 lithium battery) with a Sony CR2025 lithium battery. WARNING Battery may not function properly. Basic operations Preparing the remote control The supplied lithium battery (CR2025) has already been inserted into the remote control. Insert the battery so that "+" is facing upwards.
Operating Instructions
Page 15
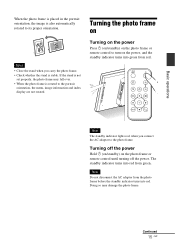
... turn on the photo frame or remote control until turning off the power. Notes • Close the stand when you connect the AC adaptor to the portrait orientation, the menu, image information and index display are not rotated. If the stand is rotated to the photo frame. Turning off the power Hold 1 (on/standby) on the power, and the standby indicator turns into green from green. Continued 15 GB Basic operations When the photo frame...
... turn on the photo frame or remote control until turning off the power. Notes • Close the stand when you connect the AC adaptor to the portrait orientation, the menu, image information and index display are not rotated. If the stand is rotated to the photo frame. Turning off the power Hold 1 (on/standby) on the power, and the standby indicator turns into green from green. Continued 15 GB Basic operations When the photo frame...
Operating Instructions
Page 16
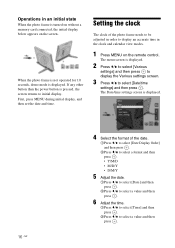
... clock and calendar view modes. 1 Press MENU on the screen. The Date/time settings screen is displayed. 16 GB 4 Select the format of the photo frame needs to be adjusted in order to select [Date/time settings] and then press . If any other button than the power button is pressed, the screen returns to select a value and then press . Operations in an initial state When the photo frame is turned on without a memory card connected, the initial display...
... clock and calendar view modes. 1 Press MENU on the screen. The Date/time settings screen is displayed. 16 GB 4 Select the format of the photo frame needs to be adjusted in order to select [Date/time settings] and then press . If any other button than the power button is pressed, the screen returns to select a value and then press . Operations in an initial state When the photo frame is turned on without a memory card connected, the initial display...
Operating Instructions
Page 18
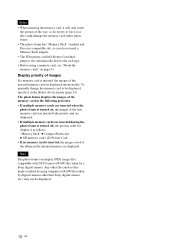
... images saved to be displayed. 18 GB To manually change the memory card to the album in the [Select device] menu (page 24). Notes • When inserting the memory card, it will only insert the portion of the way, so do not need a Memory Stick adaptor. • The SD memory card/xD-Picture Card dualpurpose slot automatically detects the card type. • Before using computer or RAW files taken by digital cameras other...
... images saved to be displayed. 18 GB To manually change the memory card to the album in the [Select device] menu (page 24). Notes • When inserting the memory card, it will only insert the portion of the way, so do not need a Memory Stick adaptor. • The SD memory card/xD-Picture Card dualpurpose slot automatically detects the card type. • Before using computer or RAW files taken by digital cameras other...

Operating Instructions
Page 20
... [Slideshow Settings] menu (page 30). Tip To perform this menu. Calendar view mode Displays images one after another. Note The present date and time cannot be displayed. Clock view mode Displays images with the effect selected in the [Slideshow Settings] menu. x Slideshow display Images in a memory card are automatically displayed one after another while showing a calendar. Single view mode Images are several slideshow modes. To start the slideshow • To start a slideshow from the photo frame, press ENTER on the single image display mode. Pressing VIEW MODE changes the modes...
... [Slideshow Settings] menu (page 30). Tip To perform this menu. Calendar view mode Displays images one after another. Note The present date and time cannot be displayed. Clock view mode Displays images with the effect selected in the [Slideshow Settings] menu. x Slideshow display Images in a memory card are automatically displayed one after another while showing a calendar. Single view mode Images are several slideshow modes. To start the slideshow • To start a slideshow from the photo frame, press ENTER on the single image display mode. Pressing VIEW MODE changes the modes...
Operating Instructions
Page 22
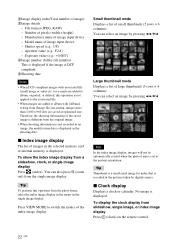
... automatically rotated when the photo frame is displayed. You can select an image by pressing B/b/v/V. To show the index image display from the single image display. x Clock display Displays a clock or calendar. 2Image display order/Total number of images in the menu on the remote control. 22 GB To display the clock display from the photo frame, select the index image display in the selected memory card or internal memory is set to album, exported, or deleted, this operation from slideshow, single image, or index image display Press (clock) on...
... automatically rotated when the photo frame is displayed. You can select an image by pressing B/b/v/V. To show the index image display from the single image display. x Clock display Displays a clock or calendar. 2Image display order/Total number of images in the menu on the remote control. 22 GB To display the clock display from the photo frame, select the index image display in the selected memory card or internal memory is set to album, exported, or deleted, this operation from slideshow, single image, or index image display Press (clock) on...
Operating Instructions
Page 25
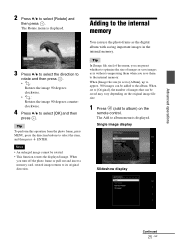
Tip In [Image file size] of images or save them when you turn off the photo frame or pull out and insert a memory card, rotated image returns to its original direction. Single image display Slideshow display Continued 25 GB Advanced operations 2 Press v/V to select the item, and then press ENTER. When set to [Album], up to album) on the remote control. Notes • An enlarged image cannot be saved may vary depending on the original image file size. 1 Press (add to...
Tip In [Image file size] of images or save them when you turn off the photo frame or pull out and insert a memory card, rotated image returns to its original direction. Single image display Slideshow display Continued 25 GB Advanced operations 2 Press v/V to select the item, and then press ENTER. When set to [Album], up to album) on the remote control. Notes • An enlarged image cannot be saved may vary depending on the original image file size. 1 Press (add to...
Operating Instructions
Page 31
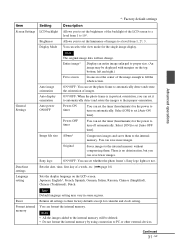
... all settings to set [Auto ON time]. General Settings Auto image orientation Auto display orientation Auto power ON/OFF Note The original image data will be displayed with margins on the LCD screen. Power-OFF timer Image file size Album* You can format the internal memory. There is in some regions. You can set the timer (hour/minute) for calendar and clock setting. Allows you to set the luminance of images to turn on automatically. Compresses images and saves them . Advanced operations *: Factory default settings Item Setting Description Screen Settings LCD...
... all settings to set [Auto ON time]. General Settings Auto image orientation Auto display orientation Auto power ON/OFF Note The original image data will be displayed with margins on the LCD screen. Power-OFF timer Image file size Album* You can format the internal memory. There is in some regions. You can set the timer (hour/minute) for calendar and clock setting. Allows you to set the luminance of images to turn on automatically. Compresses images and saves them . Advanced operations *: Factory default settings Item Setting Description Screen Settings LCD...
Operating Instructions
Page 33
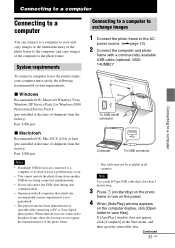
... Sony digital photo printer. To USB miniB connector Computer To USB connector * This cable may not recognize the internal memory of the photo frame. When other devices are connected to the photo frame, these devices may not be available in the Start menu, and then open the removable disc. Connecting to a computer to exchange images 1 Connect the photo frame to view files]. Continued 33 GB x Windows Recommended OS: Microsoft Windows Vista, Windows XP Service Pack 2 or Windows 2000 Professional Service Pack 4 (pre-installed...
... Sony digital photo printer. To USB miniB connector Computer To USB connector * This cable may not recognize the internal memory of the photo frame. When other devices are connected to the photo frame, these devices may not be available in the Start menu, and then open the removable disc. Connecting to a computer to exchange images 1 Connect the photo frame to view files]. Continued 33 GB x Windows Recommended OS: Microsoft Windows Vista, Windows XP Service Pack 2 or Windows 2000 Professional Service Pack 4 (pre-installed...
Operating Instructions
Page 35
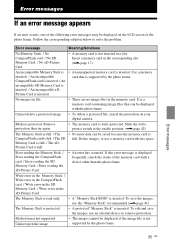
... incompatible card that can be displayed with free space. Picture Card is supported by the photo frame. Media is full. / The SD full. Slide the writeprotect switch to solve the problem. Memory Card is full. / The xDPicture Card is full. Write error in the Memory Stick. / Write error in the CompactFlash card. / Write error in the SD Memory Card. / Write error in a slot. To edit and save the images, use an external device to remove protection. Media format not supported.
... incompatible card that can be displayed with free space. Picture Card is supported by the photo frame. Media is full. / The SD full. Slide the writeprotect switch to solve the problem. Memory Card is full. / The xDPicture Card is full. Write error in the Memory Stick. / Write error in the CompactFlash card. / Write error in the SD Memory Card. / Write error in a slot. To edit and save the images, use an external device to remove protection. Media format not supported.
Operating Instructions
Page 36
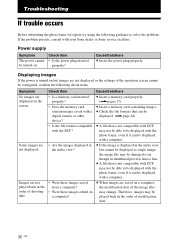
... to solve the problem. Troubleshooting If trouble occurs Before submitting the photo frame for repair, try using the following check items. Symptom No images are displayed on the screen. Check item • Is a memory card inserted properly? • Does the memory card contain images saved with a digital camera or other device? • Is the file format compatible with the photo frame, even if it can be played back in the index view? • Were these images saved from a computer? •...
... to solve the problem. Troubleshooting If trouble occurs Before submitting the photo frame for repair, try using the following check items. Symptom No images are displayed on the screen. Check item • Is a memory card inserted properly? • Does the memory card contain images saved with a digital camera or other device? • Is the file format compatible with the photo frame, even if it can be played back in the index view? • Were these images saved from a computer? •...
Operating Instructions
Page 42
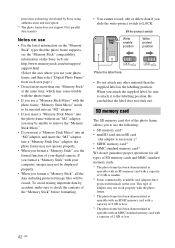
... same time, which may not operate properly. • When you format a "Memory Stick", use your digital camera. Be careful that the photo frame supports, see the "Memory Stick" compatibility information on the rear. If you format a "Memory Stick" with a capacity of 2 GB or less. 42 GB This type of adaptor may not work properly with the photo frame. *3 The photo frame has been demonstrated as operable with an SDHC memory card with...
... same time, which may not operate properly. • When you format a "Memory Stick", use your digital camera. Be careful that the photo frame supports, see the "Memory Stick" compatibility information on the rear. If you format a "Memory Stick" with a capacity of 2 GB or less. 42 GB This type of adaptor may not work properly with the photo frame. *3 The photo frame has been demonstrated as operable with an SDHC memory card with...
Operating Instructions
Page 46
... memory card 42 xD-Picture Card 43 P Placing in portrait or landscape orientation 14 Playback device 24 Precautions 40 R Remote control 12 Replacing the battery of the remote control 12 Reset 31 Rotating an image 24 S Screen Settings 31 Setting the clock 16 Setting the stand 14 Single image display 21 Entire image mode 21 Fit to screen mode 21 Image information mode 21 Slideshow 20 Calendar view mode 20 Clock view mode 20 Effect 30 Interval 30 Multiple image mode 20 Order 30 Random view mode 20 Single view mode 20 Slideshow Settings...
... memory card 42 xD-Picture Card 43 P Placing in portrait or landscape orientation 14 Playback device 24 Precautions 40 R Remote control 12 Replacing the battery of the remote control 12 Reset 31 Rotating an image 24 S Screen Settings 31 Setting the clock 16 Setting the stand 14 Single image display 21 Entire image mode 21 Fit to screen mode 21 Image information mode 21 Slideshow 20 Calendar view mode 20 Clock view mode 20 Effect 30 Interval 30 Multiple image mode 20 Order 30 Random view mode 20 Single view mode 20 Slideshow Settings...


