Operating Guide
Page 3
... into the outlet, try reversing the plug. For those sets designed to operate from overheating, these safety instructions completely before cleaning or polishing it from battery power, or other similar surface. - Object and Liquid Entry Never push objects of the set from the wall outlet before operating the appliance, and keep...
... into the outlet, try reversing the plug. For those sets designed to operate from overheating, these safety instructions completely before cleaning or polishing it from battery power, or other similar surface. - Object and Liquid Entry Never push objects of the set from the wall outlet before operating the appliance, and keep...
Operating Guide
Page 5
...Caution: Do not handle damaged or leaking Lithium-Ion batteries. The number below is subject to Part 15 of rechargeable batteries, call : Sony Customer Information Center 1-800222-SONY (7669). Telephone Number: 858-942-2230 This ...Battery pack This device complies with Canadian ICES-003. Address: 16530 Via Esprillo, San Diego, CA 92127 U.S.A. Otherwise, fire or injury may cause harmful interference to comply with the instructions, may result. This Class B digital apparatus complies with Part 15 of Conformity Trade Name: SONY Model No.: DCR-HC38 Responsible Party: Sony...
...Caution: Do not handle damaged or leaking Lithium-Ion batteries. The number below is subject to Part 15 of rechargeable batteries, call : Sony Customer Information Center 1-800222-SONY (7669). Telephone Number: 858-942-2230 This ...Battery pack This device complies with Canadian ICES-003. Address: 16530 Via Esprillo, San Diego, CA 92127 U.S.A. Otherwise, fire or injury may cause harmful interference to comply with the instructions, may result. This Class B digital apparatus complies with Part 15 of Conformity Trade Name: SONY Model No.: DCR-HC38 Responsible Party: Sony...

Operating Guide
Page 6
...number in your Sony dealer regarding this first (Continued) the user is not available under the current recording or playback conditions. • The LCD screen and the viewfinder are operational for connecting the camcorder to these ...DCR-HC38 Serial No. "First Step Guide" for effective use mini DV cassettes marked with . Increase the separation between the equipment and receiver. - ACSerial No. For the State of your camcorder to which the receiver is supplied with the Cassette Memory function (p. 58). Viewfinder Battery pack LCD panel • The camcorder...
...number in your Sony dealer regarding this first (Continued) the user is not available under the current recording or playback conditions. • The LCD screen and the viewfinder are operational for connecting the camcorder to these ...DCR-HC38 Serial No. "First Step Guide" for effective use mini DV cassettes marked with . Increase the separation between the equipment and receiver. - ACSerial No. For the State of your camcorder to which the receiver is supplied with the Cassette Memory function (p. 58). Viewfinder Battery pack LCD panel • The camcorder...
Operating Guide
Page 8
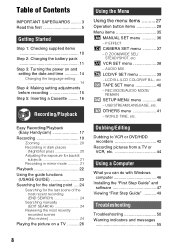
...etc. Table of Contents IMPORTANT SAFEGUARDS ......... 3 Read this first 5 Getting Started Step 1: Checking supplied items 10 Step 2: Charging the battery pack 11 Step 3: Turning the power on and setting the date and time 14 Changing the language setting 14 Step 4: Making setting adjustments... before recording 15 Step 5: Inserting a Cassette ......... 16 Recording/Playback Easy Recording/Playback (Easy Handycam 17 Recording 19 Zooming 20 Recording in dark places (NightShot plus 20 Adjusting the exposure for backlit subjects 21 Recording in mirror ...
...etc. Table of Contents IMPORTANT SAFEGUARDS ......... 3 Read this first 5 Getting Started Step 1: Checking supplied items 10 Step 2: Charging the battery pack 11 Step 3: Turning the power on and setting the date and time 14 Changing the language setting 14 Step 4: Making setting adjustments... before recording 15 Step 5: Inserting a Cassette ......... 16 Recording/Playback Easy Recording/Playback (Easy Handycam 17 Recording 19 Zooming 20 Recording in dark places (NightShot plus 20 Adjusting the exposure for backlit subjects 21 Recording in mirror ...
Operating Guide
Page 10
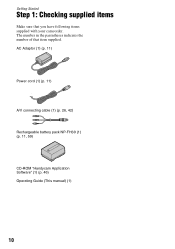
AC Adaptor (1) (p. 11) Power cord (1) (p. 11) A/V connecting cable (1) (p. 26, 42) Rechargeable battery pack NP-FH30 (1) (p. 11, 59) CD-ROM "Handycam Application Software" (1) (p. 46) Operating Guide (This manual) (1) 10 Getting Started Step 1: Checking supplied items Make sure that item supplied. The number in the parentheses indicates the number of that you have following items supplied with your camcorder.
AC Adaptor (1) (p. 11) Power cord (1) (p. 11) A/V connecting cable (1) (p. 26, 42) Rechargeable battery pack NP-FH30 (1) (p. 11, 59) CD-ROM "Handycam Application Software" (1) (p. 46) Operating Guide (This manual) (1) 10 Getting Started Step 1: Checking supplied items Make sure that item supplied. The number in the parentheses indicates the number of that you have following items supplied with your camcorder.

Operating Guide
Page 11
b Notes • You cannot attach any "InfoLITHIUM" battery pack other than the H series to your camcorder. 1 Align the terminals of the battery pack and your camcorder 1, then attach the battery pack and click it to your camcorder. 4 Connect the power cord to the DC IN jack on your camcorder. CHG (charge) lamp The CHG (charge) lamp lights up...
b Notes • You cannot attach any "InfoLITHIUM" battery pack other than the H series to your camcorder. 1 Align the terminals of the battery pack and your camcorder 1, then attach the battery pack and click it to your camcorder. 4 Connect the power cord to the DC IN jack on your camcorder. CHG (charge) lamp The CHG (charge) lamp lights up...

Operating Guide
Page 12
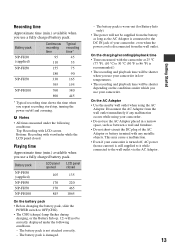
... on the LCD screen. Charging time Approximate time (min.) required when you do when charging the battery pack. Disconnect the AC Adaptor from the DC IN jack holding both the camcorder and the DC plug. Disconnect the AC Adaptor from the DC IN jack. To use an outside power source You can... operate your camcorder using the power from the wall outlet by pressing DISP/BATT INFO again while the information is fully charged. Battery pack NP-FH30 (supplied) NP-FH50 NP-FH70 NP-FH100 Charging time 115 135 170...
... on the LCD screen. Charging time Approximate time (min.) required when you do when charging the battery pack. Disconnect the AC Adaptor from the DC IN jack holding both the camcorder and the DC plug. Disconnect the AC Adaptor from the DC IN jack. To use an outside power source You can... operate your camcorder using the power from the wall outlet by pressing DISP/BATT INFO again while the information is fully charged. Battery pack NP-FH30 (supplied) NP-FH50 NP-FH70 NP-FH100 Charging time 115 135 170...
Operating Guide
Page 13
... a narrow space, such as the AC Adaptor is connected to the DC IN jack of the AC Adaptor or battery terminal with the camcorder at 25 °C (77 °F). (10 °C to 30 °C (50 °F to 86 °F) is recommended.) • The recording and playback time will be ... zooming. On the AC Adaptor • Use the nearby wall outlet when using your camcorder is worn-out (for Battery Info only). • The power will not be supplied from the wall outlet. Bottom: Recording with LCD screen. Battery pack NP-FH30 (supplied) NP-FH50 NP-FH70 NP-FH100 LCD panel opened 105...
... a narrow space, such as the AC Adaptor is connected to the DC IN jack of the AC Adaptor or battery terminal with the camcorder at 25 °C (77 °F). (10 °C to 30 °C (50 °F to 86 °F) is recommended.) • The recording and playback time will be ... zooming. On the AC Adaptor • Use the nearby wall outlet when using your camcorder is worn-out (for Battery Info only). • The power will not be supplied from the wall outlet. Bottom: Recording with LCD screen. Battery pack NP-FH30 (supplied) NP-FH50 NP-FH70 NP-FH100 LCD panel opened 105...
Operating Guide
Page 14
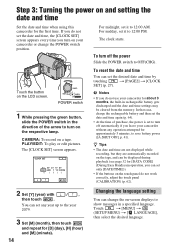
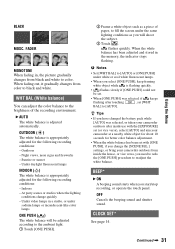
... they are automatically recorded on the tape, and can set only [DATE/TIME])). • If the buttons on -screen displays to show messages in rechargeable battery gets discharged and the date and time settings may be displayed during playback (see page 32 for the first time. CLOCK SET Y MDHM 2 0 0 7 JAN 1...midnight, set it to turn on and setting the date and time Set the date and time when using this camcorder for [DATA CODE] (During Easy Handycam operation, you do not use your camcorder or change the on the touch panel do not set to 12:00 PM. POWER switch 1 While pressing ...
... they are automatically recorded on the tape, and can set only [DATE/TIME])). • If the buttons on -screen displays to show messages in rechargeable battery gets discharged and the date and time settings may be displayed during playback (see page 32 for the first time. CLOCK SET Y MDHM 2 0 0 7 JAN 1...midnight, set it to turn on and setting the date and time Set the date and time when using this camcorder for [DATA CODE] (During Easy Handycam operation, you do not use your camcorder or change the on the touch panel do not set to 12:00 PM. POWER switch 1 While pressing ...
Operating Guide
Page 15
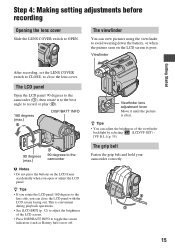
...- [VF B.L.] (p. 39). z Tips • You can view pictures using the viewfinder to the camcorder (1), then rotate it until the picture is poor. The LCD panel Open the LCD panel 90 degrees to avoid wearing down the battery, or when the picture seen on the LCD screen is clear. Step 4: Making setting... out. The viewfinder You can adjust the brightness of the LCD screen. • Press DISP/BATT INFO to toggle the screen indicators (such as Battery Info) on the LCD frame accidentally when you open or adjust the LCD panel. z Tips • If you can close the lens cover. ...
...- [VF B.L.] (p. 39). z Tips • You can view pictures using the viewfinder to the camcorder (1), then rotate it until the picture is poor. The LCD panel Open the LCD panel 90 degrees to avoid wearing down the battery, or when the picture seen on the LCD screen is clear. Step 4: Making setting... out. The viewfinder You can adjust the brightness of the LCD screen. • Press DISP/BATT INFO to toggle the screen indicators (such as Battery Info) on the LCD frame accidentally when you open or adjust the LCD panel. z Tips • If you can close the lens cover. ...
Operating Guide
Page 31
... PUSH] could not be adjusted according to the ambient light. 1 Touch [ONE PUSH]. 2 Frame a white object such as you have changed the battery pack while [AUTO] was selected, if keeps flashing after inside the house, or vice versa, you select [ONE PUSH], keep framing white object while...quickly. BLACK MOSC. When fading out, it gradually changes from inside use with the [EXPOSURE] set (or vice versa), select [AUTO] and aim your camcorder outdoors after touching , set with [ONE PUSH], if you start/stop recording, or operate the touch panel. BEEP* B ON A beeping sound starts when...
... PUSH] could not be adjusted according to the ambient light. 1 Touch [ONE PUSH]. 2 Frame a white object such as you have changed the battery pack while [AUTO] was selected, if keeps flashing after inside the house, or vice versa, you select [ONE PUSH], keep framing white object while...quickly. BLACK MOSC. When fading out, it gradually changes from inside use with the [EXPOSURE] set (or vice versa), select [AUTO] and aim your camcorder outdoors after touching , set with [ONE PUSH], if you start/stop recording, or operate the touch panel. BEEP* B ON A beeping sound starts when...
Operating Guide
Page 39
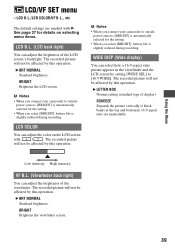
...affected by setting [WIDE SEL] to outside power sources, [BRIGHT] is automatically selected for the setting. • When you select [BRIGHT], battery life is slightly reduced during recording. B BRT NORMAL Standard brightness. B BRT NORMAL Standard brightness. Using the Menu LCD/VF SET menu - ... of the LCD screen's backlight. The recorded picture will not be affected by this operation. b Notes • When you connect your camcorder to outside power sources, [BRIGHT] is automatically selected for details on selecting menu items. LCD B.L. (LCD back light) You can adjust...
...affected by setting [WIDE SEL] to outside power sources, [BRIGHT] is automatically selected for the setting. • When you select [BRIGHT], battery life is slightly reduced during recording. B BRT NORMAL Standard brightness. B BRT NORMAL Standard brightness. Using the Menu LCD/VF SET menu - ... of the LCD screen's backlight. The recorded picture will not be affected by this operation. b Notes • When you connect your camcorder to outside power sources, [BRIGHT] is automatically selected for details on selecting menu items. LCD B.L. (LCD back light) You can adjust...
Operating Guide
Page 50
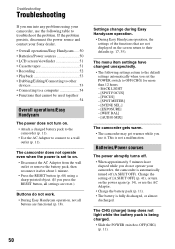
...[SPOT FOCUS] - [FOCUS] - [SPOT METER] - [SCENE SEL.] - [EXPOSURE] - [WHT BAL] - [AUDIO MIX] The camcorder gets warm. • The camcorder may get warmer while you run into any problems using a sharp-pointed object. (If you set the POWER switch to OFF(CHG) for .... The menu item settings have elapsed while you do not work. • During Easy Handycam operation, not all settings are reset.) Buttons do not operate your Sony dealer. • Overall operations/Easy Handycam ..... 50 • Batteries/Power sources 50 • LCD screen/viewfinder 51 • Cassette tapes 51 • ...
...[SPOT FOCUS] - [FOCUS] - [SPOT METER] - [SCENE SEL.] - [EXPOSURE] - [WHT BAL] - [AUDIO MIX] The camcorder gets warm. • The camcorder may get warmer while you run into any problems using a sharp-pointed object. (If you set the POWER switch to OFF(CHG) for .... The menu item settings have elapsed while you do not work. • During Easy Handycam operation, not all settings are reset.) Buttons do not operate your Sony dealer. • Overall operations/Easy Handycam ..... 50 • Batteries/Power sources 50 • LCD screen/viewfinder 51 • Cassette tapes 51 • ...
Operating Guide
Page 51
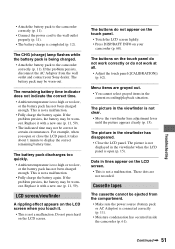
... is connected correctly (p. 11). • Moisture condensation has occurred inside the camcorder (p. 61). If the problem persists, disconnect the AC Adaptor from the compartment. • Make sure the power source (battery pack or AC Adaptor) is not clear. • Move the viewfinder lens...1 minute to display the correct remaining battery time. If the problem persists, the battery may be wornout. If the problem persists, the battery may be wornout. The battery pack may not be worn-out. LCD screen/viewfinder A rippling effect appears on your Sony dealer. Replace it with a new...
... is connected correctly (p. 11). • Moisture condensation has occurred inside the camcorder (p. 61). If the problem persists, disconnect the AC Adaptor from the compartment. • Make sure the power source (battery pack or AC Adaptor) is not clear. • Move the viewfinder lens...1 minute to display the correct remaining battery time. If the problem persists, the battery may be wornout. If the problem persists, the battery may be wornout. The battery pack may not be worn-out. LCD screen/viewfinder A rippling effect appears on your Sony dealer. Replace it with a new...
Operating Guide
Page 52
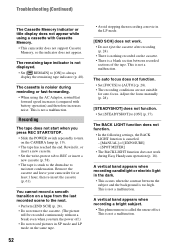
...using the AC Adaptor, rewind/fast forward speed increases (compared with Cassette Memory. • This camcorder does not support Cassette Memory, so the indicator does not appear. The remaining tape indicator is...[END SCH] does not work during rewinding or fast-forwarding. • When using a cassette with battery operation) and therefore increases noise. The cassette is too high. The auto focus does not function. ... background is noisier during Easy Handycam operation (p. 18). A vertical band appears when recording a bright subject. • This phenomenon is not a ...
...using the AC Adaptor, rewind/fast forward speed increases (compared with Cassette Memory. • This camcorder does not support Cassette Memory, so the indicator does not appear. The remaining tape indicator is...[END SCH] does not work during rewinding or fast-forwarding. • When using a cassette with battery operation) and therefore increases noise. The cassette is too high. The auto focus does not function. ... background is noisier during Easy Handycam operation (p. 18). A vertical band appears when recording a bright subject. • This phenomenon is not a ...
Operating Guide
Page 55
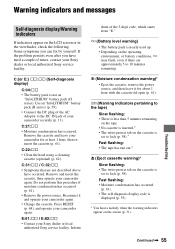
...least 1 hour, then reinsert the cassette (p. 61). Inform them of your camcorder securely (p. 11). Continued , 55 C:(or E:) ss:ss (Self-diagnosis display) C:04:ss • The battery pack is set to lock (p. 58). Do not perform this procedure if...camcorder again. • Change the cassette. Warning indicators and messages Troubleshooting Self-diagnosis display/Warning indicators If indicators appear on the operating, environment, or battery conditions, E may flash, even if there are not described above have tried a couple of times, contact your Sony dealer or local authorized Sony...
...least 1 hour, then reinsert the cassette (p. 61). Inform them of your camcorder securely (p. 11). Continued , 55 C:(or E:) ss:ss (Self-diagnosis display) C:04:ss • The battery pack is set to lock (p. 58). Do not perform this procedure if...camcorder again. • Change the cassette. Warning indicators and messages Troubleshooting Self-diagnosis display/Warning indicators If indicators appear on the operating, environment, or battery conditions, E may flash, even if there are not described above have tried a couple of times, contact your Sony dealer or local authorized Sony...

Operating Guide
Page 59
... to 10 minutes of this temperature range, you start taking shots. - The battery pack is frequently used in a dry, cool place. • To discharge the battery pack on your camcorder completely, set the POWER switch to the operating conditions of the following to [...the operating conditions or ambient temperature. Note, however, that case, do one of your camcorder. Continued , 59 Additional Information "InfoLITHIUM" H series battery packs have the mark. The "InfoLITHIUM" battery pack calculates the power consumption according to OFF(CHG) when not recording or playing back ...
... to 10 minutes of this temperature range, you start taking shots. - The battery pack is frequently used in a dry, cool place. • To discharge the battery pack on your camcorder completely, set the POWER switch to the operating conditions of the following to [...the operating conditions or ambient temperature. Note, however, that case, do one of your camcorder. Continued , 59 Additional Information "InfoLITHIUM" H series battery packs have the mark. The "InfoLITHIUM" battery pack calculates the power consumption according to OFF(CHG) when not recording or playing back ...
Operating Guide
Page 60
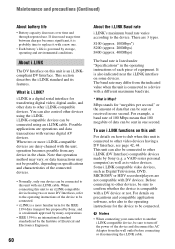
... • Battery capacity decreases over time and through repeated use i.LINK functions on this unit For details on this unit with a different maximum baud rate. * What is a digital serial interface for the IEEE 1394 data transport bus proposed by Sony, and is a trademark ...cable. For example, a baud rate of the connected devices. • Normally, only one second. b Notes • When connecting your camcorder to another i.LINK-compatible device, be possible, depending on precautions and compatible application software, refer also to the operating instructions for "megabits ...
... • Battery capacity decreases over time and through repeated use i.LINK functions on this unit For details on this unit with a different maximum baud rate. * What is a digital serial interface for the IEEE 1394 data transport bus proposed by Sony, and is a trademark ...cable. For example, a baud rate of the connected devices. • Normally, only one second. b Notes • When connecting your camcorder to another i.LINK-compatible device, be possible, depending on precautions and compatible application software, refer also to the operating instructions for "megabits ...
Operating Guide
Page 61
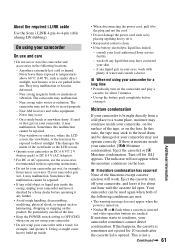
...sand or dust gets in your skin - If your camcorder, it . • Keep metal contacts clean. • If the battery electrolytic liquid has leaked, - wash off any liquid gets in your camcorder gets wet, it . x When not using your camcorder for a long time • Periodically turn off for... checked by placing anything heavy on the lens. This damages the inside your local authorized Sony service facility. - Eject the cassette] or [% Moisture condensation. Eject the cassette, turn on the camcorder and play a cassette for example, and operate it for about 3 minutes. •...
...sand or dust gets in your skin - If your camcorder, it . • Keep metal contacts clean. • If the battery electrolytic liquid has leaked, - wash off any liquid gets in your camcorder gets wet, it . x When not using your camcorder for a long time • Periodically turn off for... checked by placing anything heavy on the lens. This damages the inside your local authorized Sony service facility. - Eject the cassette] or [% Moisture condensation. Eject the cassette, turn on the camcorder and play a cassette for example, and operate it for about 3 minutes. •...

Operating Guide
Page 64
....) F1.8 ~ 4.1 Filter diameter: 30 mm (1 3/16 in about 3 months if you are not recording the date. On charging the pre-installed rechargeable battery Your camcorder has a pre-installed rechargeable battery to retain the date, time, and other settings even when the POWER switch is a precision part. Maintenance and precautions (Continued) 6 Attach the eyecup...
....) F1.8 ~ 4.1 Filter diameter: 30 mm (1 3/16 in about 3 months if you are not recording the date. On charging the pre-installed rechargeable battery Your camcorder has a pre-installed rechargeable battery to retain the date, time, and other settings even when the POWER switch is a precision part. Maintenance and precautions (Continued) 6 Attach the eyecup...


