Operating Guide
Page 4
... sure the service technician has used replacement parts specified by the manufacturer) to lightning and power-line surges. Safety Check Upon completion of other hazards. IMPORTANT SAFEGUARDS (Continued) Lightning For added protection for this indicates a need for long periods of time, unplug it from the wall outlet and refer servicing to normal operation. - Refer all servicing to dangerous voltage or other controls may...
... sure the service technician has used replacement parts specified by the manufacturer) to lightning and power-line surges. Safety Check Upon completion of other hazards. IMPORTANT SAFEGUARDS (Continued) Lightning For added protection for this indicates a need for long periods of time, unplug it from the wall outlet and refer servicing to normal operation. - Refer all servicing to dangerous voltage or other controls may...
Operating Guide
Page 5
... U.S.A. If you have any changes or modifications not expressly approved in a residential installation. You can help preserve our environment by returning your authority to radio or television reception, which can radiate radio frequency energy and, if not installed and used rechargeable batteries to comply with Part 15 of Conformity Trade Name: SONY Model No.: DCR-HC38 Responsible Party: Sony Electronics Inc. These...
... U.S.A. If you have any changes or modifications not expressly approved in a residential installation. You can help preserve our environment by returning your authority to radio or television reception, which can radiate radio frequency energy and, if not installed and used rechargeable batteries to comply with Part 15 of Conformity Trade Name: SONY Model No.: DCR-HC38 Responsible Party: Sony Electronics Inc. These...

Operating Guide
Page 6
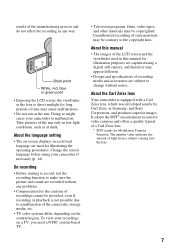
... separation between the equipment and receiver. - Viewfinder Battery pack LCD panel • The camcorder is not 6 compatible with the limits for help. See "On use mini DV cassettes marked with a USB or i.LINK cable, be some tiny black points and/or bright points (white, red, blue, or green in order to comply with the Cassette Memory function (p. 58). Model No. Reorient or relocate the receiving antenna. - Refer...
... separation between the equipment and receiver. - Viewfinder Battery pack LCD panel • The camcorder is not 6 compatible with the limits for help. See "On use mini DV cassettes marked with a USB or i.LINK cable, be some tiny black points and/or bright points (white, red, blue, or green in order to comply with the Cassette Memory function (p. 58). Model No. Reorient or relocate the receiving antenna. - Refer...
Operating Guide
Page 7
... the language setting • The on the country/region. On recording • Before starting to record, test the recording function to make sure the picture and sound are captured using your camcorder to change without any way. Change the screen language before using a digital still camera, and therefore may cause malfunctions. • Do not aim at dusk. The number value indicates the amount of a Carl Zeiss lens. * MTF stands for video cameras...
... the language setting • The on the country/region. On recording • Before starting to record, test the recording function to make sure the picture and sound are captured using your camcorder to change without any way. Change the screen language before using a digital still camera, and therefore may cause malfunctions. • Do not aim at dusk. The number value indicates the amount of a Carl Zeiss lens. * MTF stands for video cameras...
Operating Guide
Page 8
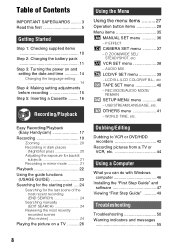
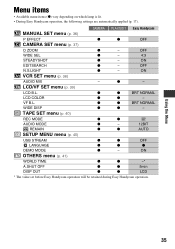
... CAMERA SET menu 37 - LCD B.L./LCD COLOR/VF B.L., etc TAPE SET menu 40 - REC MODE/AUDIO MODE/ REMAIN SETUP MENU menu 40 - WORLD TIME, etc. AUDIO MIX LCD/VF SET menu 39 - Dubbing/Editing Dubbing to VCR or DVD/HDD recorders 42 Recording pictures from a TV or VCR, etc 44 Using a Computer What you can do with Windows computer 46 Installing the "First Step Guide" and software 47 Viewing "First Step Guide 49 Troubleshooting Troubleshooting 50 Warning indicators and messages 55 8 D ZOOM/WIDE SEL/ STEADYSHOT, etc. USB STREAM/LANGUAGE, etc. OTHERS menu...
... CAMERA SET menu 37 - LCD B.L./LCD COLOR/VF B.L., etc TAPE SET menu 40 - REC MODE/AUDIO MODE/ REMAIN SETUP MENU menu 40 - WORLD TIME, etc. AUDIO MIX LCD/VF SET menu 39 - Dubbing/Editing Dubbing to VCR or DVD/HDD recorders 42 Recording pictures from a TV or VCR, etc 44 Using a Computer What you can do with Windows computer 46 Installing the "First Step Guide" and software 47 Viewing "First Step Guide 49 Troubleshooting Troubleshooting 50 Warning indicators and messages 55 8 D ZOOM/WIDE SEL/ STEADYSHOT, etc. USB STREAM/LANGUAGE, etc. OTHERS menu...

Operating Guide
Page 12
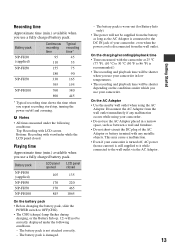
To use an outside power source You can operate your camcorder using the power from the DC IN jack. To check the remaining battery (Battery Info) Set the POWER switch to 20 seconds by making the same connections as you fully charge a fully discharged battery pack. Remaining battery (approx.) BATTERY INFO BATTERY CHARGE LEVEL 0% 50% 100% REC TIME AVAILABLE LCD SCREEN : 85 min VIEWFINDER : 99 min Recording capacity (approx.) You can view the battery information for up to...
To use an outside power source You can operate your camcorder using the power from the DC IN jack. To check the remaining battery (Battery Info) Set the POWER switch to 20 seconds by making the same connections as you fully charge a fully discharged battery pack. Remaining battery (approx.) BATTERY INFO BATTERY CHARGE LEVEL 0% 50% 100% REC TIME AVAILABLE LCD SCREEN : 85 min VIEWFINDER : 99 min Recording capacity (approx.) You can view the battery information for up to...
Operating Guide
Page 13
.... • Do not short-circuit the DC plug of your camcorder, even when the power cord is worn-out (for Battery Info only). • The power will not be shorter when you use your camcorder in a narrow space, such as the AC Adaptor is turned off and zooming. On the charging/recording/playback time • Times measured with the camcorder at 25 °C (77 °F). (10...
.... • Do not short-circuit the DC plug of your camcorder, even when the power cord is worn-out (for Battery Info only). • The power will not be shorter when you use your camcorder in a narrow space, such as the AC Adaptor is turned off and zooming. On the charging/recording/playback time • Times measured with the camcorder at 25 °C (77 °F). (10...
Operating Guide
Page 14
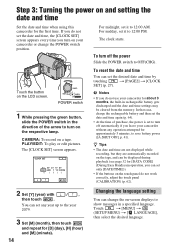
CAMERA: To record on the LCD screen. To reset the date and time You can change the POWER switch position. You can set the date and time again (p. 64). • At the time of the arrow to turn off automatically if you can set only [DATE/TIME])). • If the buttons on the tape, and can be displayed during playback (see page 32 for [DATA CODE] (During Easy Handycam operation, you leave your camcorder without any year up...
CAMERA: To record on the LCD screen. To reset the date and time You can change the POWER switch position. You can set the date and time again (p. 64). • At the time of the arrow to turn off automatically if you can set only [DATE/TIME])). • If the buttons on the tape, and can be displayed during playback (see page 32 for [DATA CODE] (During Easy Handycam operation, you leave your camcorder without any year up...

Operating Guide
Page 26
...a VCR using the A/V connecting cable (1) or the A/V connecting cable with S VIDEO (optional) When connecting to LINE (VIDEO 1, VIDEO 2, etc.), if the VCR has an input selector. Device without an S VIDEO jack Device with an S VIDEO jack (Black) (Yellow) 1 (White) A/V OUT jack (Red) (White) (Red) (Yellow) A/V OUT : Signal flow 2 A A/V connecting cable (supplied) B A/V connecting cable with S VIDEO (2). Set the input selector on the VCR. Connect your TV is not necessary. In this operation (p. 11). z Tips • You can be connected. Refer also to the instruction manuals...
...a VCR using the A/V connecting cable (1) or the A/V connecting cable with S VIDEO (optional) When connecting to LINE (VIDEO 1, VIDEO 2, etc.), if the VCR has an input selector. Device without an S VIDEO jack Device with an S VIDEO jack (Black) (Yellow) 1 (White) A/V OUT jack (Red) (White) (Red) (Yellow) A/V OUT : Signal flow 2 A A/V connecting cable (supplied) B A/V connecting cable with S VIDEO (2). Set the input selector on the VCR. Connect your TV is not necessary. In this operation (p. 11). z Tips • You can be connected. Refer also to the instruction manuals...
Operating Guide
Page 30
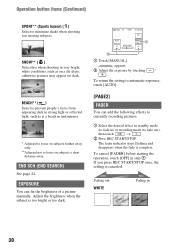
..., touch [AUTO]. [PAGE2] FADER You can fix the brightness of a picture manually. otherwise pictures may appear too dark. EXPOSURE You can add the following effects to currently recording pictures. 1 Select the desired effect in standby mode (to fade in strong light or reflected light, such as on subjects a short distance away. AL 2 1 Touch [MANUAL]. If you press REC START/STOP once, the setting is...
..., touch [AUTO]. [PAGE2] FADER You can fix the brightness of a picture manually. otherwise pictures may appear too dark. EXPOSURE You can add the following effects to currently recording pictures. 1 Select the desired effect in standby mode (to fade in strong light or reflected light, such as on subjects a short distance away. AL 2 1 Touch [MANUAL]. If you press REC START/STOP once, the setting is...
Operating Guide
Page 33
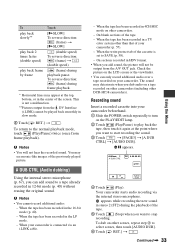
... MIC mode on other DCR-HC38 camcorders). When the tape has been recorded in stereo 2 (ST2) during playback pause. When the write-protect tab of the tape. 5 Touch (Stop) when you want to start recording the sound. 3 Touch t [PAGE3] t [A DUB CTRL] t [AUDIO DUB]. Recording sound Insert a recorded cassette into your camcorder (p. 57). - Continued , 33 Using the Menu You may deteriorate when you dub audio on a tape recorded on your camcorder is connected via the internal stereo microphone. Check the picture...
... MIC mode on other DCR-HC38 camcorders). When the tape has been recorded in stereo 2 (ST2) during playback pause. When the write-protect tab of the tape. 5 Touch (Stop) when you want to start recording the sound. 3 Touch t [PAGE3] t [A DUB CTRL] t [AUDIO DUB]. Recording sound Insert a recorded cassette into your camcorder (p. 57). - Continued , 33 Using the Menu You may deteriorate when you dub audio on a tape recorded on your camcorder is connected via the internal stereo microphone. Check the picture...
Operating Guide
Page 35
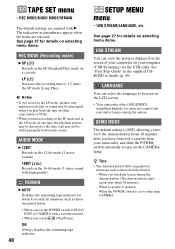
...LCD B.L. TAPE SET menu (p. 40) REC MODE z z SP AUDIO MODE z - 12BIT REMAIN z z AUTO SETUP MENU menu (p. 40) USB STREAM z z OFF LANGUAGE z z z DEMO MODE z - ON EDITSEARCH z - ON OTHERS menu (p. 41) WORLD TIME z z -* A.SHUT OFF z z 5min DISP OUT z z LCD * The value set before Easy Handycam operation will be retained during Easy Handycam operation. OFF N.S.LIGHT z - VF B.L. z z BRT NORMAL WIDE DISP z z - OFF WIDE SEL z - 4:3 STEADYSHOT z - z - Using the Menu 35 CAMERA PLAY/EDIT Easy Handycam MANUAL SET menu...
...LCD B.L. TAPE SET menu (p. 40) REC MODE z z SP AUDIO MODE z - 12BIT REMAIN z z AUTO SETUP MENU menu (p. 40) USB STREAM z z OFF LANGUAGE z z z DEMO MODE z - ON EDITSEARCH z - ON OTHERS menu (p. 41) WORLD TIME z z -* A.SHUT OFF z z 5min DISP OUT z z LCD * The value set before Easy Handycam operation will be retained during Easy Handycam operation. OFF N.S.LIGHT z - VF B.L. z z BRT NORMAL WIDE DISP z z - OFF WIDE SEL z - 4:3 STEADYSHOT z - z - Using the Menu 35 CAMERA PLAY/EDIT Easy Handycam MANUAL SET menu...
Operating Guide
Page 40
... in parentheses appear when the items are marked with B. When a cassette is set the POWER switch to turn on a cassette. LANGUAGE You can view the pictures displayed on the screen of your camcorder on the LCD screen. • Your camcorder offers [ENG[SIMP]] (simplified English) for details on selecting menu items. USB STREAM You can select the language to 1.5 times the SP mode (Long Play). See page 27 for when you touch (Play/Pause).
... in parentheses appear when the items are marked with B. When a cassette is set the POWER switch to turn on a cassette. LANGUAGE You can view the pictures displayed on the screen of your camcorder on the LCD screen. • Your camcorder offers [ENG[SIMP]] (simplified English) for details on selecting menu items. USB STREAM You can select the language to 1.5 times the SP mode (Long Play). See page 27 for when you touch (Play/Pause).

Operating Guide
Page 43
..., data code (date/time/camera settings data) may not be output via an A/V connecting cable, set it to the appropriate input (such as video input1, video input2). 3 Connect your camcorder to the recording device (VCR or DVD/ HDD recorder) with the A/V connecting cable (supplied) 1, an A/V connecting cable with your recording device for playback. Insert the recorded cassette. Connect your camcorder and the recording device. Refer to turn on the screen (p. 32). • The following cannot be displayed or recorded depending on the device or application. 43 Slide the POWER switch...
..., data code (date/time/camera settings data) may not be output via an A/V connecting cable, set it to the appropriate input (such as video input1, video input2). 3 Connect your camcorder to the recording device (VCR or DVD/ HDD recorder) with the A/V connecting cable (supplied) 1, an A/V connecting cable with your recording device for playback. Insert the recorded cassette. Connect your camcorder and the recording device. Refer to turn on the screen (p. 32). • The following cannot be displayed or recorded depending on the device or application. 43 Slide the POWER switch...
Operating Guide
Page 50
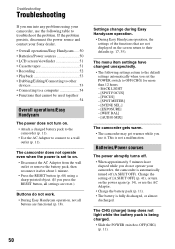
... RESET button (p. 68) using your camcorder, use it. The camcorder does not operate even when the power is not a malfunction. This is set the POWER switch to OFF(CHG) (p. 11). If the problem persists, disconnect the power source and contact your Sony dealer. • Overall operations/Easy Handycam ..... 50 • Batteries/Power sources 50 • LCD screen/viewfinder 51 • Cassette tapes 51 • Recording 52 • Playback 53 • Dubbing/Editing/Connecting to other devices...
... RESET button (p. 68) using your camcorder, use it. The camcorder does not operate even when the power is not a malfunction. This is set the POWER switch to OFF(CHG) (p. 11). If the problem persists, disconnect the power source and contact your Sony dealer. • Overall operations/Easy Handycam ..... 50 • Batteries/Power sources 50 • LCD screen/viewfinder 51 • Cassette tapes 51 • Recording 52 • Playback 53 • Dubbing/Editing/Connecting to other devices...
Operating Guide
Page 53
... the volume (p. 22). • Adjust [AUDIO MIX] until the sound is covered by your camcorder (NTSC). "---" is displayed on the screen. • The tape you are playing was recorded without setting the date and time. • A blank section on the tape is displayed on a tape with 4ch microphone recording. is being played. • The data code on the screen. • The tape you are using an S VIDEO plug, make sure the red and white plugs of the A/V connecting cable are also connected (p. 26). Playback...
... the volume (p. 22). • Adjust [AUDIO MIX] until the sound is covered by your camcorder (NTSC). "---" is displayed on the screen. • The tape you are playing was recorded without setting the date and time. • A blank section on the tape is displayed on a tape with 4ch microphone recording. is being played. • The data code on the screen. • The tape you are using an S VIDEO plug, make sure the red and white plugs of the A/V connecting cable are also connected (p. 26). Playback...
Operating Guide
Page 58
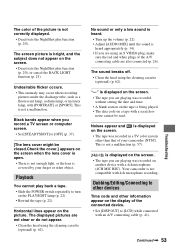
... picture or the sound. Your camcorder does not record copyright control signals on the viewfinder if you begin the next recording in an upright position. Gold-plated connector 58 Use a cassette with the Cassette Memory function. Your camcorder is dirty or dusty, the remaining tape indicator may not show correctly. x When you cannot copy it to a tape in another video camera connected to copyright protection.] appears on the LCD screen...
... picture or the sound. Your camcorder does not record copyright control signals on the viewfinder if you begin the next recording in an upright position. Gold-plated connector 58 Use a cassette with the Cassette Memory function. Your camcorder is dirty or dusty, the remaining tape indicator may not show correctly. x When you cannot copy it to a tape in another video camera connected to copyright protection.] appears on the LCD screen...
Operating Guide
Page 61
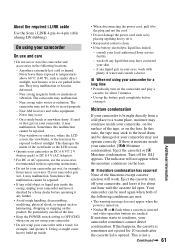
.... Eject the cassette, turn on the camcorder and play a cassette for example, and operate it. Your camcorder can be exposed to condense, your camcorder sometimes cannot detect condensation. About the required i.LINK cable Use the Sony i.LINK 4-pin-to a warm place, moisture may condense inside your camcorder, on the surface of the tape, or on the lens. Near AM receivers and video equipment. consult your camcorder On use...
.... Eject the cassette, turn on the camcorder and play a cassette for example, and operate it. Your camcorder can be exposed to condense, your camcorder sometimes cannot detect condensation. About the required i.LINK cable Use the Sony i.LINK 4-pin-to a warm place, moisture may condense inside your camcorder, on the surface of the tape, or on the lens. Near AM receivers and video equipment. consult your camcorder On use...
Operating Guide
Page 62
... you use . Playback pictures do not appear or the sound breaks off the power, then slide the POWER switch repeatedly to avoid moisture condensation When you bring your camcorder in a hot and humid place. x Note on the screen during the operation. 1 Turn off . - [x Dirty video head. Video head • If the video heads are worn. Playback pictures do not apply the cleaning liquid directly to have the video heads replaced. Please contact your camcorder to clean...
... you use . Playback pictures do not appear or the sound breaks off the power, then slide the POWER switch repeatedly to avoid moisture condensation When you bring your camcorder in a hot and humid place. x Note on the screen during the operation. 1 Turn off . - [x Dirty video head. Video head • If the video heads are worn. Playback pictures do not apply the cleaning liquid directly to have the video heads replaced. Please contact your camcorder to clean...
Operating Guide
Page 72
... 11 AUDIO MIX 34 AUDIO MODE 40 A.SHUT OFF (Auto shut off 41 A/V connecting cable .....26, 42 B BACK LIGHT 21, 52 Battery 11, 59 BEACH 30 BEEP 31 BLACK 31 B&W 36 C CALIBRATION 62 CAM DATA 32 CAMERA SET menu ...........37 Cassette 16, 58 CD-ROM 46 Charging time 12 Cleaning cassette 62 CLOCK SET 14 Computer 46 D D ZOOM (Digital zoom)......37 DATA CODE 32, 71 DATE/TIME 14, 32, 71 DEMO MODE 40 72 DISP GUIDE (Display guide 71 DISP OUT (Display output 41 Display indicators...
... 11 AUDIO MIX 34 AUDIO MODE 40 A.SHUT OFF (Auto shut off 41 A/V connecting cable .....26, 42 B BACK LIGHT 21, 52 Battery 11, 59 BEACH 30 BEEP 31 BLACK 31 B&W 36 C CALIBRATION 62 CAM DATA 32 CAMERA SET menu ...........37 Cassette 16, 58 CD-ROM 46 Charging time 12 Cleaning cassette 62 CLOCK SET 14 Computer 46 D D ZOOM (Digital zoom)......37 DATA CODE 32, 71 DATE/TIME 14, 32, 71 DEMO MODE 40 72 DISP GUIDE (Display guide 71 DISP OUT (Display output 41 Display indicators...


