Network Function/Application Operating Instructions
Page 2
... connection function using the battery pack When the remaining battery power is insufficient for illustration purposes. 2 The DCR-TRV80 is the model used for network operation, use the AC Adaptor or replace the battery pack with "So-net" and "AOL" services. All other product names mentioned herein may be lost when your camcorder was configured for...
... connection function using the battery pack When the remaining battery power is insufficient for illustration purposes. 2 The DCR-TRV80 is the model used for network operation, use the AC Adaptor or replace the battery pack with "So-net" and "AOL" services. All other product names mentioned herein may be lost when your camcorder was configured for...
Network Function/Application Operating Instructions
Page 25
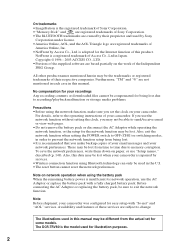
...Bluetooth device. Here we describe how to your camcorder. Preparation for Network Operation your camcorder Modem Adaptor with Bluetooth Function (not supplied) Notes •When using Sony BTA-NW1/BTA-NW1A Modem Adaptor with Bluetooth ...Sony Modem Adaptor with Bluetooth Function. Refer also to communicate with a Bluetooth device, the devices should be interrupted depending on the communication conditions. •When your camcorder is connected to a USB device, your camcorder cannot communicate via a Bluetooth device. •Do not remove the battery pack while your camcorder...
...Bluetooth device. Here we describe how to your camcorder. Preparation for Network Operation your camcorder Modem Adaptor with Bluetooth Function (not supplied) Notes •When using Sony BTA-NW1/BTA-NW1A Modem Adaptor with Bluetooth ...Sony Modem Adaptor with Bluetooth Function. Refer also to communicate with a Bluetooth device, the devices should be interrupted depending on the communication conditions. •When your camcorder is connected to a USB device, your camcorder cannot communicate via a Bluetooth device. •Do not remove the battery pack while your camcorder...
Network Function/Application Operating Instructions
Page 131
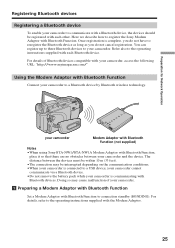
...the registration. Register it again after a while. c Charge the battery pack or use the AC Adaptor, then connect again. c Call Customer Support. 131 When your camcorder needs to your camcorder cannot access the Internet. c When setting network preferences with the ... message "Bluetooth Authentication Error Check the Certified Status" appears and your ID and/or password. The message "Low Battery" appears and your camcorder. Additional Information Troubleshooting Trouble accessing the Internet The message "...Incomplete" or "Authentication Error..." Check the settings. c ...
...the registration. Register it again after a while. c Charge the battery pack or use the AC Adaptor, then connect again. c Call Customer Support. 131 When your camcorder needs to your camcorder cannot access the Internet. c When setting network preferences with the ... message "Bluetooth Authentication Error Check the Certified Status" appears and your ID and/or password. The message "Low Battery" appears and your camcorder. Additional Information Troubleshooting Trouble accessing the Internet The message "...Incomplete" or "Authentication Error..." Check the settings. c ...
Network Function/Application Operating Instructions
Page 136
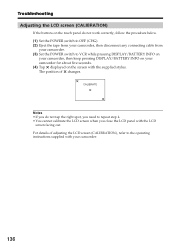
For details of changes. The position of adjusting the LCD screen (CALIBRATION), refer to VCR while pressing DISPLAY/BATTERY INFO on your camcorder, then keep pressing DISPLAY/BATTERY INFO on your camcorder. 136 Troubleshooting Adjusting the LCD screen (CALIBRATION) If the buttons on the screen with the supplied stylus. CALIBRATE Notes •If you do...
For details of changes. The position of adjusting the LCD screen (CALIBRATION), refer to VCR while pressing DISPLAY/BATTERY INFO on your camcorder, then keep pressing DISPLAY/BATTERY INFO on your camcorder. 136 Troubleshooting Adjusting the LCD screen (CALIBRATION) If the buttons on the screen with the supplied stylus. CALIBRATE Notes •If you do...
Network Function/Application Operating Instructions
Page 140
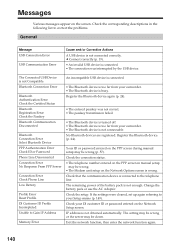
...device is wrong. Your ID or password entered on the PPP screen in the following list to your camcorder. • The Bluetooth device is busy. The remaining power of the battery pack is not connected correctly. Check the corresponding descriptions in manual setup may be wrong. •... USB device is connected. • The Bluetooth device is too far from your Setup memo (p. 149). Change the battery pack or use the AC Adaptor. Check your camcorder. • The Bluetooth device is not connectable. Exit the network function, then enter the network function again. 140 ...
...device is wrong. Your ID or password entered on the PPP screen in the following list to your camcorder. • The Bluetooth device is busy. The remaining power of the battery pack is not connected correctly. Check the corresponding descriptions in manual setup may be wrong. •... USB device is connected. • The Bluetooth device is too far from your Setup memo (p. 149). Change the battery pack or use the AC Adaptor. Check your camcorder. • The Bluetooth device is not connectable. Exit the network function, then enter the network function again. 140 ...
Operating Instructions
Page 2
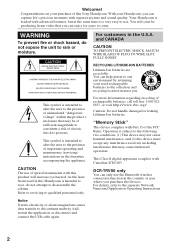
...DCR-TRV80 only You can enjoy for years to discontinue midway (fail), restart the application or disconnect and connect the USB cable again. 2 WARNING To prevent fire or shock hazard, do not attempt to disassemble the cabinet. RECYCLING LITHIUM-ION BATTERIES Lithium-Ion batteries are recyclable. Welcome! With your Handycam...appliance. Your Handycam is loaded with this Sony Handycam. CAUTION The use . As the laser beam used rechargeable batteries to rain or moisture. You can capture life's precious moments with Canadian ICES-003. This Class B digital apparatus complies with...
...DCR-TRV80 only You can enjoy for years to discontinue midway (fail), restart the application or disconnect and connect the USB cable again. 2 WARNING To prevent fire or shock hazard, do not attempt to disassemble the cabinet. RECYCLING LITHIUM-ION BATTERIES Lithium-Ion batteries are recyclable. Welcome! With your Handycam...appliance. Your Handycam is loaded with this Sony Handycam. CAUTION The use . As the laser beam used rechargeable batteries to rain or moisture. You can capture life's precious moments with Canadian ICES-003. This Class B digital apparatus complies with...
Operating Instructions
Page 6
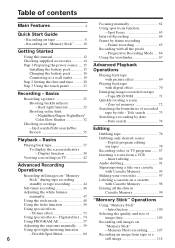
... your own titles 97 Stick" during tape recording Labeling a cassette on a cassette standby or tape recording 44 with digital effect 70 Recording - Progressive Recording Mode .... 66 Using this manual 12 Using the viewfinder 67 Checking supplied accessories 14...battery pack 16 Connecting to a wall outlet 19 Step 2 Setting the date and time ......... 20 Step 3 Using the touch panel 23 Playing back tape with picture effect 69 Playing back tape with Cassette Memory 98 Self-timer recording 46 Erasing all the pixels - Title search 73 Searching a recording by date - Digital...
... your own titles 97 Stick" during tape recording Labeling a cassette on a cassette standby or tape recording 44 with digital effect 70 Recording - Progressive Recording Mode .... 66 Using this manual 12 Using the viewfinder 67 Checking supplied accessories 14...battery pack 16 Connecting to a wall outlet 19 Step 2 Setting the date and time ......... 20 Step 3 Using the touch panel 23 Playing back tape with picture effect 69 Playing back tape with Cassette Memory 98 Self-timer recording 46 Erasing all the pixels - Title search 73 Searching a recording by date - Digital...
Operating Instructions
Page 7
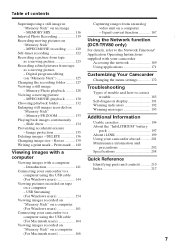
... indicators 192 Warning messages 193 Additional Information Usable cassettes 194 About the "InfoLITHIUM" battery pack 197 About i.LINK 199 Using your camcorder abroad .......... 201 Maintenance information and precautions 202 Specifications 208 computer Viewing images with ...DCR-TRV80 only) For details, refer to a computer using the USB cable (For Windows users 144 Viewing pictures recorded on tape on a computer (For Windows users 161 Connecting your camcorder. MPEG MOVIE recording ......... 120 Self-timer recording 122 Recording a picture from tape as a moving picture - Digital...
... indicators 192 Warning messages 193 Additional Information Usable cassettes 194 About the "InfoLITHIUM" battery pack 197 About i.LINK 199 Using your camcorder abroad .......... 201 Maintenance information and precautions 202 Specifications 208 computer Viewing images with ...DCR-TRV80 only) For details, refer to a computer using the USB cable (For Windows users 144 Viewing pictures recorded on tape on a computer (For Windows users 161 Connecting your camcorder. MPEG MOVIE recording ......... 120 Self-timer recording 122 Recording a picture from tape as a moving picture - Digital...
Operating Instructions
Page 8
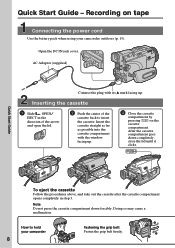
...cassette compartment opens completely in the direction of the arrow and open the lid. 2 Push the center of the cassette back to hold your camcorder outdoors (p. 15). Doing so may cause a malfunction. Recording on the cassette compartment. Open the DC IN jack cover. How to insert the... compartment with its v mark facing up . 3 Close the cassette compartment by pressing on tape Connecting the power cord Use the battery pack when using your camcorder 8 Fastening the grip belt Fasten the grip belt firmly. 2 1 3 4 After the cassette compartment goes down forcibly.
...cassette compartment opens completely in the direction of the arrow and open the lid. 2 Push the center of the cassette back to hold your camcorder outdoors (p. 15). Doing so may cause a malfunction. Recording on the cassette compartment. Open the DC IN jack cover. How to insert the... compartment with its v mark facing up . 3 Close the cassette compartment by pressing on tape Connecting the power cord Use the battery pack when using your camcorder 8 Fastening the grip belt Fasten the grip belt firmly. 2 1 3 4 After the cassette compartment goes down forcibly.
Operating Instructions
Page 9
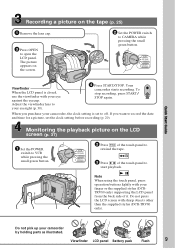
... (DCRTRV80 only) supporting the LCD panel from the back side of the touch panel to CAMERA while pressing the small green button. Your camcorder starts recording. Monitoring the playback picture on the tape (p. 25) 1 Remove the lens cap. 3 Press OPEN to open the LCD panel...Viewfinder LCD panel Battery pack Flash 9 POWER VCR OFF(CHG) CAMERA MEMORY/ NETWORK Viewfinder When the LCD panel is set the clock setting before recording (p. 20). Note When using the touch panel, press operation buttons lightly with sharp objects other than the supplied stylus (DCR-TRV80 only). Adjust...
... (DCRTRV80 only) supporting the LCD panel from the back side of the touch panel to CAMERA while pressing the small green button. Your camcorder starts recording. Monitoring the playback picture on the tape (p. 25) 1 Remove the lens cap. 3 Press OPEN to open the LCD panel...Viewfinder LCD panel Battery pack Flash 9 POWER VCR OFF(CHG) CAMERA MEMORY/ NETWORK Viewfinder When the LCD panel is set the clock setting before recording (p. 20). Note When using the touch panel, press operation buttons lightly with sharp objects other than the supplied stylus (DCR-TRV80 only). Adjust...
Operating Instructions
Page 10
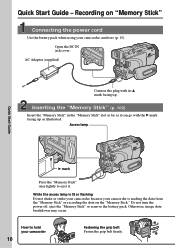
... Start Guide - Recording on the "Memory Stick." Access lamp Quick Start Guide B mark Press the "Memory Stick" once lightly to hold your camcorder 10 Fastening the grip belt Fasten the grip belt firmly. 2 1 3 4 While the access lamp is reading the data from the "Memory Stick..." or recording the data on "Memory Stick" Connecting the power cord Use the battery pack when using your camcorder is lit or flashing Do not shake or strike your camcorder because your camcorder outdoors (p. 15). Inserting the "Memory Stick" (p. 102) Insert the "Memory Stick" in the "...
... Start Guide - Recording on the "Memory Stick." Access lamp Quick Start Guide B mark Press the "Memory Stick" once lightly to hold your camcorder 10 Fastening the grip belt Fasten the grip belt firmly. 2 1 3 4 While the access lamp is reading the data from the "Memory Stick..." or recording the data on "Memory Stick" Connecting the power cord Use the battery pack when using your camcorder is lit or flashing Do not shake or strike your camcorder because your camcorder outdoors (p. 15). Inserting the "Memory Stick" (p. 102) Insert the "Memory Stick" in the "...

Operating Instructions
Page 11
...image on the "Memory Stick" (p. 107) 1 Remove the lens cap (p. 25). 3 Press OPEN to open the LCD panel. Viewfinder LCD panel Battery pack Flash 11 Make sure that the LOCK switch is displayed. When the green q mark stops flashing, then lights up your eye against the eyecup.... Adjust the viewfinder lens to your camcorder, the clock setting is closed, use the viewfinder with your camcorder by holding parts as illustrated. The last recorded image is set the clock setting before recording (p. 20). If...
...image on the "Memory Stick" (p. 107) 1 Remove the lens cap (p. 25). 3 Press OPEN to open the LCD panel. Viewfinder LCD panel Battery pack Flash 11 Make sure that the LOCK switch is displayed. When the green q mark stops flashing, then lights up your eye against the eyecup.... Adjust the viewfinder lens to your camcorder, the clock setting is closed, use the viewfinder with your camcorder by holding parts as illustrated. The last recorded image is set the clock setting before recording (p. 20). If...
Operating Instructions
Page 14
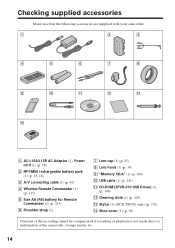
...215) 5 Size AA (R6) battery for Remote Commander (2) (p. 215) 6 Shoulder strap (1) 7 Lens cap (1) (p. 25) 8 Lens hood (1) (p. 30) 9 "Memory Stick" (1) (p. 100) 0 USB cable (1) (p. 141) qa CD-ROM (SPVD-010 USB Driver) (1) (p. 146) qs Cleaning cloth (1) (p. 203) qd Stylus (1) (DCR-TRV80 only) (p. 170) qf Shoe ...cover (1) (p. 92) Contents of the recording cannot be compensated if recording or playback is not made due to a malfunction of the camcorder, storage media, etc. 14
...215) 5 Size AA (R6) battery for Remote Commander (2) (p. 215) 6 Shoulder strap (1) 7 Lens cap (1) (p. 25) 8 Lens hood (1) (p. 30) 9 "Memory Stick" (1) (p. 100) 0 USB cable (1) (p. 141) qa CD-ROM (SPVD-010 USB Driver) (1) (p. 146) qs Cleaning cloth (1) (p. 203) qd Stylus (1) (DCR-TRV80 only) (p. 170) qf Shoe ...cover (1) (p. 92) Contents of the recording cannot be compensated if recording or playback is not made due to a malfunction of the camcorder, storage media, etc. 14

Operating Instructions
Page 15
Getting Started Step 1 Preparing the power source Installing the battery pack (1) Lift up the viewfinder. (2) Slide the battery pack down until it clicks. 1 2 To remove the battery pack (1) Lift up the viewfinder. (2) Slide the battery pack out in the direction of the arrow while pressing BATT down. 1 2 2 BATT release button If you use the large capacity battery pack If you install the NP-FM70/QM71/QM71D/FM91/QM91/QM91D battery pack on your camcorder, extend its viewfinder. 15
Getting Started Step 1 Preparing the power source Installing the battery pack (1) Lift up the viewfinder. (2) Slide the battery pack down until it clicks. 1 2 To remove the battery pack (1) Lift up the viewfinder. (2) Slide the battery pack out in the direction of the arrow while pressing BATT down. 1 2 2 BATT release button If you use the large capacity battery pack If you install the NP-FM70/QM71/QM71D/FM91/QM91/QM91D battery pack on your camcorder, extend its viewfinder. 15

Operating Instructions
Page 16
... DC IN jack with the "InfoLITHIUM" battery pack (M series). See page 197 for your camcorder. 16 Charging begins. To fully charge the battery pack (full charge), leave the battery pack attached for about one hour after charging it for details of "InfoLITHIUM" battery pack. (1) Install the battery pack on your camcorder. Step 1 Preparing the power source Charging...
... DC IN jack with the "InfoLITHIUM" battery pack (M series). See page 197 for your camcorder. 16 Charging begins. To fully charge the battery pack (full charge), leave the battery pack attached for about one hour after charging it for details of "InfoLITHIUM" battery pack. (1) Install the battery pack on your camcorder. Step 1 Preparing the power source Charging...

Operating Instructions
Page 17
... minutes when recording while you use the AC Adaptor Place the AC Adaptor near a wall outlet. Remaining battery time indicator The remaining battery time indicator in the display window. Until your camcorder calculates the actual remaining battery time "---- Getting Started Step 1 Preparing the power source Note Prevent metallic objects from a wall outlet as soon...
... minutes when recording while you use the AC Adaptor Place the AC Adaptor near a wall outlet. Remaining battery time indicator The remaining battery time indicator in the display window. Until your camcorder calculates the actual remaining battery time "---- Getting Started Step 1 Preparing the power source Note Prevent metallic objects from a wall outlet as soon...
Operating Instructions
Page 18
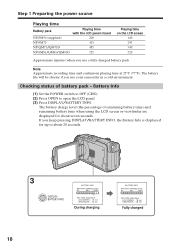
...Fully charged 18 Checking status of remaining battery time) and remaining battery time when using the LCD screen or viewfinder are displayed for up to open the LCD panel. (3) Press DISPLAY/BATTERY INFO. The battery life will be shorter if you use your camcorder in a cold environment. Step 1 ...Preparing the power source Playing time Battery pack Playing time with the LCD panel closed NP-FM50 (supplied) 200...
...Fully charged 18 Checking status of remaining battery time) and remaining battery time when using the LCD screen or viewfinder are displayed for up to open the LCD panel. (3) Press DISPLAY/BATTERY INFO. The battery life will be shorter if you use your camcorder in a cold environment. Step 1 ...Preparing the power source Playing time Battery pack Playing time with the LCD panel closed NP-FM50 (supplied) 200...
Operating Instructions
Page 19
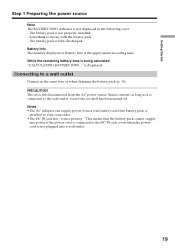
...if the power cord is connected to the DC IN jack, even when the power cord is not displayed in the same way as Battery Info is connected to your camcorder. • The DC IN jack has "source priority." Getting Started Step 1 Preparing the power source Note The... BATTERY INFO indicator is not plugged into a wall outlet. 19 Battery Info The number displayed as when charging the battery pack (p. 16). PRECAUTION The set itself has been turned off. The battery pack ...
...if the power cord is connected to the DC IN jack, even when the power cord is not displayed in the same way as Battery Info is connected to your camcorder. • The DC IN jack has "source priority." Getting Started Step 1 Preparing the power source Note The... BATTERY INFO indicator is not plugged into a wall outlet. 19 Battery Info The number displayed as when charging the battery pack (p. 16). PRECAUTION The set itself has been turned off. The battery pack ...
Operating Instructions
Page 20
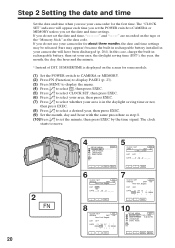
... Press r/R to select CLOCK SET, then press EXEC. (6) Press r/R to select your area, then press EXEC. (7) Press r/R to select whether your camcorder will appear each time you use your camcorder for the first time. r R EXEC 7 CLOCK SET EXIT AREA26 GMT -5.0 New York, Bogota DST OFF DATE RY R M R D R R ...and time settings. If you do not use your camcorder for about three months, the date and time settings may be released (bars may appear) because the built-in rechargeable battery installed in your area is in rechargeable battery, then set your area, the daylight saving time...
... Press r/R to select CLOCK SET, then press EXEC. (6) Press r/R to select your area, then press EXEC. (7) Press r/R to select whether your camcorder will appear each time you use your camcorder for the first time. r R EXEC 7 CLOCK SET EXIT AREA26 GMT -5.0 New York, Bogota DST OFF DATE RY R M R D R R ...and time settings. If you do not use your camcorder for about three months, the date and time settings may be released (bars may appear) because the built-in rechargeable battery installed in your area is in rechargeable battery, then set your area, the daylight saving time...

Operating Instructions
Page 23
... Press OK. The display returns to PAGE1/PAGE2/PAGE3. To make screen indicators disappear Press DISPLAY/BATTERY INFO. 23 To cancel settings Press OFF. Touch the LCD screen directly with your finger or the supplied stylus (DCR-TRV80 only) to operate each function. 3 When the POWER switch is set to CAMERA PAGE1 PAGE2... to use the "Memory Stick." (3) Press FN. Operation buttons on PAGE1 are displayed on the LCD screen. Getting Started Step 3 Using the touch panel Your camcorder has operation buttons on the LCD screen. (5) Press a desired operation item.
... Press OK. The display returns to PAGE1/PAGE2/PAGE3. To make screen indicators disappear Press DISPLAY/BATTERY INFO. 23 To cancel settings Press OFF. Touch the LCD screen directly with your finger or the supplied stylus (DCR-TRV80 only) to operate each function. 3 When the POWER switch is set to CAMERA PAGE1 PAGE2... to use the "Memory Stick." (3) Press FN. Operation buttons on PAGE1 are displayed on the LCD screen. Getting Started Step 3 Using the touch panel Your camcorder has operation buttons on the LCD screen. (5) Press a desired operation item.


