PIXELA ImageMixer 1.0 Manual
Page 6
Direct Draw driver compatible ImageMixer will not be installed. To install and use this software in Windows ® 2000 you must meet the following minimum system requirements. Introduction Chapter 1 Before Use 1-1 System Requirements System Requirements Windows Macintosh Setup Installation Uninstalling Basic Operations Starting ImageMixer ImageMixer startup screen Outline of tasks Selector Bar Status Bar...
Direct Draw driver compatible ImageMixer will not be installed. To install and use this software in Windows ® 2000 you must meet the following minimum system requirements. Introduction Chapter 1 Before Use 1-1 System Requirements System Requirements Windows Macintosh Setup Installation Uninstalling Basic Operations Starting ImageMixer ImageMixer startup screen Outline of tasks Selector Bar Status Bar...
PIXELA ImageMixer 1.0 Manual
Page 40
... Recording Mode Troubleshooting Unable to record sound files (analog recording in Windows). (See section 2-4-2) There may also be a problem with a driver. Confirm that the correct CD drive is selected (Windows only), that the CD currently in the drive is functioning properly. In Windows, right click the speaker icon on the speakers. There may be...
... Recording Mode Troubleshooting Unable to record sound files (analog recording in Windows). (See section 2-4-2) There may also be a problem with a driver. Confirm that the correct CD drive is selected (Windows only), that the CD currently in the drive is functioning properly. In Windows, right click the speaker icon on the speakers. There may be...
PIXELA ImageMixer 1.0 Manual
Page 144
In the menu window, click the desired layout type and click the [OK] layout type can also be displayed when the Layout menu is pre-installed in your machine, select a printer driver that is selected. When the printer driver is not specified, a new layout cannot be created and ...the [Apple] menu. The layout menu dialog box is acquired from the paper size of the layout is displayed. 3. button. In Windows, right-click the printer driver and select [Set As Default]. The In the Layout Environment, the size of the printer. 5-2 Layout Menu Selecting layout type 1. Open...
In the menu window, click the desired layout type and click the [OK] layout type can also be displayed when the Layout menu is pre-installed in your machine, select a printer driver that is selected. When the printer driver is not specified, a new layout cannot be created and ...the [Apple] menu. The layout menu dialog box is acquired from the paper size of the layout is displayed. 3. button. In Windows, right-click the printer driver and select [Set As Default]. The In the Layout Environment, the size of the printer. 5-2 Layout Menu Selecting layout type 1. Open...

Operating Instructions (primary manual)
Page 94
... images on your computer •Installing the USB driver (p. 96) •Installing "PIXELA ImageMixer Ver.1.0 for Sony" (p. 101) Recommended computer environment OS: Microsoft Windows 98SE, Windows Me, Windows 2000 Professional, Windows XP Home Edition or Windows XP Professional (standard installation) However, operation is ...standard. Viewing images recorded on a tape on your computer (Windows users only) If you connect your camcorder and your computer using Windows 98, you capture images recorded on a tape from your camcorder and pictures recorded on a tape on your computer (USB ...
... images on your computer •Installing the USB driver (p. 96) •Installing "PIXELA ImageMixer Ver.1.0 for Sony" (p. 101) Recommended computer environment OS: Microsoft Windows 98SE, Windows Me, Windows 2000 Professional, Windows XP Home Edition or Windows XP Professional (standard installation) However, operation is ...standard. Viewing images recorded on a tape on your computer (Windows users only) If you connect your camcorder and your computer using Windows 98, you capture images recorded on a tape from your camcorder and pictures recorded on a tape on your computer (USB ...
Operating Instructions (primary manual)
Page 96
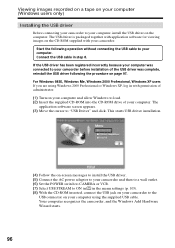
...tape on your computer (Windows users only) Installing the USB driver Before connecting your camcorder to your camcorder. For Windows 98SE, Windows Me, Windows 2000 Professional, Windows XP users If you are using the supplied USB cable. Your computer recognizes the camcorder, and the Windows Add Hardware Wizard starts....CD-ROM inserted, connect the USB jack on your camcorder to your computer using Windows 2000 Professional or Windows XP, log in with your computer, install the USB driver on the computer. The USB driver is packaged together with application software for viewing images ...
...tape on your computer (Windows users only) Installing the USB driver Before connecting your camcorder to your camcorder. For Windows 98SE, Windows Me, Windows 2000 Professional, Windows XP users If you are using the supplied USB cable. Your computer recognizes the camcorder, and the Windows Add Hardware Wizard starts....CD-ROM inserted, connect the USB jack on your camcorder to your computer using Windows 2000 Professional or Windows XP, log in with your computer, install the USB driver on the computer. The USB driver is packaged together with application software for viewing images ...

Operating Instructions (primary manual)
Page 97
... computer, then select "Browse..." If the "Files Needed" screen appears (For Windows 2000 Professional/Windows XP users) (10)Insert the supplied CD-ROM into the CD-ROM drive of the USB driver was connected to your camcorder. 3 Connect the AC power adaptor, and set the POWER switch to CAMERA ...or VCR. 97 Perform the following procedure to "Installing 'PIXELA ImageMixer Ver.1.0 for Sony'"...
... computer, then select "Browse..." If the "Files Needed" screen appears (For Windows 2000 Professional/Windows XP users) (10)Insert the supplied CD-ROM into the CD-ROM drive of the USB driver was connected to your camcorder. 3 Connect the AC power adaptor, and set the POWER switch to CAMERA ...or VCR. 97 Perform the following procedure to "Installing 'PIXELA ImageMixer Ver.1.0 for Sony'"...
Operating Instructions (primary manual)
Page 99
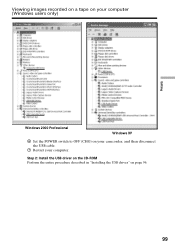
Viewing images recorded on a tape on your computer. Step 2: Install the USB driver on the CD-ROM Perform the entire procedure described in "Installing the USB driver" on your camcorder, and then disconnect the USB cable. 7 Restart your computer (Windows users only) Editing Windows 2000 Professional Windows XP 6 Set the POWER switch to OFF (CHG) on page 96. 99
Viewing images recorded on a tape on your computer. Step 2: Install the USB driver on the CD-ROM Perform the entire procedure described in "Installing the USB driver" on your camcorder, and then disconnect the USB cable. 7 Restart your computer (Windows users only) Editing Windows 2000 Professional Windows XP 6 Set the POWER switch to OFF (CHG) on page 96. 99

Operating Instructions (primary manual)
Page 104
... that are captured into your computer. Carry out the following operations after recovering from the contents. Refer to your camcorder before installation of the USB driver was completed. This is not a malfunction: - The image does not appear properly if the TV color system used....1.0 for Sony" "ImageMixer Ver.1.0 for Sony" is provided with the USB connection, the following the procedure on -line help Click located in the upper-right corner of the "ImageMixer's Manual" screen. Disconnect the USB cable - Viewing images recorded on a tape on your computer (Windows users only...
... that are captured into your computer. Carry out the following operations after recovering from the contents. Refer to your camcorder before installation of the USB driver was completed. This is not a malfunction: - The image does not appear properly if the TV color system used....1.0 for Sony" "ImageMixer Ver.1.0 for Sony" is provided with the USB connection, the following the procedure on -line help Click located in the upper-right corner of the "ImageMixer's Manual" screen. Disconnect the USB cable - Viewing images recorded on a tape on your computer (Windows users only...

Operating Instructions (primary manual)
Page 156
... been registered incorrectly because your computer was connected to your camcorder before installation of your computer. For Windows 98/98SE/Me, Windows 2000 Professional users If you installed the USB driver in step 6. For Windows XP users The USB driver needs not be installed (to load. (2) Insert the supplied CD-ROM into the CD-ROM drive...
... been registered incorrectly because your computer was connected to your camcorder before installation of your computer. For Windows 98/98SE/Me, Windows 2000 Professional users If you installed the USB driver in step 6. For Windows XP users The USB driver needs not be installed (to load. (2) Insert the supplied CD-ROM into the CD-ROM drive...

Operating Instructions (primary manual)
Page 157
... Wizard starts two times because two different USB drivers are installed. This starts USB driver installation. (4) Follow the on the LCD screen of your camcorder before installing the USB driver. 157 USB MODE appears on -screen messages to "USB Driver" and click. Your computer recognizes the camcorder, and the Windows Add Hardware Wizard starts. (7) Follow the on...
... Wizard starts two times because two different USB drivers are installed. This starts USB driver installation. (4) Follow the on the LCD screen of your camcorder before installing the USB driver. 157 USB MODE appears on -screen messages to "USB Driver" and click. Your computer recognizes the camcorder, and the Windows Add Hardware Wizard starts. (7) Follow the on...

Operating Instructions (primary manual)
Page 158
... Manager". 6 Select "Other devices". Ex: (?)Sony Camcorder 7 Turn the POWER switch to your camcorder before installation of the USB driver was completed. Step2: Install the USB driver on the CD-ROM Perform the entire procedure described in "Installing the USB driver" on your computer If you cannot install the ... following procedure to the (USB) jack on your camcorder using the USB cable supplied with the "?" Step1: Uninstall the incorrect USB driver 1 Turn on your computer and allow Windows to load. 2 Insert a "Memory Stick" into your camcorder. 3 Connect the AC power adaptor, and set ...
... Manager". 6 Select "Other devices". Ex: (?)Sony Camcorder 7 Turn the POWER switch to your camcorder before installation of the USB driver was completed. Step2: Install the USB driver on the CD-ROM Perform the entire procedure described in "Installing the USB driver" on your computer If you cannot install the ... following procedure to the (USB) jack on your camcorder using the USB cable supplied with the "?" Step1: Uninstall the incorrect USB driver 1 Turn on your computer and allow Windows to load. 2 Insert a "Memory Stick" into your camcorder. 3 Connect the AC power adaptor, and set ...

Marketing Specifications
Page 2
...DCR-TRV740 ADDITIONAL FEATURES Stamina® Power Management System ➤ Progressive Shutter System ➤ 14-Bit DXP A/D Conversion 12-Bit/16-Bit PCM Digital... Memory Stick® Media, CD-ROM with USB Driver (PIXELA ImageMixer MEMORY MODE Memory Stick Media 8MB 16MB...-VA1 Carrying Case ACC-KITFM50 Handycam Camcorder Starter Kit VCL-0637H Wide...Sony, used only to 30 frames/sec.) Headphone Jack: Yes (Stereo, Mini) Mic-Input: Yes (Stereo) White Balance: Auto Exposure: Yes, Dial (24 Steps) Power Consumption (VF/LCD/VF+LCD): 3.5W /4.3W/4.5W Software OS Compatibility: Microsoft® Windows...
...DCR-TRV740 ADDITIONAL FEATURES Stamina® Power Management System ➤ Progressive Shutter System ➤ 14-Bit DXP A/D Conversion 12-Bit/16-Bit PCM Digital... Memory Stick® Media, CD-ROM with USB Driver (PIXELA ImageMixer MEMORY MODE Memory Stick Media 8MB 16MB...-VA1 Carrying Case ACC-KITFM50 Handycam Camcorder Starter Kit VCL-0637H Wide...Sony, used only to 30 frames/sec.) Headphone Jack: Yes (Stereo, Mini) Mic-Input: Yes (Stereo) White Balance: Auto Exposure: Yes, Dial (24 Steps) Power Consumption (VF/LCD/VF+LCD): 3.5W /4.3W/4.5W Software OS Compatibility: Microsoft® Windows...


