Computer Applications Guide
Page 2
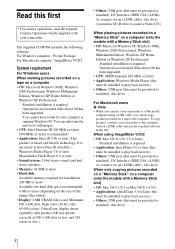
... be provided as standard), DV Interface (IEEE1394, i.LINK) (to connect via an i.LINK cable), disc drive (you need a CD-R drive to create a Video CD.) When playing pictures recorded on a "Memory Stick" on a computer (only the models with an i.LINK cable and use the standard... operations, read the separate Camera Operations Guide supplied with your camcorder to a Macintosh computer using ImageMixer VCD2 • OS: Mac OS X (v10.1.5 or later) Standard installation is required. • Application: QuickTime 4.0 or later (this must be installed to play back movies.) • Others: USB port ...
... be provided as standard), DV Interface (IEEE1394, i.LINK) (to connect via an i.LINK cable), disc drive (you need a CD-R drive to create a Video CD.) When playing pictures recorded on a "Memory Stick" on a computer (only the models with an i.LINK cable and use the standard... operations, read the separate Camera Operations Guide supplied with your camcorder to a Macintosh computer using ImageMixer VCD2 • OS: Mac OS X (v10.1.5 or later) Standard installation is required. • Application: QuickTime 4.0 or later (this must be installed to play back movies.) • Others: USB port ...
Computer Applications Guide
Page 4
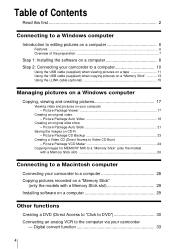
...computer - Digital convert function 33 4 Picture Package Auto Video 18 Creating an original slide show - Picture Package VCD Maker 24 Copying images for MEMORY MIX to a "Memory Stick" (only the models with a Memory Stick slot 26 Connecting to a Macintosh computer Connecting your camcorder to ... Memory Stick slot 29 Installing software on a computer 29 Other functions Creating a DVD (Direct Access to "Click to DVD 30 Connecting an analog VCR to Video CD Burn) - Picture Package CD Backup 23 Creating a Video CD (Direct Access to the computer via your camcorder - Picture Package Viewer...
...computer - Digital convert function 33 4 Picture Package Auto Video 18 Creating an original slide show - Picture Package VCD Maker 24 Copying images for MEMORY MIX to a "Memory Stick" (only the models with a Memory Stick slot 26 Connecting to a Macintosh computer Connecting your camcorder to ... Memory Stick slot 29 Installing software on a computer 29 Other functions Creating a DVD (Direct Access to "Click to DVD 30 Connecting an analog VCR to Video CD Burn) - Picture Package CD Backup 23 Creating a Video CD (Direct Access to the computer via your camcorder - Picture Package Viewer...
Computer Applications Guide
Page 6
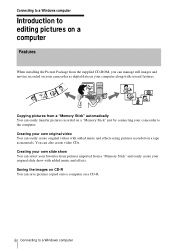
...digital data on your computer along with added music and effects. Saving the images on CD-R You can also create video CDs. You can save pictures copied onto a computer on a CD-R. 6 Connecting to the computer. Connecting to a Windows computer Introduction to editing pictures on a computer Features When installing... the Picture Package from the supplied CD-ROM, you can easily transfer pictures recorded on a "Memory Stick" just by connecting your camcorder to a Windows computer Copying pictures from a "Memory...
...digital data on your computer along with added music and effects. Saving the images on CD-R You can also create video CDs. You can save pictures copied onto a computer on a CD-R. 6 Connecting to the computer. Connecting to a Windows computer Introduction to editing pictures on a computer Features When installing... the Picture Package from the supplied CD-ROM, you can easily transfer pictures recorded on a "Memory Stick" just by connecting your camcorder to a Windows computer Copying pictures from a "Memory...

Computer Applications Guide
Page 7
... with a Handycam Station, place your camcorder on a computer CD-ROM (supplied) Connecting to a Windows computer On your camcorder Step 2: Connecting your camcorder to a Windows computer 7 Connecting to the computer. For models with an i.LINK cable (optional) See "Step 2: Connecting your computer (for details. On your camcorder to a computer" (p. 10) for the first time only) Step 1: Installing the...
... with a Handycam Station, place your camcorder on a computer CD-ROM (supplied) Connecting to a Windows computer On your camcorder Step 2: Connecting your camcorder to a Windows computer 7 Connecting to the computer. For models with an i.LINK cable (optional) See "Step 2: Connecting your computer (for details. On your camcorder to a computer" (p. 10) for the first time only) Step 1: Installing the...

Computer Applications Guide
Page 8
... check [I accept the terms of your computer. The installation is required only for installation, then click [Next]. 5 Click [Next]. Close down all applications running on , you only need to install the software to your computer to have fun with your camcorder and the computer. b Note • Do not... connect the USB cable (supplied) before installing the software. 2 Place the supplied CD-ROM in the disc drive of the license 8 ...
... check [I accept the terms of your computer. The installation is required only for installation, then click [Next]. 5 Click [Next]. Close down all applications running on , you only need to install the software to your computer to have fun with your camcorder and the computer. b Note • Do not... connect the USB cable (supplied) before installing the software. 2 Place the supplied CD-ROM in the disc drive of the license 8 ...
Computer Applications Guide
Page 17
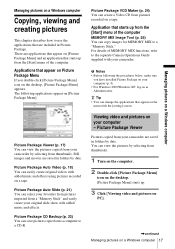
... Package Menu] icon on the desktop, [Picture Package Menu] appears. Picture Package CD Backup (p. 23) You can view the pictures by date. Application that appear on Picture Package Menu If you have installed Picture Package on your computer - Viewing video and pictures on your computer (p. 8).... images and movies are saved in Picture Package. Picture Package VCD Maker (p. 24) You can view the pictures copied from your camcorder. Managing pictures on a Windows computer Copying, viewing and creating pictures This chapter describes how to use the applications that are applications that...
... Package Menu] icon on the desktop, [Picture Package Menu] appears. Picture Package CD Backup (p. 23) You can view the pictures by date. Application that appear on Picture Package Menu If you have installed Picture Package on your computer - Viewing video and pictures on your computer (p. 8).... images and movies are saved in Picture Package. Picture Package VCD Maker (p. 24) You can view the pictures copied from your camcorder. Managing pictures on a Windows computer Copying, viewing and creating pictures This chapter describes how to use the applications that are applications that...
Computer Applications Guide
Page 29
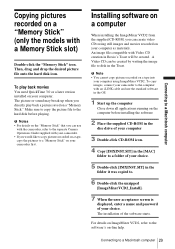
...on a tape into your camcorder first. For details on ImageMixer VCD2, refer to a Macintosh computer 29 b Notes • For details on the "Memory Stick" that you can create video CDs using ImageMixer VCD2. Installing software on a computer When installing the ImageMixer VCD2 from the supplied CD-ROM, you can use...and password of the software starts. Make sure to copy the picture file to the hard disk before installing the software 2 Place the supplied CD-ROM in the disc drive of your computer 3 Double-click CD-ROM icon. 4 Copy [IMXINST.SIT] in the [MAC] folder to a folder of your ...
...on a tape into your camcorder first. For details on ImageMixer VCD2, refer to a Macintosh computer 29 b Notes • For details on the "Memory Stick" that you can create video CDs using ImageMixer VCD2. Installing software on a computer When installing the ImageMixer VCD2 from the supplied CD-ROM, you can use...and password of the software starts. Make sure to copy the picture file to the hard disk before installing the software 2 Place the supplied CD-ROM in the disc drive of your computer 3 Double-click CD-ROM icon. 4 Copy [IMXINST.SIT] in the [MAC] folder to a folder of your ...
Computer Applications Guide
Page 36
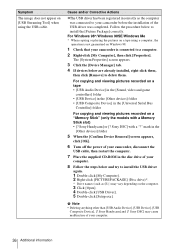
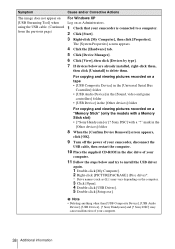
... the [Other devices] folder • [USB Composite Device] in the disc drive of your camcorder, disconnect the USB cable, then restart the computer. 7 Place the supplied CD-ROM in the [Universal Serial Bus Controller] folder For copying and viewing pictures recorded on a...the computer was connected to your camcorder before the installation of your computer. 36 Additional information Cause and/or Corrective Actions cThe USB driver has been registered incorrectly as (E:)) may cause malfunction of the USB driver was completed. Sony Handycam] or [? Sony DSC] with a Memory Stick ...
... the [Other devices] folder • [USB Composite Device] in the disc drive of your camcorder, disconnect the USB cable, then restart the computer. 7 Place the supplied CD-ROM in the [Universal Serial Bus Controller] folder For copying and viewing pictures recorded on a...the computer was connected to your camcorder before the installation of your computer. 36 Additional information Cause and/or Corrective Actions cThe USB driver has been registered incorrectly as (E:)) may cause malfunction of the USB driver was completed. Sony Handycam] or [? Sony DSC] with a Memory Stick ...
Computer Applications Guide
Page 37
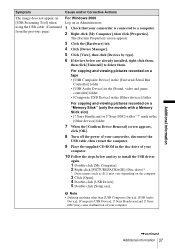
... Sony DSC] with a Memory Stick slot) • [? mark in the [Other devices] folder 7 When the [Confirm Device Removal] screen appears, click [OK]. 8 Turn off the power of your camcorder, disconnect the USB cable, then restart the computer. 9 Place the supplied CD-ROM...already installed, right-click them, then click [Uninstall] to a computer. 2 Right-click [My Computer], then click [Properties]. b Note • Deleting anything other than [USB Composite Device], [USB Audio Device], [Composite USB Device], [? Sony Handycam] and [? Sony DSC] may cause malfunction of your camcorder is...
... Sony DSC] with a Memory Stick slot) • [? mark in the [Other devices] folder 7 When the [Confirm Device Removal] screen appears, click [OK]. 8 Turn off the power of your camcorder, disconnect the USB cable, then restart the computer. 9 Place the supplied CD-ROM...already installed, right-click them, then click [Uninstall] to a computer. 2 Right-click [My Computer], then click [Properties]. b Note • Deleting anything other than [USB Composite Device], [USB Audio Device], [Composite USB Device], [? Sony Handycam] and [? Sony DSC] may cause malfunction of your camcorder is...
Computer Applications Guide
Page 38
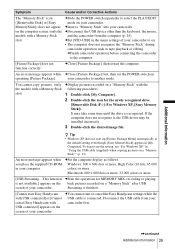
...then click [Devices by type]. 7 If devices below and try to install the USB driver again. 1 Double-click [My Computer]. 2 Right-click [PICTUREPACKAGE] (Disc drive)*. * Drive names (such as Administrators. 1 Check that your camcorder is connected to delete them. b Note • Deleting anything other...of your camcorder, disconnect the USB cable, then restart the computer. 10 Place the supplied CD-ROM in the [Other devices] folder For copying and viewing pictures recorded on a "Memory Stick" (only the models with a "?" Sony DSC] with a Memory Stick slot) • [? Sony Handycam] and ...
...then click [Devices by type]. 7 If devices below and try to install the USB driver again. 1 Double-click [My Computer]. 2 Right-click [PICTUREPACKAGE] (Disc drive)*. * Drive names (such as Administrators. 1 Check that your camcorder is connected to delete them. b Note • Deleting anything other...of your camcorder, disconnect the USB cable, then restart the computer. 10 Place the supplied CD-ROM in the [Other devices] folder For copying and viewing pictures recorded on a "Memory Stick" (only the models with a "?" Sony DSC] with a Memory Stick slot) • [? Sony Handycam] and ...
Computer Applications Guide
Page 39
... An error message appears when you place the supplied CD-ROM in the menu settings of your camcorder. cSet the computer display as tape playback or editing. cYou cannot start Easy Handycam with USB connected] or [Cannot cancel Easy Handycam with USB connected] appears on a "Memory Stick"... Stick" icon ([Removable Disk] or [Sony MemoryStick]) does not appear on the computer screen. (only the models with a Memory Stick slot) cSlide the POWER switch repeatedly to select the PLAY/EDIT mode on operating [Picture Package]. It may be installed incorrectly. 3 Double-click the desired image...
... An error message appears when you place the supplied CD-ROM in the menu settings of your camcorder. cSet the computer display as tape playback or editing. cYou cannot start Easy Handycam with USB connected] or [Cannot cancel Easy Handycam with USB connected] appears on a "Memory Stick"... Stick" icon ([Removable Disk] or [Sony MemoryStick]) does not appear on the computer screen. (only the models with a Memory Stick slot) cSlide the POWER switch repeatedly to select the PLAY/EDIT mode on operating [Picture Package]. It may be installed incorrectly. 3 Double-click the desired image...
Computer Applications Guide
Page 41
... on a "Memory Stick" .... 13, 29 D Digital convert function......33 Direct Access to "Click to DVD 30 Direct Access to Video CD Burn 24 DirectX 9.0b 9 DV Interface 15, 30, 33 DVD 30 H Handycam Station 7, 11, 13, 16, 28 I i.LINK cable 10, 15, 18, 30, 33 ImageMixer VCD2 29 Install 8 M Macintosh 28 MEMORY MIX 26...
... on a "Memory Stick" .... 13, 29 D Digital convert function......33 Direct Access to "Click to DVD 30 Direct Access to Video CD Burn 24 DirectX 9.0b 9 DV Interface 15, 30, 33 DVD 30 H Handycam Station 7, 11, 13, 16, 28 I i.LINK cable 10, 15, 18, 30, 33 ImageMixer VCD2 29 Install 8 M Macintosh 28 MEMORY MIX 26...

Camera Operations Guide
Page 13
... supplied items Make sure you have following items supplied with your camcorder. Wireless Remote Commander (1) A button-type lithium battery is only supplied with DCR-TRV460. Getting started Getting started 13 A/V connecting cable (1) USB cable (1) AC Adaptor (1) Power cord (1) Rechargeable battery pack NP-FM30 (1) CD-ROM "SPVD-012 USB Driver" (1) Cleaning cloth (1) Camera ...(1) See page 127 on how to attach the shoulder strap. The number in parentheses indicates the number of that item supplied. "Memory Stick" 8MB (1) (DCR-TRV361) "Memory Stick" media is already installed.
... supplied items Make sure you have following items supplied with your camcorder. Wireless Remote Commander (1) A button-type lithium battery is only supplied with DCR-TRV460. Getting started Getting started 13 A/V connecting cable (1) USB cable (1) AC Adaptor (1) Power cord (1) Rechargeable battery pack NP-FM30 (1) CD-ROM "SPVD-012 USB Driver" (1) Cleaning cloth (1) Camera ...(1) See page 127 on how to attach the shoulder strap. The number in parentheses indicates the number of that item supplied. "Memory Stick" 8MB (1) (DCR-TRV361) "Memory Stick" media is already installed.


