Network Function/Application Operating Instructions
Page 2
...use "Setup memo," described (p. 149). The illustrations used by Sony Corporation under license. •America Online, AOL, and the ...Ltd. Also, this product. The DCR-TRV80 is adopted for being lost when your camcorder. is the model used in ...this manual may be the trademarks or registered trademarks of Access Co., Ltd in this manual. Furthermore, "TM" and "®" are registered trademarks of the supplied... connection function using the battery pack When the remaining battery power is insufficient for the network function may not be sure ...
...use "Setup memo," described (p. 149). The illustrations used by Sony Corporation under license. •America Online, AOL, and the ...Ltd. Also, this product. The DCR-TRV80 is adopted for being lost when your camcorder. is the model used in ...this manual may be the trademarks or registered trademarks of Access Co., Ltd in this manual. Furthermore, "TM" and "®" are registered trademarks of the supplied... connection function using the battery pack When the remaining battery power is insufficient for the network function may not be sure ...
Network Function/Application Operating Instructions
Page 7
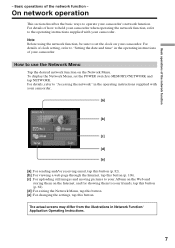
...desired network function on the Internet, and for showing them on the Network Menu. How to operate your camcorder. For details, refer to "Accessing the network" in the operating instructions supplied with your friends, tap this button (p. 68). [d]: For exiting the Network Menu, tap this button.... function. For details of your Album on the Web and storing them to set the POWER switch to the operating instructions supplied with your camcorder. [a] [b] [c] [d] [e] [a]: For sending and/or receiving email, tap this button (p. 82). [b]: For viewing a web page through the Internet, tap ...
...desired network function on the Internet, and for showing them on the Network Menu. How to operate your camcorder. For details, refer to "Accessing the network" in the operating instructions supplied with your friends, tap this button (p. 68). [d]: For exiting the Network Menu, tap this button.... function. For details of your Album on the Web and storing them to set the POWER switch to the operating instructions supplied with your camcorder. [a] [b] [c] [d] [e] [a]: For sending and/or receiving email, tap this button (p. 82). [b]: For viewing a web page through the Internet, tap ...
Network Function/Application Operating Instructions
Page 136
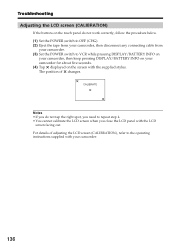
... when you do not work correctly, follow the procedure below. (1) Set the POWER switch to OFF (CHG). (2) Eject the tape from your camcorder, then disconnect any connecting cable from your camcorder. (3) Set the POWER switch to the operating instructions supplied with the supplied stylus. CALIBRATE Notes •If you close the LCD panel with the LCD...
... when you do not work correctly, follow the procedure below. (1) Set the POWER switch to OFF (CHG). (2) Eject the tape from your camcorder, then disconnect any connecting cable from your camcorder. (3) Set the POWER switch to the operating instructions supplied with the supplied stylus. CALIBRATE Notes •If you close the LCD panel with the LCD...
Operating Instructions (primary manual)
Page 5
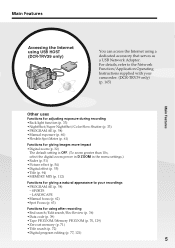
...Application Operating Instructions supplied with your recordings •PROGRAM AE (p. 58) - SPORTS - LANDSCAPE •Manual focus (p. 62) •Spot Focus (p. 63) Functions for giving a natural appearance to your camcorder. (DCR-TRV39 only) (p. ...digital zoom power in D ZOOM in the menu settings.) •Fader (p. 51) •Picture effect (p. 54) •Digital effect (p. 55) •Title (p. 94) •MEMORY MIX (p. 112) Functions for using a dedicated accessory that serves as a USB Network Adaptor. Main Features Getting Started Accessing the Internet using USB HOST (DCR-TRV39...
...Application Operating Instructions supplied with your recordings •PROGRAM AE (p. 58) - SPORTS - LANDSCAPE •Manual focus (p. 62) •Spot Focus (p. 63) Functions for giving a natural appearance to your camcorder. (DCR-TRV39 only) (p. ...digital zoom power in D ZOOM in the menu settings.) •Fader (p. 51) •Picture effect (p. 54) •Digital effect (p. 55) •Title (p. 94) •MEMORY MIX (p. 112) Functions for using a dedicated accessory that serves as a USB Network Adaptor. Main Features Getting Started Accessing the Internet using USB HOST (DCR-TRV39...

Operating Instructions (primary manual)
Page 6
Frame recording 65 Getting Started Using the viewfinder 66 Using this manual 12 Advanced Playback Checking supplied accessories 14 Step 1 Preparing the power source ..... 15 Installing the battery pack 15 Charging the battery pack 16 Connecting to a wall outlet 20 ...cassette Advanced Recording Operations Recording still images on "Memory with Cassette Memory 94 Making your own titles 96 Labeling a cassette on a cassette with digital effect 69 Enlarging images recorded on tape - Memory Photo recording ......... 106 Recording an image from a VCR - Recording on tape 8 - ...
Frame recording 65 Getting Started Using the viewfinder 66 Using this manual 12 Advanced Playback Checking supplied accessories 14 Step 1 Preparing the power source ..... 15 Installing the battery pack 15 Charging the battery pack 16 Connecting to a wall outlet 20 ...cassette Advanced Recording Operations Recording still images on "Memory with Cassette Memory 94 Making your own titles 96 Labeling a cassette on a cassette with digital effect 69 Enlarging images recorded on tape - Memory Photo recording ......... 106 Recording an image from a VCR - Recording on tape 8 - ...

Operating Instructions (primary manual)
Page 8
... into the cassette compartment with its v mark facing up . 3 Close the cassette compartment by pressing on tape Connecting the power cord Use the battery pack when using your camcorder 8 Fastening the grip belt Fasten the grip belt firmly. 2 1 3 4 Recording on the cassette compartment. Doing so may...completely in the direction of the arrow and open the lid. 2 Push the center of the cassette back to hold your camcorder outdoors (p. 15). AC Adaptor (supplied) Connect the plug with the window facing up . Inserting the cassette 1 Slide OPEN/ EJECT in step 3. Note Do ...
... into the cassette compartment with its v mark facing up . 3 Close the cassette compartment by pressing on tape Connecting the power cord Use the battery pack when using your camcorder 8 Fastening the grip belt Fasten the grip belt firmly. 2 1 3 4 Recording on the cassette compartment. Doing so may...completely in the direction of the arrow and open the lid. 2 Push the center of the cassette back to hold your camcorder outdoors (p. 15). AC Adaptor (supplied) Connect the plug with the window facing up . Inserting the cassette 1 Slide OPEN/ EJECT in step 3. Note Do ...

Operating Instructions (primary manual)
Page 9
... the touch panel, press operation buttons lightly with your eye against the eyecup. The picture appears on the screen. 2 Set the POWER switch to start playback. Your camcorder starts recording. POWER VCR OFF(CHG) CAMERA MEMORY/ NETWORK 2 Press of the touch panel to rewind the tape. 3 Press of it. Viewfinder LCD...and time for a picture, set to VCR while pressing the small green button. Monitoring the playback picture on the LCD screen (p. 38) 1 Set the POWER switch to off. Do not press the LCD screen with sharp objects other than the supplied stylus (DCR-TRV39 only).
... the touch panel, press operation buttons lightly with your eye against the eyecup. The picture appears on the screen. 2 Set the POWER switch to start playback. Your camcorder starts recording. POWER VCR OFF(CHG) CAMERA MEMORY/ NETWORK 2 Press of the touch panel to rewind the tape. 3 Press of it. Viewfinder LCD...and time for a picture, set to VCR while pressing the small green button. Monitoring the playback picture on the LCD screen (p. 38) 1 Set the POWER switch to off. Do not press the LCD screen with sharp objects other than the supplied stylus (DCR-TRV39 only).

Operating Instructions (primary manual)
Page 10
..." or recording the data on "Memory Stick" Connecting the power cord Use the battery pack when using your camcorder 10 Fastening the grip belt Fasten the grip belt firmly. 2 1 3 4 Recording on the "Memory Stick." AC Adaptor (supplied) Connect the plug with the B mark facing up . ...Access lamp Quick Start Guide B mark Press the "Memory Stick" once lightly to hold your camcorder outdoors (p. 15). Quick Start Guide - How to eject it can go with...
..." or recording the data on "Memory Stick" Connecting the power cord Use the battery pack when using your camcorder 10 Fastening the grip belt Fasten the grip belt firmly. 2 1 3 4 Recording on the "Memory Stick." AC Adaptor (supplied) Connect the plug with the B mark facing up . ...Access lamp Quick Start Guide B mark Press the "Memory Stick" once lightly to hold your camcorder outdoors (p. 15). Quick Start Guide - How to eject it can go with...
Operating Instructions (primary manual)
Page 14
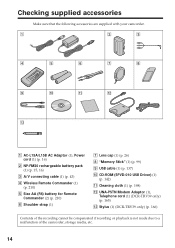
qa qs qd 1 AC-L15A/L15B AC Adaptor (1), Power cord (1) (p. 16) 2 NP-FM30 rechargeable battery pack (1) (p. 15, 16) 3 A/V connecting cable (1) (p. 43) 4 Wireless Remote Commander (1) (p. 210) 5 Size AA (R6) battery for Remote Commander... cloth (1) (p. 198) qs UNA-PSTN Modem Adaptor (1), Telephone cord (1) (DCR-TRV39 only) (p. 165) qd Stylus (1) (DCR-TRV39 only) (p. 166) Contents of the recording cannot be compensated if recording or playback is not made due to a malfunction of the camcorder, storage media, etc. 14 Checking supplied accessories Make sure that the following accessories are...
qa qs qd 1 AC-L15A/L15B AC Adaptor (1), Power cord (1) (p. 16) 2 NP-FM30 rechargeable battery pack (1) (p. 15, 16) 3 A/V connecting cable (1) (p. 43) 4 Wireless Remote Commander (1) (p. 210) 5 Size AA (R6) battery for Remote Commander... cloth (1) (p. 198) qs UNA-PSTN Modem Adaptor (1), Telephone cord (1) (DCR-TRV39 only) (p. 165) qd Stylus (1) (DCR-TRV39 only) (p. 166) Contents of the recording cannot be compensated if recording or playback is not made due to a malfunction of the camcorder, storage media, etc. 14 Checking supplied accessories Make sure that the following accessories are...

Operating Instructions (primary manual)
Page 16
... NETWORK After charging the battery pack Disconnect the AC Adaptor from the DC IN jack on your camcorder. (2) Connect the AC Adaptor supplied with your camcorder. 16 Step 1 Preparing the power source Charging the battery pack Use the battery pack after normal charge is complete until the FULL ...indicator appears in the display window. See page 192 for your camcorder. Fully charging the battery pack allows ...
... NETWORK After charging the battery pack Disconnect the AC Adaptor from the DC IN jack on your camcorder. (2) Connect the AC Adaptor supplied with your camcorder. 16 Step 1 Preparing the power source Charging the battery pack Use the battery pack after normal charge is complete until the FULL ...indicator appears in the display window. See page 192 for your camcorder. Fully charging the battery pack allows ...

Operating Instructions (primary manual)
Page 17
... when you use the AC Adaptor Place the AC Adaptor near a wall outlet. Recording time DCR-TRV38 Battery pack Recording with the viewfinder Continuous Typical* NP-FM30 (supplied) 95 55 NP-FM50 155 90 NP-FM70 320 185 NP-QM71/QM71D 375 220 NP-... cause a short-circuit, damaging the AC Adaptor. Until your camcorder calculates the actual remaining battery time "---- When you repeat recording start/ stop, zooming and turning the power on/off the power. Getting Started Step 1 Preparing the power source Note Prevent metallic objects from a wall outlet as soon...
... when you use the AC Adaptor Place the AC Adaptor near a wall outlet. Recording time DCR-TRV38 Battery pack Recording with the viewfinder Continuous Typical* NP-FM30 (supplied) 95 55 NP-FM50 155 90 NP-FM70 320 185 NP-QM71/QM71D 375 220 NP-... cause a short-circuit, damaging the AC Adaptor. Until your camcorder calculates the actual remaining battery time "---- When you repeat recording start/ stop, zooming and turning the power on/off the power. Getting Started Step 1 Preparing the power source Note Prevent metallic objects from a wall outlet as soon...

Operating Instructions (primary manual)
Page 18
... use a fully charged battery pack * Approximate number of minutes when recording while you repeat recording start/ stop, zooming and turning the power on the LCD screen 90 145 305 355 535 Approximate minutes when you use a fully charged battery pack Note Approximate recording time and ... be shorter. The actual battery life may be shorter if you use your camcorder in a cold environment. 18 Step 1 Preparing the power source DCR-TRV39 Battery pack Recording with the viewfinder Continuous Typical* NP-FM30 (supplied) 90 50 NP-FM50 150 85 NP-FM70 310 180 NP-QM71/QM71D ...
... use a fully charged battery pack * Approximate number of minutes when recording while you repeat recording start/ stop, zooming and turning the power on the LCD screen 90 145 305 355 535 Approximate minutes when you use a fully charged battery pack Note Approximate recording time and ... be shorter. The actual battery life may be shorter if you use your camcorder in a cold environment. 18 Step 1 Preparing the power source DCR-TRV39 Battery pack Recording with the viewfinder Continuous Typical* NP-FM30 (supplied) 90 50 NP-FM50 150 85 NP-FM70 310 180 NP-QM71/QM71D ...

Operating Instructions (primary manual)
Page 20
...charging the battery pack (p. 16). Step 1 Preparing the power source Connecting to a wall outlet Connect in the same way as it is connected to your camcorder. •The DC IN jack has "source priority." This means that the battery pack cannot supply any power if the power cord is connected to the DC IN jack..., even when the power cord is attached to the wall outlet, even if the...
...charging the battery pack (p. 16). Step 1 Preparing the power source Connecting to a wall outlet Connect in the same way as it is connected to your camcorder. •The DC IN jack has "source priority." This means that the battery pack cannot supply any power if the power cord is connected to the DC IN jack..., even when the power cord is attached to the wall outlet, even if the...

Operating Instructions (primary manual)
Page 24
...To make screen indicators disappear Press DISPLAY/BATTERY INFO. 24 Touch the LCD screen directly with your finger or the supplied stylus (DCR-TRV39 only) to operate each function. 3 When the POWER switch is set to CAMERA PAGE1 PAGE2 PAGE3 EXIT SPOT FOCUS SPOT METER MENU FADER END EXPOSCH SURE 1 To return... buttons on PAGE1 are displayed on the LCD screen. The display returns to PAGE1/PAGE2/PAGE3. Step 3 Using the touch panel Your camcorder has operation buttons on the LCD screen. (5) Press a desired operation item. To cancel settings Press OFF. To execute settings Press OK.
...To make screen indicators disappear Press DISPLAY/BATTERY INFO. 24 Touch the LCD screen directly with your finger or the supplied stylus (DCR-TRV39 only) to operate each function. 3 When the POWER switch is set to CAMERA PAGE1 PAGE2 PAGE3 EXIT SPOT FOCUS SPOT METER MENU FADER END EXPOSCH SURE 1 To return... buttons on PAGE1 are displayed on the LCD screen. The display returns to PAGE1/PAGE2/PAGE3. Step 3 Using the touch panel Your camcorder has operation buttons on the LCD screen. (5) Press a desired operation item. To cancel settings Press OFF. To execute settings Press OK.

Operating Instructions (primary manual)
Page 25
... MENU, LCD BRT, VOL, END SCH PB ZOOM, DIG EFFT, DATA CODE V SPD PLAY, A DUB CTRL, REC CTRL When the POWER switch is not on your finger or the supplied stylus (DCR-TRV39 only) supporting the LCD panel from the back side of the items changes to MEMORY During memory camera PAGE1 PAGE2 PAGE3... with DISPLAY/BATTERY INFO on the LCD screen, touch the LCD screen lightly to make it . •Do not press the LCD screen with your camcorder. You can operate with the touch panel using the touch panel, press operation buttons lightly with sharp objects other than the...
... MENU, LCD BRT, VOL, END SCH PB ZOOM, DIG EFFT, DATA CODE V SPD PLAY, A DUB CTRL, REC CTRL When the POWER switch is not on your finger or the supplied stylus (DCR-TRV39 only) supporting the LCD panel from the back side of the items changes to MEMORY During memory camera PAGE1 PAGE2 PAGE3... with DISPLAY/BATTERY INFO on the LCD screen, touch the LCD screen lightly to make it . •Do not press the LCD screen with your camcorder. You can operate with the touch panel using the touch panel, press operation buttons lightly with sharp objects other than the...

Operating Instructions (primary manual)
Page 38
... close the LCD panel, you can monitor the recorded tape on the LCD screen. You can also control playback using the Remote Commander supplied with your camcorder. (1) Set the POWER switch to VCR while pressing the small green button. (2) Press OPEN to open the LCD panel. (3) Press to rewind the tape. (4) Press to...
... close the LCD panel, you can monitor the recorded tape on the LCD screen. You can also control playback using the Remote Commander supplied with your camcorder. (1) Set the POWER switch to VCR while pressing the small green button. (2) Press OPEN to open the LCD panel. (3) Press to rewind the tape. (4) Press to...

Operating Instructions (primary manual)
Page 39
...playback, press again. Display function Press DISPLAY/BATTERY INFO on your camcorder or DISPLAY on the Remote Commander again. To make the indicators appear, press DISPLAY/BATTERY INFO or DISPLAY on the Remote Commander supplied with the POWER switch set to FN Press EXIT. To view a still image... (playback pause) Press during playback stop . DATA CODE DISPLAY DISPLAY/ BATTERY INFO Note Even if you leave the power on the Remote Commander with your camcorder. To display the ...
...playback, press again. Display function Press DISPLAY/BATTERY INFO on your camcorder or DISPLAY on the Remote Commander again. To make the indicators appear, press DISPLAY/BATTERY INFO or DISPLAY on the Remote Commander supplied with the POWER switch set to FN Press EXIT. To view a still image... (playback pause) Press during playback stop . DATA CODE DISPLAY DISPLAY/ BATTERY INFO Note Even if you leave the power on the Remote Commander with your camcorder. To display the ...

Operating Instructions (primary manual)
Page 43
Set the input selector on the VCR or the TV. If you power your camcorder to the audio input jack on the VCR to a TV with the A/V connecting cable supplied with your TV is R (right) signal. 43 When viewing the playback picture on the TV screen, we recommend that you connect the white... the TV with your TV or VCR is L (left) signal. S VIDEO AUDIO/ VIDEO IN Yellow S VIDEO TV : Signal flow A/V connecting cable (supplied) Red White VIDEO AUDIO If your camcorder to view images from a wall outlet using the AC Adaptor. Then set the TV/VCR selector on the TV to VCR to...
Set the input selector on the VCR or the TV. If you power your camcorder to the audio input jack on the VCR to a TV with the A/V connecting cable supplied with your TV is R (right) signal. 43 When viewing the playback picture on the TV screen, we recommend that you connect the white... the TV with your TV or VCR is L (left) signal. S VIDEO AUDIO/ VIDEO IN Yellow S VIDEO TV : Signal flow A/V connecting cable (supplied) Red White VIDEO AUDIO If your camcorder to view images from a wall outlet using the AC Adaptor. Then set the TV/VCR selector on the TV to VCR to...

Operating Instructions (primary manual)
Page 113
... Press a desired mode. MEMORY MIX The "Memory Stick" supplied with still images into your camcorder. •Insert the tape for moving picture M. CHROM: 18 images (such as a background) 101-0019 to start recording. 113 M. CHROM - OVERLAP* - The POWER switch should be set to CAMERA. (6) Press EXIT to ...C. Image data modified on the LCD screen is to be able to the tape Before operation •Insert the "Memory Stick" recorded with your camcorder are protected (p. 131). The color (blue) scheme of the picture may not be clear. •In the mirror mode (p. 30), the ...
... Press a desired mode. MEMORY MIX The "Memory Stick" supplied with still images into your camcorder. •Insert the tape for moving picture M. CHROM: 18 images (such as a background) 101-0019 to start recording. 113 M. CHROM - OVERLAP* - The POWER switch should be set to CAMERA. (6) Press EXIT to ...C. Image data modified on the LCD screen is to be able to the tape Before operation •Insert the "Memory Stick" recorded with your camcorder are protected (p. 131). The color (blue) scheme of the picture may not be clear. •In the mirror mode (p. 30), the ...

Operating Instructions (primary manual)
Page 208
... for fixing the installed accessory securely. Stylus holder (DCR-TRV39 only) (p. 166) ea Stylus (DCR-TRV39 only) (p. 166) eg es EDITSEARCH button (p. 36) ed Intelligent accessory shoe (p. 91) ef NIGHTSHOT switch (p. 33) eg Grip belt Notes on the intelligent accessory shoe •The intelligent accessory shoe supplies power to optional accessories such as a video light or...
... for fixing the installed accessory securely. Stylus holder (DCR-TRV39 only) (p. 166) ea Stylus (DCR-TRV39 only) (p. 166) eg es EDITSEARCH button (p. 36) ed Intelligent accessory shoe (p. 91) ef NIGHTSHOT switch (p. 33) eg Grip belt Notes on the intelligent accessory shoe •The intelligent accessory shoe supplies power to optional accessories such as a video light or...


