Insert: Getting Online with your Camera
Page 2
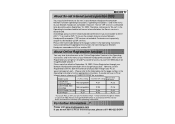
... for the page number in the Operating Instructions manual containing the appropriate instructions for connecting your Network Handycam camcorder to AOL or another ISP (*2) to use AOL as ISP, you do not have a PC or Internet access, please call 1-800-222-SONY -2- model name Registration (*1)AOL setting (*2)Other ISP setting procedure DCR-IP7BT DCR-PC120BT DCR-TRV50, 950 DCR-IP55 Not compatible Not compatible P.37 P.39 P.23 P.28 DCR-TRV80, 70...
... for the page number in the Operating Instructions manual containing the appropriate instructions for connecting your Network Handycam camcorder to AOL or another ISP (*2) to use AOL as ISP, you do not have a PC or Internet access, please call 1-800-222-SONY -2- model name Registration (*1)AOL setting (*2)Other ISP setting procedure DCR-IP7BT DCR-PC120BT DCR-TRV50, 950 DCR-IP55 Not compatible Not compatible P.37 P.39 P.23 P.28 DCR-TRV80, 70...
Network Function/Application Operating Instructions
Page 2
... replace the battery pack with "So-net" and "AOL" services. The illustrations used in the U.S. •The reset button cannot reset the network preferences. is adopted for your camcorder is insufficient for easy setup with a fully charged battery pack. Furthermore, "TM" and "®" are subject to recording/playback malfunction or storage media problems. Precautions •Before using the battery pack When the remaining battery power is repaired by services. •Wireless connection function using...
... replace the battery pack with "So-net" and "AOL" services. The illustrations used in the U.S. •The reset button cannot reset the network preferences. is adopted for your camcorder is insufficient for easy setup with a fully charged battery pack. Furthermore, "TM" and "®" are subject to recording/playback malfunction or storage media problems. Precautions •Before using the battery pack When the remaining battery power is repaired by services. •Wireless connection function using...
Network Function/Application Operating Instructions
Page 34
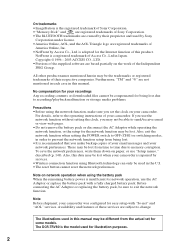
... your camcorder needs to connect with your operating instructions. When the menu bar is complete, a DI customer ID and password will appear on the Web, be sure to read "Online Privacy Policy" (p. 151) and "ImageStation Membership Agreement" (p. 156). The menu bar appears. (7) Tap END . 34 For details of the LCD screen. Customer registration Notes •When registering, you will need the registration code...
... your camcorder needs to connect with your operating instructions. When the menu bar is complete, a DI customer ID and password will appear on the Web, be sure to read "Online Privacy Policy" (p. 151) and "ImageStation Membership Agreement" (p. 156). The menu bar appears. (7) Tap END . 34 For details of the LCD screen. Customer registration Notes •When registering, you will need the registration code...
Network Function/Application Operating Instructions
Page 36
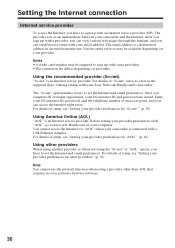
... Enter your DI customer ID, password, and the telephone number of setup, see "Setting your computer. Note You cannot use the network function when using the "So-net" or "AOL" option, you have to the supplied flyer "Getting Online with your DI customer ID and password are issued. Setting the Internet connection Internet service provider To access the Internet, you have to sign...
... Enter your DI customer ID, password, and the telephone number of setup, see "Setting your computer. Note You cannot use the network function when using the "So-net" or "AOL" option, you have to the supplied flyer "Getting Online with your DI customer ID and password are issued. Setting the Internet connection Internet service provider To access the Internet, you have to sign...
Network Function/Application Operating Instructions
Page 122
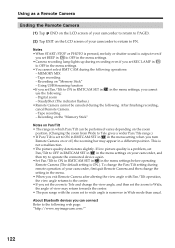
...;When START/STOP or PHOTO is pressed, melody or shutter sound is ON.). MEMORY MIX - Tape recording - Recording on the LCD screen of your camcorder to return to FN. If low picture quality is a problem, set REC LAMP in to OFF in the menu settings before operating Remote Camera (The default setting is output even if you set BEEP in to OFF in the menu settings. •Camera recording lamp lights up during recording even if you set Pan/Tilt...
...;When START/STOP or PHOTO is pressed, melody or shutter sound is ON.). MEMORY MIX - Tape recording - Recording on the LCD screen of your camcorder to return to FN. If low picture quality is a problem, set REC LAMP in to OFF in the menu settings before operating Remote Camera (The default setting is output even if you set BEEP in to OFF in the menu settings. •Camera recording lamp lights up during recording even if you set Pan/Tilt...
PIXELA ImageMixer v1.5 Instruction Manual
Page 232
... DV (digital video) form, MPEG has the feature of prolonging recording time while maintaining a smaller file size and is a general Video/TV format used for playing slideshow. It can be played using any DVD player. You can create slideshow form of a video disc. Slideshow: Like a slide, it is the International Standard for recording images and sounds on the remote control of the playing device. The audio format is 24 or 29.97 frames. Setting up menu composition...
... DV (digital video) form, MPEG has the feature of prolonging recording time while maintaining a smaller file size and is a general Video/TV format used for playing slideshow. It can be played using any DVD player. You can create slideshow form of a video disc. Slideshow: Like a slide, it is the International Standard for recording images and sounds on the remote control of the playing device. The audio format is 24 or 29.97 frames. Setting up menu composition...

Operating Instructions (primary manual)
Page 40
... screen. 40 During tape recording standby, the various settings will not be displayed. When you connect your camcorder's recording information at the time of the tape is unreadable due to VCR, then play back the tape. (2) During playback, press FN and select PAGE2. (3) Press DATA CODE. (4) Select CAM DATA or DATE DATA, then press OK. (5) Press EXIT. The tape was recorded by a camcorder without the date and time set. Data code When you use data code, bars (-- -- --) appear if: - Playing back tape About date/time...
... screen. 40 During tape recording standby, the various settings will not be displayed. When you connect your camcorder's recording information at the time of the tape is unreadable due to VCR, then play back the tape. (2) During playback, press FN and select PAGE2. (3) Press DATA CODE. (4) Select CAM DATA or DATE DATA, then press OK. (5) Press EXIT. The tape was recorded by a camcorder without the date and time set. Data code When you use data code, bars (-- -- --) appear if: - Playing back tape About date/time...

Operating Instructions (primary manual)
Page 83
... part of the first scene you want to insert using the video control buttons on tape) Operation 1: Making a Program The POWER switch should be set to insert using the video control buttons on the screen. You can fine-adjust one frame at a time with / . (9) Press MARK OUT on the screen. You can fine-adjust one program is set 20 programs in maximum. 4 OTHERS DATA CODE BEEP COMMANDER D I SPLAY V I DEO ED I T EXIT RETURN TAPE MEMORY...
... part of the first scene you want to insert using the video control buttons on tape) Operation 1: Making a Program The POWER switch should be set to insert using the video control buttons on the screen. You can fine-adjust one frame at a time with / . (9) Press MARK OUT on the screen. You can fine-adjust one program is set 20 programs in maximum. 4 OTHERS DATA CODE BEEP COMMANDER D I SPLAY V I DEO ED I T EXIT RETURN TAPE MEMORY...

Operating Instructions (primary manual)
Page 119
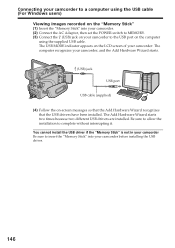
... picture on the "Memory Stick" are recorded. Various settings are recorded up to start recording from. (3) Press START/STOP. Recording a picture from tape as a moving picture Your camcorder can read moving picture data recorded on a tape and record it is recorded on the "Memory Stick." Operate by your camcorder. The picture recorded on an external device (p. 120). See page 105 for five seconds after pressing START/STOP. Connect the A/V connecting cable to input images played back on the tape is played back. (2) Press again to pause playback at...
... picture on the "Memory Stick" are recorded. Various settings are recorded up to start recording from. (3) Press START/STOP. Recording a picture from tape as a moving picture Your camcorder can read moving picture data recorded on a tape and record it is recorded on the "Memory Stick." Operate by your camcorder. The picture recorded on an external device (p. 120). See page 105 for five seconds after pressing START/STOP. Connect the A/V connecting cable to input images played back on the tape is played back. (2) Press again to pause playback at...

Operating Instructions (primary manual)
Page 142
... CD-ROM in the CD-ROM drive of the computer. Notes •If you are using Windows XP, log in with permission of computer administrators. (1) Turn on a computer and allow Windows to install the USB driver. (6) Remove the CD-ROM, then restart the computer and follow the on -screen messages. •The title screen is not displayed if the screen size of administrators. Connecting your camcorder." If you are using Windows 2000...
... CD-ROM in the CD-ROM drive of the computer. Notes •If you are using Windows XP, log in with permission of computer administrators. (1) Turn on a computer and allow Windows to install the USB driver. (6) Remove the CD-ROM, then restart the computer and follow the on -screen messages. •The title screen is not displayed if the screen size of administrators. Connecting your camcorder." If you are using Windows 2000...
Operating Instructions (primary manual)
Page 146
... different USB drivers are installed. You cannot install the USB driver if the "Memory Stick" is not in your camcorder Be sure to insert the "Memory Stick" into your camcorder. (2) Connect the AC Adaptor, then set the POWER switch to MEMORY. (3) Connect the (USB) jack on your camcorder to the USB port on -screen messages so that the Add Hardware Wizard recognizes that the USB drivers have been installed. Connecting your camcorder to a computer using the supplied USB cable. The USB MODE indicator...
... different USB drivers are installed. You cannot install the USB driver if the "Memory Stick" is not in your camcorder Be sure to insert the "Memory Stick" into your camcorder. (2) Connect the AC Adaptor, then set the POWER switch to MEMORY. (3) Connect the (USB) jack on your camcorder to the USB port on -screen messages so that the Add Hardware Wizard recognizes that the USB drivers have been installed. Connecting your camcorder to a computer using the supplied USB cable. The USB MODE indicator...
Operating Instructions (primary manual)
Page 147
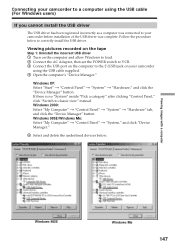
... classic view" instead. Viewing pictures recorded on the tape Step 1: Uninstall the incorrect USB driver 1 Turn on the computer and allow Windows to load. 2 Connect the AC Adaptor, then set the POWER switch to VCR. 3 Connect the USB port on the computer to the (USB) jack on your camcorder before installation of the USB driver was complete. Windows 98SE/Windows Me: Select "My Computer" t "Control Panel" t "System," and click "Device Manager." 5 Select and delete the underlined devices...
... classic view" instead. Viewing pictures recorded on the tape Step 1: Uninstall the incorrect USB driver 1 Turn on the computer and allow Windows to load. 2 Connect the AC Adaptor, then set the POWER switch to VCR. 3 Connect the USB port on the computer to the (USB) jack on your camcorder before installation of the USB driver was complete. Windows 98SE/Windows Me: Select "My Computer" t "Control Panel" t "System," and click "Device Manager." 5 Select and delete the underlined devices...
Operating Instructions (primary manual)
Page 149
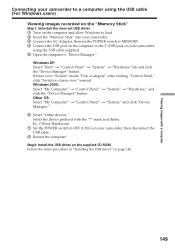
... Connecting your camcorder to a computer using the USB cable (For Windows users) Viewing images recorded on the "Memory Stick" Step1: Uninstall the incorrect USB driver 1 Turn on the computer and allow Windows to load. 2 Insert the "Memory Stick" into your camcorder. 3 Connect the AC Adaptor, then set the POWER switch to MEMORY. 4 Connect the USB port on the computer to OFF (CHG) on your camcorder using the USB cable supplied. 5 Open the computer's "Device Manager." Viewing images with the "?" Other OS: Select "My Computer" t "Control...
... Connecting your camcorder to a computer using the USB cable (For Windows users) Viewing images recorded on the "Memory Stick" Step1: Uninstall the incorrect USB driver 1 Turn on the computer and allow Windows to load. 2 Insert the "Memory Stick" into your camcorder. 3 Connect the AC Adaptor, then set the POWER switch to MEMORY. 4 Connect the USB port on the computer to OFF (CHG) on your camcorder using the USB cable supplied. 5 Open the computer's "Device Manager." Viewing images with the "?" Other OS: Select "My Computer" t "Control...

Operating Instructions (primary manual)
Page 154
... camcorder. Easy Video CD This function makes it simple to create a Video CD. (7) After the "Video CD successfully created." The tape is automatically played back. message appears, click "Quit." 154 Viewing pictures recorded on tape on the tape from your camcorder to the USB port on the computer using the supplied USB cable. (5) Insert a new CD-R in the CD-R drive of the computer. (6) Click "Start." USB Streaming (For Windows users) Making Video CDs - Capturing images recorded...
... camcorder. Easy Video CD This function makes it simple to create a Video CD. (7) After the "Video CD successfully created." The tape is automatically played back. message appears, click "Quit." 154 Viewing pictures recorded on tape on the tape from your camcorder to the USB port on the computer using the supplied USB cable. (5) Insert a new CD-R in the CD-R drive of the computer. (6) Click "Start." USB Streaming (For Windows users) Making Video CDs - Capturing images recorded...
Operating Instructions (primary manual)
Page 158
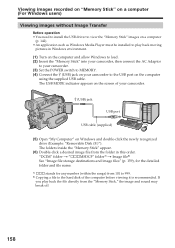
... USB MODE indicator appears on the screen of your camcorder to the hard disk of the computer before viewing it is recommended. If you play back moving pictures in this order. Viewing images recorded on "Memory Stick" on a computer (For Windows users) Viewing images without Image Transfer Before operation •You need to install the USB driver to view the "Memory Stick" images on a computer (p. 142). •An application such as Windows Media Player must be installed to play back the file directly from the "Memory Stick...
... USB MODE indicator appears on the screen of your camcorder to the hard disk of the computer before viewing it is recommended. If you play back moving pictures in this order. Viewing images recorded on "Memory Stick" on a computer (For Windows users) Viewing images without Image Transfer Before operation •You need to install the USB driver to view the "Memory Stick" images on a computer (p. 142). •An application such as Windows Media Player must be installed to play back the file directly from the "Memory Stick...
Operating Instructions (primary manual)
Page 162
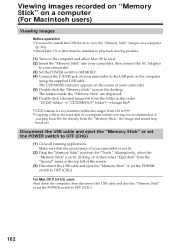
... stands for any number (within the range) from the "Special" menu at the top left of a computer before viewing it , then select "Eject disk" from 101 to 999. 2) Copying a file to the hard disk of the screen. (3) Disconnect the USB cable and eject the "Memory Stick" or set the POWER switch to OFF (CHG). Viewing images recorded on "Memory Stick" on a computer (For Macintosh users) Viewing images Before operation •You need to install the USB driver to view the "Memory Stick" images on a computer...
... stands for any number (within the range) from the "Special" menu at the top left of a computer before viewing it , then select "Eject disk" from 101 to 999. 2) Copying a file to the hard disk of the screen. (3) Disconnect the USB cable and eject the "Memory Stick" or set the POWER switch to OFF (CHG). Viewing images recorded on "Memory Stick" on a computer (For Macintosh users) Viewing images Before operation •You need to install the USB driver to view the "Memory Stick" images on a computer...

Operating Instructions (primary manual)
Page 168
... cannot adjust FLASH MODE and FLASH LVL if the external flash (optional) is not compatible. •The FLASH MODE details differ depending on the flash (optional) you can operate at the moment. Changing the menu settings Menu items are displayed as the following icons: MANUAL SET CAMERA SET VCR SET LCD/VF SET MEM SET 1 MEM SET 2 CM SET TAPE SET SETUP MENU OTHERS Selecting the mode setting of each item z is the function used to adjust the shutter speed automatically. Meaning To suit your specific shooting requirement (p. 58) POWER switch P EFFECT...
... cannot adjust FLASH MODE and FLASH LVL if the external flash (optional) is not compatible. •The FLASH MODE details differ depending on the flash (optional) you can operate at the moment. Changing the menu settings Menu items are displayed as the following icons: MANUAL SET CAMERA SET VCR SET LCD/VF SET MEM SET 1 MEM SET 2 CM SET TAPE SET SETUP MENU OTHERS Selecting the mode setting of each item z is the function used to adjust the shutter speed automatically. Meaning To suit your specific shooting requirement (p. 58) POWER switch P EFFECT...

Operating Instructions (primary manual)
Page 212
... 187 Warning messages 188 White balance 48 Wide-angle 32 Wide mode 49 WIPE 51 Write-protect tab 99 Zero set 21 Color Slow Shutter 34 Continuous photo recording 108 Data code 39 Date search 73 DEMO MODE 175 Digital effect 55, 69 Digital program editing 77, 121 DISPLAY 39 DOT 51 Dual sound track tape .......... 190 E Edit search 37 End search 36 EXP BRKTG 108 F, G, H Fader 51 FLASH 55 Flexible...
... 187 Warning messages 188 White balance 48 Wide-angle 32 Wide mode 49 WIPE 51 Write-protect tab 99 Zero set 21 Color Slow Shutter 34 Continuous photo recording 108 Data code 39 Date search 73 DEMO MODE 175 Digital effect 55, 69 Digital program editing 77, 121 DISPLAY 39 DOT 51 Dual sound track tape .......... 190 E Edit search 37 End search 36 EXP BRKTG 108 F, G, H Fader 51 FLASH 55 Flexible...
Marketing Specifications
Page 1
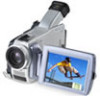
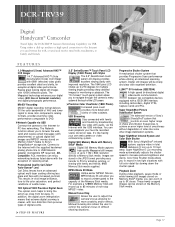
.... Super NightShot Infrared System and Color Slow Shutter With Sony's NightShot® infrared system, capture video in difficult shooting situations. Color Slow Shutter mode allows you to record uninterrupted to control the camera's focus in total darkness (0 lux) up to bring the action up to increase picture brightness and clarity. Manual focusing also allows the user to the capacity of the Memory Stick media. DCR-TRV39 Digital Handycam® Camcorder Travel light, the DCR-TRV39 features Networking Capability via the...
.... Super NightShot Infrared System and Color Slow Shutter With Sony's NightShot® infrared system, capture video in difficult shooting situations. Color Slow Shutter mode allows you to record uninterrupted to control the camera's focus in total darkness (0 lux) up to bring the action up to increase picture brightness and clarity. Manual focusing also allows the user to the capacity of the Memory Stick media. DCR-TRV39 Digital Handycam® Camcorder Travel light, the DCR-TRV39 features Networking Capability via the...
Marketing Specifications
Page 2
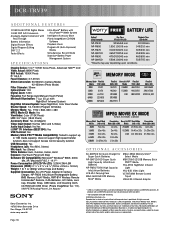
... (IEEE1394): Yes USB Terminal: Yes Memory Stick PRO™ Media Compatibility: Tested to support up to 1GB media capacity; Features and specifications subject to change without written permission is prohibited. Microsoft and Windows are trademarks of their respective owners. Sony, AccuPower, Advanced HAD, Handycam, i.LINK, ImageStation, InfoLithium, Memory Stick, Memory Stick PRO, NightShot, Remote Commander, Stamina, SteadyShot, SwivelScreen and Worry Free are registered trademarks of Apple Computer, Inc. DCR-TRV39 ADDITIONAL FEATURES 12...
... (IEEE1394): Yes USB Terminal: Yes Memory Stick PRO™ Media Compatibility: Tested to support up to 1GB media capacity; Features and specifications subject to change without written permission is prohibited. Microsoft and Windows are trademarks of their respective owners. Sony, AccuPower, Advanced HAD, Handycam, i.LINK, ImageStation, InfoLithium, Memory Stick, Memory Stick PRO, NightShot, Remote Commander, Stamina, SteadyShot, SwivelScreen and Worry Free are registered trademarks of Apple Computer, Inc. DCR-TRV39 ADDITIONAL FEATURES 12...


