
Operating Instructions
Page 4
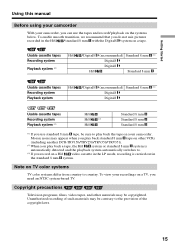
... playing them back b On the tape •Recording moving pictures (p. 30) •Recording still images (p. 56) •Playing back...digital to indicate model names. Main Features On the model name indication In this manual, check the model name of your camcorder. Before you start reading this manual, camcorder...-shape icons are for all models. USB Streaming (p. 183) •Capturing images on your computer from your camcorder on your computer CCD-TRV118 : CCD-TRV318 : CCD-TRV418 : DCR-TRV150 : DCR-TRV250 : DCR-TRV350 : DCR...
... playing them back b On the tape •Recording moving pictures (p. 30) •Recording still images (p. 56) •Playing back...digital to indicate model names. Main Features On the model name indication In this manual, check the model name of your camcorder. Before you start reading this manual, camcorder...-shape icons are for all models. USB Streaming (p. 183) •Capturing images on your computer from your camcorder on your computer CCD-TRV118 : CCD-TRV318 : CCD-TRV418 : DCR-TRV150 : DCR-TRV250 : DCR-TRV350 : DCR...
Operating Instructions
Page 6
... Setting the date and time ........ 26 Step 3 Inserting a cassette 28 Recording - ZERO SET MEMORY 89 Searching for a photo - NightShot - Digital effect ........... 65 Using the PROGRAM AE function .... 68 Adjusting the exposure manually ...... 70 Focusing manually 71 Interval recording 72 Frame by date - ... special effects - Super NightShot - BACK LIGHT 38 Shooting in light 79 Inserting a scene 82 Advanced Playback Operations Playing back a tape with picture effects .... 83 Playing back a tape with digital effects 85 Enlarging recorded images -
... Setting the date and time ........ 26 Step 3 Inserting a cassette 28 Recording - ZERO SET MEMORY 89 Searching for a photo - NightShot - Digital effect ........... 65 Using the PROGRAM AE function .... 68 Adjusting the exposure manually ...... 70 Focusing manually 71 Interval recording 72 Frame by date - ... special effects - Super NightShot - BACK LIGHT 38 Shooting in light 79 Inserting a scene 82 Advanced Playback Operations Playing back a tape with picture effects .... 83 Playing back a tape with digital effects 85 Enlarging recorded images -
Operating Instructions
Page 7
...images - PRINT MARK 180 Viewing Images on Your Computer Viewing images on tapes 106 Recording video or TV programs 119 Inserting a scene from your camcorder on your computer - Digital program editing (on your computer - Playback Viewing still images - SLIDE SHOW 174 Preventing accidental erasure - DELETE 177 Writing a print mark -... Dubbing 98 Dubbing only desired scenes - Introduction 126 Recording still images on a "Memory Stick 156 Setting up a folder 160 - Memory PB ZOOM 172 Playing back images continuously - Digital program editing (on a "Memory Stick" -
...images - PRINT MARK 180 Viewing Images on Your Computer Viewing images on tapes 106 Recording video or TV programs 119 Inserting a scene from your camcorder on your computer - Digital program editing (on your computer - Playback Viewing still images - SLIDE SHOW 174 Preventing accidental erasure - DELETE 177 Writing a print mark -... Dubbing 98 Dubbing only desired scenes - Introduction 126 Recording still images on a "Memory Stick 156 Setting up a folder 160 - Memory PB ZOOM 172 Playing back images continuously - Digital program editing (on a "Memory Stick" -

Operating Instructions
Page 11
Adjust the viewfinder lens to CAMERA while pressing the small green button. The picture in the viewfinder is closed (p. 32). PLAY CR 1 Set the POWER switch to VCR/PLAYER while pressing the small green button.* V POWER OFF(CHG) CAM ME Note Do not pick... Guide Recording a picture (p. 30) 1 Remove the lens cap. V POWER ME CR OFF(CHG) CAM Viewfinder View a picture placing your eyesight (p. 35). Your camcorder starts recording. Monitoring the playback picture on models (p. 16). 11 The picture appears on the LCD screen. 2 Set the POWER switch to your eye against...
Adjust the viewfinder lens to CAMERA while pressing the small green button. The picture in the viewfinder is closed (p. 32). PLAY CR 1 Set the POWER switch to VCR/PLAYER while pressing the small green button.* V POWER OFF(CHG) CAM ME Note Do not pick... Guide Recording a picture (p. 30) 1 Remove the lens cap. V POWER ME CR OFF(CHG) CAM Viewfinder View a picture placing your eyesight (p. 35). Your camcorder starts recording. Monitoring the playback picture on models (p. 16). 11 The picture appears on the LCD screen. 2 Set the POWER switch to your eye against...
Operating Instructions
Page 13
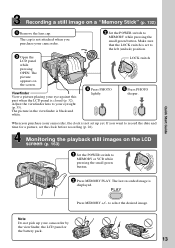
..." (p. 132) 1 Remove the lens cap. The picture in the viewfinder is displayed. If you purchase your camcorder. 3 Open the LCD panel while pressing OPEN. V POWER ME OFF(CHG) CAM 2 Press MEMORY PLAY. Make sure that the LOCK switch is not set up your eye against this part when the LCD... panel is not attached when you want to record the date and time for a picture, set to the left (unlock) position. Viewfinder View a picture placing your camcorder by the ...
..." (p. 132) 1 Remove the lens cap. The picture in the viewfinder is displayed. If you purchase your camcorder. 3 Open the LCD panel while pressing OPEN. V POWER ME OFF(CHG) CAM 2 Press MEMORY PLAY. Make sure that the LOCK switch is not set up your eye against this part when the LCD... panel is not attached when you want to record the date and time for a picture, set to the left (unlock) position. Viewfinder View a picture placing your camcorder by the ...
Operating Instructions
Page 15
... detected and the playback system automatically switches to the provision of such materials may be copyrighted. To view your recordings on your camcorder, you do not mix pictures recorded in the standard 8 mm system. Note on a tape. Unauthorized recording of the copyright ... need an NTSC system-based TV. Copyright precautions Television programs, films, video tapes, and other VCRs (including another DCR-TRV150/TRV250/TRV350/TRV351). *2) When you play back standard 8 mm tape on other materials may be sure to country. Mosaic noise may appear when you record ...
... detected and the playback system automatically switches to the provision of such materials may be copyrighted. To view your recordings on your camcorder, you do not mix pictures recorded in the standard 8 mm system. Note on a tape. Unauthorized recording of the copyright ... need an NTSC system-based TV. Copyright precautions Television programs, films, video tapes, and other VCRs (including another DCR-TRV150/TRV250/TRV350/TRV351). *2) When you play back standard 8 mm tape on other materials may be sure to country. Mosaic noise may appear when you record ...
Operating Instructions
Page 23
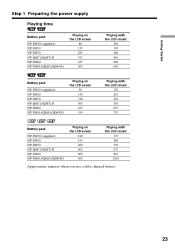
...(supplied) NP-FM50 NP-FM70 NP-QM71/QM71D NP-FM90 NP-FM91/QM91/QM91D Playing on the LCD screen 80 135 285 335 435 505 Playing with the LCD closed 120 195 400 465 600 695 Battery pack NP-FM30 (...supplied) NP-FM50 NP-FM70 NP-QM71/QM71D NP-FM90 NP-FM91/QM91/QM91D Playing on the LCD screen 90 150 310 365 475 550 Playing with the LCD closed 130 210 430 505 655 755 Battery pack NP-FM30 (...supplied) NP-FM50 NP-FM70 NP-QM71/QM71D NP-FM90 NP-FM91/QM91/QM91D Playing on the LCD screen 120 195 400 465 600 695 Playing with the LCD closed 175 280 570 675 865 1010 Approximate minutes when you use...
...(supplied) NP-FM50 NP-FM70 NP-QM71/QM71D NP-FM90 NP-FM91/QM91/QM91D Playing on the LCD screen 80 135 285 335 435 505 Playing with the LCD closed 120 195 400 465 600 695 Battery pack NP-FM30 (...supplied) NP-FM50 NP-FM70 NP-QM71/QM71D NP-FM90 NP-FM91/QM91/QM91D Playing on the LCD screen 90 150 310 365 475 550 Playing with the LCD closed 130 210 430 505 655 755 Battery pack NP-FM30 (...supplied) NP-FM50 NP-FM70 NP-QM71/QM71D NP-FM90 NP-FM91/QM91/QM91D Playing on the LCD screen 120 195 400 465 600 695 Playing with the LCD closed 175 280 570 675 865 1010 Approximate minutes when you use...
Operating Instructions
Page 24
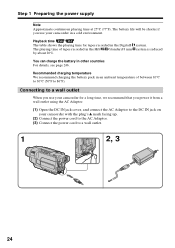
...charge the battery in the Hi8 /standard 8 mm by about 20%. Connecting to a wall outlet When you use your camcorder with the plug's v mark facing up. (2) Connect the power cord to the AC Adaptor. (3) Connect the power...(1) Open the DC IN jack cover, and connect the AC Adaptor to the DC IN jack on your camcorder in the Digital8 The playing time of between 10°C to 30°C (50°F to a wall outlet. 1 2, 3 ..., see page 246. Playback time The table shows the playing time for a long time, we recommend that you use your camcorder for tapes recorded in a cold environment.
...charge the battery in the Hi8 /standard 8 mm by about 20%. Connecting to a wall outlet When you use your camcorder with the plug's v mark facing up. (2) Connect the power cord to the AC Adaptor. (3) Connect the power...(1) Open the DC IN jack cover, and connect the AC Adaptor to the DC IN jack on your camcorder in the Digital8 The playing time of between 10°C to 30°C (50°F to a wall outlet. 1 2, 3 ..., see page 246. Playback time The table shows the playing time for a long time, we recommend that you use your camcorder for tapes recorded in a cold environment.
Operating Instructions
Page 29
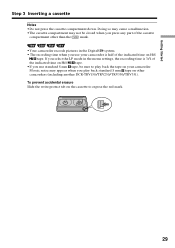
... when you play back the tape on the cassette to play back standard 8 mm tape on other than the mark. •Your camcorder records pictures in the menu settings, the recording time is half of the cassette compartment other camcorders (including another DCR-TRV150/TRV250/TRV350/TRV351). Doing... so may cause a malfunction. •The cassette compartment may appear when you press any part of the indicated time on Hi8 tape. •If you use your camcorder. Mosaic noise may...
... when you play back the tape on the cassette to play back standard 8 mm tape on other than the mark. •Your camcorder records pictures in the menu settings, the recording time is half of the cassette compartment other camcorders (including another DCR-TRV150/TRV250/TRV350/TRV351). Doing... so may cause a malfunction. •The cassette compartment may appear when you press any part of the indicated time on Hi8 tape. •If you use your camcorder. Mosaic noise may...

Operating Instructions
Page 31
Note on recording mode Your camcorder records and plays back in the SP (standard play) mode or in the menu settings (p. 219). However, check the following: - If you leave your camcorder. To set the counter to CAMERA again. To resume the standby mode, set to prevent battery and tape wear..... *1) 1.5 times: Twice: *2) three minutes: five minutes: 31 Select SP or LP in the LP (long play back the tape on your camcorder, we recommend that you record a tape in the LP mode on your camcorder in the standby mode for a certain period *2) while the cassette is inserted Your...
Note on recording mode Your camcorder records and plays back in the SP (standard play) mode or in the menu settings (p. 219). However, check the following: - If you leave your camcorder. To set the counter to CAMERA again. To resume the standby mode, set to prevent battery and tape wear..... *1) 1.5 times: Twice: *2) three minutes: five minutes: 31 Select SP or LP in the LP (long play back the tape on your camcorder, we recommend that you record a tape in the LP mode on your camcorder in the standby mode for a certain period *2) while the cassette is inserted Your...
Operating Instructions
Page 36
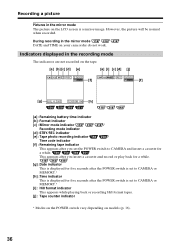
... recorded. This appears after the POWER switch is a mirror-image. Recording a picture Pictures in the mirror mode The picture on your camcorder do not work. During recording in the mirror mode DATE and TIME on the LCD screen is set to CAMERA or MEMORY.* [i] ...STBY/REC indicator [e] : Tape photo recording indicator / Time code indicator [f] : Remaining tape indicator This appears after you insert a cassette and record or play back for a while. [g] :Date indicator This is displayed for five seconds after the POWER switch is set the POWER switch to CAMERA or MEMORY.* [h]...
... recorded. This appears after the POWER switch is a mirror-image. Recording a picture Pictures in the mirror mode The picture on your camcorder do not work. During recording in the mirror mode DATE and TIME on the LCD screen is set to CAMERA or MEMORY.* [i] ...STBY/REC indicator [e] : Tape photo recording indicator / Time code indicator [f] : Remaining tape indicator This appears after you insert a cassette and record or play back for a while. [g] :Date indicator This is displayed for five seconds after the POWER switch is set the POWER switch to CAMERA or MEMORY.* [h]...
Operating Instructions
Page 37
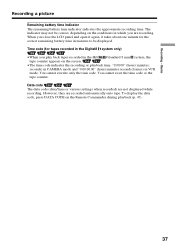
... on the Remote Commander during playback (p. 47). 37 The indicator may not be displayed. Time code (for the correct remaining battery time in which you play back tapes recorded in the Hi8 /standard 8 mm system, the tape counter appears on the screen. •The time code indicates the recording or playback...
... on the Remote Commander during playback (p. 47). 37 The indicator may not be displayed. Time code (for the correct remaining battery time in which you play back tapes recorded in the Hi8 /standard 8 mm system, the tape counter appears on the screen. •The time code indicates the recording or playback...
Operating Instructions
Page 43
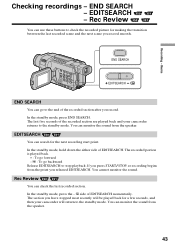
...smooth. In the standby mode, press END SEARCH. END SEARCH - The recorded portion is played back. + : To go forward - 7 : To go to the end of the recorded section are played back and your camcorder will return to check the recorded picture for making the transition between the last recorded scene and...SEARCH EDITSEARCH END SEARCH You can monitor the sound from the speaker. 43 Rec Review You can search for a few seconds, and then your camcorder returns to stop playback. You can go backward Release EDITSEARCH to the standby mode. In the standby mode, hold down the either side of ...
...smooth. In the standby mode, press END SEARCH. END SEARCH - The recorded portion is played back. + : To go forward - 7 : To go to the end of the recorded section are played back and your camcorder will return to check the recorded picture for making the transition between the last recorded scene and...SEARCH EDITSEARCH END SEARCH You can monitor the sound from the speaker. 43 Rec Review You can search for a few seconds, and then your camcorder returns to stop playback. You can go backward Release EDITSEARCH to the standby mode. In the standby mode, hold down the either side of ...
Operating Instructions
Page 45
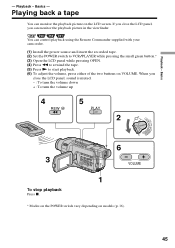
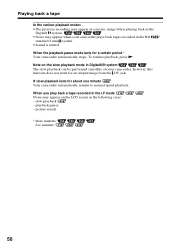
Playback - Basics - When you can monitor the playback picture in the viewfinder. Playing back a tape You can control playback using the Remote Commander supplied with your camcorder. (1) Install the power source and insert the recorded tape. (2) Set the POWER switch to VCR/PLAYER while pressing the small green button... close the LCD panel, you close the LCD panel, sound is muted. - : To turn the volume down + : To turn the volume up 4 REW 5 PLAY 2 V POWER CR OFF(CHG) CAM ME ERMAORY 6 3 VOLUME 1 To stop playback Press x. * Modes on the POWER switch vary depending on the LCD screen....
Playback - Basics - When you can monitor the playback picture in the viewfinder. Playing back a tape You can control playback using the Remote Commander supplied with your camcorder. (1) Install the power source and insert the recorded tape. (2) Set the POWER switch to VCR/PLAYER while pressing the small green button... close the LCD panel, you close the LCD panel, sound is muted. - : To turn the volume down + : To turn the volume up 4 REW 5 PLAY 2 V POWER CR OFF(CHG) CAM ME ERMAORY 6 3 VOLUME 1 To stop playback Press x. * Modes on the POWER switch vary depending on the LCD screen....
Operating Instructions
Page 46
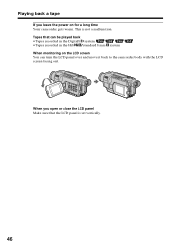
When you leave the power on the LCD screen You can be played back •Tapes recorded in the Digital8 system •Tapes recorded in the Hi8 /standard 8 mm system When monitoring on for a long time Your camcorder gets warm. This is set vertically. 46 Playing back a tape If you open or close the LCD panel Make sure that can turn the LCD panel over and move it back to the camcorder body with the LCD screen facing out. Tapes that the LCD panel is not a malfunction.
When you leave the power on the LCD screen You can be played back •Tapes recorded in the Digital8 system •Tapes recorded in the Hi8 /standard 8 mm system When monitoring on for a long time Your camcorder gets warm. This is set vertically. 46 Playing back a tape If you open or close the LCD panel Make sure that can turn the LCD panel over and move it back to the camcorder body with the LCD screen facing out. Tapes that the LCD panel is not a malfunction.
Operating Instructions
Page 47
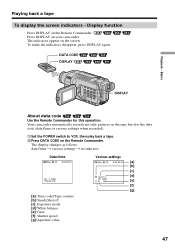
... speed [g]: Aperture value Various settings 50min 0:00:23:01 [a] [b] [c] AUTO [d] 60 AWB F1.6 9dB [e] [f] [g] 47 DATA CODE DISPLAY Playback - Your camcorder automatically records not only pictures on the tape but also the data code (date/time or various settings when recorded). 1 Set the POWER switch to... VCR, then play back a tape. 2 Press DATA CODE on the Remote Commander. Playing back a tape To display the screen indicators - Display function Press DISPLAY on the Remote Commander.
... speed [g]: Aperture value Various settings 50min 0:00:23:01 [a] [b] [c] AUTO [d] 60 AWB F1.6 9dB [e] [f] [g] 47 DATA CODE DISPLAY Playback - Your camcorder automatically records not only pictures on the tape but also the data code (date/time or various settings when recorded). 1 Set the POWER switch to... VCR, then play back a tape. 2 Press DATA CODE on the Remote Commander. Playing back a tape To display the screen indicators - Display function Press DISPLAY on the Remote Commander.
Operating Instructions
Page 48
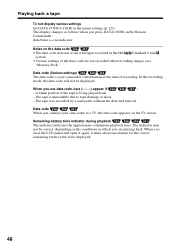
...takes about one minute for the correct remaining battery time to DATE in the menu settings (p. 222). The tape was recorded by a camcorder without the date and time set. Remaining battery time indicator during playback The indicator indicates the approximate continuous playback time. Data code (Various... the data code will not be displayed. 48 When you connect your camcorder's information at the time of the tape is unreadable due to a TV, the data code appears on a "Memory Stick." The tape is being played back. - A blank portion of recording. The indicator may not be...
...takes about one minute for the correct remaining battery time to DATE in the menu settings (p. 222). The tape was recorded by a camcorder without the date and time set. Remaining battery time indicator during playback The indicator indicates the approximate continuous playback time. Data code (Various... the data code will not be displayed. 48 When you connect your camcorder's information at the time of the tape is unreadable due to a TV, the data code appears on a "Memory Stick." The tape is being played back. - A blank portion of recording. The indicator may not be...
Operating Instructions
Page 49
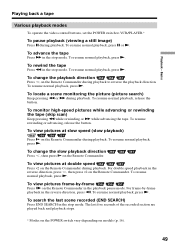
...Keep pressing m while rewinding or M while advancing the tape. To resume rewinding or advancing, release the button. To resume normal playback, press N. Playback - Basics Playing back a tape Various playback modes To operate the video control buttons, set the POWER switch to VCR/PLAYER.* To pause playback (viewing a still image) Press... normal playback, press N. For frame-by -frame Press C on the Remote Commander during playback. The last five seconds of the recorded section are played back and playback stops. * Modes on the POWER switch vary depending on the Remote Commander.
...Keep pressing m while rewinding or M while advancing the tape. To resume rewinding or advancing, release the button. To resume normal playback, press N. Playback - Basics Playing back a tape Various playback modes To operate the video control buttons, set the POWER switch to VCR/PLAYER.* To pause playback (viewing a still image) Press... normal playback, press N. For frame-by -frame Press C on the Remote Commander during playback. The last five seconds of the recorded section are played back and playback stops. * Modes on the POWER switch vary depending on the Remote Commander.
Operating Instructions
Page 50
...can be performed smoothly on the LCD screen in the following cases: - slow playback - When you play back a tape recorded in the LP mode Noise may appear when your camcorder, however, this function does not work for an output image from the DV jack. When the ...playback pause mode lasts for about one minute Your camcorder automatically returns to normal speed playback. If slow playback lasts for a certain period * Your camcorder automatically stops. picture search * three minutes: five minutes: 50 playback pause - Playing back a tape In the various playback modes •The...
...can be performed smoothly on the LCD screen in the following cases: - slow playback - When you play back a tape recorded in the LP mode Noise may appear when your camcorder, however, this function does not work for an output image from the DV jack. When the ...playback pause mode lasts for about one minute Your camcorder automatically returns to normal speed playback. If slow playback lasts for a certain period * Your camcorder automatically stops. picture search * three minutes: five minutes: 50 playback pause - Playing back a tape In the various playback modes •The...

Operating Instructions
Page 57
... the tape photo recording function using BOUNCE in the Fader function. •When recording a still image, do not shake your camcorder. Tape Photo recording Notes •During Tape Photo recording, you play back the still image on the Remote Commander. This is not a malfunction. To use PHOTO while using the Remote Commander...
... the tape photo recording function using BOUNCE in the Fader function. •When recording a still image, do not shake your camcorder. Tape Photo recording Notes •During Tape Photo recording, you play back the still image on the Remote Commander. This is not a malfunction. To use PHOTO while using the Remote Commander...


