
Operating Instructions
Page 4
...8226;Viewing images recorded on your computer - Before you start reading this manual, camcorder-shape icons are for the indicated models only. CCD-TRV118 : CCD-TRV318 : CCD-TRV418 : DCR-TRV150 : DCR-TRV250 : DCR-TRV350 : DCR-TRV351 : Instructions with icons are for all models. USB Streaming (p. 183)... your computer from your camcorder on your computer Instructions with no icons are used to capture images onto your computer (p. 208) 4 Capturing images on a "Memory Stick" using the USB cable (p. 185) •Converting an analog signal into digital to indicate model names....
...8226;Viewing images recorded on your computer - Before you start reading this manual, camcorder-shape icons are for the indicated models only. CCD-TRV118 : CCD-TRV318 : CCD-TRV418 : DCR-TRV150 : DCR-TRV250 : DCR-TRV350 : DCR-TRV351 : Instructions with icons are for all models. USB Streaming (p. 183)... your computer from your camcorder on your computer Instructions with no icons are used to capture images onto your computer (p. 208) 4 Capturing images on a "Memory Stick" using the USB cable (p. 185) •Converting an analog signal into digital to indicate model names....
Operating Instructions
Page 5
...(p. 79) Functions for giving images more impact •Digital zoom (p. 34) The default setting is OFF. (To zoom greater than 20×, select the digital zoom power in D ZOOM in the menu settings.) &#...8226;Fader (p. 61) •Picture effect (In recording mode) (p. 64) •Digital effect (In recording mode) (p. 65) •Title (p. 75, 77) •MEMORY MIX ...(p. 87) •ZERO SET MEMORY (p. 89) •Easy Dubbing (p. 98) •Digital program editing (p. 106) Contents of the recording cannot be compensated if recording or playback is not made due to...
...(p. 79) Functions for giving images more impact •Digital zoom (p. 34) The default setting is OFF. (To zoom greater than 20×, select the digital zoom power in D ZOOM in the menu settings.) &#...8226;Fader (p. 61) •Picture effect (In recording mode) (p. 64) •Digital effect (In recording mode) (p. 65) •Title (p. 75, 77) •MEMORY MIX ...(p. 87) •ZERO SET MEMORY (p. 89) •Easy Dubbing (p. 98) •Digital program editing (p. 106) Contents of the recording cannot be compensated if recording or playback is not made due to...
Operating Instructions
Page 7
...Digital program editing (on a "Memory Stick" - Introduction 126 Recording still images on tapes 106 Recording video or TV programs 119 Inserting a scene from a VCR - MEMORY MIX 140 Recording moving picture 150 Interval Photo recording 154 Recording edited pictures as still images 136 Superimposing a still image in the "Memory Stick" on your camcorder... PB ZOOM 172 Playing back images continuously - DELETE 177 Writing a print mark - Introduction 182 Connecting your camcorder to your computer using the USB cable ......... 187 Viewing pictures recorded on a tape or live from a ...
...Digital program editing (on a "Memory Stick" - Introduction 126 Recording still images on tapes 106 Recording video or TV programs 119 Inserting a scene from a VCR - MEMORY MIX 140 Recording moving picture 150 Interval Photo recording 154 Recording edited pictures as still images 136 Superimposing a still image in the "Memory Stick" on your camcorder... PB ZOOM 172 Playing back images continuously - DELETE 177 Writing a print mark - Introduction 182 Connecting your camcorder to your computer using the USB cable ......... 187 Viewing pictures recorded on a tape or live from a ...
Operating Instructions
Page 8
... video cassette 237 About the "Memory Stick 240 About the "InfoLITHIUM" battery pack 242 About i.LINK 244 Using your camcorder abroad .......... 246 Maintenance information and precautions 247 Specifications 253 • , and are trademarks. • i.LINK and are trademarks. ...• "InfoLITHIUM" is a trademark of Sony Corporation. • "Memory Stick," and "MagicGate Memory Stick" are trademarks of Sony Corporation. • "Memory Stick Duo" and are trademarks of Sony Corporation. •Windows and Windows Media are trademarks of Apple Computer ...
... video cassette 237 About the "Memory Stick 240 About the "InfoLITHIUM" battery pack 242 About i.LINK 244 Using your camcorder abroad .......... 246 Maintenance information and precautions 247 Specifications 253 • , and are trademarks. • i.LINK and are trademarks. ...• "InfoLITHIUM" is a trademark of Sony Corporation. • "Memory Stick," and "MagicGate Memory Stick" are trademarks of Sony Corporation. • "Memory Stick Duo" and are trademarks of Sony Corporation. •Windows and Windows Media are trademarks of Apple Computer ...
Operating Instructions
Page 9
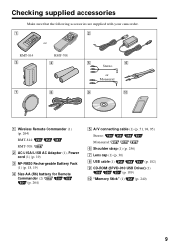
Checking supplied accessories Make sure that the following accessories are supplied with your camcorder. 1 2 or RMT-814 3 RMT-708 4 5 6 Stereo or Monaural 7 8 9 q; 1 Wireless Remote Commander (1) (p. 264) RMT-814: RMT-708: 2 AC-L15A/L15B AC Adaptor (1), Power cord (1) (p. 19) 3 NP-...
Checking supplied accessories Make sure that the following accessories are supplied with your camcorder. 1 2 or RMT-814 3 RMT-708 4 5 6 Stereo or Monaural 7 8 9 q; 1 Wireless Remote Commander (1) (p. 264) RMT-814: RMT-708: 2 AC-L15A/L15B AC Adaptor (1), Power cord (1) (p. 19) 3 NP-...

Operating Instructions
Page 10
... - See the page in the direction of the arrow and open the lid. 2 Push the center of your camcorder outdoors (p. 18). Connecting the power cord (p. 24) Use the battery pack when using your camcorder. Quick Start Guide 10 AC Adaptor (supplied) Inserting a cassette (p. 28) 1 Slide OPEN/ EJECT in parentheses "( )" for more information...
... - See the page in the direction of the arrow and open the lid. 2 Push the center of your camcorder outdoors (p. 18). Connecting the power cord (p. 24) Use the battery pack when using your camcorder. Quick Start Guide 10 AC Adaptor (supplied) Inserting a cassette (p. 28) 1 Slide OPEN/ EJECT in parentheses "( )" for more information...

Operating Instructions
Page 11
..., press START/ STOP again. The cap is black and white. 4 Press START/STOP. The picture in the viewfinder is not attached when you purchase your camcorder. 3 Open the LCD panel while pressing OPEN. The picture appears on the LCD screen (p. 45) 2 Press m to your eye against this part when the LCD...) CAM ME Note Do not pick up yet. PLAY CR 1 Set the POWER switch to record the date and time for a picture, set up your camcorder, the clock is closed (p. 32). Monitoring the playback picture on the LCD screen. 2 Set the POWER switch to start playback. If you purchase your...
..., press START/ STOP again. The cap is black and white. 4 Press START/STOP. The picture in the viewfinder is not attached when you purchase your camcorder. 3 Open the LCD panel while pressing OPEN. The picture appears on the LCD screen (p. 45) 2 Press m to your eye against this part when the LCD...) CAM ME Note Do not pick up yet. PLAY CR 1 Set the POWER switch to record the date and time for a picture, set up your camcorder, the clock is closed (p. 32). Monitoring the playback picture on the LCD screen. 2 Set the POWER switch to start playback. If you purchase your...

Operating Instructions
Page 12
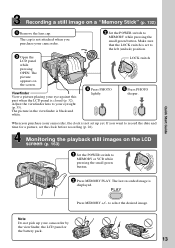
... (p. 18). Open the DC IN jack cover. Connecting the power cord (p. 24) Use the battery pack when using your camcorder. AC Adaptor (supplied) Inserting a "Memory Stick" (p. 127) Insert a "Memory Stick" in parentheses "( )" for more information. See the page in the "Memory Stick" slot as far ...
... (p. 18). Open the DC IN jack cover. Connecting the power cord (p. 24) Use the battery pack when using your camcorder. AC Adaptor (supplied) Inserting a "Memory Stick" (p. 127) Insert a "Memory Stick" in parentheses "( )" for more information. See the page in the "Memory Stick" slot as far ...
Operating Instructions
Page 13
...lightly. 5 Press PHOTO deeper. The last recorded image is set the clock before recording (p. 26). PHOTO PHOTO 2 Set the POWER switch to your camcorder by the viewfinder, the LCD panel or the battery pack. 13 to MEMORY or VCR while pressing the small green button. Viewfinder View a picture ...placing your camcorder. 3 Open the LCD panel while pressing OPEN. The picture in the viewfinder is closed (p. 32). When you purchase your eye against this ...
...lightly. 5 Press PHOTO deeper. The last recorded image is set the clock before recording (p. 26). PHOTO PHOTO 2 Set the POWER switch to your camcorder by the viewfinder, the LCD panel or the battery pack. 13 to MEMORY or VCR while pressing the small green button. Viewfinder View a picture ...placing your camcorder. 3 Open the LCD panel while pressing OPEN. The picture in the viewfinder is closed (p. 32). When you purchase your eye against this ...

Operating Instructions
Page 14
... hear a beep to CAMERA. Any differences in operation are for the seven models listed in the table below. e.g. Types of your camcorder are shown in this manual, buttons and settings on your camcorder. Hi8 Hi8/8 OUT OUT - - - - z z - - z - - z z z z - z z Provided - When you carry out ...the operation is the model used for example, " ." z - Using this manual The instructions in capital letters. The DCR-TRV350 is being carried out. z z z - z z - - - - - - As you read through this manual are clearly indicated in the illustrations. z -...
... hear a beep to CAMERA. Any differences in operation are for the seven models listed in the table below. e.g. Types of your camcorder are shown in this manual, buttons and settings on your camcorder. Hi8 Hi8/8 OUT OUT - - - - z z - - z - - z z z z - z z Provided - When you carry out ...the operation is the model used for example, " ." z - Using this manual The instructions in capital letters. The DCR-TRV350 is being carried out. z z z - z z - - - - - - As you read through this manual are clearly indicated in the illustrations. z -...
Operating Instructions
Page 15
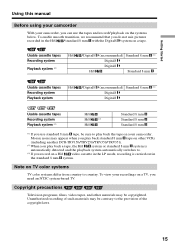
... mm system is carried out in the Hi8 /standard 8 mm with the Digital8 system on a tape. Getting Started Using this manual Before using your camcorder With your recordings on a TV, you need an NTSC system-based TV. Mosaic noise may be copyrighted. Note on your... camcorder. Copyright precautions Television programs, films, video tapes, and other materials may appear when you play back standard 8 mm tape on other VCRs (including another DCR-TRV150/TRV250/TRV350/TRV351). *2) When you play back the tape on TV color systems...
... mm system is carried out in the Hi8 /standard 8 mm with the Digital8 system on a tape. Getting Started Using this manual Before using your camcorder With your recordings on a TV, you need an NTSC system-based TV. Mosaic noise may be copyrighted. Note on your... camcorder. Copyright precautions Television programs, films, video tapes, and other materials may appear when you play back standard 8 mm tape on other VCRs (including another DCR-TRV150/TRV250/TRV350/TRV351). *2) When you play back the tape on TV color systems...
Operating Instructions
Page 16
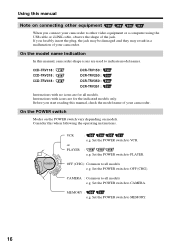
... the POWER switch to MEMORY. 16 CCD-TRV118 : CCD-TRV318 : CCD-TRV418 : DCR-TRV150 : DCR-TRV250 : DCR-TRV350 : DCR-TRV351 : Instructions with icons are used to other video equipment or a computer using the USB cable or i.LINK cable, observe the shape of your camcorder. Instructions with no icons are for the indicated models only. Using this...
... the POWER switch to MEMORY. 16 CCD-TRV118 : CCD-TRV318 : CCD-TRV418 : DCR-TRV150 : DCR-TRV250 : DCR-TRV350 : DCR-TRV351 : Instructions with icons are used to other video equipment or a computer using the USB cable or i.LINK cable, observe the shape of your camcorder. Instructions with no icons are for the indicated models only. Using this...
Operating Instructions
Page 17
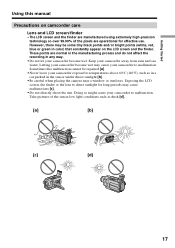
... cannot be some tiny black points and/or bright points (white, red, blue or green in color) that constantly appear on camcorder care Lens and LCD screen/finder • The LCD screen and the finder are manufactured using extremely high-precision technology so over ...These points are operational for long periods may cause malfunctions [c]. •Do not directly shoot the sun. However, there may cause your camcorder become wet. Letting your camcorder to malfunction. Exposing the LCD screen, the finder or the lens to temperatures above 60°C (140°F), such as dusk [d]. ...
... cannot be some tiny black points and/or bright points (white, red, blue or green in color) that constantly appear on camcorder care Lens and LCD screen/finder • The LCD screen and the finder are manufactured using extremely high-precision technology so over ...These points are operational for long periods may cause malfunctions [c]. •Do not directly shoot the sun. However, there may cause your camcorder become wet. Letting your camcorder to malfunction. Exposing the LCD screen, the finder or the lens to temperatures above 60°C (140°F), such as dusk [d]. ...
Operating Instructions
Page 18
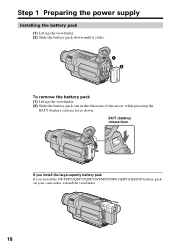
BATT (battery) release lever If you install the large-capacity battery pack If you install the NP-FM70/QM71/QM71D/FM90/FM91/QM91/QM91D battery pack on your camcorder, extend the viewfinder. 18 Step 1 Preparing the power supply Installing the battery pack (1) Lift up the viewfinder. (2) Slide the battery pack down until it clicks. 1 2 To remove the battery pack (1) Lift up the viewfinder. (2) Slide the battery pack out in the direction of the arrow while pressing the BATT (battery) release lever down.
BATT (battery) release lever If you install the large-capacity battery pack If you install the NP-FM70/QM71/QM71D/FM90/FM91/QM91/QM91D battery pack on your camcorder, extend the viewfinder. 18 Step 1 Preparing the power supply Installing the battery pack (1) Lift up the viewfinder. (2) Slide the battery pack down until it clicks. 1 2 To remove the battery pack (1) Lift up the viewfinder. (2) Slide the battery pack out in the direction of the arrow while pressing the BATT (battery) release lever down.
Operating Instructions
Page 19
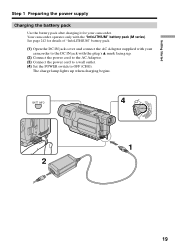
Your camcorder operates only with the plug's v mark facing up when charging begins. The charge lamp lights up . (2) Connect the ...outlet. (4) Set the POWER switch to the DC IN jack with the "InfoLITHIUM" battery pack (M series). See page 242 for your camcorder to OFF (CHG). Getting Started Step 1 Preparing the power supply Charging the battery pack Use the battery pack after charging it for details... "InfoLITHIUM" battery pack. (1) Open the DC IN jack cover and connect the AC Adaptor supplied with your camcorder. BATT INFO 4 V POWER CR OFF(CHG) CAM ME ERMAORY 1 2 19
Your camcorder operates only with the plug's v mark facing up when charging begins. The charge lamp lights up . (2) Connect the ...outlet. (4) Set the POWER switch to the DC IN jack with the "InfoLITHIUM" battery pack (M series). See page 242 for your camcorder to OFF (CHG). Getting Started Step 1 Preparing the power supply Charging the battery pack Use the battery pack after charging it for details... "InfoLITHIUM" battery pack. (1) Open the DC IN jack cover and connect the AC Adaptor supplied with your camcorder. BATT INFO 4 V POWER CR OFF(CHG) CAM ME ERMAORY 1 2 19

Operating Instructions
Page 20
... charge level is displayed in the following cases: - is still displayed. Note Prevent metallic objects from coming into contact with the metal parts on your camcorder. The numeric value displayed in the BATTERY INFO Refer to the value displayed in the BATTERY INFO as possible to cut off the power. BATTERY...
... charge level is displayed in the following cases: - is still displayed. Note Prevent metallic objects from coming into contact with the metal parts on your camcorder. The numeric value displayed in the BATTERY INFO Refer to the value displayed in the BATTERY INFO as possible to cut off the power. BATTERY...
Operating Instructions
Page 21
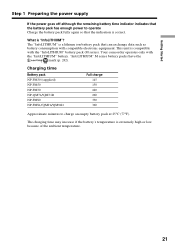
What is extremely high or low because of the ambient temperature. 21 "InfoLITHIUM" M series battery packs have the mark (p. 242). Your camcorder operates only with the "InfoLITHIUM" battery pack (M series). TM SERIES Charging time Battery pack NP-FM30 (supplied) NP-FM50 NP-FM70 NP-QM71/QM71D NP-...
What is extremely high or low because of the ambient temperature. 21 "InfoLITHIUM" M series battery packs have the mark (p. 242). Your camcorder operates only with the "InfoLITHIUM" battery pack (M series). TM SERIES Charging time Battery pack NP-FM30 (supplied) NP-FM50 NP-FM70 NP-QM71/QM71D NP-...
Operating Instructions
Page 24
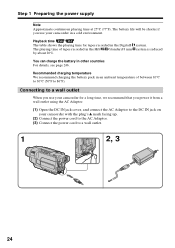
... see page 246. Connecting to a wall outlet. 1 2, 3 24 Playback time The table shows the playing time for a long time, we recommend that you use your camcorder with the plug's v mark facing up. (2) Connect the power cord to the AC Adaptor. (3) Connect the power cord to a wall outlet When you use your... tapes recorded in the Digital8 The playing time of between 10°C to 30°C (50°F to the DC IN jack on your camcorder in the Hi8 /standard 8 mm by about 20%. system. system is reduced You can charge the battery in an ambient temperature of tapes recorded in ...
... see page 246. Connecting to a wall outlet. 1 2, 3 24 Playback time The table shows the playing time for a long time, we recommend that you use your camcorder with the plug's v mark facing up. (2) Connect the power cord to the AC Adaptor. (3) Connect the power cord to a wall outlet When you use your... tapes recorded in the Digital8 The playing time of between 10°C to 30°C (50°F to the DC IN jack on your camcorder in the Hi8 /standard 8 mm by about 20%. system. system is reduced You can charge the battery in an ambient temperature of tapes recorded in ...

Operating Instructions
Page 25
... IN jack, even when the power cord is not plugged into a wall outlet. •Place the AC Adaptor near a wall outlet. Using a car battery Use Sony Car Battery Adaptor (optional). Getting Started Step 1 Preparing the power supply PRECAUTION The set itself has been turned off the power. While using the AC... Adaptor, if any power if the power cord is connected to your camcorder. •The DC IN jack has "source priority." This means that the battery pack cannot supply any trouble occurs with this unit, disconnect the plug...
... IN jack, even when the power cord is not plugged into a wall outlet. •Place the AC Adaptor near a wall outlet. Using a car battery Use Sony Car Battery Adaptor (optional). Getting Started Step 1 Preparing the power supply PRECAUTION The set itself has been turned off the power. While using the AC... Adaptor, if any power if the power cord is connected to your camcorder. •The DC IN jack has "source priority." This means that the battery pack cannot supply any trouble occurs with this unit, disconnect the plug...
Operating Instructions
Page 26
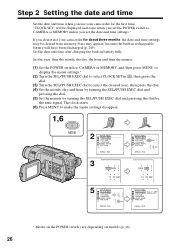
Step 2 Setting the date and time Set the date and time when you do not use your camcorder for the first time. Set the year, then the month, the day, the hour and then the minute. (1) Set the POWER switch to CAMERA or ... SET in battery fully. The clock starts. (6) Press MENU to CAMERA or MEMORY unless you set the date and time settings.* If you use your camcorder for about three months, the date and time settings may be cleared from memory (bars may appear) because the built-in rechargeable battery will have...
Step 2 Setting the date and time Set the date and time when you do not use your camcorder for the first time. Set the year, then the month, the day, the hour and then the minute. (1) Set the POWER switch to CAMERA or ... SET in battery fully. The clock starts. (6) Press MENU to CAMERA or MEMORY unless you set the date and time settings.* If you use your camcorder for about three months, the date and time settings may be cleared from memory (bars may appear) because the built-in rechargeable battery will have...


