Operating Instructions
Page 6
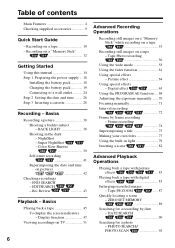
...38 Shooting in light 79 Inserting a scene 82 Advanced Playback Operations Playing back a tape with picture effects .... 83 Playing back a tape with digital effects 85 Enlarging recorded images - Basics Playing back a tape 45 To display the screen indicators - ZERO SET MEMORY 89 Searching for a ... the date and time on a tape - Recording on a "Memory Stick" 12 Getting Started Using this manual 14 Step 1 Preparing the power supply ... 18 Installing the battery pack 18 Charging the battery pack 19 Connecting to a wall outlet 24 Step 2 Setting the date and time ...
...38 Shooting in light 79 Inserting a scene 82 Advanced Playback Operations Playing back a tape with picture effects .... 83 Playing back a tape with digital effects 85 Enlarging recorded images - Basics Playing back a tape 45 To display the screen indicators - ZERO SET MEMORY 89 Searching for a ... the date and time on a tape - Recording on a "Memory Stick" 12 Getting Started Using this manual 14 Step 1 Preparing the power supply ... 18 Installing the battery pack 18 Charging the battery pack 19 Connecting to a wall outlet 24 Step 2 Setting the date and time ...
Operating Instructions
Page 9
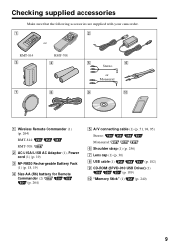
... Make sure that the following accessories are supplied with your camcorder. 1 2 or RMT-814 3 RMT-708 4 5 6 Stereo or Monaural 7 8 9 q; 1 Wireless Remote Commander (1) (p. 264) RMT-814: RMT-708: 2 AC-L15A/L15B AC Adaptor (1), Power cord (1) (p. 19) 3 NP-FM30 Rechargeable Battery Pack (1) (p. 18, 19) 4 Size AA (R6) battery for Remote Commander (2) (p. 264) 5 A/V connecting cable (1) (p. 51...
... Make sure that the following accessories are supplied with your camcorder. 1 2 or RMT-814 3 RMT-708 4 5 6 Stereo or Monaural 7 8 9 q; 1 Wireless Remote Commander (1) (p. 264) RMT-814: RMT-708: 2 AC-L15A/L15B AC Adaptor (1), Power cord (1) (p. 19) 3 NP-FM30 Rechargeable Battery Pack (1) (p. 18, 19) 4 Size AA (R6) battery for Remote Commander (2) (p. 264) 5 A/V connecting cable (1) (p. 51...

Operating Instructions
Page 10
...Connecting the power cord (p. 24) Use the battery pack when using your camcorder. AC Adaptor (supplied) Inserting a cassette (p. 28) 1 Slide OPEN/ EJECT in parentheses "( )" for more information. Quick Start Guide 10 See the page in the direction of the arrow and open the lid. 2 Push the center of your camcorder outdoors ... . 3 Close the cassette compartment by pressing on the cassette compartment. After the cassette compartment goes down completely, close the lid. Power cord Connect the plug with the cassette window facing up . Open the DC IN jack cover.
...Connecting the power cord (p. 24) Use the battery pack when using your camcorder. AC Adaptor (supplied) Inserting a cassette (p. 28) 1 Slide OPEN/ EJECT in parentheses "( )" for more information. Quick Start Guide 10 See the page in the direction of the arrow and open the lid. 2 Push the center of your camcorder outdoors ... . 3 Close the cassette compartment by pressing on the cassette compartment. After the cassette compartment goes down completely, close the lid. Power cord Connect the plug with the cassette window facing up . Open the DC IN jack cover.

Operating Instructions
Page 12
... using your camcorder. Quick Start Guide - "Memory Stick" slot b mark When ejecting the "Memory Stick," press the "Memory Stick" once lightly. 12 Power cord Connect the plug with the b mark facing the LCD panel as it can go with its v mark facing up. Open the DC IN jack cover. AC Adaptor (supplied) Inserting...
... using your camcorder. Quick Start Guide - "Memory Stick" slot b mark When ejecting the "Memory Stick," press the "Memory Stick" once lightly. 12 Power cord Connect the plug with the b mark facing the LCD panel as it can go with its v mark facing up. Open the DC IN jack cover. AC Adaptor (supplied) Inserting...
Operating Instructions
Page 18
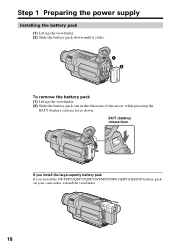
BATT (battery) release lever If you install the large-capacity battery pack If you install the NP-FM70/QM71/QM71D/FM90/FM91/QM91/QM91D battery pack on your camcorder, extend the viewfinder. 18 Step 1 Preparing the power supply Installing the battery pack (1) Lift up the viewfinder. (2) Slide the battery pack down until it clicks. 1 2 To remove the battery pack (1) Lift up the viewfinder. (2) Slide the battery pack out in the direction of the arrow while pressing the BATT (battery) release lever down.
BATT (battery) release lever If you install the large-capacity battery pack If you install the NP-FM70/QM71/QM71D/FM90/FM91/QM91/QM91D battery pack on your camcorder, extend the viewfinder. 18 Step 1 Preparing the power supply Installing the battery pack (1) Lift up the viewfinder. (2) Slide the battery pack down until it clicks. 1 2 To remove the battery pack (1) Lift up the viewfinder. (2) Slide the battery pack out in the direction of the arrow while pressing the BATT (battery) release lever down.
Operating Instructions
Page 19
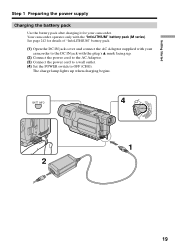
... up . (2) Connect the power cord to the AC Adaptor. (3) Connect the power cord to a wall outlet. (4) Set the POWER switch to OFF (CHG). BATT INFO 4 V POWER CR OFF(CHG) CAM ME ERMAORY 1 2 19 Getting Started Step 1 Preparing the power supply Charging the battery pack Use ...the battery pack after charging it for details of "InfoLITHIUM" battery pack. (1) Open the DC IN jack cover and connect the AC Adaptor supplied with your camcorder. Your camcorder operates only with the "InfoLITHIUM" battery ...
... up . (2) Connect the power cord to the AC Adaptor. (3) Connect the power cord to a wall outlet. (4) Set the POWER switch to OFF (CHG). BATT INFO 4 V POWER CR OFF(CHG) CAM ME ERMAORY 1 2 19 Getting Started Step 1 Preparing the power supply Charging the battery pack Use ...the battery pack after charging it for details of "InfoLITHIUM" battery pack. (1) Open the DC IN jack cover and connect the AC Adaptor supplied with your camcorder. Your camcorder operates only with the "InfoLITHIUM" battery ...

Operating Instructions
Page 20
... BATTERY INFO as percentage and recordable time with this unit, disconnect the plug from coming into contact with the metal parts on your camcorder. Note Prevent metallic objects from the wall outlet as soon as possible to the value displayed in the following cases: - The numeric.... Until the remaining battery charge is displayed for another seven seconds. If any trouble occurs with the LCD screen/viewfinder. Step 1 Preparing the power supply To check the state of the AC Adaptor. The BATTERY INFO is calculated BATTERY INFO BATTERY CHARGE LEVEL 0% 50% 100% The battery charge...
... BATTERY INFO as percentage and recordable time with this unit, disconnect the plug from coming into contact with the metal parts on your camcorder. Note Prevent metallic objects from the wall outlet as soon as possible to the value displayed in the following cases: - The numeric.... Until the remaining battery charge is displayed for another seven seconds. If any trouble occurs with the LCD screen/viewfinder. Step 1 Preparing the power supply To check the state of the AC Adaptor. The BATTERY INFO is calculated BATTERY INFO BATTERY CHARGE LEVEL 0% 50% 100% The battery charge...
Operating Instructions
Page 21
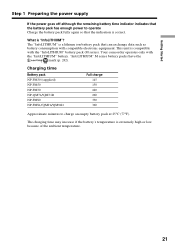
Your camcorder operates only with the "InfoLITHIUM" battery pack (M series). "InfoLITHIUM" M series battery packs have the mark (p. 242). What is extremely high or low because of the ambient temperature. 21 TM SERIES Charging time Battery pack NP-FM30 (supplied) NP-FM50 NP-FM70 NP-QM71/QM71D NP-FM90..."? The "InfoLITHIUM" is a lithium ion battery pack that the indication is compatible with the "InfoLITHIUM" battery. Getting Started Step 1 Preparing the power supply If the power goes off although the remaining battery time indicator indicates that the battery pack has enough...
Your camcorder operates only with the "InfoLITHIUM" battery pack (M series). "InfoLITHIUM" M series battery packs have the mark (p. 242). What is extremely high or low because of the ambient temperature. 21 TM SERIES Charging time Battery pack NP-FM30 (supplied) NP-FM50 NP-FM70 NP-QM71/QM71D NP-FM90..."? The "InfoLITHIUM" is a lithium ion battery pack that the indication is compatible with the "InfoLITHIUM" battery. Getting Started Step 1 Preparing the power supply If the power goes off although the remaining battery time indicator indicates that the battery pack has enough...
Operating Instructions
Page 22
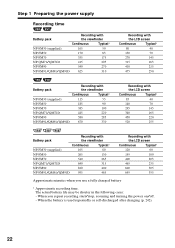
Step 1 Preparing the power supply Recording time Battery pack Recording with the viewfinder Continuous Typical* NP-FM30 (supplied) 105 50 NP-FM50 170 85 NP-FM70 355 175 ... 145 315 165 410 215 475 250 Battery pack Recording with the viewfinder Continuous Typical* NP-FM30 (supplied) 115 55 NP-FM50 185 90 NP-FM70 385 190 NP-QM71/QM71D 445 220 NP-FM90 580... 145 340 165 450 220 520 255 Battery pack Recording with the viewfinder Continuous Typical* NP-FM30 (supplied) 165 80 NP-FM50 265 130 NP-FM70 540 265 NP-QM71/QM71D 640 315 NP-FM90 820...
Step 1 Preparing the power supply Recording time Battery pack Recording with the viewfinder Continuous Typical* NP-FM30 (supplied) 105 50 NP-FM50 170 85 NP-FM70 355 175 ... 145 315 165 410 215 475 250 Battery pack Recording with the viewfinder Continuous Typical* NP-FM30 (supplied) 115 55 NP-FM50 185 90 NP-FM70 385 190 NP-QM71/QM71D 445 220 NP-FM90 580... 145 340 165 450 220 520 255 Battery pack Recording with the viewfinder Continuous Typical* NP-FM30 (supplied) 165 80 NP-FM50 265 130 NP-FM70 540 265 NP-QM71/QM71D 640 315 NP-FM90 820...
Operating Instructions
Page 23
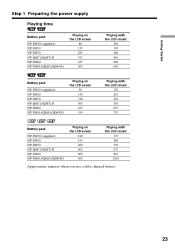
... 1 Preparing the power supply Playing time Battery pack NP-FM30 (supplied) NP-FM50 NP-FM70 NP-QM71/QM71D NP-FM90 NP-FM91/QM91/QM91D Playing on the LCD screen 80 135 285 335 435 505 Playing with the LCD closed 120 195 400 465 600 695 Battery pack NP-FM30 (supplied) NP-FM50 NP... on the LCD screen 90 150 310 365 475 550 Playing with the LCD closed 130 210 430 505 655 755 Battery pack NP-FM30 (supplied) NP-FM50 NP-FM70 NP-QM71/QM71D NP-FM90 NP-FM91/QM91/QM91D Playing on the LCD screen 120 195 400 465 600 695 Playing...
... 1 Preparing the power supply Playing time Battery pack NP-FM30 (supplied) NP-FM50 NP-FM70 NP-QM71/QM71D NP-FM90 NP-FM91/QM91/QM91D Playing on the LCD screen 80 135 285 335 435 505 Playing with the LCD closed 120 195 400 465 600 695 Battery pack NP-FM30 (supplied) NP-FM50 NP... on the LCD screen 90 150 310 365 475 550 Playing with the LCD closed 130 210 430 505 655 755 Battery pack NP-FM30 (supplied) NP-FM50 NP-FM70 NP-QM71/QM71D NP-FM90 NP-FM91/QM91/QM91D Playing on the LCD screen 120 195 400 465 600 695 Playing...
Operating Instructions
Page 24
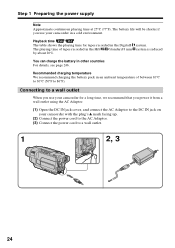
... table shows the playing time for a long time, we recommend that you use your camcorder with the plug's v mark facing up. (2) Connect the power cord to the AC Adaptor. (3) Connect the power cord to a wall outlet. 1 2, 3 24 Step 1 Preparing the power supply Note Approximate continuous playing time at 25°C (77°F). system. Recommended charging...
... table shows the playing time for a long time, we recommend that you use your camcorder with the plug's v mark facing up. (2) Connect the power cord to the AC Adaptor. (3) Connect the power cord to a wall outlet. 1 2, 3 24 Step 1 Preparing the power supply Note Approximate continuous playing time at 25°C (77°F). system. Recommended charging...

Operating Instructions
Page 25
... operating instructions of the Car Battery Adaptor for further information. 25 Refer to your camcorder. •The DC IN jack has "source priority." Using a car battery Use Sony Car Battery Adaptor (optional). Getting Started Step 1 Preparing the power supply PRECAUTION The set is not disconnected from the wall outlet as soon as it is...
... operating instructions of the Car Battery Adaptor for further information. 25 Refer to your camcorder. •The DC IN jack has "source priority." Using a car battery Use Sony Car Battery Adaptor (optional). Getting Started Step 1 Preparing the power supply PRECAUTION The set is not disconnected from the wall outlet as soon as it is...
Operating Instructions
Page 45
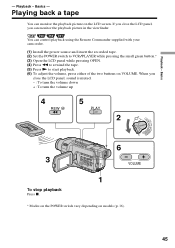
... vary depending on models (p. 16). 45 When you can control playback using the Remote Commander supplied with your camcorder. (1) Install the power source and insert the recorded tape. (2) Set the POWER switch to VCR/PLAYER while pressing the small green button.* (3) Open the LCD panel while pressing OPEN. (4) Press m to rewind the tape. (5) Press...
... vary depending on models (p. 16). 45 When you can control playback using the Remote Commander supplied with your camcorder. (1) Install the power source and insert the recorded tape. (2) Set the POWER switch to VCR/PLAYER while pressing the small green button.* (3) Open the LCD panel while pressing OPEN. (4) Press m to rewind the tape. (5) Press...
Operating Instructions
Page 51
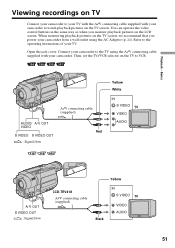
... as when you monitor playback pictures on the TV screen, we recommend that you power your camcorder from a wall outlet using the A/V connecting cable supplied with your camcorder to watch playback pictures on the TV to the operating instructions of your camcorder to the TV using the AC Adaptor (p. 24). Playback - When monitoring playback pictures...
... as when you monitor playback pictures on the TV screen, we recommend that you power your camcorder from a wall outlet using the A/V connecting cable supplied with your camcorder to watch playback pictures on the TV to the operating instructions of your camcorder to the TV using the AC Adaptor (p. 24). Playback - When monitoring playback pictures...

Operating Instructions
Page 81
Purchase the Sony XB-3D halogen lamp. If the bulb is not commercially available. The supplied halogen lamp is smudged, wipe it thoroughly. 81 Remove the power source before replacing and do not touch the bulb until the bulb becomes cool enough to handle (for about 30 minutes or more).... CAUTION •When replacing the bulb, use only the Sony XB-3D halogen...
Purchase the Sony XB-3D halogen lamp. If the bulb is not commercially available. The supplied halogen lamp is smudged, wipe it thoroughly. 81 Remove the power source before replacing and do not touch the bulb until the bulb becomes cool enough to handle (for about 30 minutes or more).... CAUTION •When replacing the bulb, use only the Sony XB-3D halogen...
Operating Instructions
Page 94
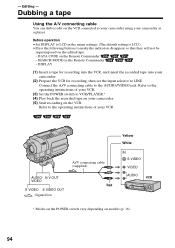
...VCR. DATA CODE on models (p. 16). 94 Connect the A/V connecting cable to your camcorder using your VCR. A/V connecting cable (supplied) AUDIO/ A/ V OUT VIDEO Red S VIDEO S VIDEO OUT : Signal flow Yellow White IN S VIDEO VIDEO AUDIO VCR * Modes on the POWER switch vary depending on the Remote Commander - Dubbing a tape Using the A/V connecting ... Remote Commander - SEARCH MODE on the VCR connected to the AUDIO/VIDEO jack. Editing - Refer to the operating instructions of your VCR. (3) Set the POWER switch to the operating instructions of your camcorder as a player.
...VCR. DATA CODE on models (p. 16). 94 Connect the A/V connecting cable to your camcorder using your VCR. A/V connecting cable (supplied) AUDIO/ A/ V OUT VIDEO Red S VIDEO S VIDEO OUT : Signal flow Yellow White IN S VIDEO VIDEO AUDIO VCR * Modes on the POWER switch vary depending on the Remote Commander - Dubbing a tape Using the A/V connecting ... Remote Commander - SEARCH MODE on the VCR connected to the AUDIO/VIDEO jack. Editing - Refer to the operating instructions of your VCR. (3) Set the POWER switch to the operating instructions of your camcorder as a player.

Operating Instructions
Page 119
... from . 3 PAUSE REC TV Yellow OUT S VIDEO VIDEO White S VIDEO AUDIO / VIDEO AUDIO VCR : Signal flow A/V connecting cable Red (supplied) When you record a tape from TV that has video/audio outputs. Before operation Set DISPLAY to LCD in the menu settings. (The default setting...Insert a tape for recording into the VCR. (2) Set the POWER switch to VCR on your camcorder. (3) Press z REC and the button on its right simultaneously on your camcorder, then immediately press X on your camcorder. (4) Press N on both your camcorder as a recorder. The picture from the TV or VCR appears...
... from . 3 PAUSE REC TV Yellow OUT S VIDEO VIDEO White S VIDEO AUDIO / VIDEO AUDIO VCR : Signal flow A/V connecting cable Red (supplied) When you record a tape from TV that has video/audio outputs. Before operation Set DISPLAY to LCD in the menu settings. (The default setting...Insert a tape for recording into the VCR. (2) Set the POWER switch to VCR on your camcorder. (3) Press z REC and the button on its right simultaneously on your camcorder, then immediately press X on your camcorder. (4) Press N on both your camcorder as a recorder. The picture from the TV or VCR appears...
Operating Instructions
Page 138
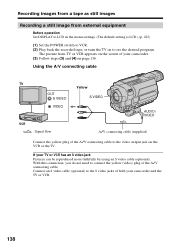
... an S video cable (optional) to see the desired program. If your camcorder and the TV or VCR. 138 Using the A/V connecting cable TV OUT S VIDEO VIDEO VCR : Signal flow Yellow S VIDEO AUDIO / VIDEO A/V connecting cable (supplied) Connect the yellow plug of the A/V connecting cable to the video output ...VCR or the TV. Recording images from a tape as still images Recording a still image from TV or VCR appears on the screen of your camcorder. (3) Follow steps (3) and (4) on page 136. The picture from external equipment Before operation Set DISPLAY to LCD in the menu settings. (The...
... an S video cable (optional) to see the desired program. If your camcorder and the TV or VCR. 138 Using the A/V connecting cable TV OUT S VIDEO VIDEO VCR : Signal flow Yellow S VIDEO AUDIO / VIDEO A/V connecting cable (supplied) Connect the yellow plug of the A/V connecting cable to the video output ...VCR or the TV. Recording images from a tape as still images Recording a still image from TV or VCR appears on the screen of your camcorder. (3) Follow steps (3) and (4) on page 136. The picture from external equipment Before operation Set DISPLAY to LCD in the menu settings. (The...

Operating Instructions
Page 145
... image has a large amount of white, the thumbnail image of the picture may not be clear. The recording folder you selected when the POWER switch was set to play modified images back with 20 images (p. 191): - When using MEMORY MIX in the "Memory Stick" on your... - CHROM: two images (such as a background) 101-0019 to DSC 00020 "Memory Stick" Operations - Sample images •The "Memory Stick" supplied with your camcorder. For M. During recording You cannot change the recording folder. Superimposing a still image in MEMORY mode The PROGRAM AE function does not work. (The ...
... image has a large amount of white, the thumbnail image of the picture may not be clear. The recording folder you selected when the POWER switch was set to play modified images back with 20 images (p. 191): - When using MEMORY MIX in the "Memory Stick" on your... - CHROM: two images (such as a background) 101-0019 to DSC 00020 "Memory Stick" Operations - Sample images •The "Memory Stick" supplied with your camcorder. For M. During recording You cannot change the recording folder. Superimposing a still image in MEMORY mode The PROGRAM AE function does not work. (The ...
Operating Instructions
Page 152
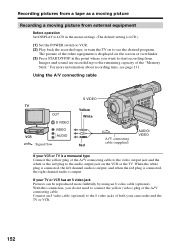
...cable TV OUT S VIDEO VIDEO VCR AUDIO : Signal flow S VIDEO Yellow White A/V connecting cable (supplied) Red AUDIO/ VIDEO If your VCR or TV is output. Connect an S video cable (optional... Press START/STOP at the point where you do not need to the S video jacks of both your camcorder and the TV or VCR. 152 With this connection, you want to start recording from. For more faithfully... by using an S video cable (optional). The picture of the other equipment is LCD.) (1) Set the POWER switch to VCR. (2) Play back the recorded tape, or turn the TV on to the remaining capacity of...
...cable TV OUT S VIDEO VIDEO VCR AUDIO : Signal flow S VIDEO Yellow White A/V connecting cable (supplied) Red AUDIO/ VIDEO If your VCR or TV is output. Connect an S video cable (optional... Press START/STOP at the point where you do not need to the S video jacks of both your camcorder and the TV or VCR. 152 With this connection, you want to start recording from. For more faithfully... by using an S video cable (optional). The picture of the other equipment is LCD.) (1) Set the POWER switch to VCR. (2) Play back the recorded tape, or turn the TV on to the remaining capacity of...


