Operating Instructions
Page 5
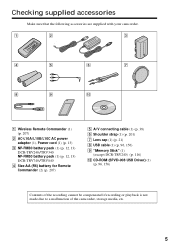
... with your camcorder. 1 2 3 4 5 6 7 8 9 0 1 Wireless Remote Commander (1) (p. 207) 2 AC-L10A/L10B/L10C AC power adaptor (1), Power cord (1) (p. 13) 3 NP-FM30 battery pack (1) (p. 12, 13) DCR-TRV240/TRV340 NP-FM50 battery pack (1) (p. 12, 13) DCR-TRV740/TRV840 ...4 Size AA (R6) battery for Remote Commander (2) (p. 207) 5 A/V connecting cable (1) (p. 38) 6 Shoulder strap (1) (p. 201) 7 Lens cap (1) (p. 21) 8 USB cable (1) (p. 96, 156) 9 "Memory Stick" (1) (except DCR-TRV240) (p. 116) 0 CD-ROM (SPVD-008 USB Driver...
... with your camcorder. 1 2 3 4 5 6 7 8 9 0 1 Wireless Remote Commander (1) (p. 207) 2 AC-L10A/L10B/L10C AC power adaptor (1), Power cord (1) (p. 13) 3 NP-FM30 battery pack (1) (p. 12, 13) DCR-TRV240/TRV340 NP-FM50 battery pack (1) (p. 12, 13) DCR-TRV740/TRV840 ...4 Size AA (R6) battery for Remote Commander (2) (p. 207) 5 A/V connecting cable (1) (p. 38) 6 Shoulder strap (1) (p. 201) 7 Lens cap (1) (p. 21) 8 USB cable (1) (p. 96, 156) 9 "Memory Stick" (1) (except DCR-TRV240) (p. 116) 0 CD-ROM (SPVD-008 USB Driver...
Operating Instructions
Page 94
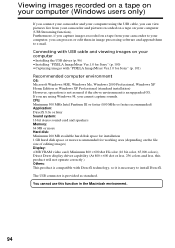
... a tape from your camcorder to your computer, you can view pictures live from your camcorder and pictures recorded on a tape on your computer (USB Streaming function). Viewing images recorded on a tape on your computer (Windows users only) If you connect your camcorder and your computer using ...installation 1 GB hard disk space or more recommended for working area (depending on your computer •Installing the USB driver (p. 96) •Installing "PIXELA ImageMixer Ver.1.0 for Sony" (p. 100) •Capturing images with DirectX technology, so it is necessary to e-mail. If you are...
... a tape from your camcorder to your computer, you can view pictures live from your camcorder and pictures recorded on a tape on your computer (USB Streaming function). Viewing images recorded on a tape on your computer (Windows users only) If you connect your camcorder and your computer using ...installation 1 GB hard disk space or more recommended for working area (depending on your computer •Installing the USB driver (p. 96) •Installing "PIXELA ImageMixer Ver.1.0 for Sony" (p. 100) •Capturing images with DirectX technology, so it is necessary to e-mail. If you are...
Operating Instructions
Page 96
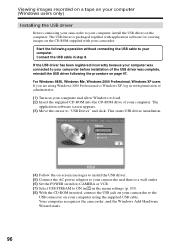
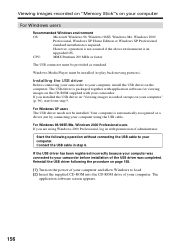
... outlet. (6) Set the POWER switch to CAMERA or VCR. (7) Select USB STREAM to ON in in the menu settings (p. 105). (8) With the CD-ROM inserted, connect the USB jack on your camcorder to the USB connector on your camcorder before installation of your camcorder. If the USB driver has been registered incorrectly because your computer was complete, reinstall the...
... outlet. (6) Set the POWER switch to CAMERA or VCR. (7) Select USB STREAM to ON in in the menu settings (p. 105). (8) With the CD-ROM inserted, connect the USB jack on your camcorder to the USB connector on your camcorder before installation of your camcorder. If the USB driver has been registered incorrectly because your computer was complete, reinstall the...
Operating Instructions
Page 97
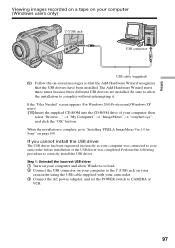
... starts three times because three different USB drivers are installed. If you cannot install the USB driver The USB driver has been registered incorrectly as your computer was completed. Perform the following procedure to "Installing 'PIXELA ImageMixer Ver.1.0 for Sony'" on page 100. Be sure ...of the USB driver was connected to your camcorder. 3 Connect the AC power adaptor, and set the POWER switch to the (USB) jack on your camcorder using the USB cable supplied with your camcorder before installation of your computer (Windows users only) (USB) jack USB connector USB cable (...
... starts three times because three different USB drivers are installed. If you cannot install the USB driver The USB driver has been registered incorrectly as your computer was completed. Perform the following procedure to "Installing 'PIXELA ImageMixer Ver.1.0 for Sony'" on page 100. Be sure ...of the USB driver was connected to your camcorder. 3 Connect the AC power adaptor, and set the POWER switch to the (USB) jack on your camcorder using the USB cable supplied with your camcorder before installation of your computer (Windows users only) (USB) jack USB connector USB cable (...
Operating Instructions
Page 99
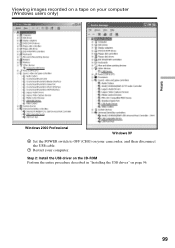
Step 2: Install the USB driver on the CD-ROM Perform the entire procedure described in "Installing the USB driver" on your camcorder, and then disconnect the USB cable. 7 Restart your computer (Windows users only) Editing Windows 2000 Professional Windows XP 6 Set the POWER switch to OFF (CHG) on page 96. 99 Viewing images recorded on a tape on your computer.
Step 2: Install the USB driver on the CD-ROM Perform the entire procedure described in "Installing the USB driver" on your camcorder, and then disconnect the USB cable. 7 Restart your computer (Windows users only) Editing Windows 2000 Professional Windows XP 6 Set the POWER switch to OFF (CHG) on page 96. 99 Viewing images recorded on a tape on your computer.
Operating Instructions
Page 104
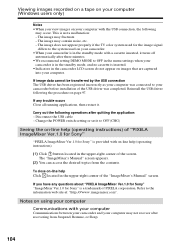
... OFF (CHG) Seeing the on-line help (operating instructions) of "PIXELA ImageMixer Ver.1.0 for Sony" "PIXELA ImageMixer Ver.1.0 for Sony" is inserted. •Indicators in the upper-right corner of the screen. The "ImageMixer's Manual...camcorder LCD screen do not appear on using your computer Communications with a cassette inserted, it . Viewing images recorded on a tape on your computer (Windows users only) Notes •When you have any trouble occurs Close all running applications, then restart it turns off automatically after quitting the application: - Reinstall the USB driver...
... OFF (CHG) Seeing the on-line help (operating instructions) of "PIXELA ImageMixer Ver.1.0 for Sony" "PIXELA ImageMixer Ver.1.0 for Sony" is inserted. •Indicators in the upper-right corner of the screen. The "ImageMixer's Manual...camcorder LCD screen do not appear on using your computer Communications with a cassette inserted, it . Viewing images recorded on a tape on your computer (Windows users only) Notes •When you have any trouble occurs Close all running applications, then restart it turns off automatically after quitting the application: - Reinstall the USB driver...
Operating Instructions
Page 156
...98SE/Me, Windows 2000 Professional users If you installed the USB driver in "Viewing images recorded on tape on your computer. The application software screen appears. 156 Installing the USB driver Before connecting your camcorder to your computer" (p. 96), start from step 5. However... the procedure on page 158. (1) Turn on the computer. Reinstall the USB driver following operation without connecting the USB cable to your camcorder before installation of your camcorder. If the USB driver has been registered incorrectly because your computer was connected to load. (2) Insert...
...98SE/Me, Windows 2000 Professional users If you installed the USB driver in "Viewing images recorded on tape on your computer. The application software screen appears. 156 Installing the USB driver Before connecting your camcorder to your computer" (p. 96), start from step 5. However... the procedure on page 158. (1) Turn on the computer. Reinstall the USB driver following operation without connecting the USB cable to your camcorder before installation of your camcorder. If the USB driver has been registered incorrectly because your computer was connected to load. (2) Insert...
Operating Instructions
Page 157
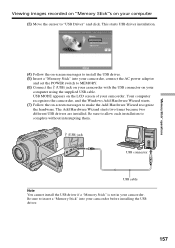
... the LCD screen of your camcorder. Be sure to insert a "Memory Stick" into your camcorder, connect the AC power adaptor and set the POWER switch to complete without interrupting them. (USB) jack USB connector USB cable Note You cannot install the USB driver if a "Memory Stick" is not in your camcorder. USB MODE appears on your camcorder before installing the USB driver. 157...
... the LCD screen of your camcorder. Be sure to insert a "Memory Stick" into your camcorder, connect the AC power adaptor and set the POWER switch to complete without interrupting them. (USB) jack USB connector USB cable Note You cannot install the USB driver if a "Memory Stick" is not in your camcorder. USB MODE appears on your camcorder before installing the USB driver. 157...
Operating Instructions
Page 158
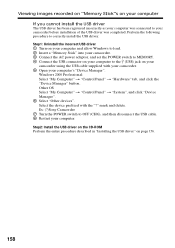
... click the "Device Manager" button. Ex: (?)Sony Camcorder 7 Turn the POWER switch to the (USB) jack on your camcorder using the USB cable supplied with the "?" Step2: Install the USB driver on the CD-ROM Perform the entire procedure described in "Installing the USB driver" on page 156. 158 Step1: Uninstall the incorrect USB driver 1 Turn on your computer and allow...
... click the "Device Manager" button. Ex: (?)Sony Camcorder 7 Turn the POWER switch to the (USB) jack on your camcorder using the USB cable supplied with the "?" Step2: Install the USB driver on the CD-ROM Perform the entire procedure described in "Installing the USB driver" on page 156. 158 Step1: Uninstall the incorrect USB driver 1 Turn on your computer and allow...
Operating Instructions
Page 160
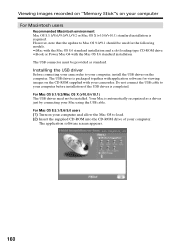
...-ROM supplied with the Mac OS 8.6 standard installation The USB connector must be provided as a driver just by connecting your camcorder. The application software screen appears. 160 Do not connect the USB cable to your computer. Viewing images recorded on "Memory ...Stick"s on your computer before installation of your computer, install the USB driver on the computer. Installing the USB driver Before connecting your camcorder to your computer For Macintosh users Recommended Macintosh environment Mac OS 8.5.1/8.6/9.0/9.1/9.2 or Mac OS X (v10...
...-ROM supplied with the Mac OS 8.6 standard installation The USB connector must be provided as a driver just by connecting your camcorder. The application software screen appears. 160 Do not connect the USB cable to your computer. Viewing images recorded on "Memory ...Stick"s on your computer before installation of your computer, install the USB driver on the computer. Installing the USB driver Before connecting your camcorder to your computer For Macintosh users Recommended Macintosh environment Mac OS 8.5.1/8.6/9.0/9.1/9.2 or Mac OS X (v10...
Operating Instructions
Page 161
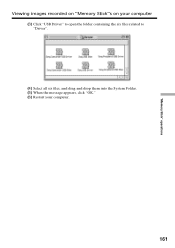
"Memory Stick" operations Viewing images recorded on "Memory Stick"s on your computer (3) Click "USB Driver" to open the folder containing the six files related to "Driver". (4) Select all six files, and drag and drop them into the System Folder. (5) When the message appears, click "OK." (6) Restart your computer. 161
"Memory Stick" operations Viewing images recorded on "Memory Stick"s on your computer (3) Click "USB Driver" to open the folder containing the six files related to "Driver". (4) Select all six files, and drag and drop them into the System Folder. (5) When the message appears, click "OK." (6) Restart your computer. 161

Operating Instructions
Page 183
...data cannot be transferred by the USB connection. • The USB cable was connected before installation of the USB driver was completed. c Uninstall the incorrect USB driver and re-install the USB driver (p. 97, 158). c Contact your Sony dealer or local authorized Sony service facility. Turn the power on... . • Disconnect the power cord of the AC power adaptor or remove the battery, then reconnect it properly. • Something is not properly installed. c Install it in about one minute. If the functions still do not work, open the LCD...
...data cannot be transferred by the USB connection. • The USB cable was connected before installation of the USB driver was completed. c Uninstall the incorrect USB driver and re-install the USB driver (p. 97, 158). c Contact your Sony dealer or local authorized Sony service facility. Turn the power on... . • Disconnect the power cord of the AC power adaptor or remove the battery, then reconnect it properly. • Something is not properly installed. c Install it in about one minute. If the functions still do not work, open the LCD...


