Operating Instructions
Page 1
DCR-TRV Model No. Serial No. Model No. Record the serial number in the space provided below. 3-065-262-13 (1) Digital Video Camera Recorder Operating Instructions Before operating the unit, please read this product. Owner's Record The model and serial numbers are located on the bottom. AC- DCR-TRV530 TM SERIES DCR-TRV230/TRV330/TRV530 ©2001 Sony Corporation Serial No. Refer to these numbers whenever you call upon your Sony dealer regarding this manual thoroughly, and retain it for future reference.
DCR-TRV Model No. Serial No. Model No. Record the serial number in the space provided below. 3-065-262-13 (1) Digital Video Camera Recorder Operating Instructions Before operating the unit, please read this product. Owner's Record The model and serial numbers are located on the bottom. AC- DCR-TRV530 TM SERIES DCR-TRV230/TRV330/TRV530 ©2001 Sony Corporation Serial No. Refer to these numbers whenever you call upon your Sony dealer regarding this manual thoroughly, and retain it for future reference.
Operating Instructions
Page 8
... to CAMERA. You, however, cannot use Hi8 /Digital8 video cassettes. The DCR-TRV530 is indicated in operation are for example, "DCR-TRV530 only." Any differences in the illustrations. Note on page 53 to the provision of your camcorder are shown in the Hi8 /standard 8 with MEMORY marked on your camcorder. Getting started - Before using your camcorder With your digital camcorder...
... to CAMERA. You, however, cannot use Hi8 /Digital8 video cassettes. The DCR-TRV530 is indicated in operation are for example, "DCR-TRV530 only." Any differences in the illustrations. Note on page 53 to the provision of your camcorder are shown in the Hi8 /standard 8 with MEMORY marked on your camcorder. Getting started - Before using your camcorder With your digital camcorder...
Operating Instructions
Page 33
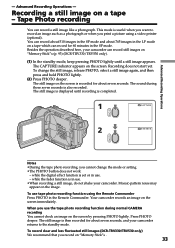
... the tape photo recording, you want to the standby mode. while the digital effect function is in use . •When recording a still image, do not shake your camcorder can record a still image like a photograph. Your camcorder records an image on "Memory Stick"s (p. 93) (DCR-TRV330/TRV530 only). (1) In the standby mode, keep pressing PHOTO lightly until recording is then...
... the tape photo recording, you want to the standby mode. while the digital effect function is in use . •When recording a still image, do not shake your camcorder can record a still image like a photograph. Your camcorder records an image on "Memory Stick"s (p. 93) (DCR-TRV330/TRV530 only). (1) In the standby mode, keep pressing PHOTO lightly until recording is then...
Operating Instructions
Page 64
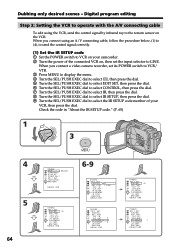
...TEST RETURN [ MENU ] : END OTHERS ED I T SET CONTROL I T SET CONTROL ADJ TEST " CUT- Dubbing only desired scenes - Digital program editing Step 2: Setting the VCR to operate with the A/V connecting cable To edit using an A/V connecting cable, follow the procedure below,... P AUS EMODE I R TEST RETURN [ MENU ] : END OTHERS ED I T SET CONTROL ADJ TEST " CUT- When you connect a video camera recorder, set its POWER switch to VCR/ VTR. 3 Press MENU to display the menu. 4 Turn the SEL/PUSH EXEC dial to select ,... of your camcorder. 2 Turn the power of the connected VCR on the VCR.
...TEST RETURN [ MENU ] : END OTHERS ED I T SET CONTROL I T SET CONTROL ADJ TEST " CUT- Dubbing only desired scenes - Digital program editing Step 2: Setting the VCR to operate with the A/V connecting cable To edit using an A/V connecting cable, follow the procedure below,... P AUS EMODE I R TEST RETURN [ MENU ] : END OTHERS ED I T SET CONTROL ADJ TEST " CUT- When you connect a video camera recorder, set its POWER switch to VCR/ VTR. 3 Press MENU to display the menu. 4 Turn the SEL/PUSH EXEC dial to select ,... of your camcorder. 2 Turn the power of the connected VCR on the VCR.
Operating Instructions
Page 68
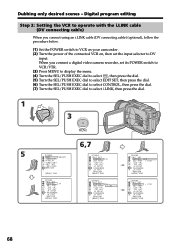
...- When you connect using an i.LINK cable (DV connecting cable) (optional), follow the procedure below. (1) Set the POWER switch to VCR on your camcorder . (2) Turn the power of the connected VCR on, then set its POWER switch to VCR/VTR. (3) Press MENU to display the menu. (4)...select CONTROL, then press the dial. (7) Turn the SEL/PUSH EXEC dial to DV input. Digital program editing Step 2: Setting the VCR to operate with the i.LINK cable (DV connecting cable) When you connect a digital video camera recorder, set the input selector to select i.LINK, then press the dial. 1 5 OFCFR...
...- When you connect using an i.LINK cable (DV connecting cable) (optional), follow the procedure below. (1) Set the POWER switch to VCR on your camcorder . (2) Turn the power of the connected VCR on, then set its POWER switch to VCR/VTR. (3) Press MENU to display the menu. (4)...select CONTROL, then press the dial. (7) Turn the SEL/PUSH EXEC dial to DV input. Digital program editing Step 2: Setting the VCR to operate with the i.LINK cable (DV connecting cable) When you connect a digital video camera recorder, set the input selector to select i.LINK, then press the dial. 1 5 OFCFR...
Operating Instructions
Page 73
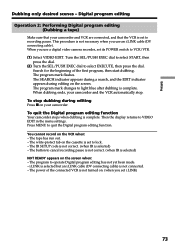
This procedure is set its POWER switch to lock. - When you use a digital video camera recorder, set to VCR/VTR. (1) Select VIDEO EDIT. The write-protect tab on . (when you set to light blue after dubbing is selected) - The power of the first program, then start ...appears during a search, and the EDIT indicator appears during editing Press x on the screen. To quit the Digital program editing function Your camcorder stops when dubbing is not connected. - Press MENU to operate Digital program editing has not yet been made. - The IR SETUP code is not correct. (when IR is ...
This procedure is set its POWER switch to lock. - When you use a digital video camera recorder, set to VCR/VTR. (1) Select VIDEO EDIT. The write-protect tab on . (when you set to light blue after dubbing is selected) - The power of the first program, then start ...appears during a search, and the EDIT indicator appears during editing Press x on the screen. To quit the Digital program editing function Your camcorder stops when dubbing is not connected. - Press MENU to operate Digital program editing has not yet been made. - The IR SETUP code is not correct. (when IR is ...

Operating Instructions
Page 86
... appears on a Sony TV when using the super laser link function (p. 32) To switch the video input on the screen and you have set the date or time (p. 17) - To cancel the demonstration, insert a cassette, set the POWER switch to other than CAMERA, or set DEMO MODE to OFF. •...camcorder. • DEMO MODE is set to CAMERA without a cassette inserted. To display selected menu items in normal size To display selected menu items at the factory and the demonstration starts about 10 minutes after you cannot select DEMO MODE in the menu settings. 86 To automatically turn on the Sony...
... appears on a Sony TV when using the super laser link function (p. 32) To switch the video input on the screen and you have set the date or time (p. 17) - To cancel the demonstration, insert a cassette, set the POWER switch to other than CAMERA, or set DEMO MODE to OFF. •...camcorder. • DEMO MODE is set to CAMERA without a cassette inserted. To display selected menu items in normal size To display selected menu items at the factory and the demonstration starts about 10 minutes after you cannot select DEMO MODE in the menu settings. 86 To automatically turn on the Sony...

Operating Instructions
Page 87
... screen, LCD screen and in the viewfinder To light up the camera recording lamp at the front of your camcorder To turn the camera recording lamp off so that the subject is not aware of the recording To make program and perform video editing (p. 63) To adjust and set time. BEEP z MELODY COMMANDER... To set the clock to set mode (p. 63) To turn off the backlight on display window To turn on your camcorder To output the beep instead of the melody To cancel all sound including shutter sound To activate the Remote Commander supplied with your camcorder To deactivate the Remote Commander to ...
... screen, LCD screen and in the viewfinder To light up the camera recording lamp at the front of your camcorder To turn the camera recording lamp off so that the subject is not aware of the recording To make program and perform video editing (p. 63) To adjust and set time. BEEP z MELODY COMMANDER... To set the clock to set mode (p. 63) To turn off the backlight on display window To turn on your camcorder To output the beep instead of the melody To cancel all sound including shutter sound To activate the Remote Commander supplied with your camcorder To deactivate the Remote Commander to ...

Operating Instructions
Page 126
... to 2 in the menu settings. c Clean the heads using the Sony V8-25CLD cleaning cassette (optional). (p. 140) No sound or only ...ON. (p. 79) In the playback mode Symptom Cause and/or Corrective Actions The tape does not move when a video control button is pressed. • ...recorded in the • PB MODE is set to ON in the menu settings without a cassette inserted, your camcorder automatically starts the demonstration. c Rewind...CAMERA or DEMO MODE is set to / in the menu settings. c Set it off or the power source does not installed. Digital8 system is selected in FLASH MODE...
... to 2 in the menu settings. c Clean the heads using the Sony V8-25CLD cleaning cassette (optional). (p. 140) No sound or only ...ON. (p. 79) In the playback mode Symptom Cause and/or Corrective Actions The tape does not move when a video control button is pressed. • ...recorded in the • PB MODE is set to ON in the menu settings without a cassette inserted, your camcorder automatically starts the demonstration. c Rewind...CAMERA or DEMO MODE is set to / in the menu settings. c Set it off or the power source does not installed. Digital8 system is selected in FLASH MODE...
Operating Instructions
Page 133
... developed to enable digital recording to Hi8 video cassette . /Digital8 Usable cassette tapes We recommend using Hi8 /Digital8 video cassette. * The recording time when you play back the tape on the screen. t / : During switching from Digital8 to Digital8 Copyright signal When you use standard 8 tape, be sure to play back Using any other DCR-TRV230/TRV330/TRV530). COPY INHIBIT...
... developed to enable digital recording to Hi8 video cassette . /Digital8 Usable cassette tapes We recommend using Hi8 /Digital8 video cassette. * The recording time when you play back the tape on the screen. t / : During switching from Digital8 to Digital8 Copyright signal When you use standard 8 tape, be sure to play back Using any other DCR-TRV230/TRV330/TRV530). COPY INHIBIT...

Operating Instructions
Page 142
...; Do not bend the power cord forcibly, or place a heavy object on and operating the video camera recorder about once per month to keep it away from coming into contact with the metal parts of...recorded by the plug. To disconnect the power cord, pull it out by Hi8/standard 8 system into Sony VAIO The Program Capture function of the lens clean with a soft cloth in an optimum state for ...Extremely hot or cold - In hot or humid locations - If this function, dub the image into a Digital8 or DV tape first, and then input it into your computer. Vibrating About care and storage of the lens...
...; Do not bend the power cord forcibly, or place a heavy object on and operating the video camera recorder about once per month to keep it away from coming into contact with the metal parts of...recorded by the plug. To disconnect the power cord, pull it out by Hi8/standard 8 system into Sony VAIO The Program Capture function of the lens clean with a soft cloth in an optimum state for ...Extremely hot or cold - In hot or humid locations - If this function, dub the image into a Digital8 or DV tape first, and then input it into your computer. Vibrating About care and storage of the lens...
Operating Instructions
Page 144
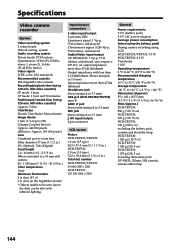
... (Optical), 700× (Digital) Focal length 2.4 - 60 mm (1/8 - 2 3/8 in.) When converted to a 35 mm still camera 42 - 1 050 mm (1 11/16 - 41 3/8 in.) Color temperature Auto Minimum illumination 4 lx (lux) (F 1.6) 0 lx (lux) (in the NightShot mode)* * Objects unable to be...cassette and shoulder strap DCR-TRV230: 1 020 g (2 lb 3 oz) DCR-TRV330: 1 040 g (2 lb 4 oz) DCR-TRV530: 1 070 g (2 lb 5 oz) including the battery pack NP-FM30, 120min. Hi8 video cassette) SP mode: 1 hour LP mode: 1 hour and 30 minuites Fastforward/rewind time (using LCD DCR-TRV230/TRV330: 3.9 W DCR-TRV530: 4.2 W ...
... (Optical), 700× (Digital) Focal length 2.4 - 60 mm (1/8 - 2 3/8 in.) When converted to a 35 mm still camera 42 - 1 050 mm (1 11/16 - 41 3/8 in.) Color temperature Auto Minimum illumination 4 lx (lux) (F 1.6) 0 lx (lux) (in the NightShot mode)* * Objects unable to be...cassette and shoulder strap DCR-TRV230: 1 020 g (2 lb 3 oz) DCR-TRV330: 1 040 g (2 lb 4 oz) DCR-TRV530: 1 070 g (2 lb 5 oz) including the battery pack NP-FM30, 120min. Hi8 video cassette) SP mode: 1 hour LP mode: 1 hour and 30 minuites Fastforward/rewind time (using LCD DCR-TRV230/TRV330: 3.9 W DCR-TRV530: 4.2 W ...
Operating Instructions
Page 147
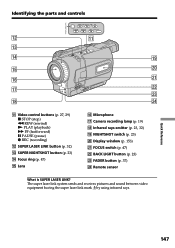
... and controls SUPER LASER LINK qs qd REW PLAY FF STOP PAUSE REC qa qf ql qg w; qh wa qj ws wd qk wf qa Video control buttons (p. 27, 29) x STOP (stop) m REW (rewind) N PLAY (playback) M FF (fastforward) X PAUSE (pause) z REC (recording) qs SUPER LASER LINK button ...(p. 32) qd SUPER NIGHTSHOT button (p. 23) qf Focus ring (p. 47) qg Lens qh Microphone qj Camera recording lamp (p. 19) qk Infrared rays emitter (p. 23, 32) ql NIGHTSHOT switch (p. 23) w; Display window (p. 153) wa FOCUS switch (p. 47) ws BACK LIGHT button...
... and controls SUPER LASER LINK qs qd REW PLAY FF STOP PAUSE REC qa qf ql qg w; qh wa qj ws wd qk wf qa Video control buttons (p. 27, 29) x STOP (stop) m REW (rewind) N PLAY (playback) M FF (fastforward) X PAUSE (pause) z REC (recording) qs SUPER LASER LINK button ...(p. 32) qd SUPER NIGHTSHOT button (p. 23) qf Focus ring (p. 47) qg Lens qh Microphone qj Camera recording lamp (p. 19) qk Infrared rays emitter (p. 23, 32) ql NIGHTSHOT switch (p. 23) w; Display window (p. 153) wa FOCUS switch (p. 47) ws BACK LIGHT button...
Operating Instructions
Page 154
... 82 AUDIO MODE 85 A/V connecting cable 31, 60, 104 BACK LIGHT 23 Battery pack 11 BEEP 87 BOUNCE 37 C, D Camera chroma key 98 Charging battery 12 Charging manganese-lithium battery 141 Clock set 17 Data code 28 Date search 57 DEMO 86 DIGITAL EFFECT 41, 54 Digital 8 system 133 Digital program editing... .......... 74 Skip scan 29 Slide show 118 Slow playback 29 SLOW SHUTTER 41 STEADYSHOT 81 Stereo tape 134 STILL 41 Sub sound 82 SUPER LASER LINK 32 SUPER NIGHTSHOT 23 S VIDEO jack 31 T, U, V Tape counter 22 Tape PB ZOOM 55 Tape photo recording 33 Telephoto 21 Time ...
... 82 AUDIO MODE 85 A/V connecting cable 31, 60, 104 BACK LIGHT 23 Battery pack 11 BEEP 87 BOUNCE 37 C, D Camera chroma key 98 Charging battery 12 Charging manganese-lithium battery 141 Clock set 17 Data code 28 Date search 57 DEMO 86 DIGITAL EFFECT 41, 54 Digital 8 system 133 Digital program editing... .......... 74 Skip scan 29 Slide show 118 Slow playback 29 SLOW SHUTTER 41 STEADYSHOT 81 Stereo tape 134 STILL 41 Sub sound 82 SUPER LASER LINK 32 SUPER NIGHTSHOT 23 S VIDEO jack 31 T, U, V Tape counter 22 Tape PB ZOOM 55 Tape photo recording 33 Telephoto 21 Time ...


