Operating Instructions
Page 3
...the instructions, may cause undesired operation. The supplied interface cable must accept any changes or modifications not expressly approved in order to the following measures: - Declaration of Conformity Trade Name: SONY Model No.: DCR-TRV240, DCR- Reorient or relocate the receiving antenna. - However, there...outlet on , the user is connected. - Consult the dealer or an experienced radio/TV technician for a Class B digital device, pursuant to correct the interference by turning the equipment off and on a circuit different from that interference will not occur ...
...the instructions, may cause undesired operation. The supplied interface cable must accept any changes or modifications not expressly approved in order to the following measures: - Declaration of Conformity Trade Name: SONY Model No.: DCR-TRV240, DCR- Reorient or relocate the receiving antenna. - However, there...outlet on , the user is connected. - Consult the dealer or an experienced radio/TV technician for a Class B digital device, pursuant to correct the interference by turning the equipment off and on a circuit different from that interference will not occur ...
Operating Instructions
Page 4
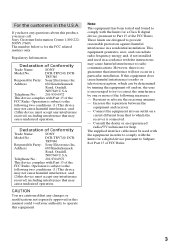
...;Viewing images recorded on "Memory Stick"s using the USB cable (except DCR-TRV240) (p. 155) •Viewing images recorded on a tape using the USB cable (p. 94) •Viewing images live on your computer from your camcorder using the USB cable (p. 103) •Capturing images from an analog video ... the exposure manually (p. 53) Functions for giving images more impact •Digital zoom [MENU] (p. 24) The default setting is OFF. (To zoom greater than 25×, (DCR-TRV240/TRV340)/15× (DCR-TRV740/TRV840), select the digital zoom power in D ZOOM in the menu settings.) •Fader (p. ...
...;Viewing images recorded on "Memory Stick"s using the USB cable (except DCR-TRV240) (p. 155) •Viewing images recorded on a tape using the USB cable (p. 94) •Viewing images live on your computer from your camcorder using the USB cable (p. 103) •Capturing images from an analog video ... the exposure manually (p. 53) Functions for giving images more impact •Digital zoom [MENU] (p. 24) The default setting is OFF. (To zoom greater than 25×, (DCR-TRV240/TRV340)/15× (DCR-TRV740/TRV840), select the digital zoom power in D ZOOM in the menu settings.) •Fader (p. ...
Operating Instructions
Page 5
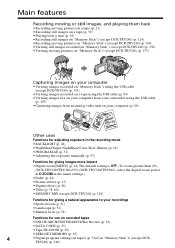
... following accessories are supplied with your camcorder. 1 2 3 4 5 6 7 8 9 0 1 Wireless Remote Commander (1) (p. 207) 2 AC-L10A/L10B/L10C AC power adaptor (1), Power cord (1) (p. 13) 3 NP-FM30 battery pack (1) (p. 12, 13) DCR-TRV240/TRV340 NP-FM50 battery pack (1) (p. 12, 13) DCR-TRV740/TRV840 4 Size AA (R6) battery for Remote Commander (2) (p. 207) 5 A/V connecting cable (1) (p. 38) 6 Shoulder strap (1) (p. 201) 7 Lens cap...
... following accessories are supplied with your camcorder. 1 2 3 4 5 6 7 8 9 0 1 Wireless Remote Commander (1) (p. 207) 2 AC-L10A/L10B/L10C AC power adaptor (1), Power cord (1) (p. 13) 3 NP-FM30 battery pack (1) (p. 12, 13) DCR-TRV240/TRV340 NP-FM50 battery pack (1) (p. 12, 13) DCR-TRV740/TRV840 4 Size AA (R6) battery for Remote Commander (2) (p. 207) 5 A/V connecting cable (1) (p. 38) 6 Shoulder strap (1) (p. 201) 7 Lens cap...
Operating Instructions
Page 38
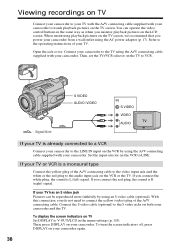
... TV is L (left) signal. Set the input selector on the VCR by using an S video cable (optional). You can be reproduced more faithfully by using the A/V connecting cable supplied with your camcorder. To display the screen indicators on the LCD screen. Open the jack cover. If you connect the ...in the same way as when you do not need to the TV using the A/V connecting cable supplied with your camcorder and the TV. To turn the screen indicators off, press DISPLAY on your camcorder. If you connect the red plug, the sound is a monaural type Connect the yellow plug...
... TV is L (left) signal. Set the input selector on the VCR by using an S video cable (optional). You can be reproduced more faithfully by using the A/V connecting cable supplied with your camcorder. To display the screen indicators on the LCD screen. Open the jack cover. If you connect the ...in the same way as when you do not need to the TV using the A/V connecting cable supplied with your camcorder and the TV. To turn the screen indicators off, press DISPLAY on your camcorder. If you connect the red plug, the sound is a monaural type Connect the yellow plug...
Operating Instructions
Page 43
... cable. ID-2 system The ID-2 system sends a copyright protection signal with video signals. Advanced Recording Operations Using the wide mode ID-1 system The ID-1 system sends aspect ratio (screen horizontal/vertical ratio) information (16:9, 4:3, or letter box) with ID-1 signals inserted between video signals when you connect your camcorder to ON (DCR-TRV240/TRV340...
... cable. ID-2 system The ID-2 system sends a copyright protection signal with video signals. Advanced Recording Operations Using the wide mode ID-1 system The ID-1 system sends aspect ratio (screen horizontal/vertical ratio) information (16:9, 4:3, or letter box) with ID-1 signals inserted between video signals when you connect your camcorder to ON (DCR-TRV240/TRV340...

Operating Instructions
Page 59
...To superimpose the title while you are recording Press TITLE while you are playing back You can record a title when you dub a tape connecting your camcorder to use a custom title, select in LARGE size. If you select LARGE. •The title position changes as follows: SMALL y LARGE You...you display the menu while superimposing a title The title is not recorded while the menu is not recorded on the screen. To use the i.LINK cable instead of a preset title If you cannot choose position 9. You can superimpose a title. If you want to step 2. When you superimpose a ...
...To superimpose the title while you are recording Press TITLE while you are playing back You can record a title when you dub a tape connecting your camcorder to use a custom title, select in LARGE size. If you select LARGE. •The title position changes as follows: SMALL y LARGE You...you display the menu while superimposing a title The title is not recorded while the menu is not recorded on the screen. To use the i.LINK cable instead of a preset title If you cannot choose position 9. You can superimpose a title. If you want to step 2. When you superimpose a ...

Operating Instructions
Page 71
...setting is LCD.) •Press the following buttons to your camcorder using the A/V connecting cable supplied with your VCR. DISPLAY - SEARCH MODE on the edited tape: - Connect the A/V connecting cable to the VCR using your camcorder and the VCR. Refer to the operating instructions of your...S-VHS, VHSC, S-VHSC, ED Betamax, mini DV, DV or Digital8 Betamax, 71 DATA CODE on both your camcorder as a player. Editing - Dubbing a tape Using the A/V connecting cable You can edit on VCRs that they will not be superimposed on the Remote Commander (1) Insert a blank tape (...
...setting is LCD.) •Press the following buttons to your camcorder using the A/V connecting cable supplied with your VCR. DISPLAY - SEARCH MODE on the edited tape: - Connect the A/V connecting cable to the VCR using your camcorder and the VCR. Refer to the operating instructions of your...S-VHS, VHSC, S-VHSC, ED Betamax, mini DV, DV or Digital8 Betamax, 71 DATA CODE on both your camcorder as a player. Editing - Dubbing a tape Using the A/V connecting cable You can edit on VCRs that they will not be superimposed on the Remote Commander (1) Insert a blank tape (...

Operating Instructions
Page 72
... output. Using the i.LINK cable (DV connecting cable) Simply connect the i.LINK cable (DV connecting cable) (optional) to DV IN/OUT on your camcorder and to the operating instructions of both your camcorder. (5) Start recording on the DV products. DV DV IN/OUT 72 If your VCR. With a digital-to VCR on your camcorder. (4) Play back the recorded...
... output. Using the i.LINK cable (DV connecting cable) Simply connect the i.LINK cable (DV connecting cable) (optional) to DV IN/OUT on your camcorder and to the operating instructions of both your camcorder. (5) Start recording on the DV products. DV DV IN/OUT 72 If your VCR. With a digital-to VCR on your camcorder. (4) Play back the recorded...

Operating Instructions
Page 73
... or the PB ZOOM function Pictures processed by picture effects, digital effects or the PB ZOOM function are output as the image signals from the DV IN/OUT jack. If you play back the picture using the i.LINK cable (DV connecting cable) See page 191 for more information about i.LINK. Editing ...Dubbing a tape Note on tapes that are not recorded in the Hi8/standard 8 system Digital signals are not output through the DV IN/OUT jack. During playback...
... or the PB ZOOM function Pictures processed by picture effects, digital effects or the PB ZOOM function are output as the image signals from the DV IN/OUT jack. If you play back the picture using the i.LINK cable (DV connecting cable) See page 191 for more information about i.LINK. Editing ...Dubbing a tape Note on tapes that are not recorded in the Hi8/standard 8 system Digital signals are not output through the DV IN/OUT jack. During playback...

Operating Instructions
Page 74
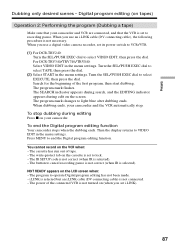
...may not be able to operate the dubbing function correctly, depending on the VCR. Using the Digital program editing function on "Memory Stick"s (except DCR-TRV240). Set CONTROL to 20 programs. Your camcorder can dub on tapes recorded other equipment Step 1 Connecting the VCR (p. 75). Step 3 ...VCR. Dubbing only desired scenes - Unwanted scene Unwanted scene Switch the order Before operating the Digital program editing function on tapes) You can be sent with an i.LINK cable (DV connecting cable), you can set up to IR in the Digital8 system. •When you connect with ...
...may not be able to operate the dubbing function correctly, depending on the VCR. Using the Digital program editing function on "Memory Stick"s (except DCR-TRV240). Set CONTROL to 20 programs. Your camcorder can dub on tapes recorded other equipment Step 1 Connecting the VCR (p. 75). Step 3 ...VCR. Dubbing only desired scenes - Unwanted scene Unwanted scene Switch the order Before operating the Digital program editing function on tapes) You can be sent with an i.LINK cable (DV connecting cable), you can set up to IR in the Digital8 system. •When you connect with ...
Operating Instructions
Page 75
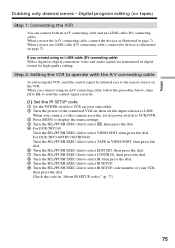
... to select IR SETUP. 0 Turn the SEL/PUSH EXEC dial to select IR SETUP code number of your camcorder. 2 Turn the power of the connected VCR on your VCR, then press the dial. Digital program editing (on page 72. When you connect a video camera recorder, set the input selector to VCR on... , then set its power switch to VCR/VTR. 3 Press MENU to display the menu settings. 4 Turn the SEL/PUSH EXEC dial to select , then press the dial. 5 For DCR-TRV240: Turn the...
... to select IR SETUP. 0 Turn the SEL/PUSH EXEC dial to select IR SETUP code number of your camcorder. 2 Turn the power of the connected VCR on your VCR, then press the dial. Digital program editing (on page 72. When you connect a video camera recorder, set the input selector to VCR on... , then set its power switch to VCR/VTR. 3 Press MENU to display the menu settings. 4 Turn the SEL/PUSH EXEC dial to select , then press the dial. 5 For DCR-TRV240: Turn the...

Operating Instructions
Page 78
...the VCR The buttons vary depending on your VCR. VCR Infrared rays emitter Remote sensor A/V connecting cable (supplied) 78 Select PAUSE if the button to cancel recording pause on the VCR 1 Turn...and remove any obstacles between the devices. Select PB if the button to cancel recording pause is X. - Digital program editing (on tapes) (2) Setting the modes to cancel the recording pause on the VCR, then ...to face each other Locate the infrared rays emitter of your camcorder and face it towards the remote sensor of your camcorder and the VCR to the operating instructions of the VCR. To cancel ...
...the VCR The buttons vary depending on your VCR. VCR Infrared rays emitter Remote sensor A/V connecting cable (supplied) 78 Select PAUSE if the button to cancel recording pause on the VCR 1 Turn...and remove any obstacles between the devices. Select PB if the button to cancel recording pause is X. - Digital program editing (on tapes) (2) Setting the modes to cancel the recording pause on the VCR, then ...to face each other Locate the infrared rays emitter of your camcorder and face it towards the remote sensor of your camcorder and the VCR to the operating instructions of the VCR. To cancel ...
Operating Instructions
Page 80
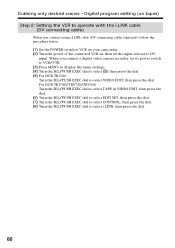
...cable) (optional), follow the procedure below. (1) Set the POWER switch to VCR on your camcorder. (2) Turn the power of the connected VCR on, then set its power switch to VCR/VTR. (3) Press MENU to display the menu settings. (4) Turn the SEL/PUSH EXEC dial to select , then press the dial. (5) For DCR-TRV240... the dial. (8) Turn the SEL/PUSH EXEC dial to select VIDEO EDIT, then press the dial. Digital program editing (on tapes) Step 2: Setting the VCR to operate with the i.LINK cable (DV connecting cable) When you connect a digital video camera recorder, set the input selector to DV input.
...cable) (optional), follow the procedure below. (1) Set the POWER switch to VCR on your camcorder. (2) Turn the power of the connected VCR on, then set its power switch to VCR/VTR. (3) Press MENU to display the menu settings. (4) Turn the SEL/PUSH EXEC dial to select , then press the dial. (5) For DCR-TRV240... the dial. (8) Turn the SEL/PUSH EXEC dial to select VIDEO EDIT, then press the dial. Digital program editing (on tapes) Step 2: Setting the VCR to operate with the i.LINK cable (DV connecting cable) When you connect a digital video camera recorder, set the input selector to DV input.

Operating Instructions
Page 81
Digital program editing (on tapes) MENU 5 For DCR-TRV240: OTHERS DATA CODE BEEP COMMANDER DISPLAY VIDEO EDIT READY INDICATOR RETURN [MENU] : END VIDEO EDIT MARK UNDO ERASE ALL START EDIT SET 0:08:55:06 1 IN TOTAL 0:00:00:00 SCENE 0 [MENU] : END For DCR-TRV340/TRV740/TRV840: OTHERS DATA CODE ... SET CONTROL i. LINK "CUT-IN" "CUT-OUT" IR SETUP PAUSEMODE IR TEST RETURN [MENU] : END When you connect using an i.LINK cable (DV connecting cable) You cannot dub the titles and display indicators. 81 LINK ADJ TEST "CUT-IN" "CUT-OUT" IR SETUP PAUSEMODE IR TEST RETURN [MENU]...
Digital program editing (on tapes) MENU 5 For DCR-TRV240: OTHERS DATA CODE BEEP COMMANDER DISPLAY VIDEO EDIT READY INDICATOR RETURN [MENU] : END VIDEO EDIT MARK UNDO ERASE ALL START EDIT SET 0:08:55:06 1 IN TOTAL 0:00:00:00 SCENE 0 [MENU] : END For DCR-TRV340/TRV740/TRV840: OTHERS DATA CODE ... SET CONTROL i. LINK "CUT-IN" "CUT-OUT" IR SETUP PAUSEMODE IR TEST RETURN [MENU] : END When you connect using an i.LINK cable (DV connecting cable) You cannot dub the titles and display indicators. 81 LINK ADJ TEST "CUT-IN" "CUT-OUT" IR SETUP PAUSEMODE IR TEST RETURN [MENU]...

Operating Instructions
Page 83
... about 10 seconds' lead before starting recording. •When you connect with an i.LINK cable (DV connecting cable) you start recording from the very beginning of the tape, the first few seconds of the tape may not record properly. Digital program editing (on tapes) Editing 3 VIDEO EDIT 0:08:55:06 EDIT SET CONTROL...
... about 10 seconds' lead before starting recording. •When you connect with an i.LINK cable (DV connecting cable) you start recording from the very beginning of the tape, the first few seconds of the tape may not record properly. Digital program editing (on tapes) Editing 3 VIDEO EDIT 0:08:55:06 EDIT SET CONTROL...
Operating Instructions
Page 87
...to cancel recording pause is not correct (when IR is not turned on your camcorder and VCR are connected, and that the VCR is set its power switch to VCR/VTR. (1) For DCR-TRV240: Turn the SEL/PUSH EXEC dial to lock. - The SEARCH indicator appears... during search, and the EDITING indicator appears during editing Press x on (when you set to select EXECUTE, then press the dial. The button to end the Digital program editing function. i.LINK is selected but an i.LINK cable (DV connecting cable...
...to cancel recording pause is not correct (when IR is not turned on your camcorder and VCR are connected, and that the VCR is set its power switch to VCR/VTR. (1) For DCR-TRV240: Turn the SEL/PUSH EXEC dial to lock. - The SEARCH indicator appears... during search, and the EDITING indicator appears during editing Press x on (when you set to select EXECUTE, then press the dial. The button to end the Digital program editing function. i.LINK is selected but an i.LINK cable (DV connecting cable...

Operating Instructions
Page 88
... images and sound on the analog video unit. Depending on your computer and the software you convert analog video signals into digital video signals via your camcorder when the video tapes include copyright protection signals such as the ID-2 system. •You can capture images and sound... flicker. Signal convert function You can capture images and sound with 88 your camcorder. Notes •You need to output the images correctly when you are using the USB cable supplied with an S video cable (optional) instead of the analog video signals, your computer may contain noise ...
... images and sound on the analog video unit. Depending on your computer and the software you convert analog video signals into digital video signals via your camcorder when the video tapes include copyright protection signals such as the ID-2 system. •You can capture images and sound... flicker. Signal convert function You can capture images and sound with 88 your camcorder. Notes •You need to output the images correctly when you are using the USB cable supplied with an S video cable (optional) instead of the analog video signals, your computer may contain noise ...

Operating Instructions
Page 89
... on your camcorder at the scene where you want to record over)... your camcorder. (3) Press z REC and the button on its right simultaneously on your camcorder, then immediately press X on your camcorder. (4)... Press N on the VCR to start recording from. 3 PAUSE REC VCR OUT S VIDEO VIDEO AUDIO S VIDEO : Signal flow When you are recording a tape from a TV that has video/ audio outputs. The picture from a TV or VCR appears on the screen of your camcorder.... (5) Press X on both your camcorder and the VCR. AUDIO / VIDEO 89 Use your camcorder as a recorder...
... on your camcorder at the scene where you want to record over)... your camcorder. (3) Press z REC and the button on its right simultaneously on your camcorder, then immediately press X on your camcorder. (4)... Press N on the VCR to start recording from. 3 PAUSE REC VCR OUT S VIDEO VIDEO AUDIO S VIDEO : Signal flow When you are recording a tape from a TV that has video/ audio outputs. The picture from a TV or VCR appears on the screen of your camcorder.... (5) Press X on both your camcorder and the VCR. AUDIO / VIDEO 89 Use your camcorder as a recorder...

Operating Instructions
Page 90
... channel audio is output, and when the red plug is connected, the right channel audio is a monaural type Connect the yellow plug of the A/V connecting cable to the video output jack and the white or the red plug to play back the original tape at normal speed. If your TV or... pictures recorded in the Hi8/standard 8 with the Digital8 system on a tape. •If you do not need to the S video jacks of both your camcorder and the TV or VCR. 90 If your VCR is output. When recording from other equipment, be reproduced more faithfully by using an S video...
... channel audio is output, and when the red plug is connected, the right channel audio is a monaural type Connect the yellow plug of the A/V connecting cable to the video output jack and the white or the red plug to play back the original tape at normal speed. If your TV or... pictures recorded in the Hi8/standard 8 with the Digital8 system on a tape. •If you do not need to the S video jacks of both your camcorder and the TV or VCR. 90 If your VCR is output. When recording from other equipment, be reproduced more faithfully by using an S video...

Operating Instructions
Page 91
... appear on the screen of your camcorder and to start playback. The picture to be uneven. With a digital-to-digital connection, video and audio signals are transmitted in digital form for high-quality editing. (1) Insert a blank tape (or a tape you play back the picture using the i.LINK cable (DV connecting cable). Before recording Make sure that...
... appear on the screen of your camcorder and to start playback. The picture to be uneven. With a digital-to-digital connection, video and audio signals are transmitted in digital form for high-quality editing. (1) Insert a blank tape (or a tape you play back the picture using the i.LINK cable (DV connecting cable). Before recording Make sure that...


