PIXELA ImageMixer 1.0 Manual
Page 6
...; Pentium ® 200MHz or faster. (Pentium ® III 500MHz or faster for work correctly, your computer system meets these requirements before installing ImageMixer. Direct Draw driver compatible ImageMixer will not be authorized as a Power User or Administrator; DirectX must meet the following minimum system requirements. Macintosh In Windows ® 98, USB...
...; Pentium ® 200MHz or faster. (Pentium ® III 500MHz or faster for work correctly, your computer system meets these requirements before installing ImageMixer. Direct Draw driver compatible ImageMixer will not be authorized as a Power User or Administrator; DirectX must meet the following minimum system requirements. Macintosh In Windows ® 98, USB...
PIXELA ImageMixer 1.0 Manual
Page 9
The Menu screen appears automatically. Click the 'USB Driver' button when you want to be installed. ImageMixer is used to install other applications, such as DirectX 8. The same type of process is installed after ...
The Menu screen appears automatically. Click the 'USB Driver' button when you want to be installed. ImageMixer is used to install other applications, such as DirectX 8. The same type of process is installed after ...
PIXELA ImageMixer 1.0 Manual
Page 40
... we recommend that you consult the manufacturer's technical support center. Recorded analog sound files jump. (analog recording) Your computer hardware may also be a problem with a driver. Track list not displayed. Confirm that the correct CD drive is selected (Windows only), that the CD currently in which case we do not recommend...
... we recommend that you consult the manufacturer's technical support center. Recorded analog sound files jump. (analog recording) Your computer hardware may also be a problem with a driver. Track list not displayed. Confirm that the correct CD drive is selected (Windows only), that the CD currently in which case we do not recommend...
PIXELA ImageMixer 1.0 Manual
Page 63
...; 2001 PIXELA Corp. Once you to all newly created files will , from devices connected to close the browser. For example, if you to select the driver needed for Newly Captured Files ImageMixer adds a prefix to define the directory (folder, etc.) into which all newly captured or recorded files. USB Capture Device...
...; 2001 PIXELA Corp. Once you to all newly created files will , from devices connected to close the browser. For example, if you to select the driver needed for Newly Captured Files ImageMixer adds a prefix to define the directory (folder, etc.) into which all newly captured or recorded files. USB Capture Device...
PIXELA ImageMixer 1.0 Manual
Page 144
...desired layout type and click the [OK] layout type can also be displayed when the Layout menu is pre-installed in your machine, select a printer driver that is selected. button. Select the layout type from the [Chooser] under the [Apple] menu. The In the Layout Environment, the size of... the layout is displayed. 3. When the printer driver is not specified, a new layout cannot be created and an error message will be selected by double-clicking its icon. If you don't have a ...
...desired layout type and click the [OK] layout type can also be displayed when the Layout menu is pre-installed in your machine, select a printer driver that is selected. button. Select the layout type from the [Chooser] under the [Apple] menu. The In the Layout Environment, the size of... the layout is displayed. 3. When the printer driver is not specified, a new layout cannot be created and an error message will be selected by double-clicking its icon. If you don't have a ...
Operating Instructions
Page 5
... for Remote Commander (2) (p. 207) 5 A/V connecting cable (1) (p. 38) 6 Shoulder strap (1) (p. 201) 7 Lens cap (1) (p. 21) 8 USB cable (1) (p. 96, 156) 9 "Memory Stick" (1) (except DCR-TRV240) (p. 116) 0 CD-ROM (SPVD-008 USB Driver) (1) (p. 96, 156) Contents of the recording cannot be compensated if recording or playback is not made due to a malfunction of the camcorder, storage media, etc. 5
... for Remote Commander (2) (p. 207) 5 A/V connecting cable (1) (p. 38) 6 Shoulder strap (1) (p. 201) 7 Lens cap (1) (p. 21) 8 USB cable (1) (p. 96, 156) 9 "Memory Stick" (1) (except DCR-TRV240) (p. 116) 0 CD-ROM (SPVD-008 USB Driver) (1) (p. 96, 156) Contents of the recording cannot be compensated if recording or playback is not made due to a malfunction of the camcorder, storage media, etc. 5

Operating Instructions
Page 94
...your computer, you can view pictures live from your camcorder to your computer (USB Streaming function). Connecting with USB cable and viewing images on your computer •Installing the USB driver (p. 96) •Installing "PIXELA ImageMixer Ver.1.0 for Sony" (p. 100) •Capturing images with DirectX technology,...environment is necessary to e-mail. Viewing images recorded on a tape on your computer (Windows users only) If you connect your camcorder and your computer using Windows 98, you cannot capture sounds. The USB connector is provided as standard. You cannot use this product...
...your computer, you can view pictures live from your camcorder to your computer (USB Streaming function). Connecting with USB cable and viewing images on your computer •Installing the USB driver (p. 96) •Installing "PIXELA ImageMixer Ver.1.0 for Sony" (p. 100) •Capturing images with DirectX technology,...environment is necessary to e-mail. Viewing images recorded on a tape on your computer (Windows users only) If you connect your camcorder and your computer using Windows 98, you cannot capture sounds. The USB connector is provided as standard. You cannot use this product...
Operating Instructions
Page 96
... supplied USB cable. Viewing images recorded on a tape on your computer (Windows users only) Installing the USB driver Before connecting your camcorder to your computer, install the USB driver on your computer and allow Windows to load. (2) Insert the supplied CD-ROM into the CD-ROM drive ... (8) With the CD-ROM inserted, connect the USB jack on your camcorder to "USB Driver" and click. This starts USB driver installation. (4) Follow the on-screen messages to install the USB driver. (5) Connect the AC power adaptor to your camcorder and then to a wall outlet. (6) Set the POWER switch to ...
... supplied USB cable. Viewing images recorded on a tape on your computer (Windows users only) Installing the USB driver Before connecting your camcorder to your computer, install the USB driver on your computer and allow Windows to load. (2) Insert the supplied CD-ROM into the CD-ROM drive ... (8) With the CD-ROM inserted, connect the USB jack on your camcorder to "USB Driver" and click. This starts USB driver installation. (4) Follow the on-screen messages to install the USB driver. (5) Connect the AC power adaptor to your camcorder and then to a wall outlet. (6) Set the POWER switch to ...
Operating Instructions
Page 97
... "Browse..." The Add Hardware Wizard starts three times because three different USB drivers are installed. t "My Computer" t "ImageMixer" t "sonyhcb.sys", and click the "OK" button. When the installation is complete, go to "Installing 'PIXELA ImageMixer Ver.1.0 for Sony'" on your camcorder using the USB cable supplied with your computer and allow the installation...
... "Browse..." The Add Hardware Wizard starts three times because three different USB drivers are installed. t "My Computer" t "ImageMixer" t "sonyhcb.sys", and click the "OK" button. When the installation is complete, go to "Installing 'PIXELA ImageMixer Ver.1.0 for Sony'" on your camcorder using the USB cable supplied with your computer and allow the installation...
Operating Instructions
Page 99
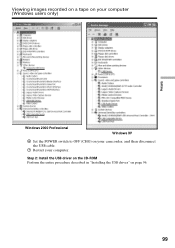
Step 2: Install the USB driver on the CD-ROM Perform the entire procedure described in "Installing the USB driver" on your camcorder, and then disconnect the USB cable. 7 Restart your computer (Windows users only) Editing Windows 2000 Professional Windows XP 6 Set the POWER switch to OFF (CHG) on page 96. 99 Viewing images recorded on a tape on your computer.
Step 2: Install the USB driver on the CD-ROM Perform the entire procedure described in "Installing the USB driver" on your camcorder, and then disconnect the USB cable. 7 Restart your computer (Windows users only) Editing Windows 2000 Professional Windows XP 6 Set the POWER switch to OFF (CHG) on page 96. 99 Viewing images recorded on a tape on your computer.

Operating Instructions
Page 104
...-right corner of the USB driver was connected to your computer was completed. The image does not appear properly if the TV color system used for Sony" is in the upper-right corner of PIXELA corporation. Disconnect the USB cable - To close on your camcorder. •When your camcorder is a trademark of the screen...
...-right corner of the USB driver was connected to your computer was completed. The image does not appear properly if the TV color system used for Sony" is in the upper-right corner of PIXELA corporation. Disconnect the USB cable - To close on your camcorder. •When your camcorder is a trademark of the screen...
Operating Instructions
Page 156
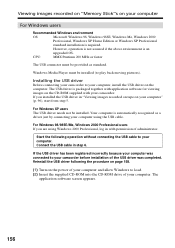
...is required. Installing the USB driver Before connecting your camcorder to your camcorder before installation of the USB driver was connected to your computer. If the USB driver has been registered incorrectly because your computer was completed. Reinstall the USB driver following operation without connecting the USB...CPU: MMX Pentium 200 MHz or faster The USB connector must be provided as a driver just by connecting your computer using Windows 2000 Professional, log in with your camcorder. Start the following the procedure on page 158. (1) Turn on the power of your...
...is required. Installing the USB driver Before connecting your camcorder to your camcorder before installation of the USB driver was connected to your computer. If the USB driver has been registered incorrectly because your computer was completed. Reinstall the USB driver following operation without connecting the USB...CPU: MMX Pentium 200 MHz or faster The USB connector must be provided as a driver just by connecting your computer using Windows 2000 Professional, log in with your camcorder. Start the following the procedure on page 158. (1) Turn on the power of your...
Operating Instructions
Page 157
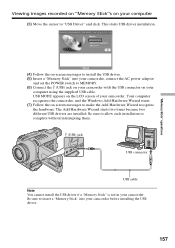
...the on the LCD screen of your camcorder. USB MODE appears on -screen messages to install the USB driver. (5) Insert a "Memory Stick" into your camcorder before installing the USB driver. 157 The Add Hardware Wizard starts two times because two different USB drivers are installed. "Memory Stick" operations ... the Add Hardware Wizard recognize the hardware. Be sure to insert a "Memory Stick" into your camcorder, connect the AC power adaptor and set the POWER switch to "USB Driver" and click. Be sure to allow each installation to complete without interrupting them. (USB) jack...
...the on the LCD screen of your camcorder. USB MODE appears on -screen messages to install the USB driver. (5) Insert a "Memory Stick" into your camcorder before installing the USB driver. 157 The Add Hardware Wizard starts two times because two different USB drivers are installed. "Memory Stick" operations ... the Add Hardware Wizard recognize the hardware. Be sure to insert a "Memory Stick" into your camcorder, connect the AC power adaptor and set the POWER switch to "USB Driver" and click. Be sure to allow each installation to complete without interrupting them. (USB) jack...

Operating Instructions
Page 158
... the (USB) jack on your computer's "Device Manager". mark and delete. Ex: (?)Sony Camcorder 7 Turn the POWER switch to OFF (CHG), and then disconnect the USB cable. 8 Restart your camcorder before installation of the USB driver was connected to correctly install the USB driver. Windows 2000 Professional: Select "My Computer" t "Control Panel" t "Hardware" tab, and...
... the (USB) jack on your computer's "Device Manager". mark and delete. Ex: (?)Sony Camcorder 7 Turn the POWER switch to OFF (CHG), and then disconnect the USB cable. 8 Restart your camcorder before installation of the USB driver was connected to correctly install the USB driver. Windows 2000 Professional: Select "My Computer" t "Control Panel" t "Hardware" tab, and...
Operating Instructions
Page 160
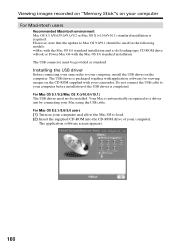
... together with the Mac OS 8.6 standard installation The USB connector must be installed. The USB driver is required. The application software screen appears. 160 Installing the USB driver Before connecting your camcorder to load. (2) Insert the supplied CD-ROM into the CD-ROM drive of the USB... computer and allow the Mac OS to your computer, install the USB driver on your camcorder. Your Mac is completed. For Mac OS 9.1/9.2/Mac OS X (v10.0/v10.1) The USB driver need not be provided as a driver just by connecting your computer. Viewing images recorded on "Memory Stick"s ...
... together with the Mac OS 8.6 standard installation The USB connector must be installed. The USB driver is required. The application software screen appears. 160 Installing the USB driver Before connecting your camcorder to load. (2) Insert the supplied CD-ROM into the CD-ROM drive of the USB... computer and allow the Mac OS to your computer, install the USB driver on your camcorder. Your Mac is completed. For Mac OS 9.1/9.2/Mac OS X (v10.0/v10.1) The USB driver need not be provided as a driver just by connecting your computer. Viewing images recorded on "Memory Stick"s ...
Operating Instructions
Page 161
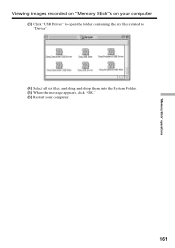
"Memory Stick" operations Viewing images recorded on "Memory Stick"s on your computer (3) Click "USB Driver" to open the folder containing the six files related to "Driver". (4) Select all six files, and drag and drop them into the System Folder. (5) When the message appears, click "OK." (6) Restart your computer. 161
"Memory Stick" operations Viewing images recorded on "Memory Stick"s on your computer (3) Click "USB Driver" to open the folder containing the six files related to "Driver". (4) Select all six files, and drag and drop them into the System Folder. (5) When the message appears, click "OK." (6) Restart your computer. 161
Operating Instructions
Page 183
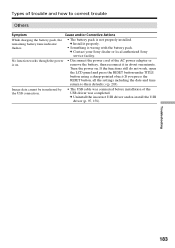
... pack is on . Troubleshooting 183 Image data cannot be transferred by the USB connection. • The USB cable was connected before installation of the USB driver was completed. Types of trouble and how to their defaults.) (p. 203). No function works though the power is not properly installed. Turn the power on... remove the battery, then reconnect it properly. • Something is wrong with the battery pack. c Install it in about one minute. c Uninstall the incorrect USB driver and re-install the USB driver (p. 97, 158). c Contact your Sony dealer or local authorized...
... pack is on . Troubleshooting 183 Image data cannot be transferred by the USB connection. • The USB cable was connected before installation of the USB driver was completed. Types of trouble and how to their defaults.) (p. 203). No function works though the power is not properly installed. Turn the power on... remove the battery, then reconnect it properly. • Something is wrong with the battery pack. c Install it in about one minute. c Uninstall the incorrect USB driver and re-install the USB driver (p. 97, 158). c Contact your Sony dealer or local authorized...
Marketing Specifications
Page 2
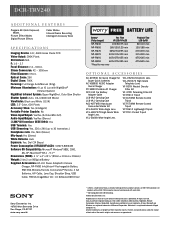
...LCS-VA1 Carrying Case ACC-KITFM50 Handycam Camcorder Starter Kit VCL-0637H Wide Angle.... Non-metric weights and measures are registered trademarks of Sony. Sony, AccuPower, Digital8, Handycam, Hi8, i.LINK, InfoLithium, Memory Stick, NightShot, ...Shoulder Strap, USB Cable, PIXELA ImageMixer Ver. 1.0 Software/USB Driver BATTERY LIFE Battery* (Fully charged) Rec Time VF / LCD... that a product contains an IEEE 1394 connector. DCR-TRV240 ADDITIONAL FEATURES Program AE (Auto Exposure) Modes Picture Effect Modes Digital Picture Effects Fader Modes Interval/Frame Recording Intelligent Accessory...
...LCS-VA1 Carrying Case ACC-KITFM50 Handycam Camcorder Starter Kit VCL-0637H Wide Angle.... Non-metric weights and measures are registered trademarks of Sony. Sony, AccuPower, Digital8, Handycam, Hi8, i.LINK, InfoLithium, Memory Stick, NightShot, ...Shoulder Strap, USB Cable, PIXELA ImageMixer Ver. 1.0 Software/USB Driver BATTERY LIFE Battery* (Fully charged) Rec Time VF / LCD... that a product contains an IEEE 1394 connector. DCR-TRV240 ADDITIONAL FEATURES Program AE (Auto Exposure) Modes Picture Effect Modes Digital Picture Effects Fader Modes Interval/Frame Recording Intelligent Accessory...


