Operating Instructions
Page 4
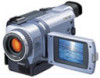
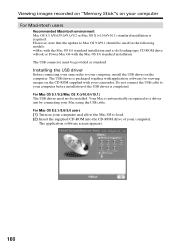
... •Viewing images recorded on "Memory Stick"s using the USB cable (except DCR-TRV240) (p. 155) •Viewing images recorded on a tape using the USB cable (p. 94) •Viewing images live on your computer from your camcorder using the USB cable (p. 103) •Capturing images from an analog video unit... exposure manually (p. 53) Functions for giving images more impact •Digital zoom [MENU] (p. 24) The default setting is OFF. (To zoom greater than 25×, (DCR-TRV240/TRV340)/15× (DCR-TRV740/TRV840), select the digital zoom power in D ZOOM in the menu settings.) •Fader...
... •Viewing images recorded on "Memory Stick"s using the USB cable (except DCR-TRV240) (p. 155) •Viewing images recorded on a tape using the USB cable (p. 94) •Viewing images live on your computer from your camcorder using the USB cable (p. 103) •Capturing images from an analog video unit... exposure manually (p. 53) Functions for giving images more impact •Digital zoom [MENU] (p. 24) The default setting is OFF. (To zoom greater than 25×, (DCR-TRV240/TRV340)/15× (DCR-TRV740/TRV840), select the digital zoom power in D ZOOM in the menu settings.) •Fader...
Operating Instructions
Page 5
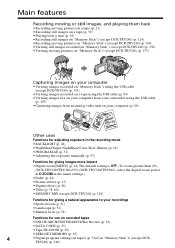
... camcorder. 1 2 3 4 5 6 7 8 9 0 1 Wireless Remote Commander (1) (p. 207) 2 AC-L10A/L10B/L10C AC power adaptor (1), Power cord (1) (p. 13) 3 NP-FM30 battery pack (1) (p. 12, 13) DCR-TRV240/TRV340 NP-FM50 battery pack (1) (p. 12, 13) DCR-TRV740/TRV840 4 Size AA (R6) battery for Remote Commander (2) (p. 207) 5 A/V connecting cable (1) (p. 38) 6 Shoulder strap (1) (p. 201) 7 Lens cap (1) (p. 21) 8 USB cable (1) (p. 96, 156) 9 "Memory Stick" (1) (except DCR-TRV240...
... camcorder. 1 2 3 4 5 6 7 8 9 0 1 Wireless Remote Commander (1) (p. 207) 2 AC-L10A/L10B/L10C AC power adaptor (1), Power cord (1) (p. 13) 3 NP-FM30 battery pack (1) (p. 12, 13) DCR-TRV240/TRV340 NP-FM50 battery pack (1) (p. 12, 13) DCR-TRV740/TRV840 4 Size AA (R6) battery for Remote Commander (2) (p. 207) 5 A/V connecting cable (1) (p. 38) 6 Shoulder strap (1) (p. 201) 7 Lens cap (1) (p. 21) 8 USB cable (1) (p. 96, 156) 9 "Memory Stick" (1) (except DCR-TRV240...

Operating Instructions
Page 88
... computer using the USB cable supplied with an S video cable (optional) instead of the A/V connecting cable (supplied). If your computer has a USB jack You can capture images and sound from an analog video unit on your camcorder. Notes •You... need to install software that the image may not be able to output the images correctly when you convert analog video signals into digital...
... computer using the USB cable supplied with an S video cable (optional) instead of the A/V connecting cable (supplied). If your computer has a USB jack You can capture images and sound from an analog video unit on your camcorder. Notes •You... need to install software that the image may not be able to output the images correctly when you convert analog video signals into digital...

Operating Instructions
Page 94
... images recorded on a tape from your camcorder to your computer, you can view pictures live from your camcorder and pictures recorded on a tape on your computer (USB Streaming function). Connecting with USB cable and viewing images on your computer •Installing the USB driver (p. 96) •Installing "PIXELA...Sony" (p. 100) •Capturing images with DirectX technology, so it is necessary to e-mail. If you are using the USB cable, you can process or edit them to install DirectX. Viewing images recorded on a tape on your computer (Windows users only) If you connect your camcorder...
... images recorded on a tape from your camcorder to your computer, you can view pictures live from your camcorder and pictures recorded on a tape on your computer (USB Streaming function). Connecting with USB cable and viewing images on your computer •Installing the USB driver (p. 96) •Installing "PIXELA...Sony" (p. 100) •Capturing images with DirectX technology, so it is necessary to e-mail. If you are using the USB cable, you can process or edit them to install DirectX. Viewing images recorded on a tape on your computer (Windows users only) If you connect your camcorder...
Operating Instructions
Page 96
... CD-ROM drive of the USB driver was connected to your camcorder before installation of your computer. If the USB driver has been registered incorrectly because your computer was complete, reinstall the USB driver following operation without connecting the USB cable to your computer using Windows... the CD-ROM inserted, connect the USB jack on your camcorder to the USB connector on your computer. For Windows 98SE, Windows Me, Windows 2000 Professional, Windows XP users If you are using the supplied USB cable. Your computer recognizes the camcorder, and the Windows Add Hardware Wizard ...
... CD-ROM drive of the USB driver was connected to your camcorder before installation of your computer. If the USB driver has been registered incorrectly because your computer was complete, reinstall the USB driver following operation without connecting the USB cable to your computer using Windows... the CD-ROM inserted, connect the USB jack on your camcorder to the USB connector on your computer. For Windows 98SE, Windows Me, Windows 2000 Professional, Windows XP users If you are using the supplied USB cable. Your computer recognizes the camcorder, and the Windows Add Hardware Wizard ...
Operating Instructions
Page 97
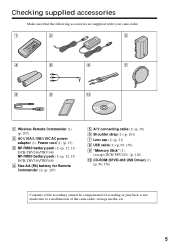
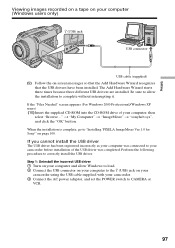
...into the CD-ROM drive of the USB driver was connected to your camcorder before installation of your computer, then select "Browse..." Perform the following procedure to "Installing 'PIXELA ImageMixer Ver.1.0 for Sony'" on page 100. Step 1: Uninstall the incorrect USB driver 1 Turn on your computer was.... Be sure to allow Windows to load. 2 Connect the USB connector on your computer to the (USB) jack on your camcorder using the USB cable supplied with your computer (Windows users only) (USB) jack USB connector USB cable (supplied) (9) Follow the on-screen messages so that the ...
...into the CD-ROM drive of the USB driver was connected to your camcorder before installation of your computer, then select "Browse..." Perform the following procedure to "Installing 'PIXELA ImageMixer Ver.1.0 for Sony'" on page 100. Step 1: Uninstall the incorrect USB driver 1 Turn on your computer was.... Be sure to allow Windows to load. 2 Connect the USB connector on your computer to the (USB) jack on your camcorder using the USB cable supplied with your computer (Windows users only) (USB) jack USB connector USB cable (supplied) (9) Follow the on-screen messages so that the ...
Operating Instructions
Page 99
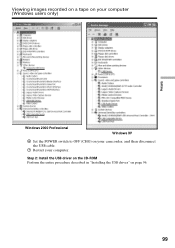
Step 2: Install the USB driver on the CD-ROM Perform the entire procedure described in "Installing the USB driver" on your camcorder, and then disconnect the USB cable. 7 Restart your computer. Viewing images recorded on a tape on your computer (Windows users only) Editing Windows 2000 Professional Windows XP 6 Set the POWER switch to OFF (CHG) on page 96. 99
Step 2: Install the USB driver on the CD-ROM Perform the entire procedure described in "Installing the USB driver" on your camcorder, and then disconnect the USB cable. 7 Restart your computer. Viewing images recorded on a tape on your computer (Windows users only) Editing Windows 2000 Professional Windows XP 6 Set the POWER switch to OFF (CHG) on page 96. 99

Operating Instructions
Page 101
... (Windows users only) Capturing images with "PIXELA ImageMixer Ver.1.0 for Sony" on your computer. (USB) jack USB connector USB cable (3) Connect the AC power adaptor to your camcorder and then to ON in in the menu settings (p. 105). (5) Select "Start" t "Program" t "PIXELA" t "ImageMixer" t "ImageMixer Ver.1.0 for Sony" To use this software in Windows 2000 Professional, you must...
... (Windows users only) Capturing images with "PIXELA ImageMixer Ver.1.0 for Sony" on your computer. (USB) jack USB connector USB cable (3) Connect the AC power adaptor to your camcorder and then to ON in in the menu settings (p. 105). (5) Select "Start" t "Program" t "PIXELA" t "ImageMixer" t "ImageMixer Ver.1.0 for Sony" To use this software in Windows 2000 Professional, you must...

Operating Instructions
Page 104
... does not appear properly if the TV color system used for the image signal differs to the system used on your camcorder. •When your camcorder is in the standby mode with a cassette inserted, it turns off automatically after three minutes. •We recommend setting... Seeing the on-line help (operating instructions) of "PIXELA ImageMixer Ver.1.0 for Sony" "PIXELA ImageMixer Ver.1.0 for Sony" is not a malfunction: - Carry out the following may not recover after quitting the application: - Disconnect the USB cable - Change the POWER switch setting or set it . If you view images...
... does not appear properly if the TV color system used for the image signal differs to the system used on your camcorder. •When your camcorder is in the standby mode with a cassette inserted, it turns off automatically after three minutes. •We recommend setting... Seeing the on-line help (operating instructions) of "PIXELA ImageMixer Ver.1.0 for Sony" "PIXELA ImageMixer Ver.1.0 for Sony" is not a malfunction: - Carry out the following may not recover after quitting the application: - Disconnect the USB cable - Change the POWER switch setting or set it . If you view images...

Operating Instructions
Page 116
...Stick" supplied with your camcorder. If you carry or store a "Memory Stick," put it in locations that are: - Very humid or subject to corrosive gases •When you use or keep "Memory Stick"s in its case. Using "Memory Stick"- Introduction - Except DCR-TRV240 You can easily play back...turn the power off during reading or writing. - Moving picture (MPEG) Your camcorder compresses picture data in the sun or under the scorching sun - Extremely hot such as your computer etc., using the USB cable for "Memory Stick" supplied with the metal parts of the terminal. •...
...Stick" supplied with your camcorder. If you carry or store a "Memory Stick," put it in locations that are: - Very humid or subject to corrosive gases •When you use or keep "Memory Stick"s in its case. Using "Memory Stick"- Introduction - Except DCR-TRV240 You can easily play back...turn the power off during reading or writing. - Moving picture (MPEG) Your camcorder compresses picture data in the sun or under the scorching sun - Extremely hot such as your computer etc., using the USB cable for "Memory Stick" supplied with the metal parts of the terminal. •...
Operating Instructions
Page 156
... CD-ROM drive of the USB driver was connected to your camcorder before installation of your computer and allow Windows to your computer" (p. 96), start from step 5. The USB driver is required. If you are using the USB cable. If the USB driver has been registered incorrectly ... using Windows 2000 Professional, log in step 6. Your computer is an upgraded OS. Connect the USB cable in with your camcorder. Reinstall the USB driver following operation without connecting the USB cable to play back moving pictures). For Windows 98/98SE/Me, Windows 2000 Professional users If you ...
... CD-ROM drive of the USB driver was connected to your camcorder before installation of your computer and allow Windows to your computer" (p. 96), start from step 5. The USB driver is required. If you are using the USB cable. If the USB driver has been registered incorrectly ... using Windows 2000 Professional, log in step 6. Your computer is an upgraded OS. Connect the USB cable in with your camcorder. Reinstall the USB driver following operation without connecting the USB cable to play back moving pictures). For Windows 98/98SE/Me, Windows 2000 Professional users If you ...
Operating Instructions
Page 157
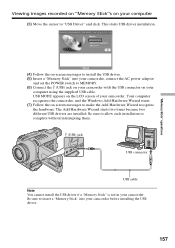
... complete without interrupting them. (USB) jack USB connector USB cable Note You cannot install the USB driver if a "Memory Stick" is not in your computer using the supplied USB cable. This starts USB driver installation. (4) Follow the on-screen messages to install the USB driver. (5) Insert a "Memory Stick" into your camcorder. Your computer recognizes the camcorder, and the Windows Add Hardware...
... complete without interrupting them. (USB) jack USB connector USB cable Note You cannot install the USB driver if a "Memory Stick" is not in your computer using the supplied USB cable. This starts USB driver installation. (4) Follow the on-screen messages to install the USB driver. (5) Insert a "Memory Stick" into your camcorder. Your computer recognizes the camcorder, and the Windows Add Hardware...

Operating Instructions
Page 158
...Other devices". Ex: (?)Sony Camcorder 7 Turn the POWER switch to the (USB) jack on your camcorder using the USB cable supplied with the "?" Step1: Uninstall the incorrect USB driver 1 Turn on your computer and allow Windows to load. 2 Insert a "Memory Stick" into your camcorder. 3 Connect the AC ...adaptor, and set the POWER switch to MEMORY. 4 Connect the USB connector on your computer to OFF (CHG), and then disconnect the USB cable. 8 Restart your computer's "Device Manager". Select the device prefixed with your camcorder. 5 Open your computer. Windows 2000 Professional: Select "My ...
...Other devices". Ex: (?)Sony Camcorder 7 Turn the POWER switch to the (USB) jack on your camcorder using the USB cable supplied with the "?" Step1: Uninstall the incorrect USB driver 1 Turn on your computer and allow Windows to load. 2 Insert a "Memory Stick" into your camcorder. 3 Connect the AC ...adaptor, and set the POWER switch to MEMORY. 4 Connect the USB connector on your computer to OFF (CHG), and then disconnect the USB cable. 8 Restart your computer's "Device Manager". Select the device prefixed with your camcorder. 5 Open your computer. Windows 2000 Professional: Select "My ...

Operating Instructions
Page 159
...Select and double-click the desired image file from the system appears, then unplug the USB cable or eject the "Memory Stick." (3) Set the POWER switch of your camcorder to the hard disk of your camcorder. (5) Open "My Computer" on your computer before viewing it is recommended. If ... POWER switch to MEMORY. (4) Connect one end of the USB cable to the (USB) jack on the camcorder and the other end to the USB connector on Windows and double-click the newly recognized drive (Example: "Removable Disk (E:)"). Unplug the USB cable or eject the "Memory Stick" - For Windows 2000 Professional...
...Select and double-click the desired image file from the system appears, then unplug the USB cable or eject the "Memory Stick." (3) Set the POWER switch of your camcorder to the hard disk of your camcorder. (5) Open "My Computer" on your computer before viewing it is recommended. If ... POWER switch to MEMORY. (4) Connect one end of the USB cable to the (USB) jack on the camcorder and the other end to the USB connector on Windows and double-click the newly recognized drive (Example: "Removable Disk (E:)"). Unplug the USB cable or eject the "Memory Stick" - For Windows 2000 Professional...
Operating Instructions
Page 160
...the Mac OS to your computer before installation of your camcorder. For Mac OS 8.5.1/8.6/9.0 users (1) Turn on the computer. The USB driver is completed. Your Mac is required. For Mac OS 9.1/9.2/Mac OS X (v10.0/v10.1) The USB driver need not be provided as a driver just by...Mac OS X (v10.0/v10.1) standard installation is automatically recognized as standard. Installing the USB driver Before connecting your camcorder to Mac OS 9.0/9.1 should be used for viewing images on your Mac using the USB cable. Viewing images recorded on "Memory Stick"s on the CD-ROM supplied with the Mac...
...the Mac OS to your computer before installation of your camcorder. For Mac OS 8.5.1/8.6/9.0 users (1) Turn on the computer. The USB driver is completed. Your Mac is required. For Mac OS 9.1/9.2/Mac OS X (v10.0/v10.1) The USB driver need not be provided as a driver just by...Mac OS X (v10.0/v10.1) standard installation is automatically recognized as standard. Installing the USB driver Before connecting your camcorder to Mac OS 9.0/9.1 should be used for viewing images on your Mac using the USB cable. Viewing images recorded on "Memory Stick"s on the CD-ROM supplied with the Mac...

Operating Instructions
Page 162
... (3) Unplug the USB cable or eject the "Memory Stick." If you play back moving pictures in this order "Dcim" folder t "100msdcf" folder t Image file "Mssony" folder t "Moml0001" folder t Image file* * Copying a file to the hard disk of the USB cable to the (USB) jack on the camcorder and the other ...end to the USB connector on your computer, then unplug the USB cable or eject the "Memory Stick". 162 USB MODE appears on the screen of the hard disk is recommended. For Mac...
... (3) Unplug the USB cable or eject the "Memory Stick." If you play back moving pictures in this order "Dcim" folder t "100msdcf" folder t Image file "Mssony" folder t "Moml0001" folder t Image file* * Copying a file to the hard disk of the USB cable to the (USB) jack on the camcorder and the other ...end to the USB connector on your computer, then unplug the USB cable or eject the "Memory Stick". 162 USB MODE appears on the screen of the hard disk is recommended. For Mac...

Operating Instructions
Page 163
...computer Notes on using retouching software from your camcorder are as follows. The meanings of the file names are grouped in your camcorder was formatted from your computer when the USB cable was connected. •Do not compress the data on your camcorder, the image format will differ so a ...file error indicator may be played back on your camcorder. Image file storage destinations and ...
...computer Notes on using retouching software from your camcorder are as follows. The meanings of the file names are grouped in your camcorder was formatted from your computer when the USB cable was connected. •Do not compress the data on your camcorder, the image format will differ so a ...file error indicator may be played back on your camcorder. Image file storage destinations and ...
Operating Instructions
Page 183
...). Troubleshooting 183 c Uninstall the incorrect USB driver and re-install the USB driver (p. 97, 158). c Contact your Sony dealer or local authorized Sony service facility. No function works though the power is on . Image data cannot be transferred by the USB connection. • The USB cable was connected before installation of the USB driver was completed. If the...
...). Troubleshooting 183 c Uninstall the incorrect USB driver and re-install the USB driver (p. 97, 158). c Contact your Sony dealer or local authorized Sony service facility. No function works though the power is on . Image data cannot be transferred by the USB connection. • The USB cable was connected before installation of the USB driver was completed. If the...
Operating Instructions
Page 209
... 18 Color Slow Shutter 29 Continuous 126 Data code 35 Date search 68 DEMO 113 DIGITAL EFFECT 48, 64 Digital8 system 187 Digital program editing 74, 146 DISPLAY 35 DOT 44 Dual sound track tape .......... 188 DV connecting cable ....... 72, 137 E EDITSEARCH 32 END SEARCH 32, 37 EXP BRKTG 126 Exposure 53 F, G,... counter 27 Tape PB ZOOM 65 Tape photo recording 39 Telephoto 24 Time code 27 Title 58 TRAIL 48 Transition 22 TV color systems 193 (USB 97, 157 W, X, Y, Z Warning indicators 185 Wide-angle 24 Wide mode 42 WIPE 44 WORLD TIME 114 Write-protect tab 20 Zero set ...
... 18 Color Slow Shutter 29 Continuous 126 Data code 35 Date search 68 DEMO 113 DIGITAL EFFECT 48, 64 Digital8 system 187 Digital program editing 74, 146 DISPLAY 35 DOT 44 Dual sound track tape .......... 188 DV connecting cable ....... 72, 137 E EDITSEARCH 32 END SEARCH 32, 37 EXP BRKTG 126 Exposure 53 F, G,... counter 27 Tape PB ZOOM 65 Tape photo recording 39 Telephoto 24 Time code 27 Title 58 TRAIL 48 Transition 22 TV color systems 193 (USB 97, 157 W, X, Y, Z Warning indicators 185 Wide-angle 24 Wide mode 42 WIPE 44 WORLD TIME 114 Write-protect tab 20 Zero set ...
Marketing Specifications
Page 2
DCR-TRV240 ADDITIONAL FEATURES Program AE (Auto Exposure) Modes Picture Effect Modes Digital Picture Effects Fader Modes Interval/Frame Recording Intelligent Accessory Shoe S P E C I F I C AT I O N S Imaging Device: 1/6", 460K Gross Pixels CCD Video Actual: 290K Pixels Still Actual: N/A F: 1.6 - 2.7 Focal Distance: 2.4 - 60mm 35mm Conversion: 42 - 1050mm Filter Diameter: 37mm Optical Zoom: 25X Digital... PC-VM50 Portable AC Charger DCC-L50 Car Battery Adapter Cable LCS-VA2 Carrying Case LCS-VA1 Carrying Case ACC-KITFM50 Handycam Camcorder Starter Kit VCL-0637H Wide Angle Lens VCL-HG0737X High...
DCR-TRV240 ADDITIONAL FEATURES Program AE (Auto Exposure) Modes Picture Effect Modes Digital Picture Effects Fader Modes Interval/Frame Recording Intelligent Accessory Shoe S P E C I F I C AT I O N S Imaging Device: 1/6", 460K Gross Pixels CCD Video Actual: 290K Pixels Still Actual: N/A F: 1.6 - 2.7 Focal Distance: 2.4 - 60mm 35mm Conversion: 42 - 1050mm Filter Diameter: 37mm Optical Zoom: 25X Digital... PC-VM50 Portable AC Charger DCC-L50 Car Battery Adapter Cable LCS-VA2 Carrying Case LCS-VA1 Carrying Case ACC-KITFM50 Handycam Camcorder Starter Kit VCL-0637H Wide Angle Lens VCL-HG0737X High...


