Operating Instructions
Page 4
...DCR-TRV11/TRV20 only) Using a "Memory Stick" - Memory PB ZOOM 118 Playing back images in the dark (NightShot/Super NightShot) .... 22 Self-timer recording 23 Checking the recording - Insert editing 71 Audio dubbing 73 Superimposing a title 77 Making your camcorder...Step 2 Inserting a cassette 15 Using with digital effects ... 46 Enlarging images recorded on tapes ...still image on "Memory Stick"s - Tape Photo recording 30 Adjusting the white balance manually ... 33 Using the wide mode... the boundaries of contents Checking supplied accessories 5 Quick Start Guide 6 Getting ...
...DCR-TRV11/TRV20 only) Using a "Memory Stick" - Memory PB ZOOM 118 Playing back images in the dark (NightShot/Super NightShot) .... 22 Self-timer recording 23 Checking the recording - Insert editing 71 Audio dubbing 73 Superimposing a title 77 Making your camcorder...Step 2 Inserting a cassette 15 Using with digital effects ... 46 Enlarging images recorded on tapes ...still image on "Memory Stick"s - Tape Photo recording 30 Adjusting the white balance manually ... 33 Using the wide mode... the boundaries of contents Checking supplied accessories 5 Quick Start Guide 6 Getting ...
Operating Instructions
Page 5
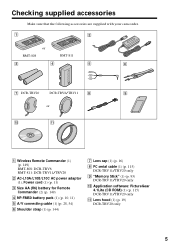
Getting started Checking supplied accessories Make sure that the following accessories are supplied with your camcorder. 1 2 or RMT-808 RMT-811 3 4 5 6 7 DCR-TRV20 DCR-TRV6/TRV11 8 9 or 0 qa 1 Wireless Remote Commander (1) (p. 149) RMT-808: DCR-TRV6 RMT-811: DCR-TRV11/TRV20 2 AC-L10A/L10B/L10C AC ...(1) (p. 28, 54) 6 Shoulder strap (1) (p. 144) 7 Lens cap (1) (p. 16) 8 PC serial cable (1) (p. 115) DCR-TRV11/TRV20 only 9 "Memory Stick" (1) (p. 93) DCR-TRV11/TRV20 only 0 Application software: PictureGear 4.1Lite (CD ROM) (1) (p. 115) DCR-TRV11/TRV20 only qa Lens hood (1) (p. 19...
Getting started Checking supplied accessories Make sure that the following accessories are supplied with your camcorder. 1 2 or RMT-808 RMT-811 3 4 5 6 7 DCR-TRV20 DCR-TRV6/TRV11 8 9 or 0 qa 1 Wireless Remote Commander (1) (p. 149) RMT-808: DCR-TRV6 RMT-811: DCR-TRV11/TRV20 2 AC-L10A/L10B/L10C AC ...(1) (p. 28, 54) 6 Shoulder strap (1) (p. 144) 7 Lens cap (1) (p. 16) 8 PC serial cable (1) (p. 115) DCR-TRV11/TRV20 only 9 "Memory Stick" (1) (p. 93) DCR-TRV11/TRV20 only 0 Application software: PictureGear 4.1Lite (CD ROM) (1) (p. 115) DCR-TRV11/TRV20 only qa Lens hood (1) (p. 19...

Operating Instructions
Page 73
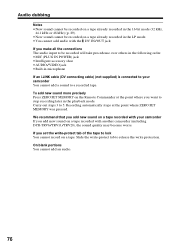
Connecting the microphone with the intelligent accessory shoe Microphone (not supplied) Intelligent Accessory Shoe 73 Connecting the microphone with the MIC jack MIC (PLUG IN POWER) : Signal flow Microphone (not supplied) You can check the recorded picture and ...
Connecting the microphone with the intelligent accessory shoe Microphone (not supplied) Intelligent Accessory Shoe 73 Connecting the microphone with the MIC jack MIC (PLUG IN POWER) : Signal flow Microphone (not supplied) You can check the recorded picture and ...
Operating Instructions
Page 76
...MEMORY on a tape. Recording automatically stops at the point where you want to stop recording later in the LP mode. • You cannot add audio with another camcorder (including DCR-TRV6/TRV11/TRV20), the sound quality may become worse. If you set the write-protect tab of the tape to lock ...MIC (PLUG IN POWER) jack • Intelligent accessory shoe • AUDIO/VIDEO jack • Built-in microphone If an i.LINK cable (DV connecting cable) (not supplied) is connected to your camcorder If you add new sound on a tape already recorded in the playback mode. If you add new sound on a tape ...
...MEMORY on a tape. Recording automatically stops at the point where you want to stop recording later in the LP mode. • You cannot add audio with another camcorder (including DCR-TRV6/TRV11/TRV20), the sound quality may become worse. If you set the write-protect tab of the tape to lock ...MIC (PLUG IN POWER) jack • Intelligent accessory shoe • AUDIO/VIDEO jack • Built-in microphone If an i.LINK cable (DV connecting cable) (not supplied) is connected to your camcorder If you add new sound on a tape already recorded in the playback mode. If you add new sound on a tape ...
Operating Instructions
Page 104
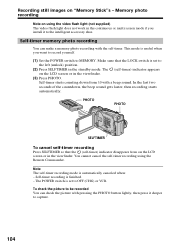
... the left (unlock) position. (2) Press SELFTIMER in the continuous or multi screen mode if you want to record yourself. (1) Set the POWER switch to MEMORY. Recording still images on using the Remote Commander. This mode is set to be recorded You can make a memory photo recording with the self...PHOTO PHOTO SELFTIMER To cancel self-timer recording Press SELFTIMER so that the LOCK switch is useful when you install it deeper to the intelligent accessory shoe. To check the picture to OFF (CHG) or VCR. You cannot cancel the self-timer recording using the video flash light (...
... the left (unlock) position. (2) Press SELFTIMER in the continuous or multi screen mode if you want to record yourself. (1) Set the POWER switch to MEMORY. Recording still images on using the Remote Commander. This mode is set to be recorded You can make a memory photo recording with the self...PHOTO PHOTO SELFTIMER To cancel self-timer recording Press SELFTIMER so that the LOCK switch is useful when you install it deeper to the intelligent accessory shoe. To check the picture to OFF (CHG) or VCR. You cannot cancel the self-timer recording using the video flash light (...

Operating Instructions
Page 140
... a short may occur and the unit may heat up inside the casing, unplug your camcorder and have it checked by the plug. To disconnect the power cord, pull it out by a Sony dealer before operating it from the sand or dust. Doing so might cause heat to ...of solvent which may appear on the LCD screen. Maintenance information and precautions Precautions Camcorder operation • Operate your camcorder on 7.2 V (battery pack) or 8.4 V (AC power adaptor). • For DC or AC operation, use the accessories recommended in this operating instructions. • If any solid object or liquid ...
... a short may occur and the unit may heat up inside the casing, unplug your camcorder and have it checked by the plug. To disconnect the power cord, pull it out by a Sony dealer before operating it from the sand or dust. Doing so might cause heat to ...of solvent which may appear on the LCD screen. Maintenance information and precautions Precautions Camcorder operation • Operate your camcorder on 7.2 V (battery pack) or 8.4 V (AC power adaptor). • For DC or AC operation, use the accessories recommended in this operating instructions. • If any solid object or liquid ...
Operating Instructions
Page 142
... Filter diameter DCR-TRV6/TRV11: 1 3/16 in. (30 mm) DCR-TRV20: 1 1/2 in. (37 mm) 10× (Optical), 120× (Digital) Focal length DCR-TRV6/TRV11: 5/32 - 1 5/16 in. (3.3 - 33 mm) DCR-TRV20: 3/16 - 1 11/16 in. (4.2 - 42 mm) When converted to the dark can be seen due to a 35 mm 142 still camera DCR-TRV6/TRV11: Camera/Memory mode: 1 11/16...
... Filter diameter DCR-TRV6/TRV11: 1 3/16 in. (30 mm) DCR-TRV20: 1 1/2 in. (37 mm) 10× (Optical), 120× (Digital) Focal length DCR-TRV6/TRV11: 5/32 - 1 5/16 in. (3.3 - 33 mm) DCR-TRV20: 3/16 - 1 11/16 in. (4.2 - 42 mm) When converted to the dark can be seen due to a 35 mm 142 still camera DCR-TRV6/TRV11: Camera/Memory mode: 1 11/16...
Operating Instructions
Page 144
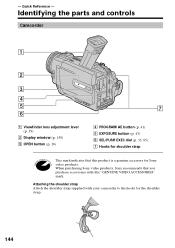
... button (p. 16) 4 PROGRAM AE button (p. 41) 5 EXPOSURE button (p. 43) 6 SEL/PUSH EXEC dial (p. 33, 85) 7 Hooks for shoulder strap This mark indicates that you purchase accessories with your camcorder to the hooks for Sony video products. - Attaching the shoulder strap Attach the shoulder strap supplied with this product is a genuine...
... button (p. 16) 4 PROGRAM AE button (p. 41) 5 EXPOSURE button (p. 43) 6 SEL/PUSH EXEC dial (p. 33, 85) 7 Hooks for shoulder strap This mark indicates that you purchase accessories with your camcorder to the hooks for Sony video products. - Attaching the shoulder strap Attach the shoulder strap supplied with this product is a genuine...
Operating Instructions
Page 145
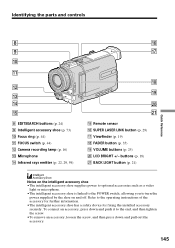
...Refer to turn the power supplied by the shoe on the intelligent accessory shoe •The intelligent accessory shoe supplies power to optional accessories such as a video light or microphone. •The intelligent accessory shoe is linked to the POWER switch, allowing you to the ...the end, and then tighten the screw. •To remove an accessory, loosen the screw, and then press down and pull out the accessory. 145 LCD BRIGHT +/- Identifying the parts and controls H I J K L M N O 8 EDITSEARCH buttons (p. 24) 9 Intelligent accessory shoe (p. 73) 0 Focus ring (p. 44) qa FOCUS switch ...
...Refer to turn the power supplied by the shoe on the intelligent accessory shoe •The intelligent accessory shoe supplies power to optional accessories such as a video light or microphone. •The intelligent accessory shoe is linked to the POWER switch, allowing you to the ...the end, and then tighten the screw. •To remove an accessory, loosen the screw, and then press down and pull out the accessory. 145 LCD BRIGHT +/- Identifying the parts and controls H I J K L M N O 8 EDITSEARCH buttons (p. 24) 9 Intelligent accessory shoe (p. 73) 0 Focus ring (p. 44) qa FOCUS switch ...
Operating Instructions
Page 152
...mode... DIGITAL EFFECT 38, 46 DIGITAL I/O/ (LANC 148 Digital ...mode 96 INDEX (Multiple) display ... 114 "InfoLITHIUM" battery ........ 13 Infrared rays emitter ... 22, 29, 59 Insert editing 71 Intelligent accessory... shoe .... 145 JPEG 93 LANC 148 Labeling a cassette 83 LCD screen 17 LUMINANCEKEY 38 M, N Main sound 87 Manual focus 44 Memory chromakey 105 Memory luminancekey ........ 105 MEMORY MIX 105 Memory PB ZOOM 118 Memory photo recording 100 Memory Stick 93 Menu settings 85 Memory overlap 105 M.FADER 35 Mirror mode...125 STILL 38 ...mode 34 WIPE 35 WORLD TIME 91 Write-protect...
...mode... DIGITAL EFFECT 38, 46 DIGITAL I/O/ (LANC 148 Digital ...mode 96 INDEX (Multiple) display ... 114 "InfoLITHIUM" battery ........ 13 Infrared rays emitter ... 22, 29, 59 Insert editing 71 Intelligent accessory... shoe .... 145 JPEG 93 LANC 148 Labeling a cassette 83 LCD screen 17 LUMINANCEKEY 38 M, N Main sound 87 Manual focus 44 Memory chromakey 105 Memory luminancekey ........ 105 MEMORY MIX 105 Memory PB ZOOM 118 Memory photo recording 100 Memory Stick 93 Menu settings 85 Memory overlap 105 M.FADER 35 Mirror mode...125 STILL 38 ...mode 34 WIPE 35 WORLD TIME 91 Write-protect...

