Operating Instructions
Page 2
... and CANADA DISPOSAL OF LITHIUM ION BATTERY. For the Sony Factory Service Center nearest you can capture life's precious moments with Part 15 of Conformity Trade Name: SONY Model No.: DCR-TRV6, DCR-TRV11 Responsible Party:Sony Electronics Inc. If you have any questions about this equipment... to alert the user to the following two conditions.: (1) This device may not cause harmful interference, and (2)this Sony Digital Handycam camcorder. This symbol is subject to the presence of important operating and maintenance (servicing) instructions in household or business trash ...
... and CANADA DISPOSAL OF LITHIUM ION BATTERY. For the Sony Factory Service Center nearest you can capture life's precious moments with Part 15 of Conformity Trade Name: SONY Model No.: DCR-TRV6, DCR-TRV11 Responsible Party:Sony Electronics Inc. If you have any questions about this equipment... to alert the user to the following two conditions.: (1) This device may not cause harmful interference, and (2)this Sony Digital Handycam camcorder. This symbol is subject to the presence of important operating and maintenance (servicing) instructions in household or business trash ...

Operating Instructions
Page 3
...designed to provide reasonable protection against harmful interference in a particular installation. Reorient or relocate the receiving antenna. - This Class B digital apparatus complies with the limits for help. However, there is no guarantee that to which can radiate radio frequency energy and, ...MATCH WIDE BLADE OF PLUG TO WIDE SLOT, FULLY INSERT. Consult the dealer or an experienced radio/ TV technician for a Class B digital device, pursuant to Part 15 of the following measures: - Note: This equipment has been tested and found to comply with Canadian ICES-003. 3 This ...
...designed to provide reasonable protection against harmful interference in a particular installation. Reorient or relocate the receiving antenna. - This Class B digital apparatus complies with the limits for help. However, there is no guarantee that to which can radiate radio frequency energy and, ...MATCH WIDE BLADE OF PLUG TO WIDE SLOT, FULLY INSERT. Consult the dealer or an experienced radio/ TV technician for a Class B digital device, pursuant to Part 15 of the following measures: - Note: This equipment has been tested and found to comply with Canadian ICES-003. 3 This ...
Operating Instructions
Page 4
...mark - introduction 93 Recording still images on a tape - SLIDE SHOW 119 Preventing accidental erasure - Insert editing 71 Audio dubbing 73 Superimposing a title 77 Making your camcorder abroad .......... 137 Maintenance ...still image on "Memory Stick"s - Photo search/ Photo scan 52 Changing the menu settings 85 Resetting the date and time 92 "Memory Stick" Operations (DCR-TRV11/TRV20 only) Using a "Memory Stick" - Signal convert function 66 Recording video or TV programs ....... 67 Inserting a scene from a mini DV tape - Digital program editing 56 Identifying the parts...
...mark - introduction 93 Recording still images on a tape - SLIDE SHOW 119 Preventing accidental erasure - Insert editing 71 Audio dubbing 73 Superimposing a title 77 Making your camcorder abroad .......... 137 Maintenance ...still image on "Memory Stick"s - Photo search/ Photo scan 52 Changing the menu settings 85 Resetting the date and time 92 "Memory Stick" Operations (DCR-TRV11/TRV20 only) Using a "Memory Stick" - Signal convert function 66 Recording video or TV programs ....... 67 Inserting a scene from a mini DV tape - Digital program editing 56 Identifying the parts...
Operating Instructions
Page 11
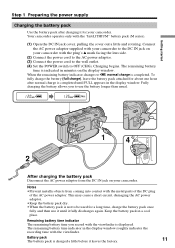
...The remaining battery time indicator in the display window. Charging begins. Fully charging the battery allows you record with the metal parts of the DC plug of the AC power adaptor. The remaining battery time is completed. Notes •Prevent metallic objects ...from the DC IN jack on your camcorder to be used for your camcorder with your camcorder. Keep the battery pack in minutes on your camcorder. Your camcorder operates only with the viewfinder. Remaining battery time indicator The remaining battery time ...
...The remaining battery time indicator in the display window. Charging begins. Fully charging the battery allows you record with the metal parts of the DC plug of the AC power adaptor. The remaining battery time is completed. Notes •Prevent metallic objects ...from the DC IN jack on your camcorder to be used for your camcorder with your camcorder. Keep the battery pack in minutes on your camcorder. Your camcorder operates only with the viewfinder. Remaining battery time indicator The remaining battery time ...
Operating Instructions
Page 15
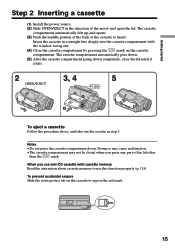
... the window facing out. (4) Close the cassette compartment by pressing the mark on the cassette to expose the red mark. 15 When you press any part of the arrow and open the lid. Notes •Do not press the cassette compartment down completely, close the lid until it clicks. 2 3, 4 5 OPEN/EJECT...
... the window facing out. (4) Close the cassette compartment by pressing the mark on the cassette to expose the red mark. 15 When you press any part of the arrow and open the lid. Notes •Do not press the cassette compartment down completely, close the lid until it clicks. 2 3, 4 5 OPEN/EJECT...
Operating Instructions
Page 64
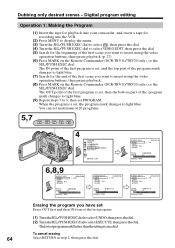
Digital program editing Operation 1: Making the Program (1) Insert the tape for playback into your camcorder, and insert a tape for recording into the VCR. (2) Press MENU to display the menu. (3) Turn the SEL/PUSH EXEC dial to select , then press the ... for the beginning of the first scene you have set , then the bottom part of the first scene you want to insert using the video operation buttons, then pause playback (p. 27). (6) Press MARK on the Remote Commander (DCR-TRV11/TRV20 only), or the SEL/PUSH EXEC dial. When the program is cancelled. The...
Digital program editing Operation 1: Making the Program (1) Insert the tape for playback into your camcorder, and insert a tape for recording into the VCR. (2) Press MENU to display the menu. (3) Turn the SEL/PUSH EXEC dial to select , then press the ... for the beginning of the first scene you have set , then the bottom part of the first scene you want to insert using the video operation buttons, then pause playback (p. 27). (6) Press MARK on the Remote Commander (DCR-TRV11/TRV20 only), or the SEL/PUSH EXEC dial. When the program is cancelled. The...

Operating Instructions
Page 78
...THE END [T I TLE] : END If you want to superimpose a title because the memory is full. The titles superimposed with your camcorder •They are displayed by only the DV format video equipment with other video equipment. HAPPY BIRTHDAY HAPPY HOLIDAYS CONGRATULATIONS! HAPPY BIRTHDAY HAPPY ...HOLIDAYS CONGRATULATIONS! If the tape has a blank portion in the middle of the recorded parts The title may be able to use the custom title, select in the menu settings (p. 85). 78 Superimposing a title 1 TITLE 2 3...
...THE END [T I TLE] : END If you want to superimpose a title because the memory is full. The titles superimposed with your camcorder •They are displayed by only the DV format video equipment with other video equipment. HAPPY BIRTHDAY HAPPY HOLIDAYS CONGRATULATIONS! HAPPY BIRTHDAY HAPPY ...HOLIDAYS CONGRATULATIONS! If the tape has a blank portion in the middle of the recorded parts The title may be able to use the custom title, select in the menu settings (p. 85). 78 Superimposing a title 1 TITLE 2 3...
Operating Instructions
Page 82
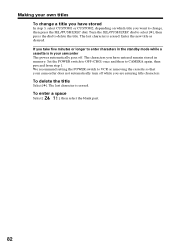
... character is erased. To enter a space Select [ ], then select the blank part. 82 Making your own titles To change , then press the SEL/PUSH EXEC...3, select CUSTOM1 or CUSTOM2, depending on which title you want to enter characters in the standby mode while a cassette is in your camcorder does not automatically turn off . To delete the title Select [C]. The last character is erased..... We recommend setting the POWER switch to VCR or removing the cassette so that your camcorder The power automatically goes off while you take five minutes or longer to change a title you have entered...
... character is erased. To enter a space Select [ ], then select the blank part. 82 Making your own titles To change , then press the SEL/PUSH EXEC...3, select CUSTOM1 or CUSTOM2, depending on which title you want to enter characters in the standby mode while a cassette is in your camcorder does not automatically turn off . To delete the title Select [C]. The last character is erased..... We recommend setting the POWER switch to VCR or removing the cassette so that your camcorder The power automatically goes off while you take five minutes or longer to change a title you have entered...
Operating Instructions
Page 84
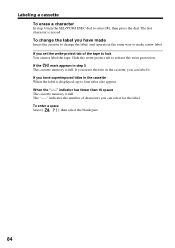
.... Labeling a cassette To erase a character In step 6 turn the SEL/PUSH EXEC dial to make a new label. To enter a space Select [ ], then select the blank part. 84 If you have made Insert the cassette to change the label you can label it.
.... Labeling a cassette To erase a character In step 6 turn the SEL/PUSH EXEC dial to make a new label. To enter a space Select [ ], then select the blank part. 84 If you have made Insert the cassette to change the label you can label it.

Operating Instructions
Page 93
... off while reading or writing. - "Memory Stick" Operations - Under direct sunlight. - DCR-TRV11/TRV20 only You can record and play back, record or delete still images. You can easily play back still images on a "Memory Stick" supplied with the metal parts of your camcorder. Using a "Memory Stick" Terminal Write-protect tab Labeling position •You cannot...
... off while reading or writing. - "Memory Stick" Operations - Under direct sunlight. - DCR-TRV11/TRV20 only You can record and play back, record or delete still images. You can easily play back still images on a "Memory Stick" supplied with the metal parts of your camcorder. Using a "Memory Stick" Terminal Write-protect tab Labeling position •You cannot...

Operating Instructions
Page 106
...a moving picture. LUMI I ¥ ¥ ¥ ¥ 6 Still picture M. Superimposing a still picture in the standby mode. CHROM M. The last recorded or last composed image appears on the lower part of the screen as follows: M.CHROM t M.LUMI t C.CHROM t M. ...MEMORY MIX Before operation •Insert a mini DV tape for recording into your camcorder. •Insert a recorded "Memory Stick" into your camcorder...
...a moving picture. LUMI I ¥ ¥ ¥ ¥ 6 Still picture M. Superimposing a still picture in the standby mode. CHROM M. The last recorded or last composed image appears on the lower part of the screen as follows: M.CHROM t M.LUMI t C.CHROM t M. ...MEMORY MIX Before operation •Insert a mini DV tape for recording into your camcorder. •Insert a recorded "Memory Stick" into your camcorder...

Operating Instructions
Page 140
...back of the LCD screen may appear on the LCD screen. On handling tapes • Do not insert anything into contact with the metal parts of the cassette. Camcorder care • Remove the tape, and periodically turn on the power, operate the CAMERA and VCR sections and play back a tape for... about three minutes when your camcorder is used in a cold place, a residual image may heat up inside the casing, unplug your camcorder and have it checked by a Sony dealer before operating it out by the plug. Doing so might cause heat to ...
...back of the LCD screen may appear on the LCD screen. On handling tapes • Do not insert anything into contact with the metal parts of the cassette. Camcorder care • Remove the tape, and periodically turn on the power, operate the CAMERA and VCR sections and play back a tape for... about three minutes when your camcorder is used in a cold place, a residual image may heat up inside the casing, unplug your camcorder and have it checked by a Sony dealer before operating it out by the plug. Doing so might cause heat to ...

Operating Instructions
Page 143
...parts Mass (approx.) 9.8 oz (280 g) excluding mains lead Cord length (approx.) Power cord: 6.6 feet (2 m) Connecting cord: 5.2 feet (1.6 m) Battery pack Output voltage DC 7.2 V Capacity 8.5 Wh (1,180 mA) Dimensions (approx.) 1 9/16 × 13/16 × 2 1/4 in. (38.2 × 20.5 × 55.6 mm) (w/h/d) Mass (approx.) 2.7 oz (76 g) Type Lithium ion "Memory Stick" (DCR-TRV11.../TRV20 only) Memory Flash memory 4MB: MSA-4A Operating voltage 2.7-3.6V Power consumption Approx. 45mA in the operating mode Approx. 130µA in the standby mode Dimensions (approx.) 2 ×...
...parts Mass (approx.) 9.8 oz (280 g) excluding mains lead Cord length (approx.) Power cord: 6.6 feet (2 m) Connecting cord: 5.2 feet (1.6 m) Battery pack Output voltage DC 7.2 V Capacity 8.5 Wh (1,180 mA) Dimensions (approx.) 1 9/16 × 13/16 × 2 1/4 in. (38.2 × 20.5 × 55.6 mm) (w/h/d) Mass (approx.) 2.7 oz (76 g) Type Lithium ion "Memory Stick" (DCR-TRV11.../TRV20 only) Memory Flash memory 4MB: MSA-4A Operating voltage 2.7-3.6V Power consumption Approx. 45mA in the operating mode Approx. 130µA in the standby mode Dimensions (approx.) 2 ×...
Operating Instructions
Page 144
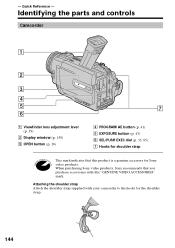
...parts and controls Camcorder 1 2 3 4 5 7 6 1 Viewfinder lens adjustment lever (p. 19) 2 Display window (p. 150) 3 OPEN button (p. 16) 4 PROGRAM AE button (p. 41) 5 EXPOSURE button (p. 43) 6 SEL/PUSH EXEC dial (p. 33, 85) 7 Hooks for shoulder strap This mark indicates that you purchase accessories with your camcorder to the hooks for Sony video products. When purchasing Sony... video products, Sony recommends that this "GENUINE VIDEO ACCESSORIES" mark....
...parts and controls Camcorder 1 2 3 4 5 7 6 1 Viewfinder lens adjustment lever (p. 19) 2 Display window (p. 150) 3 OPEN button (p. 16) 4 PROGRAM AE button (p. 41) 5 EXPOSURE button (p. 43) 6 SEL/PUSH EXEC dial (p. 33, 85) 7 Hooks for shoulder strap This mark indicates that you purchase accessories with your camcorder to the hooks for Sony video products. When purchasing Sony... video products, Sony recommends that this "GENUINE VIDEO ACCESSORIES" mark....
Operating Instructions
Page 145
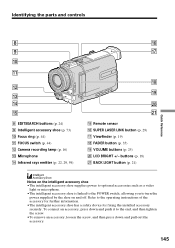
... tighten the screw. •To remove an accessory, loosen the screw, and then press down and pull out the accessory. 145 LCD BRIGHT +/- Identifying the parts and controls H I J K L M N O 8 EDITSEARCH buttons (p. 24) 9 Intelligent accessory shoe (p. 73) 0 Focus ring (p. 44) qa FOCUS switch (p. 44) qs Camera recording lamp (p. 16) qd Microphone qf Infrared...
... tighten the screw. •To remove an accessory, loosen the screw, and then press down and pull out the accessory. 145 LCD BRIGHT +/- Identifying the parts and controls H I J K L M N O 8 EDITSEARCH buttons (p. 24) 9 Intelligent accessory shoe (p. 73) 0 Focus ring (p. 44) qa FOCUS switch (p. 44) qs Camera recording lamp (p. 16) qd Microphone qf Infrared...
Operating Instructions
Page 146
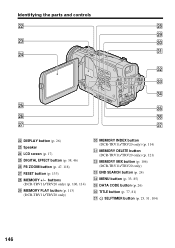
... only) (p. 106, 114) wl MEMORY PLAY button (p. 113) (DCR-TRV11/TRV20 only) e; MEMORY INDEX button (DCR-TRV11/TRV20 only) (p. 114) ea MEMORY DELETE button (DCR-TRV11/TRV20 only) (p. 121) es MEMORY MIX button (p. 106) (DCR-TRV11/TRV20 only) ed END SEARCH button (p. 24) ef MENU button (p. 33, 85) eg DATA CODE button (p. 26) eh TITLE button (p. 77, 81..., 31, 104) 146 ea wf es ed ef wg eg wh eh wj ej ws DISPLAY button (p. 26) wd Speaker wf LCD screen (p. 17) wg DIGITAL EFFECT button (p. 38, 46) wh PB ZOOM button (p. 47, 118) wj RESET button (p. 133) wk MEMORY +/- Identifying the...
... only) (p. 106, 114) wl MEMORY PLAY button (p. 113) (DCR-TRV11/TRV20 only) e; MEMORY INDEX button (DCR-TRV11/TRV20 only) (p. 114) ea MEMORY DELETE button (DCR-TRV11/TRV20 only) (p. 121) es MEMORY MIX button (p. 106) (DCR-TRV11/TRV20 only) ed END SEARCH button (p. 24) ef MENU button (p. 33, 85) eg DATA CODE button (p. 26) eh TITLE button (p. 77, 81..., 31, 104) 146 ea wf es ed ef wg eg wh eh wj ej ws DISPLAY button (p. 26) wd Speaker wf LCD screen (p. 17) wg DIGITAL EFFECT button (p. 38, 46) wh PB ZOOM button (p. 47, 118) wj RESET button (p. 133) wk MEMORY +/- Identifying the...
Operating Instructions
Page 147
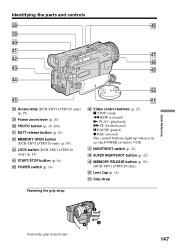
rj NIGHTSHOT switch (p. 22) rk SUPER NIGHTSHOT button (p. 22) rl MEMORY RELEASE button (p. 95) (DCR-TRV11/TRV20 only) t; Identifying the parts and controls ek rh el r; ra rj rs rk rd rl rf t; Lens Cap (p. 16) ta Grip strap Fastening the grip strap Quick Reference Fasten ...
rj NIGHTSHOT switch (p. 22) rk SUPER NIGHTSHOT button (p. 22) rl MEMORY RELEASE button (p. 95) (DCR-TRV11/TRV20 only) t; Identifying the parts and controls ek rh el r; ra rj rs rk rd rl rf t; Lens Cap (p. 16) ta Grip strap Fastening the grip strap Quick Reference Fasten ...
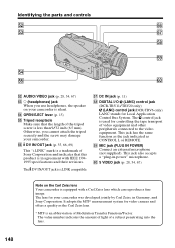
Operating Instructions
Page 148
... specifications and their revisions. y; Identifying the parts and controls ts th td tj tk tl...DIGITAL I/O (LANC) control jack (DCR-TRV11/TRV20 only) (LANC) control jack(DCR-TRV6 only) LANC stands for video camera and offers a quality as CONTROL L or REMOTE. It adopts the MTF* measurement system for Local Application Control Bus System. Otherwise, you use headphones, the speaker on the Carl Zeiss lens Your camcorder... is i.LINK compatible. This jack also accepts a "plug-in Germany, and Sony Corporation. S VIDEO jack (p. 28, 54, 67) Note on your camcorder...
... specifications and their revisions. y; Identifying the parts and controls ts th td tj tk tl...DIGITAL I/O (LANC) control jack (DCR-TRV11/TRV20 only) (LANC) control jack(DCR-TRV6 only) LANC stands for video camera and offers a quality as CONTROL L or REMOTE. It adopts the MTF* measurement system for Local Application Control Bus System. Otherwise, you use headphones, the speaker on the Carl Zeiss lens Your camcorder... is i.LINK compatible. This jack also accepts a "plug-in Germany, and Sony Corporation. S VIDEO jack (p. 28, 54, 67) Note on your camcorder...
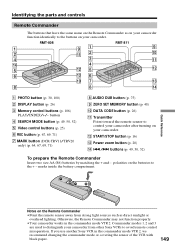
Operating Instructions
Page 149
...;Your camcorder works in the commander mode VTR 2, we recommend changing the commander mode or covering the sensor of the VCR with black paper. 149 If you use another Sony VCR in the commander mode VTR 2. button 4 SEARCH MODE button (p. 49, 50, 52) 5 Video control buttons (p. 25) 6 REC button (p. 67, 69, 71) 7 MARK button (DCR-TRV11/TRV20 only...
...;Your camcorder works in the commander mode VTR 2, we recommend changing the commander mode or covering the sensor of the VCR with black paper. 149 If you use another Sony VCR in the commander mode VTR 2. button 4 SEARCH MODE button (p. 49, 50, 52) 5 Video control buttons (p. 25) 6 REC button (p. 67, 69, 71) 7 MARK button (DCR-TRV11/TRV20 only...

Operating Instructions
Page 150
...parts and controls Operation indicators A B C D E F 1 2 0 min - + ST I LL 1 6 : 9W I W J K X L Y wj Z B 150 1 Cassette memory indicator (p. 21, 124) 2 Remaining battery time indicator (p. 21) 3 Zoom indicator (p. 20)/Exposure indicator (p. 43)/Data file name indicator (DCR-TRV11/TRV20 only) (p. 93) 4 Digital effect indicator (p. 38)/ MEMORY MIX indicator (DCR-TRV11...indicator (p. 44) qd Recording mode indicator (p. 21, 89) qf STBY/REC indicator (p. 16)/Video control mode indicator (p. 27)/Image size indicator (p. 98)/Image quality mode indicator (DCR-TRV11/TRV20 only) (p. 96) ...
...parts and controls Operation indicators A B C D E F 1 2 0 min - + ST I LL 1 6 : 9W I W J K X L Y wj Z B 150 1 Cassette memory indicator (p. 21, 124) 2 Remaining battery time indicator (p. 21) 3 Zoom indicator (p. 20)/Exposure indicator (p. 43)/Data file name indicator (DCR-TRV11/TRV20 only) (p. 93) 4 Digital effect indicator (p. 38)/ MEMORY MIX indicator (DCR-TRV11...indicator (p. 44) qd Recording mode indicator (p. 21, 89) qf STBY/REC indicator (p. 16)/Video control mode indicator (p. 27)/Image size indicator (p. 98)/Image quality mode indicator (DCR-TRV11/TRV20 only) (p. 96) ...


