

Operating Guide
Page 7
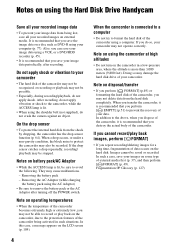
... and specifications of recording media and other materials may not delete data from being activated in this manual are based on DCR-SR300. • The...recorded images on the camcorder in each local language are recorded without notice. • Unless otherwise specially indicated, illustrations in this manual were taken with a digital still camera, and may damage the hard disk drive...Handycam Handbook" (PDF). 7 About language setting • The on : - About this case, an indicator appears on disposal/transfer • If you perform [ FORMAT]* or formatting the hard...
... and specifications of recording media and other materials may not delete data from being activated in this manual are based on DCR-SR300. • The...recorded images on the camcorder in each local language are recorded without notice. • Unless otherwise specially indicated, illustrations in this manual were taken with a digital still camera, and may damage the hard disk drive...Handycam Handbook" (PDF). 7 About language setting • The on : - About this case, an indicator appears on disposal/transfer • If you perform [ FORMAT]* or formatting the hard...

Operating Guide
Page 12
...:min.) DCR-SR200 DCR-SR300 Charging time 135 135 Recording time*1 Continuous recording time 115*2 120*3 95*2 100*3 Typical 55*2 45*2 recording time*4 60*3 50*3 Playback time*2 165 160 *1 When [REC MODE] is set to [SP]. *2 When the LCD backlight turns on. *3When the LCD backlight turns off. *4 Typical recording time shows...your camcorder. • Do not use your camcorder. This may cause a malfunction. • Even if your camcorder or the Handycam Station, even when the power cord is still supplied to it while connected to the wall outlet via the AC Adaptor. To ...
...:min.) DCR-SR200 DCR-SR300 Charging time 135 135 Recording time*1 Continuous recording time 115*2 120*3 95*2 100*3 Typical 55*2 45*2 recording time*4 60*3 50*3 Playback time*2 165 160 *1 When [REC MODE] is set to [SP]. *2 When the LCD backlight turns on. *3When the LCD backlight turns off. *4 Typical recording time shows...your camcorder. • Do not use your camcorder. This may cause a malfunction. • Even if your camcorder or the Handycam Station, even when the power cord is still supplied to it while connected to the wall outlet via the AC Adaptor. To ...

Operating Guide
Page 13
... until the respective lamp lights up . (Movie): To record movies (Still): To record still images • When you record or play back an image, turn on the LCD screen. Changing the language setting You can change the on...-screen displays to 4:3 automatically. 2 Select the desired geographical area with v/V, then touch [NEXT]. 3 Set [DST SET] or [SUMMERTIME], [Y] (year), [M] (month), [D] (day), hour and minute. • The date and time does not appear during recording, but they are automatically recorded on the hard disc...
... until the respective lamp lights up . (Movie): To record movies (Still): To record still images • When you record or play back an image, turn on the LCD screen. Changing the language setting You can change the on...-screen displays to 4:3 automatically. 2 Select the desired geographical area with v/V, then touch [NEXT]. 3 Set [DST SET] or [SUMMERTIME], [Y] (year), [M] (month), [D] (day), hour and minute. • The date and time does not appear during recording, but they are automatically recorded on the hard disc...
Operating Guide
Page 14
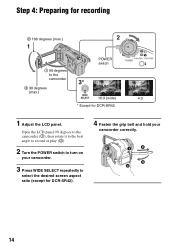
Open the LCD panel 90 degrees to the camcorder (1), then rotate it to the best angle to record or play (2). 2 Turn the POWER switch to turn on your camcorder correctly. 14 Step 4: Preparing for recording 2 180 degrees (max.) 1 90 degrees to select the desired screen aspect ratio (except for DCR-SR42). 4 Fasten the grip belt and hold your camcorder. 3 Press WIDE SELECT repeatedly to the camcorder POWER switch 2 90 degrees (max.) 16:9 (wide) 4:3 * Except for DCR-SR42. 1 Adjust the LCD panel.
Open the LCD panel 90 degrees to the camcorder (1), then rotate it to the best angle to record or play (2). 2 Turn the POWER switch to turn on your camcorder correctly. 14 Step 4: Preparing for recording 2 180 degrees (max.) 1 90 degrees to select the desired screen aspect ratio (except for DCR-SR42). 4 Fasten the grip belt and hold your camcorder. 3 Press WIDE SELECT repeatedly to the camcorder POWER switch 2 90 degrees (max.) 16:9 (wide) 4:3 * Except for DCR-SR42. 1 Adjust the LCD panel.

Operating Guide
Page 16
• You can check the free hard disk space by pressing PHOTO during Easy Handycam operation. x Inserting/ejecting a "Memory Stick Duo" Open the LCD panel, then insert the "Memory Stick Duo" into the slot in the wrong direction, the "Memory Stick Duo," the...next movie file is reading/writing data. DCR-SR42: 5,900 ([VGA (0.3M)]) DCR-SR62/SR82: 1,800 ([1.0M]) DCR-SR200: 480 ([4.0M]) DCR-SR300: 315 ([6.1M]) • All numbers measured when using a "Memory Stick Duo" made by Sony Corporation. During Easy Handycam operation, appears on the recording environment. • The number of still...
• You can check the free hard disk space by pressing PHOTO during Easy Handycam operation. x Inserting/ejecting a "Memory Stick Duo" Open the LCD panel, then insert the "Memory Stick Duo" into the slot in the wrong direction, the "Memory Stick Duo," the...next movie file is reading/writing data. DCR-SR42: 5,900 ([VGA (0.3M)]) DCR-SR62/SR82: 1,800 ([1.0M]) DCR-SR200: 480 ([4.0M]) DCR-SR300: 315 ([6.1M]) • All numbers measured when using a "Memory Stick Duo" made by Sony Corporation. During Easy Handycam operation, appears on the recording environment. • The number of still...
Operating Guide
Page 17
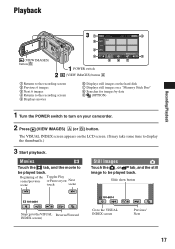
...movie to be played back. Playback Recording/Playback (VIEW IMAGES) button B POWER switch (VIEW IMAGES) button A 1 Returns to the recording screen 2 Previous 6 images 3 Next 6 images 4 Returns to the recording screen 5 Displays movies 6 Displays still images on the hard disk 7 Displays still images on... a "Memory Stick Duo" 8 Searches for images by date 9 (OPTION) 1 Turn the POWER switch to turn on the LCD ...
...movie to be played back. Playback Recording/Playback (VIEW IMAGES) button B POWER switch (VIEW IMAGES) button A 1 Returns to the recording screen 2 Previous 6 images 3 Next 6 images 4 Returns to the recording screen 5 Displays movies 6 Displays still images on the hard disk 7 Displays still images on... a "Memory Stick Duo" 8 Searches for images by date 9 (OPTION) 1 Turn the POWER switch to turn on the LCD ...

Operating Guide
Page 20
.../BATT INFO button You can switch the screen display when you touched will be displayed in .)) to the tripod receptacle using the flash. 9 LCD screen To record in /out. When you press while the power is set the NIGHTSHOT switch to OFF (CHG), you operate the POWER switch on . qj... ON. ( 20 appears.) qk Tripod receptacle (Bottom surface) Attach the tripod (optional: the length of the screw must be turned on or off as a video light, a flash, or a microphone. qa BACK LIGHT button*4 To adjust the exposure for date and time. Zoom buttons You can check the remaining battery....
.../BATT INFO button You can switch the screen display when you touched will be displayed in .)) to the tripod receptacle using the flash. 9 LCD screen To record in /out. When you press while the power is set the NIGHTSHOT switch to OFF (CHG), you operate the POWER switch on . qj... ON. ( 20 appears.) qk Tripod receptacle (Bottom surface) Attach the tripod (optional: the length of the screw must be turned on or off as a video light, a flash, or a microphone. qa BACK LIGHT button*4 To adjust the exposure for date and time. Zoom buttons You can check the remaining battery....
Operating Guide
Page 23
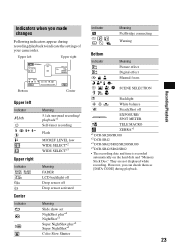
... Warning Bottom Indicator 9 Meaning Picture effect Digital effect Manual focus SCENE SELECTION . They are not displayed while recording. Indicators when you can check them as [DATA CODE] during recording/playback to indicate the settings of your ...recording/ playback*1 Self-timer recording Flash MICREF LEVEL low WIDE SELECT*2 WIDE SELECT*3 Meaning FADER LCD backlight off Drop sensor off EXPOSURE/ SPOT METER TELE MACRO ZEBRA*1 *1 DCR-SR200/SR300 *2 DCR-SR42 *3 DCR-SR62/SR82/SR200/SR300 *4 DCR-SR42/SR62/SR82 • The recording date and time is recorded automatically on the hard...
... Warning Bottom Indicator 9 Meaning Picture effect Digital effect Manual focus SCENE SELECTION . They are not displayed while recording. Indicators when you can check them as [DATA CODE] during recording/playback to indicate the settings of your ...recording/ playback*1 Self-timer recording Flash MICREF LEVEL low WIDE SELECT*2 WIDE SELECT*3 Meaning FADER LCD backlight off Drop sensor off EXPOSURE/ SPOT METER TELE MACRO ZEBRA*1 *1 DCR-SR200/SR300 *2 DCR-SR42 *3 DCR-SR62/SR82/SR200/SR300 *4 DCR-SR42/SR62/SR82 • The recording date and time is recorded automatically on the hard...
Operating Guide
Page 30
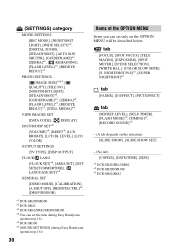
... MODE]*3, [TIMING]*2, [RECORD SOUND]*2 - (A tab depends on the OPTION MENU will be described below. (SETTINGS) category MOVIE SETTINGS [REC MODE], [NIGHTSHOT LIGHT], [WIDE SELECT]*2, [DIGITAL ZOOM], [STEADYSHOT], [...LCD BRIGHT], [LCD BL LEVEL], [LCD COLOR] OUTPUT SETTINGS [TV TYPE], [DISP OUTPUT] CLOCK/ LANG [CLOCK SET]*4, [AREA SET], [DST SET]/[SUMMERTIME], [ LANGUAGE SET]*4 GENERAL SET [DEMO MODE], [CALIBRATION], [A.SHUT OFF], [REMOTE CTRL]*3, [DROP SENSOR] *1 DCR-SR200/SR300 *2 DCR-SR42 *3 DCR-SR62/SR82/SR200/SR300 *4 You can set the item during Easy Handycam operation (p.16). *5 DCR-SR300...
... MODE]*3, [TIMING]*2, [RECORD SOUND]*2 - (A tab depends on the OPTION MENU will be described below. (SETTINGS) category MOVIE SETTINGS [REC MODE], [NIGHTSHOT LIGHT], [WIDE SELECT]*2, [DIGITAL ZOOM], [STEADYSHOT], [...LCD BRIGHT], [LCD BL LEVEL], [LCD COLOR] OUTPUT SETTINGS [TV TYPE], [DISP OUTPUT] CLOCK/ LANG [CLOCK SET]*4, [AREA SET], [DST SET]/[SUMMERTIME], [ LANGUAGE SET]*4 GENERAL SET [DEMO MODE], [CALIBRATION], [A.SHUT OFF], [REMOTE CTRL]*3, [DROP SENSOR] *1 DCR-SR200/SR300 *2 DCR-SR42 *3 DCR-SR62/SR82/SR200/SR300 *4 You can set the item during Easy Handycam operation (p.16). *5 DCR-SR300...

Operating Guide
Page 32
...even if the lens cover is closed (DCR-SR42/ SR62/SR82). • When you... battery pack (p.11). • Connect the DC plug of the lens cover may appear on the LCD screen, check the following. Contact your camcorder again. C:04:00 C:(or E:) ss:ss (Self-...digit code, which starts from "E." 101-0001 (Warning indicator pertaining to the DC IN jack of times, contact your Sony dealer or local authorized Sony service facility. This is not an "InfoLITHIUM" battery pack. Warning indicators Menu items are grayed out. • There are some functions you have tried a couple of the Handycam...
...even if the lens cover is closed (DCR-SR42/ SR62/SR82). • When you... battery pack (p.11). • Connect the DC plug of the lens cover may appear on the LCD screen, check the following. Contact your camcorder again. C:04:00 C:(or E:) ss:ss (Self-...digit code, which starts from "E." 101-0001 (Warning indicator pertaining to the DC IN jack of times, contact your Sony dealer or local authorized Sony service facility. This is not an "InfoLITHIUM" battery pack. Warning indicators Menu items are grayed out. • There are some functions you have tried a couple of the Handycam...
Operating Guide
Page 34
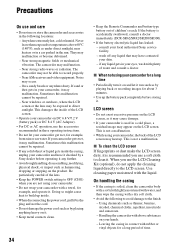
...malfunction cannot be exposed to direct sunlight. Sometimes this malfunction cannot be able to record properly. - Leaving the casing in contact with above 60°C (140°...Periodically turn it on the LCD screen. consult your hands. - x When not using your camcorder is accidentally swallowed, consult a doctor immediately (DCR-SR62/SR82/SR200/SR300). • If the ...- LCD screen • Do not exert excessive pressure on the LCD screen, as hammering, dropping or stepping on your local authorized Sony service facility. - Near AM receivers and video equipment....
...malfunction cannot be exposed to direct sunlight. Sometimes this malfunction cannot be able to record properly. - Leaving the casing in contact with above 60°C (140°...Periodically turn it on the LCD screen. consult your hands. - x When not using your camcorder is accidentally swallowed, consult a doctor immediately (DCR-SR62/SR82/SR200/SR300). • If the ...- LCD screen • Do not exert excessive pressure on the LCD screen, as hammering, dropping or stepping on your local authorized Sony service facility. - Near AM receivers and video equipment....
Operating Guide
Page 37
... the time of recording. *2 The unique pixel array of pixels DCR-SR42/SR62/SR82 123 200 (560 × 220) DCR-SR200/SR300 211 200 (960 × 220) General Power requirements 6.8 V/7.2 V (battery pack) 8.4 V (AC Adaptor) Average power consumption During camera recording with supplied battery pack...NightShot function) *1 "Exif" is a file format for DCR-SR42) Stereo mini-minijack (Ø 2.5 mm) LCD screen Picture DCR-SR42 6.2 cm (2.5 type) DCR-SR62/SR82/SR200/SR300 6.9 cm (2.7 type, aspect ratio 16:9) Total number of Sony's ClearVid CMOS Sensor and image processing system (new Enhanced Imaging...
... the time of recording. *2 The unique pixel array of pixels DCR-SR42/SR62/SR82 123 200 (560 × 220) DCR-SR200/SR300 211 200 (960 × 220) General Power requirements 6.8 V/7.2 V (battery pack) 8.4 V (AC Adaptor) Average power consumption During camera recording with supplied battery pack...NightShot function) *1 "Exif" is a file format for DCR-SR42) Stereo mini-minijack (Ø 2.5 mm) LCD screen Picture DCR-SR42 6.2 cm (2.5 type) DCR-SR62/SR82/SR200/SR300 6.9 cm (2.7 type, aspect ratio 16:9) Total number of Sony's ClearVid CMOS Sensor and image processing system (new Enhanced Imaging...
Handycam® Handbook
Page 2
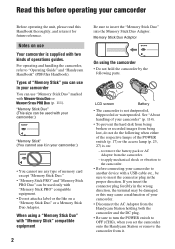
... remove the camcorder from the camcorder. - See "About handling of your camcorder" (p. 114). • To prevent the hard disk from being broken or recorded images from the Handycam Station holding both the camcorder and the DC plug. • Be sure to turn the POWER switch to insert the "Memory... Stick Duo" into the Memory Stick Duo Adaptor. LCD screen Battery • The camcorder is supplied with "Memory Stick"...
... remove the camcorder from the camcorder. - See "About handling of your camcorder" (p. 114). • To prevent the hard disk from being broken or recorded images from the Handycam Station holding both the camcorder and the DC plug. • Be sure to turn the POWER switch to insert the "Memory... Stick Duo" into the Memory Stick Duo Adaptor. LCD screen Battery • The camcorder is supplied with "Memory Stick"...
Handycam® Handbook
Page 3
...system-based TV. • Television programs, films, video tapes, and other materials may be provided, even if recording or playback is equipped with a digital still camera, and may be copyrighted. About this Handbook • The LCD screens and indicators shown in this Handbook were taken...measurement system for DCR-SR200/SR300 is manufactured using your camcorder to make sure the image and sound are normal results of a Carl Zeiss lens. On recording • Before starting to record, test the recording function to malfunction. Also, the lens for video cameras and offers ...
...system-based TV. • Television programs, films, video tapes, and other materials may be provided, even if recording or playback is equipped with a digital still camera, and may be copyrighted. About this Handbook • The LCD screens and indicators shown in this Handbook were taken...measurement system for DCR-SR200/SR300 is manufactured using your camcorder to make sure the image and sound are normal results of a Carl Zeiss lens. On recording • Before starting to record, test the recording function to malfunction. Also, the lens for video cameras and offers ...
Handycam® Handbook
Page 4
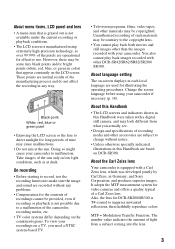
...Drive Handycam Save all your recorded image data • To prevent your image data from being activated in a low-pressure area, where the altitude is recommended that you save your images on a disc such as DVD-R using your computer (p. 77). Notes on the camcorder, due to your camcorder • The hard... recorded images on the LCD screen (p. 104). 4 When the camcorder is connected to a computer • Do not try to the above, when you may not be possible. • Especially, during recording/playback, do not crash the camera against an object. If you repeat recording/deleting...
...Drive Handycam Save all your recorded image data • To prevent your image data from being activated in a low-pressure area, where the altitude is recommended that you save your images on a disc such as DVD-R using your computer (p. 77). Notes on the camcorder, due to your camcorder • The hard... recorded images on the LCD screen (p. 104). 4 When the camcorder is connected to a computer • Do not try to the above, when you may not be possible. • Especially, during recording/playback, do not crash the camera against an object. If you repeat recording/deleting...
Handycam® Handbook
Page 8
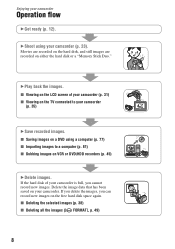
x Viewing on VCR or DVD/HDD recorders (p. 45) B Delete images. If the hard disk of your camcorder (p. 31) x Viewing on the TV connected to a computer (p. 81) x Dubbing images on the LCD screen of your camcorder (p. 35) B Save recorded images. Delete the image data that has been saved on a DVD using your camcorder. If you delete...
x Viewing on VCR or DVD/HDD recorders (p. 45) B Delete images. If the hard disk of your camcorder (p. 31) x Viewing on the TV connected to a computer (p. 81) x Dubbing images on the LCD screen of your camcorder (p. 35) B Save recorded images. Delete the image data that has been saved on a DVD using your camcorder. If you delete...
Handycam® Handbook
Page 16
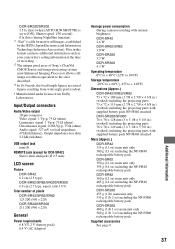
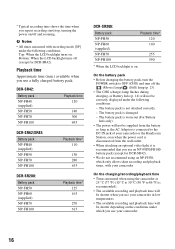
...DCR-SR300: Battery pack NP-FH50 NP-FH60 (supplied) NP-FH70 NP-FH100 Playback time* 120 160 255 590 * When the LCD backlight is not attached correctly. - On the battery pack • Before changing the battery pack, turn the POWER switch to the DC IN jack of your camcorder or the Handycam... Station, even when the power cord is disconnected from the wall outlet. • When attaching an optional video light, it is recommended that you use your camcorder in low temperatures. • The available recording and playback time will not be supplied ...
...DCR-SR300: Battery pack NP-FH50 NP-FH60 (supplied) NP-FH70 NP-FH100 Playback time* 120 160 255 590 * When the LCD backlight is not attached correctly. - On the battery pack • Before changing the battery pack, turn the POWER switch to the DC IN jack of your camcorder or the Handycam... Station, even when the power cord is disconnected from the wall outlet. • When attaching an optional video light, it is recommended that you use your camcorder in low temperatures. • The available recording and playback time will not be supplied ...

Handycam® Handbook
Page 17
... a wall and furniture. • Do not short-circuit the DC plug of the arrow until the respective lamp lights up. (Movie): To record movies (Still): To record still images The [CLOCK SET] screen appears. 2 Select the desired geographical area with any metallic objects. Step 3: Turning the power on the... LCD screen. Lens cover Touch the button on , and setting the date and time Set the date and time when using the AC Adaptor...
... a wall and furniture. • Do not short-circuit the DC plug of the arrow until the respective lamp lights up. (Movie): To record movies (Still): To record still images The [CLOCK SET] screen appears. 2 Select the desired geographical area with any metallic objects. Step 3: Turning the power on the... LCD screen. Lens cover Touch the button on , and setting the date and time Set the date and time when using the AC Adaptor...

Handycam® Handbook
Page 19
...for a few seconds until disappears. Getting Started Step 4: Preparing for recording Opening the lens cover manually (DCR-SR42/SR62/ SR82) Slide the lens cover switch to open or adjust the LCD panel. Adjusting the LCD panel Open the LCD panel 90 degrees to the camcorder (1), then rotate it 180 degrees to... the (max.) camcorder To turn on the LCD frame accidentally when you can close the lens cover. • For DCR-SR200/SR300, the lens cover opens and closes automatically. Fastening the grip belt Fasten the grip belt and hold...
...for a few seconds until disappears. Getting Started Step 4: Preparing for recording Opening the lens cover manually (DCR-SR42/SR62/ SR82) Slide the lens cover switch to open or adjust the LCD panel. Adjusting the LCD panel Open the LCD panel 90 degrees to the camcorder (1), then rotate it 180 degrees to... the (max.) camcorder To turn on the LCD frame accidentally when you can close the lens cover. • For DCR-SR200/SR300, the lens cover opens and closes automatically. Fastening the grip belt Fasten the grip belt and hold...

Handycam® Handbook
Page 20
... playback with ease (Easy Handycam operation) Easy Handycam operation makes nearly all settings automatic so that you can change the recording media of [ QUALITY] is fixed to [FINE] (p. 58). 20 Recording still images Still images are recorded on the LCD screen. 3 Press START/STOP H (or E) to a "Memory Stick Duo" (p....CHG), turn it while pressing the green button. appears on the hard disk in the default setting. It also makes screen font size larger for easy viewing. Open the lens cover (DCR-SR42/SR62/SR82) (p. 19) Recording movies 1 Turn the POWER switch G until the (Still) lamp...
... playback with ease (Easy Handycam operation) Easy Handycam operation makes nearly all settings automatic so that you can change the recording media of [ QUALITY] is fixed to [FINE] (p. 58). 20 Recording still images Still images are recorded on the LCD screen. 3 Press START/STOP H (or E) to a "Memory Stick Duo" (p....CHG), turn it while pressing the green button. appears on the hard disk in the default setting. It also makes screen font size larger for easy viewing. Open the lens cover (DCR-SR42/SR62/SR82) (p. 19) Recording movies 1 Turn the POWER switch G until the (Still) lamp...


