
Operating Guide
Page 3
... aerosol cleaners. for necessary ventilation. Never block the slots and openings by items placed upon or against them . For those sets designed to operate from battery power, or other ). Do not defeat the safety purpose of any kind on a bed, sofa, rug, or other materials. - Object and Liquid Entry Never push...
... aerosol cleaners. for necessary ventilation. Never block the slots and openings by items placed upon or against them . For those sets designed to operate from battery power, or other ). Do not defeat the safety purpose of any kind on a bed, sofa, rug, or other materials. - Object and Liquid Entry Never push...

Operating Guide
Page 5
... complies with the specified type only. For customers in the U.S.A. Regulatory Information Declaration of rechargeable batteries, call : Sony Customer Information Center 1-800222-SONY (7669). For more information regarding recycling of Conformity Trade Name: SONY Model No.: DCR-SR100 Responsible Party: Sony Electronics Inc. If you have any questions about this device must accept any interference received, including...
... complies with the specified type only. For customers in the U.S.A. Regulatory Information Declaration of rechargeable batteries, call : Sony Customer Information Center 1-800222-SONY (7669). For more information regarding recycling of Conformity Trade Name: SONY Model No.: DCR-SR100 Responsible Party: Sony Electronics Inc. If you have any questions about this device must accept any interference received, including...
Operating Guide
Page 6
... the ACCESS lamp (p.30) is encouraged to try to Part 15 of operations guides. - DCR-SR100 Serial No. Model No. AC- Consult the dealer or an experienced radio/TV technician for ...a particular installation. Model No. "Camera Operating Guide" (This manual) - Removing the battery pack or AC Adaptor from being lost, do not do the followings when either of the...the terminal may cause a malfunction of your Sony dealer regarding this product. Applying mechanical shock or vibration to the camcorder • Before connecting your camcorder to another device with a USB cable etc...
... the ACCESS lamp (p.30) is encouraged to try to Part 15 of operations guides. - DCR-SR100 Serial No. Model No. AC- Consult the dealer or an experienced radio/TV technician for ...a particular installation. Model No. "Camera Operating Guide" (This manual) - Removing the battery pack or AC Adaptor from being lost, do not do the followings when either of the...the terminal may cause a malfunction of your Sony dealer regarding this product. Applying mechanical shock or vibration to the camcorder • Before connecting your camcorder to another device with a USB cable etc...
Operating Guide
Page 8
... [HDD FORMAT] • If you perform [EMPTY HDD] (p.60) to make it difficult to the camcorder. In addition to remove the battery pack or the AC Adaptor after recording. Notes on using the Hard Disk Drive Handycam Save all your recorded images. When a drop occurs, or under a non-gravity condition, the block noise...
... [HDD FORMAT] • If you perform [EMPTY HDD] (p.60) to make it difficult to the camcorder. In addition to remove the battery pack or the AC Adaptor after recording. Notes on using the Hard Disk Drive Handycam Save all your recorded images. When a drop occurs, or under a non-gravity condition, the block noise...

Operating Guide
Page 9
... first 5 Notes on using your camcorder with automatic settings Using Easy Handycam operation 24 Recording with ease 26 Playback with your Hard Disk Drive Handycam 12 Using your Hard Disk Drive Handycam 14 Getting Started Step 1: Checking supplied items 15 Step 2: Charging the battery pack 16 Step 3: Turning the ... used for recording/playback, etc 34 Recording To use zoom To use the flash Continued , 9 using the Hard Disk Drive Handycam 8 Enjoying with your camcorder 19 Step 4: Adjusting the LCD screen and viewfinder 20 Step 5: Using the touch panel 21 Step 6: Setting the date and...
... first 5 Notes on using your camcorder with automatic settings Using Easy Handycam operation 24 Recording with ease 26 Playback with your Hard Disk Drive Handycam 12 Using your Hard Disk Drive Handycam 14 Getting Started Step 1: Checking supplied items 15 Step 2: Charging the battery pack 16 Step 3: Turning the ... used for recording/playback, etc 34 Recording To use zoom To use the flash Continued , 9 using the Hard Disk Drive Handycam 8 Enjoying with your camcorder 19 Step 4: Adjusting the LCD screen and viewfinder 20 Step 5: Using the touch panel 21 Step 6: Setting the date and...
Operating Guide
Page 10
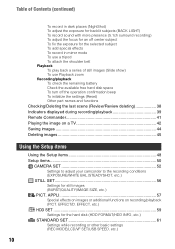
... Saving images 44 Deleting images 45 Using the Setup items Using the Setup items 48 Setup items 50 CAMERA SET 52 Settings to adjust your camcorder to the recording conditions (EXPOSURE/WHITE BAL./STEADYSHOT, etc.) STILL SET 56 Settings for still images (BURST/QUALITY/IMAGE SIZE, etc.) PICT. ... the shoulder belt Playback To play back a series of still images (Slide show) To use Playback zoom Recording/playback To check the remaining battery Check the available free hard disk space To turn off the operation confirmation beep To initialize the settings (Reset) Other part names and functions ...
... Saving images 44 Deleting images 45 Using the Setup items Using the Setup items 48 Setup items 50 CAMERA SET 52 Settings to adjust your camcorder to the recording conditions (EXPOSURE/WHITE BAL./STEADYSHOT, etc.) STILL SET 56 Settings for still images (BURST/QUALITY/IMAGE SIZE, etc.) PICT. ... the shoulder belt Playback To play back a series of still images (Slide show) To use Playback zoom Recording/playback To check the remaining battery Check the available free hard disk space To turn off the operation confirmation beep To initialize the settings (Reset) Other part names and functions ...

Operating Guide
Page 11
... (PictBridge compliant printer 75 Jacks to connect external devices 77 Troubleshooting Troubleshooting 78 Warning indicators and messages 88 Additional Information Using your camcorder abroad 92 Files on the camcorder hard disk/folder structure 94 About the "InfoLITHIUM" battery pack 95 Maintenance and precautions 96 Specifications 99 Glossary, Index Glossary 101 Index...103 11
... (PictBridge compliant printer 75 Jacks to connect external devices 77 Troubleshooting Troubleshooting 78 Warning indicators and messages 88 Additional Information Using your camcorder abroad 92 Files on the camcorder hard disk/folder structure 94 About the "InfoLITHIUM" battery pack 95 Maintenance and precautions 96 Specifications 99 Glossary, Index Glossary 101 Index...103 11

Operating Guide
Page 15
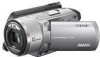
Getting Started Getting Started Step 1: Checking supplied items Make sure that item supplied. The number in the parentheses indicates the number of that you have following items supplied with your camcorder. AC Adaptor (1) (p.16) Rechargeable battery pack NP-FP60 (1) (p.17) Power cord (1) (p.16) CD-ROM "ImageMixer for HDD Camcorder" (1) "Camera Operating Guide" (This manual) (1) "Computer Application Guide" (1) A/V connecting cable (1) (p.42, 71, 73) USB cable (1) (p.75, 77) Wireless Remote Commander (1) (p.41) A button-type lithium battery is already installed. 15
Getting Started Getting Started Step 1: Checking supplied items Make sure that item supplied. The number in the parentheses indicates the number of that you have following items supplied with your camcorder. AC Adaptor (1) (p.16) Rechargeable battery pack NP-FP60 (1) (p.17) Power cord (1) (p.16) CD-ROM "ImageMixer for HDD Camcorder" (1) "Camera Operating Guide" (This manual) (1) "Computer Application Guide" (1) A/V connecting cable (1) (p.42, 71, 73) USB cable (1) (p.75, 77) Wireless Remote Commander (1) (p.41) A button-type lithium battery is already installed. 15

Operating Guide
Page 16
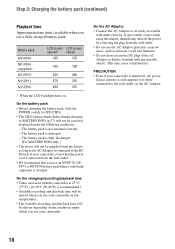
... connect the AC Adaptor. Open the jack cover to the DC IN jack on your camcorder. (See the reverse side of the battery pack for the model number.) Installing the battery pack with excess force may lead to the AC Adaptor and the wall outlet. Jack ...in the direction of the camcorder. 4 Connect the power cord to camcorder malfunction such as deterioration in battery pack performance or difficulty in removing the battery pack. Step 2: Charging the battery pack You can charge the battery after attaching the "InfoLITHIUM" battery pack (P series) (p.95) to your camcorder. • You cannot ...
... connect the AC Adaptor. Open the jack cover to the DC IN jack on your camcorder. (See the reverse side of the battery pack for the model number.) Installing the battery pack with excess force may lead to the AC Adaptor and the wall outlet. Jack ...in the direction of the camcorder. 4 Connect the power cord to camcorder malfunction such as deterioration in battery pack performance or difficulty in removing the battery pack. Step 2: Charging the battery pack You can charge the battery after attaching the "InfoLITHIUM" battery pack (P series) (p.95) to your camcorder. • You cannot ...

Operating Guide
Page 17
... when you do not intend to use a fully charged battery pack. Top: When the LCD backlight turns on your camcorder. • Remove the AC Adaptor holding both your camcorder and the DC plug. Slide the BATT (battery) release lever and remove the battery pack. Battery pack NP-FP50 NP-FP60 (supplied) NP-FP70 NP-...8226; When you repeat recording start/stop, turning the power on . Remove the AC Adaptor from the DC IN jack on . - To remove the battery pack Slide the POWER switch to OFF (CHG). Bottom: Recording time when recording with the viewfinder while the LCD panel is on / off when the...
... when you do not intend to use a fully charged battery pack. Top: When the LCD backlight turns on your camcorder. • Remove the AC Adaptor holding both your camcorder and the DC plug. Slide the BATT (battery) release lever and remove the battery pack. Battery pack NP-FP50 NP-FP60 (supplied) NP-FP70 NP-...8226; When you repeat recording start/stop, turning the power on . Remove the AC Adaptor from the DC IN jack on . - To remove the battery pack Slide the POWER switch to OFF (CHG). Bottom: Recording time when recording with the viewfinder while the LCD panel is on / off when the...
Operating Guide
Page 18
...the LCD backlight turns on the conditions under the following conditions. - On the battery pack • Before changing the battery pack, slide the POWER switch to the DC IN jack of the AC Adaptor or battery terminal with the camcorder at 25 °C (77°F). (10-30°C (50-86°...is recommended.) • Available recording and playback time will be shorter when you use your camcorder in a narrow space, such as the AC Adaptor is attached. The battery pack is fully discharged. (For BATTERY INFO only.) • The power will be correctly displayed under which you use the AC ...
...the LCD backlight turns on the conditions under the following conditions. - On the battery pack • Before changing the battery pack, slide the POWER switch to the DC IN jack of the AC Adaptor or battery terminal with the camcorder at 25 °C (77°F). (10-30°C (50-86°...is recommended.) • Available recording and playback time will be shorter when you use your camcorder in a narrow space, such as the AC Adaptor is attached. The battery pack is fully discharged. (For BATTERY INFO only.) • The power will be correctly displayed under which you use the AC ...

Operating Guide
Page 19
... record, slide the POWER switch to OFF (CHG). • At the time of your camcorder, the current date and time will be displayed on the LCD screen for approximately five minutes, to save battery power. ([A.SHUT OFF], p.64). • When you set to turn on the respective lamp. When... purchase, the power will be set the POWER switch to (Movie) or (Still), the lens cover opens up . POWER switch Lens cover 2 Hold your camcorder without any operation for a few seconds. Green button 3 Ensure a good grip, then fasten the belt. (Movie): To record movies (Still): To record still...
... record, slide the POWER switch to OFF (CHG). • At the time of your camcorder, the current date and time will be displayed on the LCD screen for approximately five minutes, to save battery power. ([A.SHUT OFF], p.64). • When you set to turn on the respective lamp. When... purchase, the power will be set the POWER switch to (Movie) or (Still), the lens cover opens up . POWER switch Lens cover 2 Hold your camcorder without any operation for a few seconds. Green button 3 Ensure a good grip, then fasten the belt. (Movie): To record movies (Still): To record still...

Operating Guide
Page 20
...facing out. Viewfinder Extend the viewfinder until disappears. • See [LCD/VF SET] - [LCD BRIGHT] (p.62) to save battery power. This setting is practical when you use your camcorder in bright conditions or you can adjust the brightness of the LCD screen. • You can close it 180 degrees to...by the setting. This is clear. To turn off the LCD backlight to make the battery last longer Press and hold DISP/BATT INFO until it clicks. 2 90 degrees 1 90 degrees to the (max.) camcorder • Be careful not to press the buttons on the LCD frame accidentally, when ...
...facing out. Viewfinder Extend the viewfinder until disappears. • See [LCD/VF SET] - [LCD BRIGHT] (p.62) to save battery power. This setting is practical when you use your camcorder in bright conditions or you can adjust the brightness of the LCD screen. • You can close it 180 degrees to...by the setting. This is clear. To turn off the LCD backlight to make the battery last longer Press and hold DISP/BATT INFO until it clicks. 2 90 degrees 1 90 degrees to the (max.) camcorder • Be careful not to press the buttons on the LCD frame accidentally, when ...

Operating Guide
Page 22
..., then touch . 6 Set [Y] (year) with / , then touch . In that case, charge the rechargeable battery and then set it to 12:00 AM. POWER switch Skip to step 4 when you do not use your camcorder or slide the POWER switch. • If you set the clock for the first time. For... 2079. 7 Set [M] (month), [D] (day), hour and minute, then touch . Step 6: Setting the date and time Set the date and time when using this camcorder for the first time. 1 Touch t [SETUP]. 60min CAMERA SET PROGRAM AE SPOT METER EXPOSURE OK 2 Select (TIME/LANGU.) with / , then touch . 60min DISP...
..., then touch . 6 Set [Y] (year) with / , then touch . In that case, charge the rechargeable battery and then set it to 12:00 AM. POWER switch Skip to step 4 when you do not use your camcorder or slide the POWER switch. • If you set the clock for the first time. For... 2079. 7 Set [M] (month), [D] (day), hour and minute, then touch . Step 6: Setting the date and time Set the date and time when using this camcorder for the first time. 1 Touch t [SETUP]. 60min CAMERA SET PROGRAM AE SPOT METER EXPOSURE OK 2 Select (TIME/LANGU.) with / , then touch . 60min DISP...

Operating Guide
Page 30
... is created automatically. • For image quality of movies, see [ IMAGE SIZE] (p.57). 30 Do not apply shock or vibration to your camcorder, and do not remove the battery pack or AC Adaptor. • You cannot record movies and still images at the same time. • A recordable time of movies in a succession...
... is created automatically. • For image quality of movies, see [ IMAGE SIZE] (p.57). 30 Do not apply shock or vibration to your camcorder, and do not remove the battery pack or AC Adaptor. • You cannot record movies and still images at the same time. • A recordable time of movies in a succession...

Operating Guide
Page 34
... be impaired if heat discoloration or dust obscures the lamp. • The flash charge lamp flickers when charging the flash, and remains lit when the battery charge is complete. • If you do not cover the infrared port 4 with the zoom buttons 7 on the LCD frame. • The minimum distance ...effective. • The flash does not work when attaching the conversion lens (optional) or filter (optional). • You can change the zoom speed with your camcorder and the subject to get a sharp focus is 0.3 to 2.7 m (1 to the subject when using it is insufficient ambient light.
... be impaired if heat discoloration or dust obscures the lamp. • The flash charge lamp flickers when charging the flash, and remains lit when the battery charge is complete. • If you do not cover the infrared port 4 with the zoom buttons 7 on the LCD frame. • The minimum distance ...effective. • The flash does not work when attaching the conversion lens (optional) or filter (optional). • You can change the zoom speed with your camcorder and the subject to get a sharp focus is 0.3 to 2.7 m (1 to the subject when using it is insufficient ambient light.

Operating Guide
Page 37
...TIME AVAILABLE LCD SCREEN: 90 VIEWFINDER: 99 Remaining battery (approx.) Recording capacity (approx.) Check the available free hard disk space 6 See [HDD INFO] (p.59). • During recording, the remaining recordable time/ number of the camcorder is connected, it takes precedence over the internal ...press DISP/BATT INFO qf. If you press this button once, BATTERY INFO appears on page 64. Recording/Playback Recording/playback To check the remaining battery .... qf Set the POWER switch to operate your camcorder. 4 Recording lamp The recording lamp lights up in 4ch microphone...
...TIME AVAILABLE LCD SCREEN: 90 VIEWFINDER: 99 Remaining battery (approx.) Recording capacity (approx.) Check the available free hard disk space 6 See [HDD INFO] (p.59). • During recording, the remaining recordable time/ number of the camcorder is connected, it takes precedence over the internal ...press DISP/BATT INFO qf. If you press this button once, BATTERY INFO appears on page 64. Recording/Playback Recording/playback To check the remaining battery .... qf Set the POWER switch to operate your camcorder. 4 Recording lamp The recording lamp lights up in 4ch microphone...

Operating Guide
Page 39
Recording/Playback Indicators displayed during recording will not be recorded. Recording still images 60min REC 00:01:00 [60min] 60min 112 P-MENU 1 Remaining battery (approx.) (37) 2 Recording mode (HQ / SP / LP) (61) 3 Recording status ([STBY] (standby) / [REC] (recording)) 4 Counter (hour: minute: second) 5 Remaining recordable time of movies 6 5.1ch surround ...
Recording/Playback Indicators displayed during recording will not be recorded. Recording still images 60min REC 00:01:00 [60min] 60min 112 P-MENU 1 Remaining battery (approx.) (37) 2 Recording mode (HQ / SP / LP) (61) 3 Recording status ([STBY] (standby) / [REC] (recording)) 4 Counter (hour: minute: second) 5 Remaining recordable time of movies 6 5.1ch surround ...
Operating Guide
Page 41
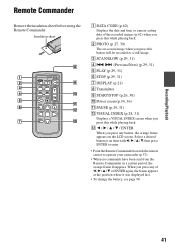
...(p.62) when you press any of b / B / v / V, or ENTER again, the frame appears at the position where it was displayed last. • To change the battery, see page 98. 41 qd b / B / v / V / ENTER When you press this while playing back. 2 PHOTO (p.27, 30) The on the LCD screen. Power...button or an item with b / B / v / V, then press ENTER to enter. • Point the Remote Commander towards the remote sensor to operate your camcorder (p.37). • When no commands have been sent from the Remote Commander in a certain period, the orange frame disappears. When you press any button, the...
...(p.62) when you press any of b / B / v / V, or ENTER again, the frame appears at the position where it was displayed last. • To change the battery, see page 98. 41 qd b / B / v / V / ENTER When you press this while playing back. 2 PHOTO (p.27, 30) The on the LCD screen. Power...button or an item with b / B / v / V, then press ENTER to enter. • Point the Remote Commander towards the remote sensor to operate your camcorder (p.37). • When no commands have been sent from the Remote Commander in a certain period, the orange frame disappears. When you press any button, the...
Operating Guide
Page 53
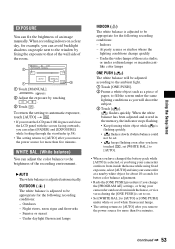
...scenes or studios where the lighting conditions change the [PROGRAM AE] settings, or bring your camcorder outdoors from inside the house while using fixed exposure, select [AUTO] and aim your camcorder outdoors from inside the house, or vice versa during the [ONE PUSH] is set [WHITE...[EXPOSURE] while looking through the viewfinder (p.58). • The setting returns to be set. • keeps flashing even after you have changed the battery pack while [AUTO] is adjusted automatically. WHITE BAL. (White balance) You can adjust the color balance to the window by touching /. 3 Touch ....
...scenes or studios where the lighting conditions change the [PROGRAM AE] settings, or bring your camcorder outdoors from inside the house while using fixed exposure, select [AUTO] and aim your camcorder outdoors from inside the house, or vice versa during the [ONE PUSH] is set [WHITE...[EXPOSURE] while looking through the viewfinder (p.58). • The setting returns to be set. • keeps flashing even after you have changed the battery pack while [AUTO] is adjusted automatically. WHITE BAL. (White balance) You can adjust the color balance to the window by touching /. 3 Touch ....


