
Computer Applications Guide
Page 7
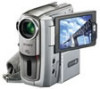
..., start from Step1 ! * These illustrations are two ways to connect your camcorder to a computer. • Connecting with a USB cable (supplied) • Connecting with a Handycam Station, place your camcorder on a computer CD-ROM (supplied) Connecting to a Windows computer On your camcorder Step 2: Connecting your camcorder to a computer" (p. 10) for the first time only) Step 1: Installing the...
..., start from Step1 ! * These illustrations are two ways to connect your camcorder to a computer. • Connecting with a USB cable (supplied) • Connecting with a Handycam Station, place your camcorder on a computer CD-ROM (supplied) Connecting to a Windows computer On your camcorder Step 2: Connecting your camcorder to a computer" (p. 10) for the first time only) Step 1: Installing the...
Computer Applications Guide
Page 11
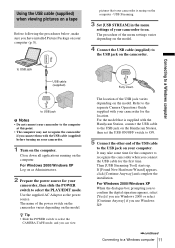
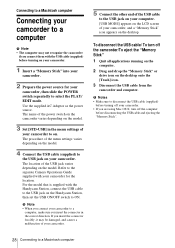
...on the model. 4 Connect the USB cable (supplied) to on the computer - For the model that your camcorder is supplied with the Handycam Station, connect the USB cable to the USB jack on the Handycam Station, then set the USB ON/OFF switch to ON. 5 Connect the other end of the power switch... • Slide the POWER switch to a Windows computer 11 For Windows 2000/Windows XP When the dialogue box prompting you to confirm the digital signature appears, select [Yes] if you use Windows 2000 or select [Continue Anyway] if you use Windows XP. ,continued Connecting to select the CAMERA-...
...on the model. 4 Connect the USB cable (supplied) to on the computer - For the model that your camcorder is supplied with the Handycam Station, connect the USB cable to the USB jack on the Handycam Station, then set the USB ON/OFF switch to ON. 5 Connect the other end of the power switch... • Slide the POWER switch to a Windows computer 11 For Windows 2000/Windows XP When the dialogue box prompting you to confirm the digital signature appears, select [Yes] if you use Windows 2000 or select [Continue Anyway] if you use Windows XP. ,continued Connecting to select the CAMERA-...
Computer Applications Guide
Page 13
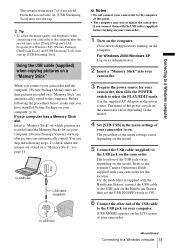
... for the location. The name of the power switch on the camcorder varies depending on the model. 4 Set [STD-USB] in the menu settings of the USB jack varies depending on your camcorder for Windows XP), [Picture Package], [Handycam Tools], and [USB Streaming Tool], then start up , then ...pictures recorded on . Refer to the separate Camera Operations Guide supplied with the Handycam Station, connect the USB cable to the USB ...
... for the location. The name of the power switch on the camcorder varies depending on the model. 4 Set [STD-USB] in the menu settings of the USB jack varies depending on your camcorder for Windows XP), [Picture Package], [Handycam Tools], and [USB Streaming Tool], then start up , then ...pictures recorded on . Refer to the separate Camera Operations Guide supplied with the Handycam Station, connect the USB cable to the USB ...
Computer Applications Guide
Page 16
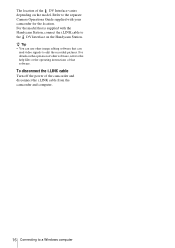
...of other image editing software that can use other software, refer to the help files or the operating instructions of the camcorder and disconnect the i.LINK cable from the camcorder and computer. 16 Connecting to a Windows computer z Tip • You can read video signals to the DV ...off the power of that is supplied with your camcorder for the location. For the model that software. The location of the DV Interface varies depending on the Handycam Station. Refer to the separate Camera Operations Guide supplied with the Handycam Station, connect the i.LINK cable to edit the...
...of other image editing software that can use other software, refer to the help files or the operating instructions of the camcorder and disconnect the i.LINK cable from the camcorder and computer. 16 Connecting to a Windows computer z Tip • You can read video signals to the DV ...off the power of that is supplied with your camcorder for the location. For the model that software. The location of the DV Interface varies depending on the Handycam Station. Refer to the separate Camera Operations Guide supplied with the Handycam Station, connect the i.LINK cable to edit the...
Computer Applications Guide
Page 26
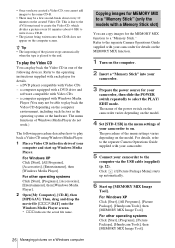
...the operating instructions supplied with your camcorder for details on the MEMORY MIX function. 1 Turn on the computer. 2 Insert a "Memory Stick" into your camcorder. 3 Prepare the power source for details. - For other operating systems Click [Start], [Programs], [Picture Package], [Handycam Tools], then [MEMORY MIX ...Image Tool]. Refer to the separate Camera Operations Guide supplied with each player for your camcorder to on. For Windows XP Click [Start], [All Programs], [Picture Package], [Handycam Tools], then [MEMORY MIX Image Tool]. To play the Video CD You can copy images ...
...the operating instructions supplied with your camcorder for details on the MEMORY MIX function. 1 Turn on the computer. 2 Insert a "Memory Stick" into your camcorder. 3 Prepare the power source for details. - For other operating systems Click [Start], [Programs], [Picture Package], [Handycam Tools], then [MEMORY MIX ...Image Tool]. Refer to the separate Camera Operations Guide supplied with each player for your camcorder to on. For Windows XP Click [Start], [All Programs], [Picture Package], [Handycam Tools], then [MEMORY MIX Image Tool]. To play the Video CD You can copy images ...
Computer Applications Guide
Page 28
... cable (supplied) before turning on your camcorder. 1 Insert a "Memory Stick" into your camcorder. 2 Prepare the power source for your camcorder, then slide the POWER switch repeatedly to the separate Camera Operations Guide supplied with the Handycam Station, connect the USB cable to the USB jack on the Handycam Station, then set the USB ON/OFF...
... cable (supplied) before turning on your camcorder. 1 Insert a "Memory Stick" into your camcorder. 2 Prepare the power source for your camcorder, then slide the POWER switch repeatedly to the separate Camera Operations Guide supplied with the Handycam Station, connect the USB cable to the USB jack on the Handycam Station, then set the USB ON/OFF...

Computer Applications Guide
Page 35
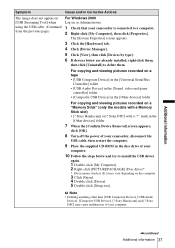
... on the "Memory Stick" to the computer. cFinish camcorder operation before connecting the camcorder to your camcorder first, then copy the pictures recorded on . Connect the camcorder and the computer using the USB cable. cFor the model that is supplied with the Handycam Station, connect the Handycam Station to on the computer. cYou cannot use an...
... on the "Memory Stick" to the computer. cFinish camcorder operation before connecting the camcorder to your camcorder first, then copy the pictures recorded on . Connect the camcorder and the computer using the USB cable. cFor the model that is supplied with the Handycam Station, connect the Handycam Station to on the computer. cYou cannot use an...
Computer Applications Guide
Page 36
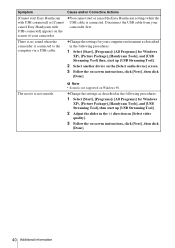
...than [USB Audio Device], [USB Device], [USB Composite Device], [? Sony Handycam] and [? mark in the [Other devices] folder 5 When the [Confirm Device Removal] screen appears, click [OK]. 6 Turn off the power of your camcorder, disconnect the USB cable, then restart the computer. 7 Place the ... driver again. 1 Double-click [My Computer]. 2 Right-click [PICTUREPACKAGE] (Disc drive)*. * Drive names (such as the computer was completed. Sony Handycam] or [? Sony DSC] with a Memory Stick slot) • [? For Windows 98*/Windows 98SE/Windows Me * When copying or playing the pictures on a tape...
...than [USB Audio Device], [USB Device], [USB Composite Device], [? Sony Handycam] and [? mark in the [Other devices] folder 5 When the [Confirm Device Removal] screen appears, click [OK]. 6 Turn off the power of your camcorder, disconnect the USB cable, then restart the computer. 7 Place the ... driver again. 1 Double-click [My Computer]. 2 Right-click [PICTUREPACKAGE] (Disc drive)*. * Drive names (such as the computer was completed. Sony Handycam] or [? Sony DSC] with a Memory Stick slot) • [? For Windows 98*/Windows 98SE/Windows Me * When copying or playing the pictures on a tape...
Computer Applications Guide
Page 37
...video and game controller] folder • [Composite USB Device] in the disc drive of your camcorder is connected to a computer. 2 Right-click [My Computer], then click [Properties]. Sony DSC] with a Memory Stick slot) • [? Sony Handycam] and [? The [System Properties] screen appears. 3 Click the [Hardware] tab. 4 ... a "?" b Note • Deleting anything other than [USB Composite Device], [USB Audio Device], [Composite USB Device], [? Sony Handycam] or [? Sony DSC] may vary depending on the computer. 3 Click [Open]. 4 Double-click [Driver]. 5 Double-click [Setup.exe].
...video and game controller] folder • [Composite USB Device] in the disc drive of your camcorder is connected to a computer. 2 Right-click [My Computer], then click [Properties]. Sony DSC] with a Memory Stick slot) • [? Sony Handycam] and [? The [System Properties] screen appears. 3 Click the [Hardware] tab. 4 ... a "?" b Note • Deleting anything other than [USB Composite Device], [USB Audio Device], [Composite USB Device], [? Sony Handycam] or [? Sony DSC] may vary depending on the computer. 3 Click [Open]. 4 Double-click [Driver]. 5 Double-click [Setup.exe].
Computer Applications Guide
Page 38
... the USB cable. (Continued from the previous page) For Windows XP Log on as (E:)) may cause malfunction of your computer. 38 Additional information Sony Handycam] and [? Sony DSC] may vary depending on the computer. 3 Click [Open]. 4 Double-click [Driver]. 5 Double-click [Setup.exe]. The [System Properties... 1 Double-click [My Computer]. 2 Right-click [PICTUREPACKAGE] (Disc drive)*. * Drive names (such as Administrators. 1 Check that your camcorder, disconnect the USB cable, then restart the computer. 10 Place the supplied CD-ROM in the [Other devices] folder For copying and viewing...
... the USB cable. (Continued from the previous page) For Windows XP Log on as (E:)) may cause malfunction of your computer. 38 Additional information Sony Handycam] and [? Sony DSC] may vary depending on the computer. 3 Click [Open]. 4 Double-click [Driver]. 5 Double-click [Setup.exe]. The [System Properties... 1 Double-click [My Computer]. 2 Right-click [PICTUREPACKAGE] (Disc drive)*. * Drive names (such as Administrators. 1 Check that your camcorder, disconnect the USB cable, then restart the computer. 10 Place the supplied CD-ROM in the [Other devices] folder For copying and viewing...
Computer Applications Guide
Page 40
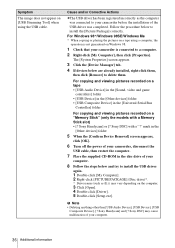
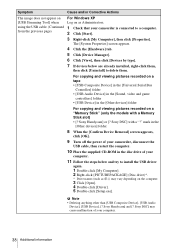
...on -screen instructions, click [Next] , then click [Done]. There is no sound when the camcorder is not smooth. Symptom Cause and/or Corrective Actions [Cannot start or cancel the Easy Handycam settings while the USB cable is connected. b Note • Sound is not supported on the ...screen of your camcorder first. cYou cannot start Easy Handycam with USB connected] or [Cannot cancel Easy Handycam with USB connected] appears on Windows 98...
...on -screen instructions, click [Next] , then click [Done]. There is no sound when the camcorder is not smooth. Symptom Cause and/or Corrective Actions [Cannot start or cancel the Easy Handycam settings while the USB cable is connected. b Note • Sound is not supported on the ...screen of your camcorder first. cYou cannot start Easy Handycam with USB connected] or [Cannot cancel Easy Handycam with USB connected] appears on Windows 98...
Computer Applications Guide
Page 41
... C CD-R 20, 22, 23, 24, 25 CD-ROM 8 CD-RW 20, 22, 24, 25 Click to DVD 30 Copying pictures on a "Memory Stick" .... 13, 29 D Digital convert function......33 Direct Access to "Click to DVD 30 Direct Access to Video CD Burn 24 DirectX 9.0b 9 DV Interface 15, 30, 33 DVD... 30 H Handycam Station 7, 11, 13, 16, 28 I i.LINK cable 10, 15, 18, 30, 33 ImageMixer VCD2 29 Install 8 M Macintosh 28 MEMORY MIX 26 "Memory Stick" ..... 13, 26...
... C CD-R 20, 22, 23, 24, 25 CD-ROM 8 CD-RW 20, 22, 24, 25 Click to DVD 30 Copying pictures on a "Memory Stick" .... 13, 29 D Digital convert function......33 Direct Access to "Click to DVD 30 Direct Access to Video CD Burn 24 DirectX 9.0b 9 DV Interface 15, 30, 33 DVD... 30 H Handycam Station 7, 11, 13, 16, 28 I i.LINK cable 10, 15, 18, 30, 33 ImageMixer VCD2 29 Install 8 M Macintosh 28 MEMORY MIX 26 "Memory Stick" ..... 13, 26...

Camera Operations Guide
Page 3
...to Subpart B of Part 15 of FCC Rules. Bernardo Dr, San Diego, CA 92127 U.S.A. b Note: DCR-PC109 is about this manual could void your camcorder. However, there is for a Class B digital device, pursuant to which can be determined by one or more of the following two conditions: (1) This device...serial numbers are cautioned that may call upon your Sony dealer regarding this device must be used with . These limits are marked with Handycam Station Model DCRA-C111 and AC Power Adaptor Model AC-L25A/L25B. Model No.DCR-PC Serial No. The supplied interface cable must ...
...to Subpart B of Part 15 of FCC Rules. Bernardo Dr, San Diego, CA 92127 U.S.A. b Note: DCR-PC109 is about this manual could void your camcorder. However, there is for a Class B digital device, pursuant to which can be determined by one or more of the following two conditions: (1) This device...serial numbers are cautioned that may call upon your Sony dealer regarding this device must be used with . These limits are marked with Handycam Station Model DCRA-C111 and AC Power Adaptor Model AC-L25A/L25B. Model No.DCR-PC Serial No. The supplied interface cable must ...
Camera Operations Guide
Page 5
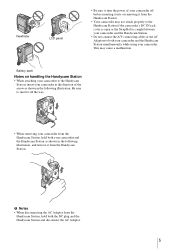
Battery pack Notes on handling the Handycam Station • When attaching your camcorder to the Handycam Station, insert your camcorder in the direction of your camcorder off before inserting it into or removing it from the Handycam Station. • Your camcorder may cause a malfunction. This may not attach properly to the Handycam Station if the camcorder's DC IN jack cover...
Battery pack Notes on handling the Handycam Station • When attaching your camcorder to the Handycam Station, insert your camcorder in the direction of your camcorder off before inserting it into or removing it from the Handycam Station. • Your camcorder may cause a malfunction. This may not attach properly to the Handycam Station if the camcorder's DC IN jack cover...
Camera Operations Guide
Page 6
Easy Handycam 35 Recording a movie 35 Recording a still image 36 Making full use of Contents : Features available for tape only. : Features available for a longer time 29 Using ... "Memory Stick Duo" only. Read this first 2 Quick Start Guide Recording movies 10 Recording still images 12 Recording/Playing back with ease - Table of Easy Handycam operation 37 6
Easy Handycam 35 Recording a movie 35 Recording a still image 36 Making full use of Contents : Features available for tape only. : Features available for a longer time 29 Using ... "Memory Stick Duo" only. Read this first 2 Quick Start Guide Recording movies 10 Recording still images 12 Recording/Playing back with ease - Table of Easy Handycam operation 37 6
Camera Operations Guide
Page 7
... Searching for the starting point 48 Searching for a scene by date of a scene - EDIT SEARCH 48 Reviewing the most recent recording - Digital effect 52 Viewing recordings on a tape - Tape playback zoom/Memory playback zoom 57 Displaying the screen indicators 58 Displaying the date/time and... the most recently recorded scenes - Title search 61 Searching for the last scene of Easy Handycam operation 56 Various playback functions 57 Magnifying pictures - FADER 43 Using special effects - Digital effect 44 Overlaying still images on movies on a "Memory Stick Duo 53 Playing back in...
... Searching for the starting point 48 Searching for a scene by date of a scene - EDIT SEARCH 48 Reviewing the most recent recording - Digital effect 52 Viewing recordings on a tape - Tape playback zoom/Memory playback zoom 57 Displaying the screen indicators 58 Displaying the date/time and... the most recently recorded scenes - Title search 61 Searching for the last scene of Easy Handycam operation 56 Various playback functions 57 Magnifying pictures - FADER 43 Using special effects - Digital effect 44 Overlaying still images on movies on a "Memory Stick Duo 53 Playing back in...
Camera Operations Guide
Page 14
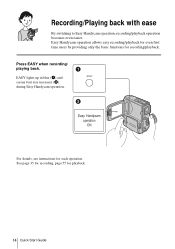
EASY lights up in blue (1) and screen font size increases (2) during Easy Handycam operation. Recording/Playing back with ease By switching to Easy Handycam operation, recording/playback operation becomes even easier. Easy Handycam operation ON For details, see instructions for playback. 14 Quick Start Guide Press EASY when recording/ playing back. See page 35 for recording, page 55 for each operation. Easy Handycam operation allows easy recording/playback for even first time users by providing only the basic functions for recording/playback.
EASY lights up in blue (1) and screen font size increases (2) during Easy Handycam operation. Recording/Playing back with ease By switching to Easy Handycam operation, recording/playback operation becomes even easier. Easy Handycam operation ON For details, see instructions for playback. 14 Quick Start Guide Press EASY when recording/ playing back. See page 35 for recording, page 55 for each operation. Easy Handycam operation allows easy recording/playback for even first time users by providing only the basic functions for recording/playback.
Camera Operations Guide
Page 15
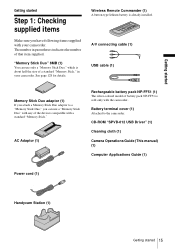
... "Memory Stick." CD-ROM "SPVD-012 USB Driver" (1) Cleaning cloth (1) Camera Operations Guide (This manual) (1) Computer Applications Guide (1) Power cord (1) Handycam Station (1) Getting started Step 1: Checking supplied items Make sure you can use a "Memory Stick Duo" with any of a standard "Memory Stick," in... started Getting started 15 Wireless Remote Commander (1) A button-type lithium battery is sold only with the camcorder. The number in your camcorder. A/V connecting cable (1) USB cable (1) Memory Stick Duo adaptor (1) If you attach a Memory Stick Duo adaptor to the...
... "Memory Stick." CD-ROM "SPVD-012 USB Driver" (1) Cleaning cloth (1) Camera Operations Guide (This manual) (1) Computer Applications Guide (1) Power cord (1) Handycam Station (1) Getting started Step 1: Checking supplied items Make sure you can use a "Memory Stick Duo" with any of a standard "Memory Stick," in... started Getting started 15 Wireless Remote Commander (1) A button-type lithium battery is sold only with the camcorder. The number in your camcorder. A/V connecting cable (1) USB cable (1) Memory Stick Duo adaptor (1) If you attach a Memory Stick Duo adaptor to the...

Camera Operations Guide
Page 16
... outlet AC Adaptor 16 Getting started 3 With the v mark on the Handycam Station. Step 2: Charging the battery pack You can charge the battery by attaching the "InfoLITHIUM" battery pack (F series) to your camcorder as shown in the following illustration and press down the battery pack until... series) (p. 131). • Do not short-circuit the DC plug of the AC Adaptor or battery terminals with its terminal side facing your camcorder. Disconnect the AC Adaptor from the wall outlet immediately if any metallic objects. This may cause a malfunction. • Use a nearby wall outlet...
... outlet AC Adaptor 16 Getting started 3 With the v mark on the Handycam Station. Step 2: Charging the battery pack You can charge the battery by attaching the "InfoLITHIUM" battery pack (F series) to your camcorder as shown in the following illustration and press down the battery pack until... series) (p. 131). • Do not short-circuit the DC plug of the AC Adaptor or battery terminals with its terminal side facing your camcorder. Disconnect the AC Adaptor from the wall outlet immediately if any metallic objects. This may cause a malfunction. • Use a nearby wall outlet...
Camera Operations Guide
Page 17
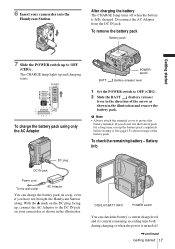
... the battery pack for a long time, use up and charging starts. DISPLAY/BATT INFO POWER switch You can charge the battery pack on your camcorder into the Handycam Station. The CHARGE lamp lights up the battery pack completely before storing it. Disconnect the AC Adaptor from the DC IN jack. See page...
... the battery pack for a long time, use up and charging starts. DISPLAY/BATT INFO POWER switch You can charge the battery pack on your camcorder into the Handycam Station. The CHARGE lamp lights up the battery pack completely before storing it. Disconnect the AC Adaptor from the DC IN jack. See page...


