

Operating Instructions
Page 4
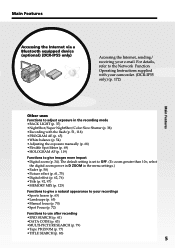
It does not adopt the or the MPEG2 format of this camcorder adopts the format only. Main Features Recording moving pictures or still images, and playing them back •Recording moving pictures on tapes (p. 29) •Playing ... (p. 152) (The i.LINK of .) •Viewing images recorded on the "Memory Stick"s using the USB cable (p. 166, 171) •Viewing moving pictures recorded on your camcorder using the USB cable (p. 163) 4 Capturing images on tapes using the USB cable (p. 161) •Capturing images on your computer from your computer
It does not adopt the or the MPEG2 format of this camcorder adopts the format only. Main Features Recording moving pictures or still images, and playing them back •Recording moving pictures on tapes (p. 29) •Playing ... (p. 152) (The i.LINK of .) •Viewing images recorded on the "Memory Stick"s using the USB cable (p. 166, 171) •Viewing moving pictures recorded on your camcorder using the USB cable (p. 163) 4 Capturing images on tapes using the USB cable (p. 161) •Capturing images on your computer from your computer
Operating Instructions
Page 5
... (To zoom greater than 10×, select the digital zoom power in D ZOOM in the recording mode •BACK LIGHT (p. 37) •NightShot/Super NightShot/Color Slow Shutter (p. 38) •Recording with your camcorder. (DCR-IP55 only) (p. 172) Main Features Other uses Functions... to adjust exposure in the menu settings.) •Fader (p. 58) •Picture effect (p. 61, 75) •Digital effect (p. 62, 76) •Title (p. 92, 97) •...
... (To zoom greater than 10×, select the digital zoom power in D ZOOM in the recording mode •BACK LIGHT (p. 37) •NightShot/Super NightShot/Color Slow Shutter (p. 38) •Recording with your camcorder. (DCR-IP55 only) (p. 172) Main Features Other uses Functions... to adjust exposure in the menu settings.) •Fader (p. 58) •Picture effect (p. 61, 75) •Digital effect (p. 62, 76) •Title (p. 92, 97) •...
Operating Instructions
Page 7
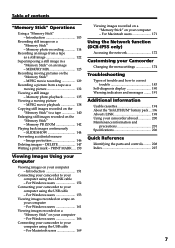
...135 Viewing a moving pictures on the "Memory Stick" - For Macintosh users 171 Using the Network function (DCR-IP55 only) Accessing the network 172 Customising your Camcorder Changing the menu settings 174 Troubleshooting Types of contents "Memory Stick" Operations Using a "Memory Stick" -........... 191 Additional Information Usable cassettes 194 About the "InfoLITHIUM" battery pack .... 196 About i.LINK 198 Using your camcorder abroad 200 Maintenance information and precautions 201 Specifications 206 Quick Reference Identifying the parts and controls ......... 208 Index 215 ...
...135 Viewing a moving pictures on the "Memory Stick" - For Macintosh users 171 Using the Network function (DCR-IP55 only) Accessing the network 172 Customising your Camcorder Changing the menu settings 174 Troubleshooting Types of contents "Memory Stick" Operations Using a "Memory Stick" -........... 191 Additional Information Usable cassettes 194 About the "InfoLITHIUM" battery pack .... 196 About i.LINK 198 Using your camcorder abroad 200 Maintenance information and precautions 201 Specifications 206 Quick Reference Identifying the parts and controls ......... 208 Index 215 ...

Operating Instructions
Page 8
... turned on a tape. Basic operations This section describes the basic operations to turn on the power and select the mode To supply power for the camcorder, see "Step 1 Preparing the power supply" on a tape or "Memory Stick". 8 VCR Use this mode when you play back or edit an image in ...a "Memory Stick." MEMORY/NETWORK (DCR-IP55) MEMORY: Use this mode when you record on a "Memory Stick," or play back or edit an image recorded on page 17. 1,2 CAMERA MEMORY/ ...
... turned on a tape. Basic operations This section describes the basic operations to turn on the power and select the mode To supply power for the camcorder, see "Step 1 Preparing the power supply" on a tape or "Memory Stick". 8 VCR Use this mode when you play back or edit an image in ...a "Memory Stick." MEMORY/NETWORK (DCR-IP55) MEMORY: Use this mode when you record on a "Memory Stick," or play back or edit an image recorded on page 17. 1,2 CAMERA MEMORY/ ...

Operating Instructions
Page 9
...position Turn the grip to this position so that the cassette lid can be seen completely. Basic operations Grip position The grip on your camcorder. GInettrtoidnugcsttioanrte-dBasic operations Introduction - Then hold your camcorder through the wrist strap to perform operations such as the zoom function. Turn the grip to this... camcorder can be moved to the cassette inserting/ ejecting position. Otherwise, the cassette cannot be sure to turn the grip to three positions. Storing ...
...position Turn the grip to this position so that the cassette lid can be seen completely. Basic operations Grip position The grip on your camcorder. GInettrtoidnugcsttioanrte-dBasic operations Introduction - Then hold your camcorder through the wrist strap to perform operations such as the zoom function. Turn the grip to this... camcorder can be moved to the cassette inserting/ ejecting position. Otherwise, the cassette cannot be sure to turn the grip to three positions. Storing ...

Operating Instructions
Page 10
... Slide OPEN/ EJECT in the direction of the arrow and open the lid. 3 Push the middle portion of the back of your camcorder. Quick Start Guide Quick Start Guide - AC power adaptor Connect the plug with the cassette window facing out. 4 Press the cassette ...compartment lightly to the recording position, and hold your camcorder outdoors (p. 17). After the cassette compartment goes down completely, close . Cassette window OPEN/EJECT 10 Cassette compartment Inserting a cassette (p. 25) ...
... Slide OPEN/ EJECT in the direction of the arrow and open the lid. 3 Push the middle portion of the back of your camcorder. Quick Start Guide Quick Start Guide - AC power adaptor Connect the plug with the cassette window facing out. 4 Press the cassette ...compartment lightly to the recording position, and hold your camcorder outdoors (p. 17). After the cassette compartment goes down completely, close . Cassette window OPEN/EJECT 10 Cassette compartment Inserting a cassette (p. 25) ...

Operating Instructions
Page 11
...OPEN in the direction of the B mark indicated on the camcorder to VCR. Quick Start Guide Note Do not pick up . Note When using the touch panel, press operation buttons lightly with sharp objects other than the stylus supplied (DCR-IP55 only). 11 Do not press the LCD screen with your...supplied stylus (DCR-IP55 only) supporting the LCD screen from the rear of the touch panel to CAMERA. To stop recording, press START/ STOP again. Monitoring the playback picture on the LCD screen. 1 Remove the lens cap. 2 Turn the grip to the recording position, and hold your camcorder, the clock...
...OPEN in the direction of the B mark indicated on the camcorder to VCR. Quick Start Guide Note Do not pick up . Note When using the touch panel, press operation buttons lightly with sharp objects other than the stylus supplied (DCR-IP55 only). 11 Do not press the LCD screen with your...supplied stylus (DCR-IP55 only) supporting the LCD screen from the rear of the touch panel to CAMERA. To stop recording, press START/ STOP again. Monitoring the playback picture on the LCD screen. 1 Remove the lens cap. 2 Turn the grip to the recording position, and hold your camcorder, the clock...
Operating Instructions
Page 12
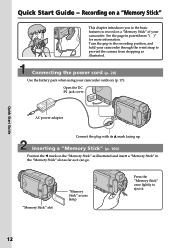
...page in the "Memory Stick" slot as far as it . 12 Inserting a "Memory Stick" (p. 104) Position the b mark on a "Memory Stick" of your camcorder. "Memory Stick" slot "Memory Stick" access lamp Press the "Memory Stick" once lightly to eject it can go. Turn the grip to the recording position..., and hold your camcorder outdoors (p. 17). Connecting the power cord (p. 20) Use the battery pack when using your camcorder through the wrist strap to record on the "Memory Stick" as illustrated. Quick Start Guide Quick ...
...page in the "Memory Stick" slot as far as it . 12 Inserting a "Memory Stick" (p. 104) Position the b mark on a "Memory Stick" of your camcorder. "Memory Stick" slot "Memory Stick" access lamp Press the "Memory Stick" once lightly to eject it can go. Turn the grip to the recording position..., and hold your camcorder outdoors (p. 17). Connecting the power cord (p. 20) Use the battery pack when using your camcorder through the wrist strap to record on the "Memory Stick" as illustrated. Quick Start Guide Quick ...

Operating Instructions
Page 13
...CAMERA MEMORY/ NET- The last recorded image is closed, use the viewfinder. Adjust the viewfinder lens to MEMORY/ NETWORK (DCR-IP55 only). When the green z mark stops flashing, then lights up your camcorder, the clock setting is not set the clock setting before recording (p. 22). 1 Remove the lens cap. 2 Turn..." (p. 114) Viewfinder When the LCD panel is displayed. PLAY PB Note Do not pick up , you pressed PHOTO deeper will be recorded on the camcorder to record the date and time for a picture, set up . The MEMORY/ NETWORK lamp lights up. 4 Slide OPEN in the direction of the ...
...CAMERA MEMORY/ NET- The last recorded image is closed, use the viewfinder. Adjust the viewfinder lens to MEMORY/ NETWORK (DCR-IP55 only). When the green z mark stops flashing, then lights up your camcorder, the clock setting is not set the clock setting before recording (p. 22). 1 Remove the lens cap. 2 Turn..." (p. 114) Viewfinder When the LCD panel is displayed. PLAY PB Note Do not pick up , you pressed PHOTO deeper will be recorded on the camcorder to record the date and time for a picture, set up . The MEMORY/ NETWORK lamp lights up. 4 Slide OPEN in the direction of the ...
Operating Instructions
Page 14
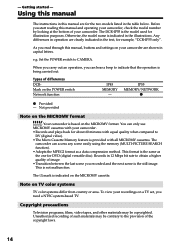
...camcorder. - e.g. You can only use MICROMV cassettes with all MICROMV cassettes. Unauthorized recording of the copyright laws. 14 IP55 MEMORY/NETWORK z z Provided - The DCR-IP55 is provided with your camcorder are for illustration purposes. This format is indicated on the POWER switch Network function IP45...Otherwise, the model name is indicated in the text, for DVD (digital versatile disc). Set the POWER switch to indicate that the operation is not malfunction. The camcorder can hear a beep to CAMERA. Types of your recordings on TV...
...camcorder. - e.g. You can only use MICROMV cassettes with all MICROMV cassettes. Unauthorized recording of the copyright laws. 14 IP55 MEMORY/NETWORK z z Provided - The DCR-IP55 is provided with your camcorder are for illustration purposes. This format is indicated on the POWER switch Network function IP45...Otherwise, the model name is indicated in the text, for DVD (digital versatile disc). Set the POWER switch to indicate that the operation is not malfunction. The camcorder can hear a beep to CAMERA. Types of your recordings on TV...

Operating Instructions
Page 15
... this malfunction cannot be some tiny black points and/or bright points (white, red, blue or green in color) that constantly appear on camcorder care Lens and LCD screen/finder •The LCD screen and the finder are manufactured using extremely high-precision technology, so over 99.99...careful when placing the camera near a window or outdoors. However, there may cause malfunctions [c]. •Do not directly shoot the sun. Letting your camcorder get wet. Take pictures of the pixels are normal in the manufacturing process and do not affect the recording in any way. •Do not...
... this malfunction cannot be some tiny black points and/or bright points (white, red, blue or green in color) that constantly appear on camcorder care Lens and LCD screen/finder •The LCD screen and the finder are manufactured using extremely high-precision technology, so over 99.99...careful when placing the camera near a window or outdoors. However, there may cause malfunctions [c]. •Do not directly shoot the sun. Letting your camcorder get wet. Take pictures of the pixels are normal in the manufacturing process and do not affect the recording in any way. •Do not...

Operating Instructions
Page 16
... Remote Commander (1) (p. 212) 5 Size AA (R6) batteries for MICROMV) (1) (p. 152) qa Battery terminal cover (1) (p. 17) qs Cleaning cloth (1) (p. 202) qd Stylus (1) (DCR-IP55 only) Contents of the recording cannot be compensated if recording or playback is not made due to a malfunction of the camcorder, storage media, etc. 16 CD-ROM (MovieShaker Ver.3.1 for...
... Remote Commander (1) (p. 212) 5 Size AA (R6) batteries for MICROMV) (1) (p. 152) qa Battery terminal cover (1) (p. 17) qs Cleaning cloth (1) (p. 202) qd Stylus (1) (DCR-IP55 only) Contents of the recording cannot be compensated if recording or playback is not made due to a malfunction of the camcorder, storage media, etc. 16 CD-ROM (MovieShaker Ver.3.1 for...
Operating Instructions
Page 17
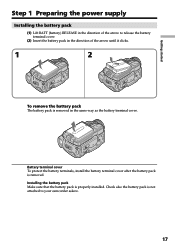
... direction of the arrow until it clicks. 1 2 To remove the battery pack The battery pack is removed in the direction of the arrow to your camcorder askew. 17 Getting started Step 1 Preparing the power supply Installing the battery pack (1) Lift BATT (battery) RELEASE in the same way as the battery terminal...
... direction of the arrow until it clicks. 1 2 To remove the battery pack The battery pack is removed in the direction of the arrow to your camcorder askew. 17 Getting started Step 1 Preparing the power supply Installing the battery pack (1) Lift BATT (battery) RELEASE in the same way as the battery terminal...
Operating Instructions
Page 18
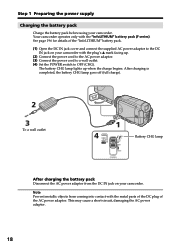
... a wall outlet. (4) Set the POWER switch to the DC IN jack on your camcorder with the "InfoLITHIUM" battery pack (F series). This may cause a short-circuit, damaging the AC power adaptor. 18 Your camcorder operates only with the plug's v mark facing up when the charge begins. Step 1... Preparing the power supply Charging the battery pack Charge the battery pack before using your camcorder. Note Prevent metallic objects from the DC IN jack...
... a wall outlet. (4) Set the POWER switch to the DC IN jack on your camcorder with the "InfoLITHIUM" battery pack (F series). This may cause a short-circuit, damaging the AC power adaptor. 18 Your camcorder operates only with the plug's v mark facing up when the charge begins. Step 1... Preparing the power supply Charging the battery pack Charge the battery pack before using your camcorder. Note Prevent metallic objects from the DC IN jack...
Operating Instructions
Page 20
Your camcorder operates only with the "InfoLITHIUM" battery pack (F series). Recommended charging temperature We recommend charging the battery pack in a cold environment. If the power goes off ... fully again so that the battery pack has enough power to 86 °F). The battery life will be shorter if you use your camcorder in an ambient temperature of Sony Corporation. 20 What is a lithium ion battery pack which can exchange data such as battery consumption with compatible electronic equipment. Step 1 Preparing...
Your camcorder operates only with the "InfoLITHIUM" battery pack (F series). Recommended charging temperature We recommend charging the battery pack in a cold environment. If the power goes off ... fully again so that the battery pack has enough power to 86 °F). The battery life will be shorter if you use your camcorder in an ambient temperature of Sony Corporation. 20 What is a lithium ion battery pack which can exchange data such as battery consumption with compatible electronic equipment. Step 1 Preparing...

Operating Instructions
Page 21
... means that you use a car battery with the metal parts of the DC plug of the AC power adaptor. A car battery You cannot use your camcorder for a long time, we recommend that the battery pack cannot supply any power if the power cord is connected to the DC IN jack, even... using the AC power adaptor. (1) Open the DC IN jack cover and connect the supplied AC power adaptor to the DC IN jack on your camcorder with the plug's v mark facing up. (2) Connect the power cord to the AC power adaptor. (3) Connect the power cord to a wall outlet. 1 2,3 To a wall outlet...
... means that you use a car battery with the metal parts of the DC plug of the AC power adaptor. A car battery You cannot use your camcorder for a long time, we recommend that the battery pack cannot supply any power if the power cord is connected to the DC IN jack, even... using the AC power adaptor. (1) Open the DC IN jack cover and connect the supplied AC power adaptor to the DC IN jack on your camcorder with the plug's v mark facing up. (2) Connect the power cord to the AC power adaptor. (3) Connect the power cord to a wall outlet. 1 2,3 To a wall outlet...

Operating Instructions
Page 22
... r/R to select the year, then press EXEC. (9) Set the month, day and hour with the same procedure as step 8. (10) Press r/R to set your camcorder for about three months, the date and time settings may be released (bars may appear) because the built-in rechargeable battery installed in rechargeable battery...EXEC by the time signal. If you do not use your camcorder for the first time. In this case, charge the built-in your camcorder will be displayed each time you set the POWER switch to CAMERA or MEMORY/ NETWORK (DCR-IP55 only) unless you use your area, the daylight saving ...
... r/R to select the year, then press EXEC. (9) Set the month, day and hour with the same procedure as step 8. (10) Press r/R to set your camcorder for about three months, the date and time settings may be released (bars may appear) because the built-in rechargeable battery installed in rechargeable battery...EXEC by the time signal. If you do not use your camcorder for the first time. In this case, charge the built-in your camcorder will be displayed each time you set the POWER switch to CAMERA or MEMORY/ NETWORK (DCR-IP55 only) unless you use your area, the daylight saving ...

Operating Instructions
Page 23
If you use the camcorder in the menu settings. If you do not set the date and time and are recorded on the...screen for noon. 23 Getting started Step 2 Setting the date and time The year changes as the data code. Note Instead of your camcorder abroad Set the clock to the local time (p. 24). Note on a 12-hour cycle. - 12:00 AM stands for midnight.... - 12:00 PM stands for some models. When using your camcorder operates on the time indicator The internal clock of DST, SUMMERTIME is used Set DST SET to FN (Function) Press EXIT.
If you use the camcorder in the menu settings. If you do not set the date and time and are recorded on the...screen for noon. 23 Getting started Step 2 Setting the date and time The year changes as the data code. Note Instead of your camcorder abroad Set the clock to the local time (p. 24). Note on a 12-hour cycle. - 12:00 AM stands for midnight.... - 12:00 PM stands for some models. When using your camcorder operates on the time indicator The internal clock of DST, SUMMERTIME is used Set DST SET to FN (Function) Press EXIT.

Operating Instructions
Page 26
Doing so may cause a malfunction of the cassette other than the label position [a]. [a] 26 Otherwise, the cassette cannot be sure not to: •Stick on the cassette to the cassette inserting/ejecting position. Label Labels may cause malfunction. •Be sure to turn the grip to expose the red mark. To prevent accidental erasure Slide the write-protect tab on any labels other than the one supplied. •Stick the label onto any part of the camcorder. Therefore, be inserted or ejected. Step 3 Inserting a cassette Notes •Do not press the cassette compartment down.
Doing so may cause a malfunction of the cassette other than the label position [a]. [a] 26 Otherwise, the cassette cannot be sure not to: •Stick on the cassette to the cassette inserting/ejecting position. Label Labels may cause malfunction. •Be sure to turn the grip to expose the red mark. To prevent accidental erasure Slide the write-protect tab on any labels other than the one supplied. •Stick the label onto any part of the camcorder. Therefore, be inserted or ejected. Step 3 Inserting a cassette Notes •Do not press the cassette compartment down.
Operating Instructions
Page 27
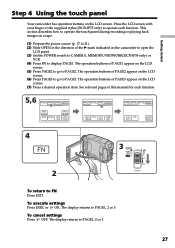
...EXIT. The display returns to PAGE2. To cancel settings Press OFF. The operation buttons of PAGE1 appear on the camcorder to open the LCD panel. (3) Set the POWER switch to CAMERA, MEMORY/NETWORK(DCR-IP55 only) or VCR. (4) Press FN to operate each function. 5,6 PAGE1 PAGE2 PAGE3 EXIT SPOT FOCUS ...PAGE1 PAGE2 PAGE3 EXIT LCD VOL BRT COUNT RESET 4 FN 2 3 CAMERA MEMORY/ NET- Press the LCD screen with your finger or the supplied stylus (DCR-IP55 only) to display PAGE1. The operation buttons of the B mark indicated on the LCD screen. (5) Press PAGE2 to go to PAGE3. This section ...
...EXIT. The display returns to PAGE2. To cancel settings Press OFF. The operation buttons of PAGE1 appear on the camcorder to open the LCD panel. (3) Set the POWER switch to CAMERA, MEMORY/NETWORK(DCR-IP55 only) or VCR. (4) Press FN to operate each function. 5,6 PAGE1 PAGE2 PAGE3 EXIT SPOT FOCUS ...PAGE1 PAGE2 PAGE3 EXIT LCD VOL BRT COUNT RESET 4 FN 2 3 CAMERA MEMORY/ NET- Press the LCD screen with your finger or the supplied stylus (DCR-IP55 only) to display PAGE1. The operation buttons of the B mark indicated on the LCD screen. (5) Press PAGE2 to go to PAGE3. This section ...


