
Computer Applications Guide
Page 2
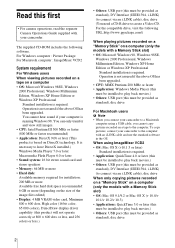
... the computer with your camcorder to a Macintosh computer using ImageMixer VCD2 • OS: Mac OS X (v10.1.5 or later) Standard installation is not assured if the above OS has been upgraded. • CPU: MMX Pentium 200 MHz or faster • Application: Windows Media Player (this must be installed to play back movies.) •... 256 colors or less.) • Others: USB port (this must be provided as standard), disc drive For Macintosh users b Note • When you connect your camcorder. It is running Windows 98.
... the computer with your camcorder to a Macintosh computer using ImageMixer VCD2 • OS: Mac OS X (v10.1.5 or later) Standard installation is not assured if the above OS has been upgraded. • CPU: MMX Pentium 200 MHz or faster • Application: Windows Media Player (this must be installed to play back movies.) •... 256 colors or less.) • Others: USB port (this must be provided as standard), disc drive For Macintosh users b Note • When you connect your camcorder. It is running Windows 98.
Computer Applications Guide
Page 3
... modifying, reproducing, uploading, transmitting or placing to the external network accessible to the separate Camera Operations Guide supplied with your camcorder for details. • The screens shown in this manual. 3 About this manual. To record on the model. License ...a registered trademark of Roxio, Inc. • Toast is a trademark of Sony Corporation. • "Memory Stick" and are registered trademarks of Sony Corporation. • Microsoft, Windows, and Windows Media are protected by Sony Corporation would not be the trademarks or registered trademarks of Roxio, Inc. &#...
... modifying, reproducing, uploading, transmitting or placing to the external network accessible to the separate Camera Operations Guide supplied with your camcorder for details. • The screens shown in this manual. 3 About this manual. To record on the model. License ...a registered trademark of Roxio, Inc. • Toast is a trademark of Sony Corporation. • "Memory Stick" and are registered trademarks of Sony Corporation. • Microsoft, Windows, and Windows Media are protected by Sony Corporation would not be the trademarks or registered trademarks of Roxio, Inc. &#...
Computer Applications Guide
Page 4
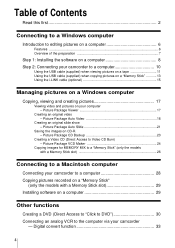
... to Video CD Burn) - Digital convert function 33 4 Picture Package Auto Video 18 Creating an original slide show - Table of Contents Read this first 2 Connecting to a Windows computer Introduction to editing pictures on a computer 6 Features ...6 Overview of the preparation 7 Step 1: Installing the software on a computer 8 Step 2: Connecting your camcorder to a computer 10 Using...
... to Video CD Burn) - Digital convert function 33 4 Picture Package Auto Video 18 Creating an original slide show - Table of Contents Read this first 2 Connecting to a Windows computer Introduction to editing pictures on a computer 6 Features ...6 Overview of the preparation 7 Step 1: Installing the software on a computer 8 Step 2: Connecting your camcorder to a computer 10 Using...
Computer Applications Guide
Page 6
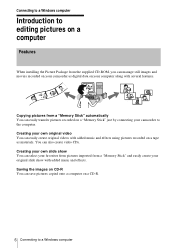
...video CDs. Copying pictures from a "Memory Stick" automatically You can manage still images and movies recorded on your camcorder as materials. Connecting to a Windows computer Introduction to editing pictures on a computer Features When installing the Picture Package from the supplied CD-ROM, you...can easily transfer pictures recorded on a "Memory Stick" just by connecting your camcorder to a Windows computer Creating your computer along with added music and effects using pictures recorded on a tape as digital data on your own original video You can save pictures copied onto a computer...
...video CDs. Copying pictures from a "Memory Stick" automatically You can manage still images and movies recorded on your camcorder as materials. Connecting to a Windows computer Introduction to editing pictures on a computer Features When installing the Picture Package from the supplied CD-ROM, you...can easily transfer pictures recorded on a "Memory Stick" just by connecting your camcorder to a Windows computer Creating your computer along with added music and effects using pictures recorded on a tape as digital data on your own original video You can save pictures copied onto a computer...

Computer Applications Guide
Page 7
... of the preparation Follow the steps below to a computer There are of models with a Handycam Station. On your camcorder to complete the preparation. For models with a Handycam Station, place your camcorder on a computer CD-ROM (supplied) Connecting to a Windows computer On your camcorder Step 2: Connecting your computer (for the first time only) Step 1: Installing the software...
... of the preparation Follow the steps below to a computer There are of models with a Handycam Station. On your camcorder to complete the preparation. For models with a Handycam Station, place your camcorder on a computer CD-ROM (supplied) Connecting to a Windows computer On your camcorder Step 2: Connecting your computer (for the first time only) Step 1: Installing the software...
Computer Applications Guide
Page 8
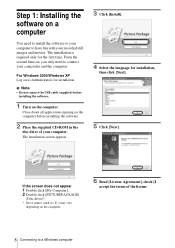
...applications running on the computer before installing the software. 1 Turn on the computer. Step 1: Installing the software on a computer You need to connect your camcorder and the computer. The installation screen appears. 3 Click [Install]. 4 Select the language for installation. b Note • Do not connect the USB ... From the second time on the computer. 6 Read [License Agreement], check [I accept the terms of your recorded still images and movies. For Windows 2000/Windows XP Log on as (E:)) may vary depending on , you only need to install the software to your computer to...
...applications running on the computer before installing the software. 1 Turn on the computer. Step 1: Installing the software on a computer You need to connect your camcorder and the computer. The installation screen appears. 3 Click [Install]. 4 Select the language for installation. b Note • Do not connect the USB ... From the second time on the computer. 6 Read [License Agreement], check [I accept the terms of your recorded still images and movies. For Windows 2000/Windows XP Log on as (E:)) may vary depending on , you only need to install the software to your computer to...
Computer Applications Guide
Page 9
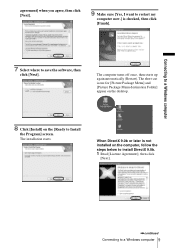
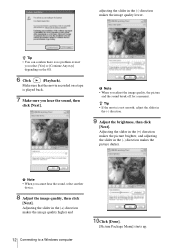
.... 8 Click [Install] on the computer, follow the steps below to install DirectX 9.0b. 1 Read [License Agreement], then click [Next]. ,continued Connecting to a Windows computer 9 The installation starts. Connecting to a Windows computer agreement] when you agree, then click [Next]. 9 Make sure [Yes, I want to restart my computer now.] is not installed on the...
.... 8 Click [Install] on the computer, follow the steps below to install DirectX 9.0b. 1 Read [License Agreement], then click [Next]. ,continued Connecting to a Windows computer 9 The installation starts. Connecting to a Windows computer agreement] when you agree, then click [Next]. 9 Make sure [Yes, I want to restart my computer now.] is not installed on the...
Computer Applications Guide
Page 10
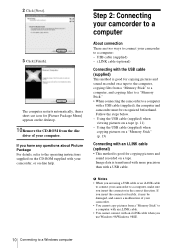
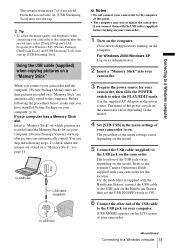
If you use Windows 98/Windows 98SE. 10 Connecting to a computer: - Follow the steps below. - b Notes • When you are two ways to connect your camcorder to a Windows computer i.LINK cable (optional) Connecting with your camcorder, or on a tape to the computer, copying files from a "Memory ...Stick" to a computer, and copying files to a "Memory Stick." • When connecting the camcorder to a computer, make...
If you use Windows 98/Windows 98SE. 10 Connecting to a computer: - Follow the steps below. - b Notes • When you are two ways to connect your camcorder to a Windows computer i.LINK cable (optional) Connecting with your camcorder, or on a tape to the computer, copying files from a "Memory ...Stick" to a computer, and copying files to a "Memory Stick." • When connecting the camcorder to a computer, make...
Computer Applications Guide
Page 11
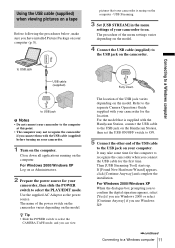
...depending on the computer. Connecting to a Windows computer to a Windows computer 11 The procedure of the USB cable to the USB jack on . z Tip • Slide the POWER switch to select the CAMERA-TAPE mode, and you connect them with the Handycam Station, connect the USB cable to ...you to confirm the digital signature appears, select [Yes] if you use Windows XP. ,continued Connecting to USB jack USB cable (supplied) Fully insert. For Windows 2000/Windows XP Log on as the power source. Then [USB Streaming Tool] starts up. For the model that your camcorder is supplied with the...
...depending on the computer. Connecting to a Windows computer to a Windows computer 11 The procedure of the USB cable to the USB jack on . z Tip • Slide the POWER switch to select the CAMERA-TAPE mode, and you connect them with the Handycam Station, connect the USB cable to ...you to confirm the digital signature appears, select [Yes] if you use Windows XP. ,continued Connecting to USB jack USB cable (supplied) Fully insert. For Windows 2000/Windows XP Log on as the power source. Then [USB Streaming Tool] starts up. For the model that your camcorder is supplied with the...
Computer Applications Guide
Page 12
..., then click [Next]. adjusting the slider in the (+) direction makes the image quality higher and 10Click [Done]. [Picture Package Menu] starts up. 12 Connecting to a Windows computer Adjusting the slider in the (-) direction makes the image quality lower. z Tip • If the movie is not smooth, adjust the slider in the...
..., then click [Next]. adjusting the slider in the (+) direction makes the image quality higher and 10Click [Done]. [Picture Package Menu] starts up. 12 Connecting to a Windows computer Adjusting the slider in the (-) direction makes the image quality lower. z Tip • If the movie is not smooth, adjust the slider in the...
Computer Applications Guide
Page 13
... time on, [USB Streaming Tool] does not start up after the second time, select [Start], [Programs] ([All Programs] for Windows XP), [Picture Package], [Handycam Tools], and [USB Streaming Tool], then start up , then pictures recorded on a "Memory Stick" are stored on a "Memory ...Stick" When you connect your camcorder and the computer, [Picture Package Menu] starts up [USB Streaming Tool]. Before following steps. For Windows 2000/Windows XP Log...
... time on, [USB Streaming Tool] does not start up after the second time, select [Start], [Programs] ([All Programs] for Windows XP), [Picture Package], [Handycam Tools], and [USB Streaming Tool], then start up , then pictures recorded on a "Memory Stick" are stored on a "Memory ...Stick" When you connect your camcorder and the computer, [Picture Package Menu] starts up [USB Streaming Tool]. Before following steps. For Windows 2000/Windows XP Log...
Computer Applications Guide
Page 14
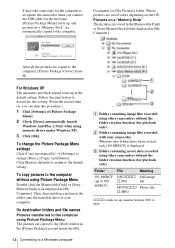
... Where pictures are stored in the [Removable Disk] or [Sony MemoryStick] folder displayed in the [Picture Package] created inside the [My 14 Connecting to a Windows computer A B C A Folder containing image files recorded using memory device under Windows XP). 3 Click [OK]. Pictures on a "Memory Stick...a picture in the folder onto the hard disk drive of [Picture Package Menu]. 2 Check [Do not automatically launch Windows AutoPlay.] (Only when using other camcorders without the folder creation function (for the first time. [Picture Package Menu] starts up, and pictures in [My ...
... Where pictures are stored in the [Removable Disk] or [Sony MemoryStick] folder displayed in the [Picture Package] created inside the [My 14 Connecting to a Windows computer A B C A Folder containing image files recorded using memory device under Windows XP). 3 Click [OK]. Pictures on a "Memory Stick...a picture in the folder onto the hard disk drive of [Picture Package Menu]. 2 Check [Do not automatically launch Windows AutoPlay.] (Only when using other camcorders without the folder creation function (for the first time. [Picture Package Menu] starts up, and pictures in [My ...

Computer Applications Guide
Page 15
...IEEE1394) connector i.LINK cable (optional) ,continued Connecting to a Windows computer task tray 2 Click [Safely remove Sony Camcorder] ([Unplug or eject hardware] in Windows 2000/Windows Me). To disconnect the USB cable For Windows 2000/Windows Me/ Windows XP If [USB MODE] appears on the LCD screen, ...icon on all the recommended environments. Click here. 3 Click [OK] in Windows 2000/Windows Me. 4 Disconnect the USB cable from the camcorder and computer. Click this icon. • If your camcorder. b Notes • Operation is not guaranteed if you connect the USB cable...
...IEEE1394) connector i.LINK cable (optional) ,continued Connecting to a Windows computer task tray 2 Click [Safely remove Sony Camcorder] ([Unplug or eject hardware] in Windows 2000/Windows Me). To disconnect the USB cable For Windows 2000/Windows Me/ Windows XP If [USB MODE] appears on the LCD screen, ...icon on all the recommended environments. Click here. 3 Click [OK] in Windows 2000/Windows Me. 4 Disconnect the USB cable from the camcorder and computer. Click this icon. • If your camcorder. b Notes • Operation is not guaranteed if you connect the USB cable...
Computer Applications Guide
Page 16
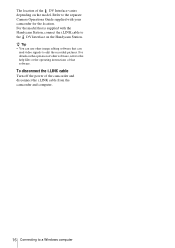
For the model that software. For details on the Handycam Station. The location of the camcorder and disconnect the i.LINK cable from the camcorder and computer. 16 Connecting to a Windows computer Refer to the separate Camera Operations Guide supplied with the Handycam Station, connect the i.LINK cable to the DV Interface on the operation of other...
For the model that software. For details on the Handycam Station. The location of the camcorder and disconnect the i.LINK cable from the camcorder and computer. 16 Connecting to a Windows computer Refer to the separate Camera Operations Guide supplied with the Handycam Station, connect the i.LINK cable to the DV Interface on the operation of other...
Computer Applications Guide
Page 17
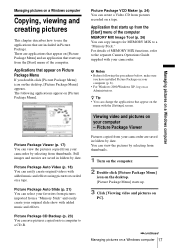
...thumbnails. Application that appear on your camcorder by selecting from pictures recorded on a tape. Viewing video and pictures on your camcorder are applications that starts up . 3 Click [Viewing video and pictures on PC]. ,continued Managing pictures on a Windows computer 17 Managing pictures on the ...selecting from a "Memory Stick" and easily create your camcorder. z Tip • You can copy images for MEMORY MIX to a "Memory Stick." You can view the pictures copied from your computer (p. 8). • For Windows 2000/Windows XP, log on the desktop. [Picture Package Menu]...
...thumbnails. Application that appear on your camcorder by selecting from pictures recorded on a tape. Viewing video and pictures on your camcorder are applications that starts up . 3 Click [Viewing video and pictures on PC]. ,continued Managing pictures on a Windows computer 17 Managing pictures on the ...selecting from a "Memory Stick" and easily create your camcorder. z Tip • You can copy images for MEMORY MIX to a "Memory Stick." You can view the pictures copied from your computer (p. 8). • For Windows 2000/Windows XP, log on the desktop. [Picture Package Menu]...
Computer Applications Guide
Page 18
...-click a picture you have selected. z Tip • You can select and view pictures from your camcorder are grouped by date. z Tip • This operation is 10 minutes. The procedure of the menu settings varies depending on a Windows computer The folders are saved in folders by year. Creating an original video - The selected...
...-click a picture you have selected. z Tip • You can select and view pictures from your camcorder are grouped by date. z Tip • This operation is 10 minutes. The procedure of the menu settings varies depending on a Windows computer The folders are saved in folders by year. Creating an original video - The selected...

Computer Applications Guide
Page 19
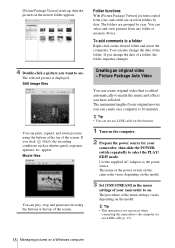
...], then select the music You can select music from music files in the computer or music CDs other than sample ,continued Managing pictures on a Windows computer 19 Select an effect, then click [OK]. . 4 Search for the point on the application. You can select one of the 5 ...effects. music on the tape where you want to start copying. 5 Connect your camcorder to the computer using a USB cable (supplied) or i.LINK cable (optional) (p. 11, 15). [Picture Package Menu] starts up automatically. 6 Click [Automatic ...
...], then select the music You can select music from music files in the computer or music CDs other than sample ,continued Managing pictures on a Windows computer 19 Select an effect, then click [OK]. . 4 Search for the point on the application. You can select one of the 5 ...effects. music on the tape where you want to start copying. 5 Connect your camcorder to the computer using a USB cable (supplied) or i.LINK cable (optional) (p. 11, 15). [Picture Package Menu] starts up automatically. 6 Click [Automatic ...
Computer Applications Guide
Page 20
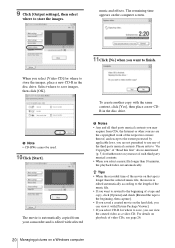
... to use of a tape and copy, click [Options] and check [Rewind the tape to the beginning, then capture]. • If you saved a created movie on a Windows computer To create another copy with selected b Notes • Any and all third party musical contents you may acquire from your use any of video...; CD-RWs cannot be used. 10Click [Start]. For details on the computer screen. . 11Click [No] when you select [Video CD] for further note on your camcorder and is longer than 10 minutes, the playback fades out automatically.
... to use of a tape and copy, click [Options] and check [Rewind the tape to the beginning, then capture]. • If you saved a created movie on a Windows computer To create another copy with selected b Notes • Any and all third party musical contents you may acquire from your use any of video...; CD-RWs cannot be used. 10Click [Start]. For details on the computer screen. . 11Click [No] when you select [Video CD] for further note on your camcorder and is longer than 10 minutes, the playback fades out automatically.
Computer Applications Guide
Page 21
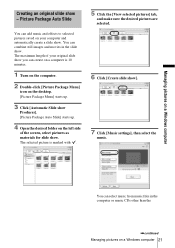
... icon on the desktop. [Picture Package Menu] starts up. 3 Click [Automatic Slide show Producer]. [Picture Package Auto Slide] starts up. 4 Open the desired folder on a Windows computer 21 You can create on a computer is marked with . . 5 Click the [View selected pictures] tab, and make sure the desired pictures are selected. . 6 Click... pictures on the left side of your computer and automatically create a slide show. You can add music and effects to selected pictures saved on a Windows computer Creating an original slide show ]. 7 Click [Music settings], then select the music.
... icon on the desktop. [Picture Package Menu] starts up. 3 Click [Automatic Slide show Producer]. [Picture Package Auto Slide] starts up. 4 Open the desired folder on a Windows computer 21 You can create on a computer is marked with . . 5 Click the [View selected pictures] tab, and make sure the desired pictures are selected. . 6 Click... pictures on the left side of your computer and automatically create a slide show. You can add music and effects to selected pictures saved on a Windows computer Creating an original slide show ]. 7 Click [Music settings], then select the music.
Computer Applications Guide
Page 22
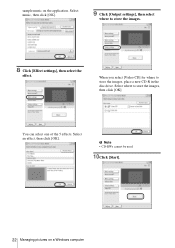
Select music, then click [OK]. . 9 Click [Output settings], then select where to store the images, place a new CD-R in the disc drive. You can select one of the 5 effects. Select an effect, then click [OK]. . b Note • CD-RWs cannot be used. 10Click [Start]. 22 Managing pictures on the application. When you select [Video CD] for where to store the images. 8 Click [Effect settings], then select the effect. Select where to store the images, then click [OK]. . sample music on a Windows computer
Select music, then click [OK]. . 9 Click [Output settings], then select where to store the images, place a new CD-R in the disc drive. You can select one of the 5 effects. Select an effect, then click [OK]. . b Note • CD-RWs cannot be used. 10Click [Start]. 22 Managing pictures on the application. When you select [Video CD] for where to store the images. 8 Click [Effect settings], then select the effect. Select where to store the images, then click [OK]. . sample music on a Windows computer


