
Operating Instructions
Page 1
3-211-166-13 (1) Data Projector Operating Instructions VPL-CX100 VPL-CX120/CX125 VPL-CX150/CX155 VPL-CW125 © 2007 Sony Corporation
3-211-166-13 (1) Data Projector Operating Instructions VPL-CX100 VPL-CX120/CX125 VPL-CX150/CX155 VPL-CW125 © 2007 Sony Corporation

Operating Instructions
Page 4
...(Main Unit 13 Top/Front/Side 13 Rear/Side/Bottom 13 Control Panel 15 Connector Panel 16 Remote Commander 17 VPL-CX125/CX155/CW125 ..... 17 VPL-CX100/CX120/CX150 ...... 19 Effective Tools for Your Presentation 32 Controlling the Computer Using a Presentation Tool, RM-PJPK1 (not supplied)...38 The Function Menu 39 The Installation Menu 41 The Setup Menu 43 The Information Menu 44 Projecting the Picture Installing the Projector 21 Connecting the Projector 23 Connecting a Computer 23 Connecting a VCR 24 Projecting 26 Turning Off the Power 28 Convenient Functions Selecting the Menu ...
...(Main Unit 13 Top/Front/Side 13 Rear/Side/Bottom 13 Control Panel 15 Connector Panel 16 Remote Commander 17 VPL-CX125/CX155/CW125 ..... 17 VPL-CX100/CX120/CX150 ...... 19 Effective Tools for Your Presentation 32 Controlling the Computer Using a Presentation Tool, RM-PJPK1 (not supplied)...38 The Function Menu 39 The Installation Menu 41 The Setup Menu 43 The Information Menu 44 Projecting the Picture Installing the Projector 21 Connecting the Projector 23 Connecting a Computer 23 Connecting a VCR 24 Projecting 26 Turning Off the Power 28 Convenient Functions Selecting the Menu ...
Operating Instructions
Page 6
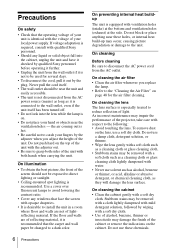
Do not push hard on the lens, use these holes, or internal heat build-up may impair the performance of the projector, take care with respect to the following: • Avoid touching the lens. Use a cover over fluorescent lamps to avoid lowering the contrast ratio. •...ventilation holes - Stubborn stains may damage the finish of light. Do not use a soft dry cloth. If voltage adaptation is required, consult with qualified Sony personnel. • Should any windows that face the screen with opaque draperies. • It is identical with the voltage of the screen should be ...
Do not push hard on the lens, use these holes, or internal heat build-up may impair the performance of the projector, take care with respect to the following: • Avoid touching the lens. Use a cover over fluorescent lamps to avoid lowering the contrast ratio. •...ventilation holes - Stubborn stains may damage the finish of light. Do not use a soft dry cloth. If voltage adaptation is required, consult with qualified Sony personnel. • Should any windows that face the screen with opaque draperies. • It is identical with the voltage of the screen should be ...
Operating Instructions
Page 7
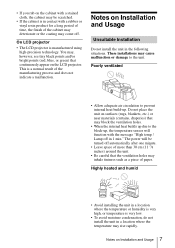
...piece of more than 30 cm (11 7/8 inches) around the unit. • Be careful that the ventilation holes may rise rapidly. Notes on the LCD projector. You may, however, see tiny black points and/or bright points (red, blue, or green) that may block the ventilation holes. • ...When the internal heat builds up due to the block-up . Poorly ventilated • Allow adequate air circulation to the unit. On LCD projector • The LCD projector is very low. • To avoid moisture condensation, do not install the unit in a location where the temperature or humidity is very high...
...piece of more than 30 cm (11 7/8 inches) around the unit. • Be careful that the ventilation holes may rise rapidly. Notes on the LCD projector. You may, however, see tiny black points and/or bright points (red, blue, or green) that may block the ventilation holes. • ...When the internal heat builds up due to the block-up . Poorly ventilated • Allow adequate air circulation to the unit. On LCD projector • The LCD projector is very low. • To avoid moisture condensation, do not install the unit in a location where the temperature or humidity is very high...
Operating Instructions
Page 9
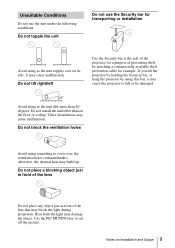
...or installation Avoid using this bar, it may build up. Do not tilt right/left Use the Security bar at the side of the projector for example. Use the PIC MUTING key to fall or be damaged. It may damage the object. These installations may block the light during... over the ventilation holes (exhaust/intake); otherwise, the internal heat may cause the projector to cut off the picture. Notes on its side. If you lift the projector by holding the Security bar, or hang the projector by attaching a commercially available theft prevention cable for a purpose of the lens that...
...or installation Avoid using this bar, it may build up. Do not tilt right/left Use the Security bar at the side of the projector for example. Use the PIC MUTING key to fall or be damaged. It may damage the object. These installations may block the light during... over the ventilation holes (exhaust/intake); otherwise, the internal heat may cause the projector to cut off the picture. Notes on its side. If you lift the projector by holding the Security bar, or hang the projector by attaching a commercially available theft prevention cable for a purpose of the lens that...
Operating Instructions
Page 10
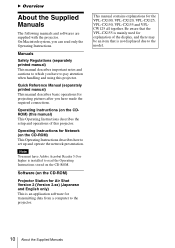
... presentation. B Overview About the Supplied Manuals The following manuals and softwares are supplied with the projector. Be aware that the VPL-CX155 is installed to the model. 10 About the Supplied Manuals On Macintosh system, you have...projector. Operating Instructions (on the CD-ROM) This Operating Instructions describes how to the projector. Manuals Safety Regulations (separately printed manual) This manual describes important notes and cautions to which you have Adobe Acrobat Reader 5.0 or higher is mainly used for the VPL-CX100, VPL-CX120, VPL-CX125, VPL-CX150, VPL...
... presentation. B Overview About the Supplied Manuals The following manuals and softwares are supplied with the projector. Be aware that the VPL-CX155 is installed to the model. 10 About the Supplied Manuals On Macintosh system, you have...projector. Operating Instructions (on the CD-ROM) This Operating Instructions describes how to the projector. Manuals Safety Regulations (separately printed manual) This manual describes important notes and cautions to which you have Adobe Acrobat Reader 5.0 or higher is mainly used for the VPL-CX100, VPL-CX120, VPL-CX125, VPL-CX150, VPL...
Operating Instructions
Page 11
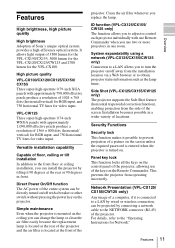
...horizontal TV lines for the VPL-CX100. High picture quality VPL-CX100/CX120/CX125/CX150/ CX155 Three super-high-aperture 0.79-inch XGA panels with approximately 1,090,000 effective pixels produce a resolution of floor, ceiling or tilt installation In addition to obtain projector status information such as ...prevent projection of the projector. Clean the air filter whenever you can be projected by tilting it possible to the NETWORK connector (RJ-45) of a picture on . Security Functions Security lock This function makes it 90 degrees at the front of Sony's unique optical system ...
...horizontal TV lines for the VPL-CX100. High picture quality VPL-CX100/CX120/CX125/CX150/ CX155 Three super-high-aperture 0.79-inch XGA panels with approximately 1,090,000 effective pixels produce a resolution of floor, ceiling or tilt installation In addition to obtain projector status information such as ...prevent projection of the projector. Clean the air filter whenever you can be projected by tilting it possible to the NETWORK connector (RJ-45) of a picture on . Security Functions Security lock This function makes it 90 degrees at the front of Sony's unique optical system ...
Operating Instructions
Page 15
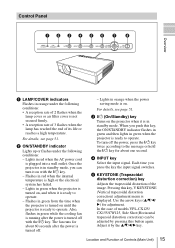
... of its life or reaches a high temperature. d INPUT key Select the input signal. For details, see page 51. Lights in green when the projector is turned on . e KEYSTONE (Trapezoidal distortion correction) key Adjusts the trapezoidal distortion of Controls (Main Unit) 15 Control Panel 123456 7 8 LAMP...or air filter cover is not secured firmly. • A reception rate of 3 flashes when the lamp has reached the end of models VPL-CX125/ CX155/CW125, Side Shot (Horizontal trapezoid distortion correction) can turn off the power, press the ?/1 key twice according to operate. ...
... of its life or reaches a high temperature. d INPUT key Select the input signal. For details, see page 51. Lights in green when the projector is turned on . e KEYSTONE (Trapezoidal distortion correction) key Adjusts the trapezoidal distortion of Controls (Main Unit) 15 Control Panel 123456 7 8 LAMP...or air filter cover is not secured firmly. • A reception rate of 3 flashes when the lamp has reached the end of models VPL-CX125/ CX155/CW125, Side Shot (Horizontal trapezoid distortion correction) can turn off the power, press the ?/1 key twice according to operate. ...
Operating Instructions
Page 17
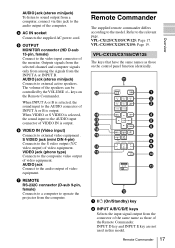
...the speakers can be controlled by the VOLUME +/- e OUTPUT MONITOR connector (HD D-sub 15-pin, female) Connect to operate the projector from the INPUT A or INPUT B. VPL-CX125/CX155/CW125 The keys that have the same names as those on the Remote Commander. f VIDEO IN (Video input) Connects to... the relevant page. VPL-CX100/CX120/CX150: Page 19. VIDEO jack (phono type) Connects to the AUDIO connector of video equipment. Refer to external video equipment . When INPUT A or...
...the speakers can be controlled by the VOLUME +/- e OUTPUT MONITOR connector (HD D-sub 15-pin, female) Connect to operate the projector from the INPUT A or INPUT B. VPL-CX125/CX155/CW125 The keys that have the same names as those on the Remote Commander. f VIDEO IN (Video input) Connects to... the relevant page. VPL-CX100/CX120/CX150: Page 19. VIDEO jack (phono type) Connects to the AUDIO connector of video equipment. Refer to external video equipment . When INPUT A or...
Operating Instructions
Page 18
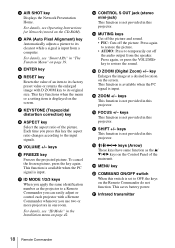
... and sound. • PIC: Cuts off the audio output from a computer. o ZOOM +/- keys This function is not provided in this projector. keys This function is not provided in one room. e ENTER key f RESET key Resets the value of the picture. This function is available when ... Menu" on page 39. i VOLUME +/- keys j FREEZE key Freezes the projected picture. p FOCUS +/- q SHIFT +/- Each time you use two or more projectors in this key the aspect ratio changes according to its factory preset value or returns the enlarged image with a Remote Commander whenever you press this...
... and sound. • PIC: Cuts off the audio output from a computer. o ZOOM +/- keys This function is not provided in this projector. keys This function is not provided in one room. e ENTER key f RESET key Resets the value of the picture. This function is available when ... Menu" on page 39. i VOLUME +/- keys j FREEZE key Freezes the projected picture. p FOCUS +/- q SHIFT +/- Each time you use two or more projectors in this key the aspect ratio changes according to its factory preset value or returns the enlarged image with a Remote Commander whenever you press this...
Operating Instructions
Page 19
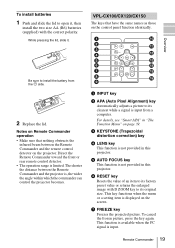
... that have the same names as those on the projector. VPL-CX100/CX120/CX150 The keys that nothing obstructs the infrared beam between the Remote Commander and the projector is, the wider the angle within which the commander can control the projector becomes. e AUTO FOCUS key This function is displayed...input from the # side. 2 Replace the lid. To cancel the frozen picture, press the key again. For details, see "Smart APA" in this projector. g FREEZE key Freezes the projected picture. While pressing the lid, slide it , then install the two size AA (R6) batteries (supplied) with D...
... that have the same names as those on the projector. VPL-CX100/CX120/CX150 The keys that nothing obstructs the infrared beam between the Remote Commander and the projector is, the wider the angle within which the commander can control the projector becomes. e AUTO FOCUS key This function is displayed...input from the # side. 2 Replace the lid. To cancel the frozen picture, press the key again. For details, see "Smart APA" in this projector. g FREEZE key Freezes the projected picture. While pressing the lid, slide it , then install the two size AA (R6) batteries (supplied) with D...
Operating Instructions
Page 20
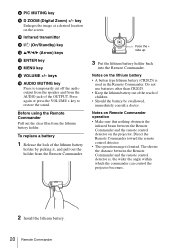
...Direct the Remote Commander toward the remote control detector. • The operation range is , the wider the angle within which the commander can control the projector becomes. 2 Install the lithium battery. 20 Remote Commander j Infrared transmitter k ?/1 (On/Standby) key l v/V/b/B (Arrow) keys m ENTER key ... the lithium battery holder back into the Remote Commander. h PIC MUTING key i D ZOOM (Digital Zoom) +/- Notes on the projector. The shorter the distance between the Remote Commander and the remote control detector on Remote Commander operation • Make sure that nothing ...
...Direct the Remote Commander toward the remote control detector. • The operation range is , the wider the angle within which the commander can control the projector becomes. 2 Install the lithium battery. 20 Remote Commander j Infrared transmitter k ?/1 (On/Standby) key l v/V/b/B (Arrow) keys m ENTER key ... the lithium battery holder back into the Remote Commander. h PIC MUTING key i D ZOOM (Digital Zoom) +/- Notes on the projector. The shorter the distance between the Remote Commander and the remote control detector on Remote Commander operation • Make sure that nothing ...
Operating Instructions
Page 21
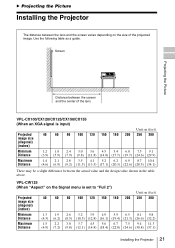
... of the projected image. VPL-CW125 (When "Aspect" on the size of the lens VPL-CX100/CX120/CX125/CX150/CX155 (When an XGA signal is set to "...Full 2") Unit: m (feet) Projected image size (diagonal) (inches) 40 60 80 100 120 150 180 200 250 300 Minimum Distance 1.3 1.9 2.6 3.2 3.9 4.9 5.9 6.5 8.1 9.8 (4.3) (6.2) (8.5) (10.5) (12.8) (16.1) (19.4) (21.3) (26.6) (32.2) Maximum Distance 1.5 2.2 3.0 3.7 4.5 5.6 6.7 7.5 9.4 11.3 (4.9) (7.2) (9.8) (12.1) (14.8) (18.4) (22.0) (24.6) (30.8) (37.1) Installing the Projector...
... of the projected image. VPL-CW125 (When "Aspect" on the size of the lens VPL-CX100/CX120/CX125/CX150/CX155 (When an XGA signal is set to "...Full 2") Unit: m (feet) Projected image size (diagonal) (inches) 40 60 80 100 120 150 180 200 250 300 Minimum Distance 1.3 1.9 2.6 3.2 3.9 4.9 5.9 6.5 8.1 9.8 (4.3) (6.2) (8.5) (10.5) (12.8) (16.1) (19.4) (21.3) (26.6) (32.2) Maximum Distance 1.5 2.2 3.0 3.7 4.5 5.6 6.7 7.5 9.4 11.3 (4.9) (7.2) (9.8) (12.1) (14.8) (18.4) (22.0) (24.6) (30.8) (37.1) Installing the Projector...
Operating Instructions
Page 22
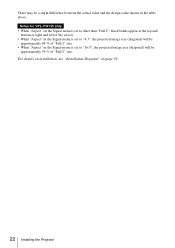
... "16:9", the projected image size (diagonal) will be a slight difference between the actual value and the design value shown in the table above. Notes for VPL-CW125 only • When "Aspect" on page 59. 22 Installing the...
... "16:9", the projected image size (diagonal) will be a slight difference between the actual value and the design value shown in the table above. Notes for VPL-CW125 only • When "Aspect" on page 59. 22 Installing the...
Operating Instructions
Page 23
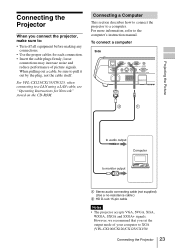
... it out by the plug, not the cable itself. For VPL-CX125/CX155/CW125, when connecting to monitor output A Stereo audio connecting cable (not supplied) (Use a no-resistance cable.) B HD D-sub 15-pin cable Notes • The projector accepts VGA, SVGA, XGA, WXGA, SXGA and SXGA+ signals. To connect a computer...; Use the proper cables for Network" stored on the CD-ROM. loose connections may increase noise and reduce performance of your computer to XGA (VPL-CX100/CX120/CX125/CX150/ Connecting the Projector 23 Connecting the Projector When you set the output mode of picture signals.
... it out by the plug, not the cable itself. For VPL-CX125/CX155/CW125, when connecting to monitor output A Stereo audio connecting cable (not supplied) (Use a no-resistance cable.) B HD D-sub 15-pin cable Notes • The projector accepts VGA, SVGA, XGA, WXGA, SXGA and SXGA+ signals. To connect a computer...; Use the proper cables for Network" stored on the CD-ROM. loose connections may increase noise and reduce performance of your computer to XGA (VPL-CX100/CX120/CX125/CX150/ Connecting the Projector 23 Connecting the Projector When you set the output mode of picture signals.
Operating Instructions
Page 24
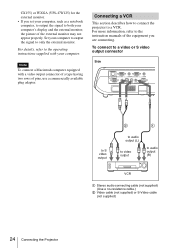
...monitor may not appear properly. For details, refer to only the external monitor. Connecting a VCR This section describes how to connect the projector to the instruction manuals of the equipment you set your computer's display and the external monitor, the picture of pins, use a ... connecting cable (not supplied) (Use a no-resistance cable.) B Video cable (not supplied) or S-Video cable (not supplied) 24 Connecting the Projector Note To connect a Macintosh computer equipped with your computer. CX155) or WXGA (VPL-CW125) for the external monitor. • If you are connecting.
...monitor may not appear properly. For details, refer to only the external monitor. Connecting a VCR This section describes how to connect the projector to the instruction manuals of the equipment you set your computer's display and the external monitor, the picture of pins, use a ... connecting cable (not supplied) (Use a no-resistance cable.) B Video cable (not supplied) or S-Video cable (not supplied) 24 Connecting the Projector Note To connect a Macintosh computer equipped with your computer. CX155) or WXGA (VPL-CW125) for the external monitor. • If you are connecting.

Operating Instructions
Page 25
... setting on the Signal menu according to the input signal. • When you connect the projector to a video GBR output connector, select "Video GBR" or when you connect the projector to a component output connector, select "Component" with the "Input-A Signal Sel." To connect to a video GBR/ Component output connector Side NETWORK INPUT...
... setting on the Signal menu according to the input signal. • When you connect the projector to a video GBR output connector, select "Video GBR" or when you connect the projector to a component output connector, select "Component" with the "Input-A Signal Sel." To connect to a video GBR/ Component output connector Side NETWORK INPUT...

Operating Instructions
Page 26
... Remote Commander. 26 Projecting To operate with the Remote Commander of VPL-CX125/ CX155/CW125 You can select directly the input signal you want to the projector. 4 Select the input source. The ON/STANDBY indicator flashes in... green, and then lights in red and the projector goes into a wall outlet, then connect all equipment. Projecting 24 LAMP...SHOT VIDEO S VIDEO 2 4 MENU APA ENTER RESET FOCUS ZOOM SHIFT ASPECT KEY STONE VPL-CX125/CX155/CW125 APA INPUT KEY STONE /TILT LENS ENTER AUTO FOCUS RESET MENU FREEZE PIC MUTING D ZOOM AUDIO...
... Remote Commander. 26 Projecting To operate with the Remote Commander of VPL-CX125/ CX155/CW125 You can select directly the input signal you want to the projector. 4 Select the input source. The ON/STANDBY indicator flashes in... green, and then lights in red and the projector goes into a wall outlet, then connect all equipment. Projecting 24 LAMP...SHOT VIDEO S VIDEO 2 4 MENU APA ENTER RESET FOCUS ZOOM SHIFT ASPECT KEY STONE VPL-CX125/CX155/CW125 APA INPUT KEY STONE /TILT LENS ENTER AUTO FOCUS RESET MENU FREEZE PIC MUTING D ZOOM AUDIO...
Operating Instructions
Page 27
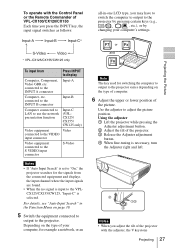
For details, see "Auto Input Search" in -one LCD type, you may have to switch the computer to output to display Computer, Component, Video GBR etc. Depending on the type of computer. 6 Adjust the upper or lower position of the projector. 3 Release the Adjuster adjustment button. 4 When fine-tuning is ...necessary, turn the Adjuster right and left. 2 13 4 Notes • When you adjust the tilt of the projector with the Control Panel or the Remote Commander of VPL-CX100/CX120/CX150 Each time you press the INPUT key, the input signal switches as follows: all-in the Function Menu on page...
For details, see "Auto Input Search" in -one LCD type, you may have to switch the computer to output to display Computer, Component, Video GBR etc. Depending on the type of computer. 6 Adjust the upper or lower position of the projector. 3 Release the Adjuster adjustment button. 4 When fine-tuning is ...necessary, turn the Adjuster right and left. 2 13 4 Notes • When you adjust the tilt of the projector with the Control Panel or the Remote Commander of VPL-CX100/CX120/CX150 Each time you press the INPUT key, the input signal switches as follows: all-in the Function Menu on page...
Operating Instructions
Page 28
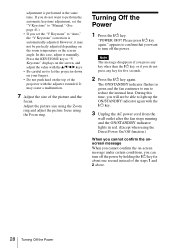
... again." However, it manually. Note The message disappears if you press any key for about one second instead of the projector with the v/V/b/B keys. • Be careful not to let the projector down on your fingers. • Do not push hard on -screen message under certain conditions, you do not want to...
... again." However, it manually. Note The message disappears if you press any key for about one second instead of the projector with the v/V/b/B keys. • Be careful not to let the projector down on your fingers. • Do not push hard on -screen message under certain conditions, you do not want to...


