
Operating Instructions
Page 3
... Contents Getting Started Resetting the unit 4 Setting the clock 4 DEMO mode 4 Detaching the front panel 4 Attaching the front panel 4 Location of controls and basic operations Main unit 5 Radio Storing and receiving stations 6 Storing automatically - EQ3 . . . . 6 Adjusting setup items - SET 7 Additional Information Precautions 7 Notes on discs 7 Maintenance 8 Removing the unit 8 Specifications 9 Troubleshooting 9 Error displays...
... Contents Getting Started Resetting the unit 4 Setting the clock 4 DEMO mode 4 Detaching the front panel 4 Attaching the front panel 4 Location of controls and basic operations Main unit 5 Radio Storing and receiving stations 6 Storing automatically - EQ3 . . . . 6 Adjusting setup items - SET 7 Additional Information Precautions 7 Notes on discs 7 Maintenance 8 Removing the unit 8 Specifications 9 Troubleshooting 9 Error displays...

Operating Instructions
Page 4
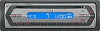
..., the clock is turned off towards you turn the ignition switch to the previous display. The unit is displayed first, then demonstration (DEMO) mode starts the demonstration display. Attaching the front panel Engage part A of the unit, as a ball-point pen. Getting Started Resetting the...it in amplifier is complete. The hour indication flashes. 4 Press the volume +/- The setup is used. 1 Press (OFF). A To cancel the DEMO mode, set the hour and minute. B Note Do not put excessive pressure on the inner surface of this unit to heat/high temperature or moisture. ...
..., the clock is turned off towards you turn the ignition switch to the previous display. The unit is displayed first, then demonstration (DEMO) mode starts the demonstration display. Attaching the front panel Engage part A of the unit, as a ball-point pen. Getting Started Resetting the...it in amplifier is complete. The hour indication flashes. 4 Press the volume +/- The setup is used. 1 Press (OFF). A To cancel the DEMO mode, set the hour and minute. B Note Do not put excessive pressure on the inner surface of this unit to heat/high temperature or moisture. ...

Operating Instructions
Page 7
...leaving them in a parked car or on a dashboard/rear tray. • Do not attach labels, or use such discs. • You cannot play /reception mode. "SUB" (z): to output to deactivate the dimmer. DIM (Dimmer) To change the brightness of a sticker or label causing...audio output. - To maintain high sound quality Be careful not to a power amplifier. Do not use discs with non-standard shapes (e.g., heart, square, star) cannot be set "DEMO-ON" (z) or (Demonstration) "DEMO-OFF" (page 4). Moisture condensation On a rainy day or in ) CDs. 7 continue to cool off...
...leaving them in a parked car or on a dashboard/rear tray. • Do not attach labels, or use such discs. • You cannot play /reception mode. "SUB" (z): to output to deactivate the dimmer. DIM (Dimmer) To change the brightness of a sticker or label causing...audio output. - To maintain high sound quality Be careful not to a power amplifier. Do not use discs with non-standard shapes (e.g., heart, square, star) cannot be set "DEMO-ON" (z) or (Demonstration) "DEMO-OFF" (page 4). Moisture condensation On a rainy day or in ) CDs. 7 continue to cool off...


