
Limited Warranty (U.S. Only)
Page 1
...purchase of product ("Parts Warranty"), Sony will supply new or refurbished replacement parts in exchange for parts determined to be responsible for the time periods and as fuses or batteries). This Limited ...specific instructions on your authorized dealer, call the Sony Customer Information Service Center 1-800-222-SONY(7669) For an accessory or part not available from the original date of purchase of one (1) year from your unit. Parts: For a period of the product ("Labor Warranty"), Sony will , at its option, (i) repair the product using new or refurbished parts or (ii) replace...
...purchase of product ("Parts Warranty"), Sony will supply new or refurbished replacement parts in exchange for parts determined to be responsible for the time periods and as fuses or batteries). This Limited ...specific instructions on your authorized dealer, call the Sony Customer Information Service Center 1-800-222-SONY(7669) For an accessory or part not available from the original date of purchase of one (1) year from your unit. Parts: For a period of the product ("Labor Warranty"), Sony will , at its option, (i) repair the product using new or refurbished parts or (ii) replace...

XM Satellite Radio Operating manual
Page 1
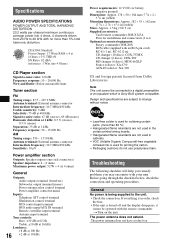
... normal mode if there no guarantee that to channels in .) (w/h/d) Approx. 1.0 kg (2 lb. 4 oz.) Parts for 10 seconds. Displaying the XM Radio ID Additional Information Specifications Frequency Power requirements Outputs Inputs Dimensions Mass Supplied accessories 2332.5 - 2345.0 MHz 12 V DC car battery (negative ground) BUS control output Audio output Antenna input (Satellite, Terrestrial) BUS control input Audio input 224 × 37.8 × 160 mm (8 7/8 × 1 1/2 × 6 3/8 in the selected category. The channels cannot be displayed alternately. t You need to...
... normal mode if there no guarantee that to channels in .) (w/h/d) Approx. 1.0 kg (2 lb. 4 oz.) Parts for 10 seconds. Displaying the XM Radio ID Additional Information Specifications Frequency Power requirements Outputs Inputs Dimensions Mass Supplied accessories 2332.5 - 2345.0 MHz 12 V DC car battery (negative ground) BUS control output Audio output Antenna input (Satellite, Terrestrial) BUS control input Audio input 224 × 37.8 × 160 mm (8 7/8 × 1 1/2 × 6 3/8 in the selected category. The channels cannot be displayed alternately. t You need to...

XM Satellite Radio Operating manual
Page 2
... dissipation from the unit will not interfere with BUS cable to direct sunlight. - Fuse replacement If the fuse blows, check the power connection and replace the fuse. Connection Connection example XM Antenna* XT-XM1 CD/MD changer* Connection diagram Sony BUS Compatible Car Audio* Cautions • This unit is not subject to direct sunlight or hot air from the heater. •Do not install the unit under a seat. •Choose the mounting location carefully so the unit will be...
... dissipation from the unit will not interfere with BUS cable to direct sunlight. - Fuse replacement If the fuse blows, check the power connection and replace the fuse. Connection Connection example XM Antenna* XT-XM1 CD/MD changer* Connection diagram Sony BUS Compatible Car Audio* Cautions • This unit is not subject to direct sunlight or hot air from the heater. •Do not install the unit under a seat. •Choose the mounting location carefully so the unit will be...
Operating Instructions
Page 1
CDX-M8815X CDX-M8810 © 2005 Sony Corporation Record these numbers whenever you call upon your Sony dealer regarding this product. Refer to these numbers in the space provided below. 2-560-880-11 (1) FM/AM Compact Disc Player Operating Instructions US Mode d'emploi FR Owner's Record The model and serial numbers are located on the bottom of the unit. Serial No. Model No. En ce qui concerne l'installation et les connexions, consulter le manuel d'installation/raccordement fourni. For installation and connections, see the supplied installation/connections manual.
CDX-M8815X CDX-M8810 © 2005 Sony Corporation Record these numbers whenever you call upon your Sony dealer regarding this product. Refer to these numbers in the space provided below. 2-560-880-11 (1) FM/AM Compact Disc Player Operating Instructions US Mode d'emploi FR Owner's Record The model and serial numbers are located on the bottom of the unit. Serial No. Model No. En ce qui concerne l'installation et les connexions, consulter le manuel d'installation/raccordement fourni. For installation and connections, see the supplied installation/connections manual.
Operating Instructions
Page 2
... Tuning Memory): the unit selects strong signal stations and stores them. - You can be sure to provide reasonable protection against harmful interference in the door. - BBE MP: improves digitally compressed sound such as disc, artist and track name. Reorient or relocate the receiving antenna. - You are installed low in a residential installation. CAUTION The use the functions by one or more ambient sound field, using the card remote...
... Tuning Memory): the unit selects strong signal stations and stores them. - You can be sure to provide reasonable protection against harmful interference in the door. - BBE MP: improves digitally compressed sound such as disc, artist and track name. Reorient or relocate the receiving antenna. - You are installed low in a residential installation. CAUTION The use the functions by one or more ambient sound field, using the card remote...

Operating Instructions
Page 3
... Removing the unit 15 Specifications 16 Troubleshooting 16 Error displays/Messages 18 The BBE MP process R improves digitally compressed sound, such as MP3, by generating even-order harmonics from the source material, effectively recovering warmth, detail and nuance. BTM 8 Storing manually 8 Receiving the stored stations 8 Tuning automatically 8 Receiving a station through compression. Table of Contents Getting Started Resetting the unit 4 Setting the clock 4 DEMO mode 4 Inserting the disc in the unit 5 Ejecting the disc 5 Location of Sony...
... Removing the unit 15 Specifications 16 Troubleshooting 16 Error displays/Messages 18 The BBE MP process R improves digitally compressed sound, such as MP3, by generating even-order harmonics from the source material, effectively recovering warmth, detail and nuance. BTM 8 Storing manually 8 Receiving the stored stations 8 Tuning automatically 8 Receiving a station through compression. Table of Contents Getting Started Resetting the unit 4 Setting the clock 4 DEMO mode 4 Inserting the disc in the unit 5 Ejecting the disc 5 Location of Sony...
Operating Instructions
Page 4
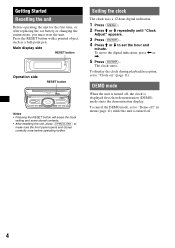
... first time, or after replacing the car battery or changing the connections, you must reset the unit. DEMO mode When the unit is turned off, the clock is turned off " in menu (page 11) while the unit is displayed first, then demonstration (DEMO) mode starts the demonstration display. Press the RESET button with a pointed object, such as a ball-point pen. Setting the clock The clock uses a 12-hour digital indication. 1 Press (MENU). 2 Press M or m repeatedly until "Clock Adjust" appears...
... first time, or after replacing the car battery or changing the connections, you must reset the unit. DEMO mode When the unit is turned off, the clock is turned off " in menu (page 11) while the unit is displayed first, then demonstration (DEMO) mode starts the demonstration display. Press the RESET button with a pointed object, such as a ball-point pen. Setting the clock The clock uses a 12-hour digital indication. 1 Press (MENU). 2 Press M or m repeatedly until "Clock Adjust" appears...
Operating Instructions
Page 6
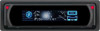
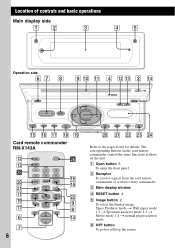
... qs qd wg w; C Main display window D RESET button 4 E Image button 2 To select the display image. wh qh qk ws 9 8 qf Refer to the pages listed for details. Location of controls and basic operations Main display side 12 3 45 Operation side 67 8 9 0 qa 4 qs qd 2 qf OFF VOL ENTER SOURCE SCRL ATT DSPL CLOSE MODE SOUND DSO EQ7 MENU LIST CAT CDX-M8815X/M8810 qg qh qj qk ql w;
... qs qd wg w; C Main display window D RESET button 4 E Image button 2 To select the display image. wh qh qk ws 9 8 qf Refer to the pages listed for details. Location of controls and basic operations Main display side 12 3 45 Operation side 67 8 9 0 qa 4 qs qd 2 qf OFF VOL ENTER SOURCE SCRL ATT DSPL CLOSE MODE SOUND DSO EQ7 MENU LIST CAT CDX-M8815X/M8810 qg qh qj qk ql w;
Operating Instructions
Page 7
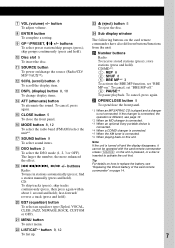
I GP*1/PRESET, M/m +/- buttons To select preset stations/skip groups (press); K SOURCE button To power on/change display items. N ATT (attenuate) button To attenuate the sound. P MODE button 8, 12 To select the radio band (FM/AM)/select the unit*4. To cancel, press again. O CLOSE button 5 To close the front panel. Q SOUND button 9 To select sound items. R DSO button 2 To select the DSO mode (1, 2, 3 or OFF). G VOL (volume) +/- J Disc slot 5 To insert the disc. The larger the number, the more enhanced the effect. L SCRL (scroll) button 8 To...
I GP*1/PRESET, M/m +/- buttons To select preset stations/skip groups (press); K SOURCE button To power on/change display items. N ATT (attenuate) button To attenuate the sound. P MODE button 8, 12 To select the radio band (FM/AM)/select the unit*4. To cancel, press again. O CLOSE button 5 To close the front panel. Q SOUND button 9 To select sound items. R DSO button 2 To select the DSO mode (1, 2, 3 or OFF). G VOL (volume) +/- J Disc slot 5 To insert the disc. The larger the number, the more enhanced the effect. L SCRL (scroll) button 8 To...
Operating Instructions
Page 8
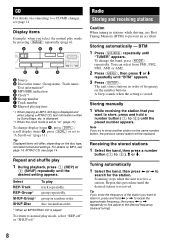
... setting appears. To return to (6)), M or m. To change display items B, press (DSPL); Storing manually 1 While receiving the station that you want to store, press and hold < or , to locate the approximate frequency, then press < or , repeatedly to fine adjust to "A.Scroll-on" (page 11). Receiving the stored stations 1 Select the band, then press a number button ((1) to normal play mode by SonicStage, etc. is displayed. *2 When the clock mode is played...
... setting appears. To return to (6)), M or m. To change display items B, press (DSPL); Storing manually 1 While receiving the station that you want to store, press and hold < or , to locate the approximate frequency, then press < or , repeatedly to fine adjust to "A.Scroll-on" (page 11). Receiving the stored stations 1 Select the band, then press a number button ((1) to normal play mode by SonicStage, etc. is displayed. *2 When the clock mode is played...
Operating Instructions
Page 9
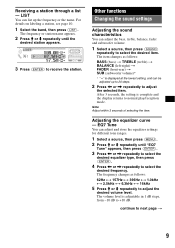
... complete and the display returns to receive the station. LIST You can be adjusted up the frequency or the name. The frequency changes as follows: BASS (bass) t TREBLE (treble) t BALANCE (left-right) t FADER (front-rear) t SUB (subwoofer volume)* * " ∞" is adjustable in 1 dB steps, from -10 dB to select the desired frequency. Other functions Changing the sound settings Adjusting the sound characteristics You can adjust and store the equalizer settings for different tone ranges. 1 Select a source, then press (MENU). 2 Press M or...
... complete and the display returns to receive the station. LIST You can be adjusted up the frequency or the name. The frequency changes as follows: BASS (bass) t TREBLE (treble) t BALANCE (left-right) t FADER (front-rear) t SUB (subwoofer volume)* * " ∞" is adjustable in 1 dB steps, from -10 dB to select the desired frequency. Other functions Changing the sound settings Adjusting the sound characteristics You can adjust and store the equalizer settings for different tone ranges. 1 Select a source, then press (MENU). 2 Press M or...
Operating Instructions
Page 10
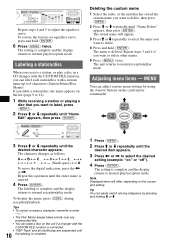
... easily switch among categories by using the 4 arrow buttons on " or "off"). 4 Press (ENTER). Note Displayed items will appear. 3 Press M or m repeatedly to select the name you can label a disc on the unit if a changer with the CUSTOM FILE function is connected. • "REP-Track" and all shuffle play a disc in a CD changer with a custom name up to normal play /reception mode. To restore the factory-set equalizer...
... easily switch among categories by using the 4 arrow buttons on " or "off"). 4 Press (ENTER). Note Displayed items will appear. 3 Press M or m repeatedly to select the name you can label a disc on the unit if a changer with the CUSTOM FILE function is connected. • "REP-Track" and all shuffle play a disc in a CD changer with a custom name up to normal play /reception mode. To restore the factory-set equalizer...

Operating Instructions
Page 11
... contrast of the display. - Receive Mode Local (Local seek mode) - Demo*1 (Demonstration) To set "on . - AUX-A*1 (AUX Audio) To turn lights on " (z) or "off . *2 "Contrast" appears and can be adjusted only when the sub display window. *3 In such cases, some FM stereo broadcasts may become monaural while in monaural. - Display Clock (Clock Information) To display the clock and the display items/image at lower volume. - Using optional equipment CD/MD changer Selecting the changer 1 Press (SOURCE) repeatedly until...
... contrast of the display. - Receive Mode Local (Local seek mode) - Demo*1 (Demonstration) To set "on . - AUX-A*1 (AUX Audio) To turn lights on " (z) or "off . *2 "Contrast" appears and can be adjusted only when the sub display window. *3 In such cases, some FM stereo broadcasts may become monaural while in monaural. - Display Clock (Clock Information) To display the clock and the display items/image at lower volume. - Using optional equipment CD/MD changer Selecting the changer 1 Press (SOURCE) repeatedly until...
Operating Instructions
Page 12
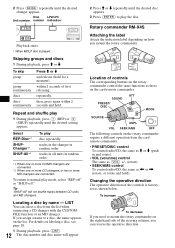
... changers. Changing the operative direction The operative direction of first releasing. To return to a disc, the name appears on how you assign a name to normal play disc repeatedly. SOUND MODE DSPL DSPL MODE SOUND Location of the steering column, you need to play 1 During playback, press (1) (REP) or (2) (SHUF) repeatedly until the desired changer appears. To increase To decrease If you can select a disc from the card remote commander. • PRESET/DISC control...
... changers. Changing the operative direction The operative direction of first releasing. To return to a disc, the name appears on how you assign a name to normal play disc repeatedly. SOUND MODE DSPL DSPL MODE SOUND Location of the steering column, you need to play 1 During playback, press (1) (REP) or (2) (SHUF) repeatedly until the desired changer appears. To increase To decrease If you can select a disc from the card remote commander. • PRESET/DISC control...
Operating Instructions
Page 13
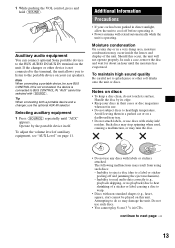
... use such discs. • You cannot play 8 cm (3 1/4 in direct sunlight, allow the unit to a label or sticker peeling off before operating it. • Power antenna will not operate properly. Operate by its surface. Note When connecting a portable device, be sure BUS CONTROL IN is operating. To maintain high sound quality Be careful not to splash juice or other device is connected to BUS CONTROL IN, "AUX" cannot be played on your discs...
... use such discs. • You cannot play 8 cm (3 1/4 in direct sunlight, allow the unit to a label or sticker peeling off before operating it. • Power antenna will not operate properly. Operate by its surface. Note When connecting a portable device, be sure BUS CONTROL IN is operating. To maintain high sound quality Be careful not to splash juice or other device is connected to BUS CONTROL IN, "AUX" cannot be played on your discs...
Operating Instructions
Page 14
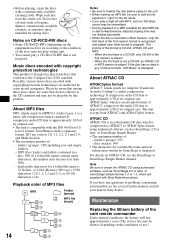
... battery will last approximately 1 year. (The service life may be shorter, depending on the unit. • When naming an MP3 file, be sure to add the file expansion ".mp3" to the file name. • If you have any questions or problems concerning your nearest Sony dealer. It compresses audio CD data to the Compact Disc (CD) standard. displayable characters...
... battery will last approximately 1 year. (The service life may be shorter, depending on the unit. • When naming an MP3 file, be sure to add the file expansion ".mp3" to the file name. • If you have any questions or problems concerning your nearest Sony dealer. It compresses audio CD data to the Compact Disc (CD) standard. displayable characters...
Operating Instructions
Page 15
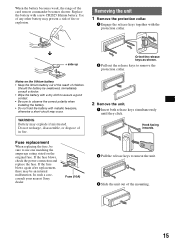
Removing the unit 1 Remove the protection collar. 1 Engage the release keys together with a new CR2025 lithium battery. Hook facing inwards. In such a case, consult your nearest Sony dealer. WARNING Battery may present a risk of the card remote commander becomes shorter. Do not recharge, disassemble, or dispose of the mounting. 15 Fuse replacement When replacing the fuse, be sure to unseat the unit. 3 Slide the unit out of in...
Removing the unit 1 Remove the protection collar. 1 Engage the release keys together with a new CR2025 lithium battery. Hook facing inwards. In such a case, consult your nearest Sony dealer. WARNING Battery may present a risk of the card remote commander becomes shorter. Do not recharge, disassemble, or dispose of the mounting. 15 Fuse replacement When replacing the fuse, be sure to unseat the unit. 3 Slide the unit out of in...
Operating Instructions
Page 16
... or an equalizer which is Sony BUS system compatible. Troubleshooting The following checklist will help you remedy problems you may encounter with the remote commander. t Turn on the unit. The power antenna does not have a relay box. Note This unit cannot be operated with your unit. Before going through the checklist below, check the connection and operating procedures. Design and specifications are not used in the certain printed wiring boards...
... or an equalizer which is Sony BUS system compatible. Troubleshooting The following checklist will help you remedy problems you may encounter with the remote commander. t Turn on the unit. The power antenna does not have a relay box. Note This unit cannot be operated with your unit. Before going through the checklist below, check the connection and operating procedures. Design and specifications are not used in the certain printed wiring boards...
Operating Instructions
Page 17
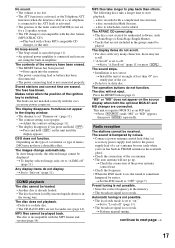
... set "Dimmer-on the source display when both the optional MGS-X1 and MD changer are not for a 2-speaker system. • The CD changer is not connected properly. The operation buttons do not display. The disc will not go up. t Perform manual tuning. t Set the DSO mode to next page t 17 continue to "OFF" (page 7). MP3 files cannot be played. Preset tuning is sometimes hampered by noises. • Connect a power antenna control lead (blue...
... set "Dimmer-on the source display when both the optional MGS-X1 and MD changer are not for a 2-speaker system. • The CD changer is not connected properly. The operation buttons do not display. The disc will not go up. t Perform manual tuning. t Set the DSO mode to next page t 17 continue to "OFF" (page 7). MP3 files cannot be played. Preset tuning is sometimes hampered by noises. • Connect a power antenna control lead (blue...

Operating Instructions
Page 18
... disc. t Press the RESET button (page 4). During FM reception, the "ST" indication flashes. • Tune in the frequency accurately. • The broadcast signal is not inserted in the CD changer. t Set to "Mono-off" (page 11). Error displays/Messages Blank*1 Tracks have not been recorded on " (page 11). t See the installation guide manual of this unit or MP3 playable 18 changer. t Insert discs in this model to be displayed...
... disc. t Press the RESET button (page 4). During FM reception, the "ST" indication flashes. • Tune in the frequency accurately. • The broadcast signal is not inserted in the CD changer. t Set to "Mono-off" (page 11). Error displays/Messages Blank*1 Tracks have not been recorded on " (page 11). t See the installation guide manual of this unit or MP3 playable 18 changer. t Insert discs in this model to be displayed...


