

Limited Warranty (U.S. Only)
Page 1
..., in the Product; Instructions: To obtain warranty service, you may not apply to the software. A dated purchase receipt is invalid if the factory-applied serial number has been altered or removed from state to commercial use ; Any parts or product replaced under this product against defects in the United States. This Limited Warranty does not cover Sony products sold AS...
..., in the Product; Instructions: To obtain warranty service, you may not apply to the software. A dated purchase receipt is invalid if the factory-applied serial number has been altered or removed from state to commercial use ; Any parts or product replaced under this product against defects in the United States. This Limited Warranty does not cover Sony products sold AS...
Installation/Connections Instructions
Page 1
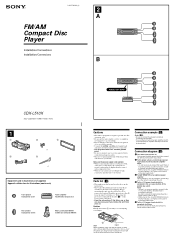
... unit. 4 To the +12 V power terminal which is energized in the accessory position of an optional power amplifier This connection is energized at all times. 3-247-736-11 (1) 2 A FM/AM Compact Disc Player Installation/Connections Installation/Connexions B AUDIO OUT REAR CDX-L510X Sony Corporation © 2003 Printed in Korea 1 1 2 3 × 4 4 5 × 2 Equipment used in illustrations (not supplied) Appareils utilisés dans les illustrations (non fournis) Front speaker Haut-parleur avant Power amplifier...
... unit. 4 To the +12 V power terminal which is energized in the accessory position of an optional power amplifier This connection is energized at all times. 3-247-736-11 (1) 2 A FM/AM Compact Disc Player Installation/Connections Installation/Connexions B AUDIO OUT REAR CDX-L510X Sony Corporation © 2003 Printed in Korea 1 1 2 3 × 4 4 5 × 2 Equipment used in illustrations (not supplied) Appareils utilisés dans les illustrations (non fournis) Front speaker Haut-parleur avant Power amplifier...
Operating Instructions
Page 1
Model No. CDX-L510X © 2003 Sony Corporation Refer to these numbers in the space provided below. En ce qui concerne l'installation et les connexions, consulter le manuel d'installation/raccordement fourni. For installation and connections, see the supplied installation/connections manual. CDX-L510X Serial No. Record these numbers whenever you call upon your Sony dealer regarding this product. 3-247-734-11 (1) FM/AM Compact Disc Player Operating Instructions US Mode d'emploi FR Owner's Record The model and serial numbers are located on the bottom of the unit.
Model No. CDX-L510X © 2003 Sony Corporation Refer to these numbers in the space provided below. En ce qui concerne l'installation et les connexions, consulter le manuel d'installation/raccordement fourni. For installation and connections, see the supplied installation/connections manual. CDX-L510X Serial No. Record these numbers whenever you call upon your Sony dealer regarding this product. 3-247-734-11 (1) FM/AM Compact Disc Player Operating Instructions US Mode d'emploi FR Owner's Record The model and serial numbers are located on the bottom of the unit.

Operating Instructions
Page 2
... , the user is encouraged to try to correct the interference by one or more with the instructions, may cause harmful interference to radio communications. Thank you for a Class B digital device, pursuant to Part 15 of the FCC Rules. Warning This equipment has been tested and found to comply with the limits for purchasing this Sony Compact Disc Player. Welcome...
... , the user is encouraged to try to correct the interference by one or more with the instructions, may cause harmful interference to radio communications. Thank you for a Class B digital device, pursuant to Part 15 of the FCC Rules. Warning This equipment has been tested and found to comply with the limits for purchasing this Sony Compact Disc Player. Welcome...

Operating Instructions
Page 3
Best Tuning Memory (BTM 10 Receiving the stored stations 11 Storing only the desired stations 11 Other Functions Using the rotary commander 12 Adjusting the balance and fader 13 Quickly attenuating the sound 13 Canceling the beep sound 13 Setting the equalizer (EQ3 14 Setting the Dynamic Soundstage Organizer (DSO 14 Additional Information Maintenance 15 Removing the unit 16 Specifications 17 Troubleshooting 18 Error displays/Messages 19 3 Repeat Play 10 Playing tracks in...
Best Tuning Memory (BTM 10 Receiving the stored stations 11 Storing only the desired stations 11 Other Functions Using the rotary commander 12 Adjusting the balance and fader 13 Quickly attenuating the sound 13 Canceling the beep sound 13 Setting the equalizer (EQ3 14 Setting the Dynamic Soundstage Organizer (DSO 14 Additional Information Maintenance 15 Removing the unit 16 Specifications 17 Troubleshooting 18 Error displays/Messages 19 3 Repeat Play 10 Playing tracks in...
Operating Instructions
Page 4
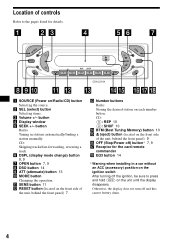
... (display mode change) button 8, 9 g OPEN button 7, 9 h DSO button 14 i ATT (attenuate) button 13 j MODE button Changing the operation. SO URCE SEL DSO MODE ATT DSP OPE N L SEEK EQ3 SENS 1 REP SHUF 2 3 4 5 6 BTM REMOTE CONTROL OFF CDX-L510X a SOURCE (Power on/Radio/CD) button Selecting the source. button d Display window e SEEK +/- k SENS button 11 l RESET button (located on the front side of the unit, behind the front panel) 9 p OFF (Stop/Power off) button* 7, 9 q Receptor for details. CD: Skipping tracks/fast-forwarding, reversing a track. Otherwise, the display...
... (display mode change) button 8, 9 g OPEN button 7, 9 h DSO button 14 i ATT (attenuate) button 13 j MODE button Changing the operation. SO URCE SEL DSO MODE ATT DSP OPE N L SEEK EQ3 SENS 1 REP SHUF 2 3 4 5 6 BTM REMOTE CONTROL OFF CDX-L510X a SOURCE (Power on/Radio/CD) button Selecting the source. button d Display window e SEEK +/- k SENS button 11 l RESET button (located on the front side of the unit, behind the front panel) 9 p OFF (Stop/Power off) button* 7, 9 q Receptor for details. CD: Skipping tracks/fast-forwarding, reversing a track. Otherwise, the display...
Operating Instructions
Page 5
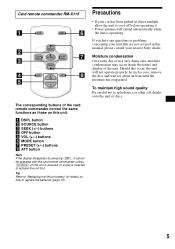
... button e VOL (+/-) buttons f MODE button g PRESET (+/-) buttons h ATT button Note If the display disappears by pressing (OFF), it . • Power antenna will not operate properly. Precautions • If your unit that are not covered in direct sunlight, allow the unit to cool off before operating it cannot be operated with the card remote commander unless (SOURCE) on how to activate the unit first. If you have any questions or problems concerning your car...
... button e VOL (+/-) buttons f MODE button g PRESET (+/-) buttons h ATT button Note If the display disappears by pressing (OFF), it . • Power antenna will not operate properly. Precautions • If your unit that are not covered in direct sunlight, allow the unit to cool off before operating it cannot be operated with the card remote commander unless (SOURCE) on how to activate the unit first. If you have any questions or problems concerning your car...

Operating Instructions
Page 7
... turned on, the power will beep for the first time, or after replacing the car battery or changing the connections, you , use the built-in a parked car or on the ignition switch, be deactivated. 1 Press (OFF)*. CD playback or radio reception stops (the key illumination and display remain on). * If your car has no ACC position on a dashboard/rear tray. Getting Started Resetting the unit Before operating the unit...
... turned on, the power will beep for the first time, or after replacing the car battery or changing the connections, you , use the built-in a parked car or on the ignition switch, be deactivated. 1 Press (OFF)*. CD playback or radio reception stops (the key illumination and display remain on). * If your car has no ACC position on a dashboard/rear tray. Getting Started Resetting the unit Before operating the unit...

Operating Instructions
Page 8
... front panel. 8 button to normal play mode. Note Do not put anything on the unit, then lightly push the left side in. After the clock setting is completed, the display returns to set the hour. 2 Press (SEL). Press (SOURCE) on the unit (or insert a CD) to 10:08 1 Press (DSPL) for 2 seconds. The minute indication flashes. 3 Press the volume +/- The hour indication flashes. 1 Press the volume +/-
... front panel. 8 button to normal play mode. Note Do not put anything on the unit, then lightly push the left side in. After the clock setting is completed, the display returns to set the hour. 2 Press (SEL). Press (SOURCE) on the unit (or insert a CD) to 10:08 1 Press (DSPL) for 2 seconds. The minute indication flashes. 3 Press the volume +/- The hour indication flashes. 1 Press the volume +/-

Operating Instructions
Page 10
.... Radio The unit can select to play the tracks on the number buttons. A beep sounds when the setting is displayed. "SHUF" indicator is stored. The unit stores stations in the order of their former settings. • When a number is displayed. To return to select the band. 3 Press (BTM) for 2 seconds. Repeat Play The current track will retain their frequencies on the current disc in stations while driving, use Best Tuning Memory to normal play mode...
.... Radio The unit can select to play the tracks on the number buttons. A beep sounds when the setting is displayed. "SHUF" indicator is stored. The unit stores stations in the order of their former settings. • When a number is displayed. To return to select the band. 3 Press (BTM) for 2 seconds. Repeat Play The current track will retain their frequencies on the current disc in stations while driving, use Best Tuning Memory to normal play mode...
Operating Instructions
Page 11
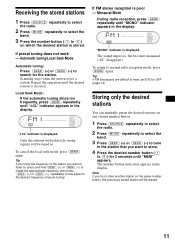
... FM broodcasts are difficult to hear, set DSO to normal redio reception mode, press (SENS) again. If preset tuning does not work - Receiving the stored stations 1 Press (SOURCE) repeatedly to select the radio. 2 Press (MODE) repeatedly to select the band. 3 Press the number button ((1) to search for 2 seconds until "LCL" indicator appears in the display. "LCL" indicator is displayed. If FM stereo reception is stored. Automatic tuning/Local Seek Mode Automatic tuning...
... FM broodcasts are difficult to hear, set DSO to normal redio reception mode, press (SENS) again. If preset tuning does not work - Receiving the stored stations 1 Press (SOURCE) repeatedly to select the radio. 2 Press (MODE) repeatedly to select the band. 3 Press the number button ((1) to search for 2 seconds until "LCL" indicator appears in the display. "LCL" indicator is displayed. If FM stereo reception is stored. Automatic tuning/Local Seek Mode Automatic tuning...
Operating Instructions
Page 12
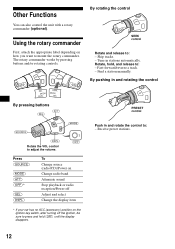
.... - Tune in and rotate the control to : - Rotate, hold (OFF) until the display disappers. Fast-forward/reverse a track. - By pushing in and rotating the control PRESET control Push in stations automatically. Receive preset stations. 12 SEL MODE DSPL DSPL MODE SEL By pressing buttons (SEL) (ATT) (SOURCE) (MODE) OFF (DSPL) Rotate the VOL control to adjust the volume. (OFF) Press (SOURCE) (MODE) (ATT) (OFF)* (SEL) (DSPL) To Change source (radio/CD)/Power on Change radio band Attenuate sound Stop...
.... - Tune in and rotate the control to : - Rotate, hold (OFF) until the display disappers. Fast-forward/reverse a track. - By pushing in and rotating the control PRESET control Push in stations automatically. Receive preset stations. 12 SEL MODE DSPL DSPL MODE SEL By pressing buttons (SEL) (ATT) (SOURCE) (MODE) OFF (DSPL) Rotate the VOL control to adjust the volume. (OFF) Press (SOURCE) (MODE) (ATT) (OFF)* (SEL) (DSPL) To Change source (radio/CD)/Power on Change radio band Attenuate sound Stop...

Operating Instructions
Page 13
... the VOL control. To increase To decrease If you need to adjust the selected item. Quickly attenuating the sound Press (ATT). Each time you connect an optional power amplifier and do not use the built-in the display. Note Adjust within 3 seconds after selecting the item. To activate the beep sound again, press these buttons again. Changing the operative direction The operative direction of the steering column, you can adjust the balance and fader...
... the VOL control. To increase To decrease If you need to adjust the selected item. Quickly attenuating the sound Press (ATT). Each time you connect an optional power amplifier and do not use the built-in the display. Note Adjust within 3 seconds after selecting the item. To activate the beep sound again, press these buttons again. Changing the operative direction The operative direction of the steering column, you can adjust the balance and fader...
Operating Instructions
Page 14
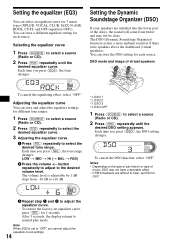
... until the desired DSO setting appears. Selecting the equalizer curve 1 Press (SOURCE) to select a source (Radio or CD). 2 Press (DSO) repeatedly until the desired equalizer curve. After 3 seconds, the display returns to the desired volume level. You can store a different equalizer setting for each source. Each time you press (EQ3), the item changes. Each time you cannot adjust the equalizer curve settings. 14 To cancel the DSO function, select "OFF." You can...
... until the desired DSO setting appears. Selecting the equalizer curve 1 Press (SOURCE) to select a source (Radio or CD). 2 Press (DSO) repeatedly until the desired equalizer curve. After 3 seconds, the display returns to the desired volume level. You can store a different equalizer setting for each source. Each time you press (EQ3), the item changes. Each time you cannot adjust the equalizer curve settings. 14 To cancel the DSO function, select "OFF." You can...
Operating Instructions
Page 15
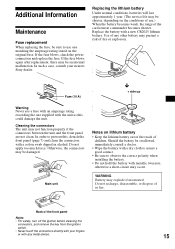
... of children. Fuse (10 A) x + side up Warning Never use a fuse with your nearest Sony dealer. Cleaning the connectors The unit may be damaged. Main unit Notes on the original fuse. In order to prevent this could damage the unit. Use of any metal device. 15 If the fuse blows, check the power connection and replace the fuse. Do not apply too much force. WARNING Battery may occur...
... of children. Fuse (10 A) x + side up Warning Never use a fuse with your nearest Sony dealer. Cleaning the connectors The unit may be damaged. Main unit Notes on the original fuse. In order to prevent this could damage the unit. Use of any metal device. 15 If the fuse blows, check the power connection and replace the fuse. Do not apply too much force. WARNING Battery may occur...
Operating Instructions
Page 17
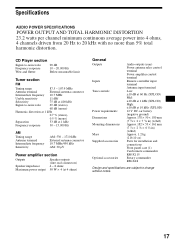
... µV Power amplifier section Outputs Speaker impedance Maximum power output Speaker outputs (sure seal connectors) 4 - 8 ohms 50 W × 4 (at 4 ohms) General Outputs Inputs Tone controls Power requirements Dimensions Mounting dimensions Mass Supplied accessories Optional accessories Audio outputs (rear) Power antenna relay control terminal Power amplifier control terminal Remote controller input terminal Antenna input terminal Low: ±10 dB at 60 Hz (XPLOD) Mid: ±10 dB at 1 kHz (XPLOD) High: ±10 dB at 10 kHz (XPLOD) 12 V DC car battery (negative ground...
... µV Power amplifier section Outputs Speaker impedance Maximum power output Speaker outputs (sure seal connectors) 4 - 8 ohms 50 W × 4 (at 4 ohms) General Outputs Inputs Tone controls Power requirements Dimensions Mounting dimensions Mass Supplied accessories Optional accessories Audio outputs (rear) Power antenna relay control terminal Power amplifier control terminal Remote controller input terminal Antenna input terminal Low: ±10 dB at 60 Hz (XPLOD) Mid: ±10 dB at 1 kHz (XPLOD) High: ±10 dB at 10 kHz (XPLOD) 12 V DC car battery (negative ground...
Operating Instructions
Page 18
... for audio use. • Some CD-Rs/CD-RWs may encounter with the car's accessory power connector. Dirty or defective disc. 18 General No sound. • Press the volume + button to adjust the volume. • Cancel the ATT function. • Set the fader control to the unit. The contents of the memory have an ACC position. Makes noise when the ignition key is not installed in order, check the fuse...
... for audio use. • Some CD-Rs/CD-RWs may encounter with the car's accessory power connector. Dirty or defective disc. 18 General No sound. • Press the volume + button to adjust the volume. • Cancel the ATT function. • Set the fader control to the unit. The contents of the memory have an ACC position. Makes noise when the ignition key is not installed in order, check the fuse...
Operating Instructions
Page 19
... connection of some problem. t Press the RESET button on , the sound is hampered by noises. The stations cannot be heard. t Set the local seek mode to "ON." If these solutions do not help improve the situation, consult your car has built-in FM/AM antenna in stereo is too weak. The "ST" indication flashes. • Tune in monaural reception mode. t Cancel monaural reception mode (page 11). Error displays/Messages Error displays...
... connection of some problem. t Press the RESET button on , the sound is hampered by noises. The stations cannot be heard. t Set the local seek mode to "ON." If these solutions do not help improve the situation, consult your car has built-in FM/AM antenna in stereo is too weak. The "ST" indication flashes. • Tune in monaural reception mode. t Cancel monaural reception mode (page 11). Error displays/Messages Error displays...
Product Guide / Specifications
Page 1
... SONY MOBILE PRODUCT GUIDE CDX-L510X FM/AM Compact Disc Player • DSO, EQ3 • CD-R/RW Playback • Flip-down Detachable Face • 60 Degree Install • Supplied Wireless Card Remote • SSIR-EX Tuner • 50W x 4 High Power • Rear Preout • 8fs, 1-Bit D/A Converter • Active Servo Control • 18FM + 12AM memory presets • 2-color, 13-segment LED Display • Supplied Wireless Card Remote (RM-X115) • Optional Wired...
... SONY MOBILE PRODUCT GUIDE CDX-L510X FM/AM Compact Disc Player • DSO, EQ3 • CD-R/RW Playback • Flip-down Detachable Face • 60 Degree Install • Supplied Wireless Card Remote • SSIR-EX Tuner • 50W x 4 High Power • Rear Preout • 8fs, 1-Bit D/A Converter • Active Servo Control • 18FM + 12AM memory presets • 2-color, 13-segment LED Display • Supplied Wireless Card Remote (RM-X115) • Optional Wired...
Product Guide / Specifications
Page 2
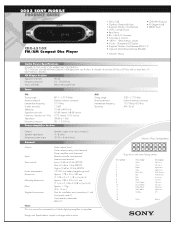
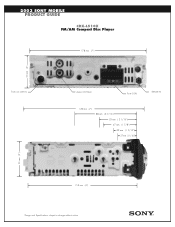
2003 SONY MOBILE PRODUCT GUIDE CDX-L510X FM/AM Compact Disc Player 178 mm (7") 50 mm (2") From car antenna Audio OUT Rear Fuse (10A) 178 mm (7") 88 mm (3 7/16") 53 mm ( 2 1/16") 47 mm (1 7/8") 33 mm (1 5/16") 27 mm (1 1/16") Remote IN 50 mm (2") 153 mm (6") Design and Specifications subject to change without notice.
2003 SONY MOBILE PRODUCT GUIDE CDX-L510X FM/AM Compact Disc Player 178 mm (7") 50 mm (2") From car antenna Audio OUT Rear Fuse (10A) 178 mm (7") 88 mm (3 7/16") 53 mm ( 2 1/16") 47 mm (1 7/8") 33 mm (1 5/16") 27 mm (1 1/16") Remote IN 50 mm (2") 153 mm (6") Design and Specifications subject to change without notice.


