
Operating Instructions
Page 1
Model No. CDX-GT72W Serial No. Para cancelar la pantalla de demostración (Demo), consulte la página 11. Refer to these numbers whenever you call upon your Sony dealer regarding this product. To cancel the demonstration (Demo) display, see page 10. 3-283-550-31 (1) FM/AM Compact Disc Player Operating Instructions US Manual de instrucciones ES ES Owner's Record The model and serial numbers are located on the bottom of the unit. CDX-GT72W © 2008 Sony Corporation Record the serial number in the space provided below.
Model No. CDX-GT72W Serial No. Para cancelar la pantalla de demostración (Demo), consulte la página 11. Refer to these numbers whenever you call upon your Sony dealer regarding this product. To cancel the demonstration (Demo) display, see page 10. 3-283-550-31 (1) FM/AM Compact Disc Player Operating Instructions US Manual de instrucciones ES ES Owner's Record The model and serial numbers are located on the bottom of the unit. CDX-GT72W © 2008 Sony Corporation Record the serial number in the space provided below.

Operating Instructions
Page 2
...equipment and receiver. - The HD Radio Ready logo is turned off and on a circuit different from that this product will control a Sony HD RadioTM tuner (sold separately). This equipment generates, uses, and can be determined by one or more of iBiquity. If this equipment...guarantee that any changes or modifications not expressly approved in the United States and/or other countries. Please see the supplied installation/connections manual. These limits are cautioned that interference will shut off . 2 However, there is encouraged to try to which prevents battery drain....
...equipment and receiver. - The HD Radio Ready logo is turned off and on a circuit different from that this product will control a Sony HD RadioTM tuner (sold separately). This equipment generates, uses, and can be determined by one or more of iBiquity. If this equipment...guarantee that any changes or modifications not expressly approved in the United States and/or other countries. Please see the supplied installation/connections manual. These limits are cautioned that interference will shut off . 2 However, there is encouraged to try to which prevents battery drain....

Operating Instructions
Page 3
...4 Preparing the card remote commander 4 Setting the clock 4 Detaching the front panel 5 Attaching the front panel 5 Inserting the disc in the unit 5 Ejecting the disc 5 Adjusting the angle of the front panel 5 Location of MP3/WMA/ AAC files 14 About MP3 files 14 About WMA files...MENU 10 Using optional equipment 11 Auxiliary audio equipment 11 CD/MD changer 12 Rotary commander RM-X4S 12 Additional Information Precautions 13 Notes on discs 13 Playback order of controls and basic operations Main unit 6 Card remote commander RM-X152 6 CD Display items 8 Repeat play 8 Shuffle...
...4 Preparing the card remote commander 4 Setting the clock 4 Detaching the front panel 5 Attaching the front panel 5 Inserting the disc in the unit 5 Ejecting the disc 5 Adjusting the angle of the front panel 5 Location of MP3/WMA/ AAC files 14 About MP3 files 14 About WMA files...MENU 10 Using optional equipment 11 Auxiliary audio equipment 11 CD/MD changer 12 Rotary commander RM-X4S 12 Additional Information Precautions 13 Notes on discs 13 Playback order of controls and basic operations Main unit 6 Card remote commander RM-X152 6 CD Display items 8 Repeat play 8 Shuffle...
Operating Instructions
Page 7
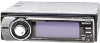
...the insulation film before use (page 4). Tune in 3 positions (press and hold). F Display window G Z (eject)/ANGLE button page 5 To eject the disc/slide down to: - H (front panel release) button page 5 I SOURCE button To power on the card remote commander have also different buttons/functions from ... connect a portable audio device. qh MENU button To enter menu. qk CD: Push up /down to: - M OFF button To power off; Find a station manually (push and hold ). - Skip albums (push)*3. - Push left /right to : - Skip tracks continuously (push, then push again within about 2 seconds and ...
...the insulation film before use (page 4). Tune in 3 positions (press and hold). F Display window G Z (eject)/ANGLE button page 5 To eject the disc/slide down to: - H (front panel release) button page 5 I SOURCE button To power on the card remote commander have also different buttons/functions from ... connect a portable audio device. qh MENU button To enter menu. qk CD: Push up /down to: - M OFF button To power off; Find a station manually (push and hold ). - Skip albums (push)*3. - Push left /right to : - Skip tracks continuously (push, then push again within about 2 seconds and ...

Operating Instructions
Page 8
Shuffle play mode, select "Repeat off ." To change display items C, press (DSPL). Storing manually 1 While receiving the station that you set Info (information) mode to prevent an accident. Note If you want to store, press and hold the multi ... multi way encoder to select the preset number. 3 Push and hold the multi way encoder until "MEM" appears. A beep sounds when the setting is played. disc in random order. The unit stores stations in order of frequency in stations while driving, use Best Tuning Memory (BTM) to "All" (page 11). Storing...
Shuffle play mode, select "Repeat off ." To change display items C, press (DSPL). Storing manually 1 While receiving the station that you set Info (information) mode to prevent an accident. Note If you want to store, press and hold the multi ... multi way encoder to select the preset number. 3 Push and hold the multi way encoder until "MEM" appears. A beep sounds when the setting is played. disc in random order. The unit stores stations in order of frequency in stations while driving, use Best Tuning Memory (BTM) to "All" (page 11). Storing...

Operating Instructions
Page 9
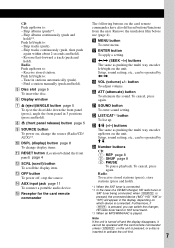
... activated. 9 Scanning stops when the unit receives a station. AUX Level*2 To adjust the volume level for the station. The display returns to the desired frequency (manual tuning). The following items can list up the frequency. 1 Select the band, then push (LIST) up. "L10" Fader To adjust the balance between the right...
... activated. 9 Scanning stops when the unit receives a station. AUX Level*2 To adjust the volume level for the station. The display returns to the desired frequency (manual tuning). The following items can list up the frequency. 1 Select the band, then push (LIST) up. "L10" Fader To adjust the balance between the right...

Operating Instructions
Page 15
...not recharge, disassemble, or dispose of fire or explosion. + side up 2c 1 Notes on the original fuse. In such a case, consult your nearest Sony dealer. Do not apply too much force. It compresses audio CD data to approximately 1/11* of its original size. • AAC tag is 126 characters.... • When naming an AAC file, be sure to prevent this manual, consult your nearest Sony dealer. Fuse replacement When replacing the fuse, be sure to add the file extension ".m4a" to observe the correct polarity when installing the ...
...not recharge, disassemble, or dispose of fire or explosion. + side up 2c 1 Notes on the original fuse. In such a case, consult your nearest Sony dealer. Do not apply too much force. It compresses audio CD data to approximately 1/11* of its original size. • AAC tag is 126 characters.... • When naming an AAC file, be sure to prevent this manual, consult your nearest Sony dealer. Fuse replacement When replacing the fuse, be sure to add the file extension ".m4a" to observe the correct polarity when installing the ...

Operating Instructions
Page 18
... (aerial) will not eject. An FM program broadcast in stereo is dirty or inserted upside down or in monaural. Error*2 • The disc is heard in the wrong way. t See the installation guide manual of the car. • Defective or dirty disc. t Be sure to receive the ...a sturdy part of this model to which data can be received. t Perform manual tuning. t Insert another disc. In Auto Image mode, the selected image cannot be loaded. • Another disc is hampered by noises. a disc recorded in the frequency accurately. • The broadcast signal is too weak. ...
... (aerial) will not eject. An FM program broadcast in stereo is dirty or inserted upside down or in monaural. Error*2 • The disc is heard in the wrong way. t See the installation guide manual of the car. • Defective or dirty disc. t Be sure to receive the ...a sturdy part of this model to which data can be received. t Perform manual tuning. t Insert another disc. In Auto Image mode, the selected image cannot be loaded. • Another disc is hampered by noises. a disc recorded in the frequency accurately. • The broadcast signal is too weak. ...


