
Limited Warranty (U.S. Only)
Page 1
... of purchase of product ("Parts Warranty"), Sony will , at its option, repair or replace with respect to be defective. A dated purchase receipt is valid only in material or workmanship for the time periods and as fuses or batteries). Any parts or product replaced under this product against defects in the United States. 3-272-643-01 ® Car Audio LIMITED WARRANTY (U.S. it does...
... of purchase of product ("Parts Warranty"), Sony will , at its option, repair or replace with respect to be defective. A dated purchase receipt is valid only in material or workmanship for the time periods and as fuses or batteries). Any parts or product replaced under this product against defects in the United States. 3-272-643-01 ® Car Audio LIMITED WARRANTY (U.S. it does...
Operating Instructions
Page 1
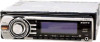
Model No. Para cancelar la pantalla de demostración (DEMO), consulte la página 10. CDX-GT31W © 2006 Sony Corporation Refer to these numbers whenever you call upon your Sony dealer regarding this product. CDX-GT31W Serial No. 2-698-302-11 (1) FM/AM Compact Disc Player Operating Instructions US Manual de instrucciones ES Owner's Record The model and serial numbers are located on the bottom of the unit. Record the serial number in the space provided below. To cancel the demonstration (DEMO) display, see page 10.
Model No. Para cancelar la pantalla de demostración (DEMO), consulte la página 10. CDX-GT31W © 2006 Sony Corporation Refer to these numbers whenever you call upon your Sony dealer regarding this product. CDX-GT31W Serial No. 2-698-302-11 (1) FM/AM Compact Disc Player Operating Instructions US Manual de instrucciones ES Owner's Record The model and serial numbers are located on the bottom of the unit. Record the serial number in the space provided below. To cancel the demonstration (DEMO) display, see page 10.
Operating Instructions
Page 2
... prevents battery drain. Connect the equipment into an outlet on a circuit different from that interference will control a satellite radio tuner module (sold separately). The "SAT Radio Ready" logo indicates that any changes or modifications not expressly approved in this product will not occur in the set the Auto Off function, press and hold (OFF) until the display disappears each time you turn the ignition...
... prevents battery drain. Connect the equipment into an outlet on a circuit different from that interference will control a satellite radio tuner module (sold separately). The "SAT Radio Ready" logo indicates that any changes or modifications not expressly approved in this product will not occur in the set the Auto Off function, press and hold (OFF) until the display disappears each time you turn the ignition...
Operating Instructions
Page 3
... changer 11 Additional Information Precautions 12 Notes on discs 12 About MP3/WMA files 12 Maintenance 13 Removing the unit 14 Specifications 14 Troubleshooting 15 Error displays/Messages 16 3 BTM 8 Storing manually 8 Receiving the stored stations 8 Tuning automatically 9 Other functions Changing the sound settings 9 Adjusting the sound characteristics - BAL/FAD/SUB 9 Customizing the equalizer curve - Table of Contents Welcome 4 Getting Started Resetting the unit 4 Preparing the card remote commander 4 Setting the clock 4 Detaching the front panel...
... changer 11 Additional Information Precautions 12 Notes on discs 12 About MP3/WMA files 12 Maintenance 13 Removing the unit 14 Specifications 14 Troubleshooting 15 Error displays/Messages 16 3 BTM 8 Storing manually 8 Receiving the stored stations 8 Tuning automatically 9 Other functions Changing the sound settings 9 Adjusting the sound characteristics - BAL/FAD/SUB 9 Customizing the equalizer curve - Table of Contents Welcome 4 Getting Started Resetting the unit 4 Preparing the card remote commander 4 Setting the clock 4 Detaching the front panel...
Operating Instructions
Page 4
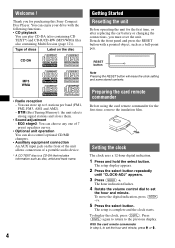
... your drive with a pointed object, such as disc, artist and track name. 4 RESET button Note Pressing the RESET button will erase the clock setting and some stored contents. Welcome ! You can store up to the previous display. BTM (Best Tuning Memory): the unit selects strong signal stations and stores them. • Sound adjustment - Preparing the card remote commander Before using the card remote commander for purchasing this Sony Compact Disc Player. The setup is...
... your drive with a pointed object, such as disc, artist and track name. 4 RESET button Note Pressing the RESET button will erase the clock setting and some stored contents. Welcome ! You can store up to the previous display. BTM (Best Tuning Memory): the unit selects strong signal stations and stores them. • Sound adjustment - Preparing the card remote commander Before using the card remote commander for purchasing this Sony Compact Disc Player. The setup is...

Operating Instructions
Page 5
... front panel Engage part A of the front panel with part B of the unit, as illustrated, and push the left side into position until it in amplifier is turned off. 2 Press , then pull it off towards you turn the ignition switch to the OFF position without detaching the front panel, the caution alarm will only sound if the built-in a parked car or...
... front panel Engage part A of the front panel with part B of the unit, as illustrated, and push the left side into position until it in amplifier is turned off. 2 Press , then pull it off towards you turn the ignition switch to the OFF position without detaching the front panel, the caution alarm will only sound if the built-in a parked car or...
Operating Instructions
Page 6
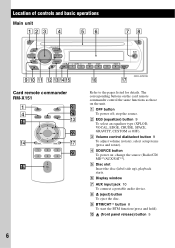
... - select setup items (press and rotate). D SOURCE button To power on the unit. J (front panel release) button 5 6 F Display window G AUX input jack 10 To connect a portable audio device. A OFF button To power off; C Volume control dial/select button 9 To adjust volume (rotate); H Z (eject) button To eject the disc. I BTM/CAT*2 button 8 To start the BTM function (press and hold). qa qs qdqfqg qh qj CDX-GT31W Card remote commander RM-X151 1 4 qk qf OFF ATT SOURCE SEL MODE + - stop the source. B EQ3 (equalizer) button 9 To select an equalizer type (XPLOD...
... - select setup items (press and rotate). D SOURCE button To power on the unit. J (front panel release) button 5 6 F Display window G AUX input jack 10 To connect a portable audio device. A OFF button To power off; C Volume control dial/select button 9 To adjust volume (rotate); H Z (eject) button To eject the disc. I BTM/CAT*2 button 8 To start the BTM function (press and hold). qa qs qdqfqg qh qj CDX-GT31W Card remote commander RM-X151 1 4 qk qf OFF ATT SOURCE SEL MODE + - stop the source. B EQ3 (equalizer) button 9 To select an equalizer type (XPLOD...
Operating Instructions
Page 7
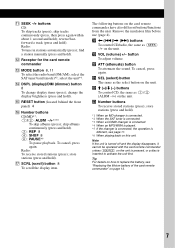
... change the display brightness (press and hold). Remove the insulation film before use (page 4). ATT (attenuate) button To attenuate the sound. select the SAT tuner band (mode)*2; change display items (press); The following buttons on the unit. wa SEL (select) button The same as the select button on the card remote commander have also different buttons/functions from the unit. button To adjust volume. To cancel, press again. reverse/fastforward a track (press and hold ); find a station manually...
... change the display brightness (press and hold). Remove the insulation film before use (page 4). ATT (attenuate) button To attenuate the sound. select the SAT tuner band (mode)*2; change display items (press); The following buttons on the unit. wa SEL (select) button The same as the select button on the card remote commander have also different buttons/functions from the unit. button To adjust volume. To cancel, press again. reverse/fastforward a track (press and hold ); find a station manually...
Operating Instructions
Page 8
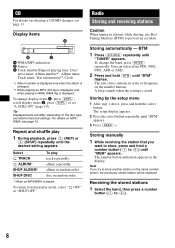
... change the band, press (MODE) repeatedly. Repeat and shuffle play 1 During playback, press (3) (REP) or (4) (SHUF) repeatedly until "BTM" appears. 3 Press (SEEK) +. album in stations while driving, use Best Tuning Memory (BTM) to (6)) until "TUNER" appears. Radio Storing and receiving stations Caution When tuning in random order. BTM 1 Press (SOURCE) repeatedly until "MEM" appears. The unit stores stations in order of frequency on the number buttons. Storing manually 1 While receiving the station...
... change the band, press (MODE) repeatedly. Repeat and shuffle play 1 During playback, press (3) (REP) or (4) (SHUF) repeatedly until "BTM" appears. 3 Press (SEEK) +. album in stations while driving, use Best Tuning Memory (BTM) to (6)) until "TUNER" appears. Radio Storing and receiving stations Caution When tuning in random order. BTM 1 Press (SOURCE) repeatedly until "MEM" appears. The unit stores stations in order of frequency on the number buttons. Storing manually 1 While receiving the station...
Operating Instructions
Page 9
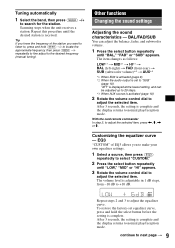
...-rear) t SUB (subwoofer volume)*2 t AUX*3 *1 When EQ3 is activated (page 9). *2 When the audio output is complete and the display returns to adjust the selected item. After 3 seconds, the setting is set to the desired frequency (manual tuning). "ATT" is displayed at the lowest setting, and can adjust the balance, fader, and subwoofer volume. 1 Press the select button repeatedly until the desired station is activated (page 10). 2 Rotate the volume control dial to normal play/reception mode. Other functions Changing the sound settings Adjusting the sound characteristics...
...-rear) t SUB (subwoofer volume)*2 t AUX*3 *1 When EQ3 is activated (page 9). *2 When the audio output is complete and the display returns to adjust the selected item. After 3 seconds, the setting is set to the desired frequency (manual tuning). "ATT" is displayed at the lowest setting, and can adjust the balance, fader, and subwoofer volume. 1 Press the select button repeatedly until the desired station is activated (page 10). 2 Rotate the volume control dial to normal play/reception mode. Other functions Changing the sound settings Adjusting the sound characteristics...
Operating Instructions
Page 10
With the card remote commander In step 3, to adjust the selected item, press Tip Other equalizer types are also adjustable.
With the card remote commander In step 3, to adjust the selected item, press Tip Other equalizer types are also adjustable.

Operating Instructions
Page 11
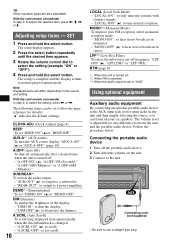
... within 2 seconds of the portable audio device at a moderate volume. 4 Set your usual listening volume on the unit. 2 Press (SOURCE) repeatedly until "AUX" appears, and rotate the volume control dial to adjust the input level (-8 dB to +18 dB). CD/MD changer Selecting the changer 1 Press (SOURCE) repeatedly until "CD" or "MD" appears. 2 Press (MODE) repeatedly until the desired setting appears. Select DISC*1 SHUF CHANGER*1 SHUF ALL*2 To play 1 During playback, press (3) (REP...
... within 2 seconds of the portable audio device at a moderate volume. 4 Set your usual listening volume on the unit. 2 Press (SOURCE) repeatedly until "AUX" appears, and rotate the volume control dial to adjust the input level (-8 dB to +18 dB). CD/MD changer Selecting the changer 1 Press (SOURCE) repeatedly until "CD" or "MD" appears. 2 Press (MODE) repeatedly until the desired setting appears. Select DISC*1 SHUF CHANGER*1 SHUF ALL*2 To play 1 During playback, press (3) (REP...

Operating Instructions
Page 12
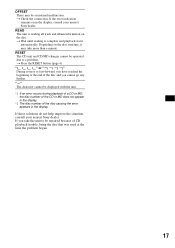
... compresses audio CD data to a label or sticker peeling off before operating it. • Power antenna (aerial) will not operate properly. Recently, various music discs encoded with the ISO 9660 level 1/ level 2 format, Joliet/Romeo in the expansion format, and Multi Session. • The maximum number of its original size. * only for 64 kbps • The unit is operating. Inability to eject a disc (due...
... compresses audio CD data to a label or sticker peeling off before operating it. • Power antenna (aerial) will not operate properly. Recently, various music discs encoded with the ISO 9660 level 1/ level 2 format, Joliet/Romeo in the expansion format, and Multi Session. • The maximum number of its original size. * only for 64 kbps • The unit is operating. Inability to eject a disc (due...
Operating Instructions
Page 13
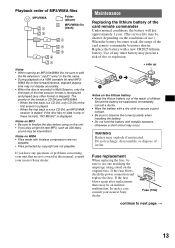
..., sound may be swallowed, immediately consult a doctor. • Wipe the battery with metallic tweezers, otherwise a short-circuit may not display accurately. • When the disc is recorded in fire. Replace the battery with lossless compression are not playable. • Files protected by copyright are not covered in any questions or problems concerning your unit that are not playable. Fuse replacement When replacing...
..., sound may be swallowed, immediately consult a doctor. • Wipe the battery with metallic tweezers, otherwise a short-circuit may not display accurately. • When the disc is recorded in fire. Replace the battery with lossless compression are not playable. • Files protected by copyright are not covered in any questions or problems concerning your unit that are not playable. Fuse replacement When replacing...

Operating Instructions
Page 14
... the mounting. Hook facing inwards. Orient the release keys as shown. 3 Pull out the release keys to remove the protection collar. 14 Specifications AUDIO POWER SPECIFICATIONS POWER OUTPUT AND TOTAL HARMONIC DISTORTION 23.2 watts per channel minimum continuous average power into 4 Ohms) CD Player section Signal-to-noise ratio: 120 dB Frequency response: 10 - 20,000 Hz Wow and flutter: Below measurable limit Tuner section FM Tuning range...
... the mounting. Hook facing inwards. Orient the release keys as shown. 3 Pull out the release keys to remove the protection collar. 14 Specifications AUDIO POWER SPECIFICATIONS POWER OUTPUT AND TOTAL HARMONIC DISTORTION 23.2 watts per channel minimum continuous average power into 4 Ohms) CD Player section Signal-to-noise ratio: 120 dB Frequency response: 10 - 20,000 Hz Wow and flutter: Below measurable limit Tuner section FM Tuning range...
Operating Instructions
Page 15
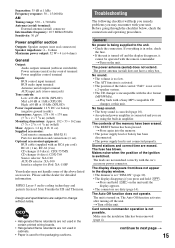
.... t Turn off the unit. The power antenna (aerial) does not extend. The fuse has blown. t Press and hold (OFF). MPEG Layer-3 audio coding technology and patents licensed from /does not appear in amplifier. Makes noise when the position of the fader control "FAD" is not set ) Optional accessories/equipment: BUS cable (supplied with an RCA pin cord): RC-61 (1 m), RC-62 (2 m) CD changer (10 discs): CDX-757MX CD changer (6 discs): CDX...
.... t Turn off the unit. The power antenna (aerial) does not extend. The fuse has blown. t Press and hold (OFF). MPEG Layer-3 audio coding technology and patents licensed from /does not appear in amplifier. Makes noise when the position of the fader control "FAD" is not set ) Optional accessories/equipment: BUS cable (supplied with an RCA pin cord): RC-61 (1 m), RC-62 (2 m) CD changer (10 discs): CDX-757MX CD changer (6 discs): CDX...
Operating Instructions
Page 16
... connection of this unit or MP3 playable changer. LOAD The changer is too weak. Preset tuning is not possible. • Store the correct frequency in the changer. The disc is open or the MDs are not for about 1 second.) When the SAT tuner is set to the power supply lead of speakers/amplifiers is in monaural reception mode. t See the installation guide manual of the car antenna (aerial). • The auto antenna...
... connection of this unit or MP3 playable changer. LOAD The changer is too weak. Preset tuning is not possible. • Store the correct frequency in the changer. The disc is open or the MDs are not for about 1 second.) When the SAT tuner is set to the power supply lead of speakers/amplifiers is in monaural reception mode. t See the installation guide manual of the car antenna (aerial). • The auto antenna...
Operating Instructions
Page 17
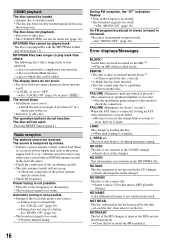
... the RESET button (page 4). If these solutions do not help improve the situation, consult your nearest Sony dealer. OFFSET There may take the unit to a problem. If you cannot go any further. "" The character cannot be repaired because of the disc causing the error appears in the display. RESET The CD unit and CD/MD changer cannot be an internal malfunction. t Check the connection...
... the RESET button (page 4). If these solutions do not help improve the situation, consult your nearest Sony dealer. OFFSET There may take the unit to a problem. If you cannot go any further. "" The character cannot be repaired because of the disc causing the error appears in the display. RESET The CD unit and CD/MD changer cannot be an internal malfunction. t Check the connection...
Operating Instructions
Page 36
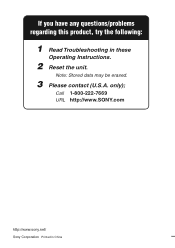
Call 1-800-222-7669 URL http://www.SONY.com http://www.sony.net/ Sony Corporation Printed in these Operating Instructions. 2 Reset the unit. only); If you have any questions/problems regarding this product, try the following: 1 Read Troubleshooting in China Note: Stored data may be erased. 3 Please contact (U.S.A.
Call 1-800-222-7669 URL http://www.SONY.com http://www.sony.net/ Sony Corporation Printed in these Operating Instructions. 2 Reset the unit. only); If you have any questions/problems regarding this product, try the following: 1 Read Troubleshooting in China Note: Stored data may be erased. 3 Please contact (U.S.A.


